Leaderboard


Popular Content
Showing content with the highest reputation on 04/23/22 in all areas
-
This has now been added and should be in RC5. Below is on an internal test release and loopbacks are not shown now.
 2 points
 -
Summary: Support Thread for ich777 Application Dockers (DirSyncPro, Rapid Photo Downloader,... all available Docker's in the second post) DockerHub: https://hub.docker.com/u/ich777/ Please read the discription of each docker and the variables (some dockers need special variables to run). If you like my work, please consider making a donation
 1 point
 -
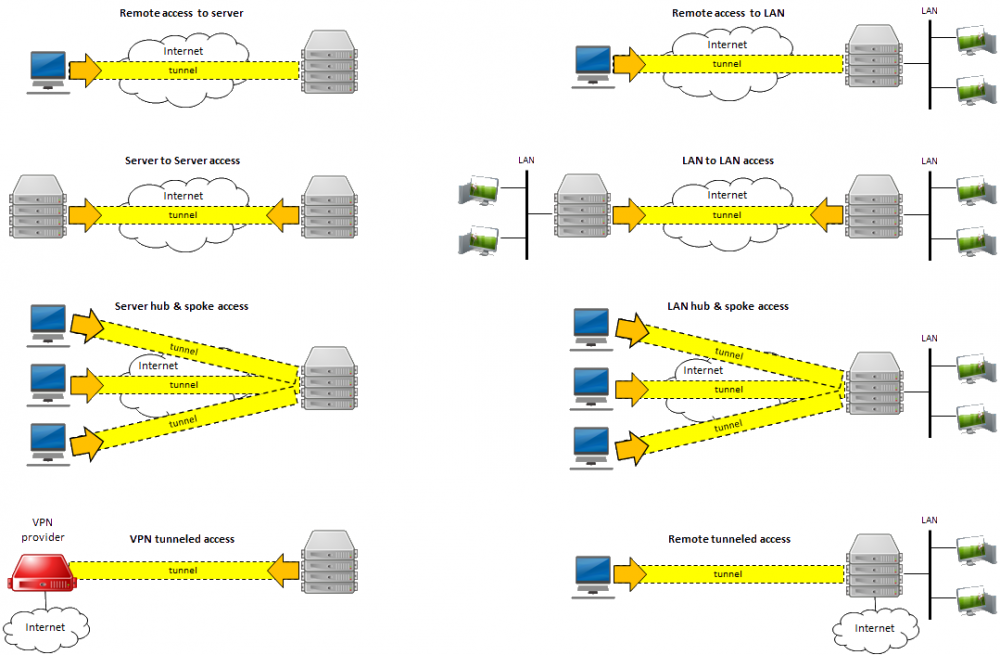
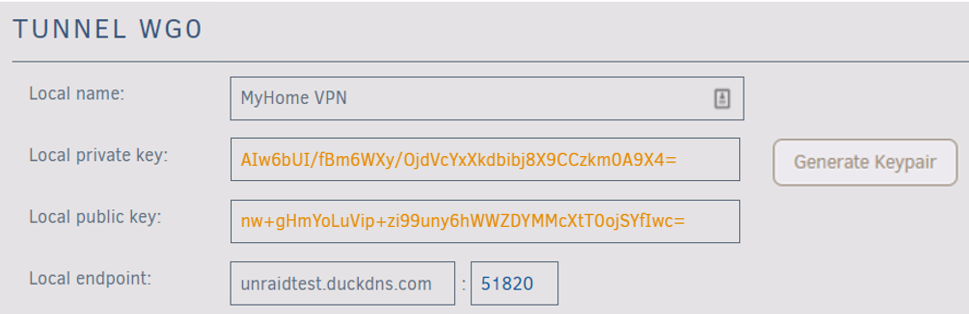
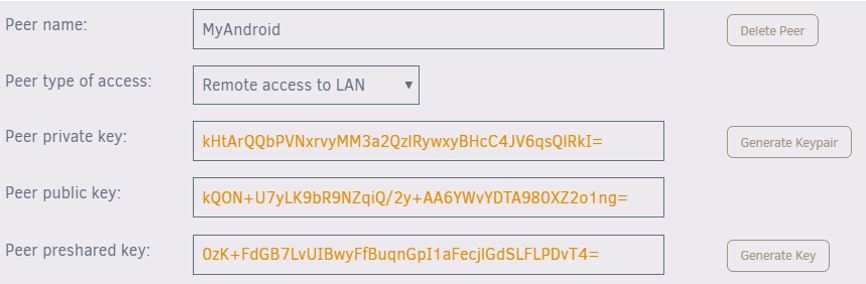
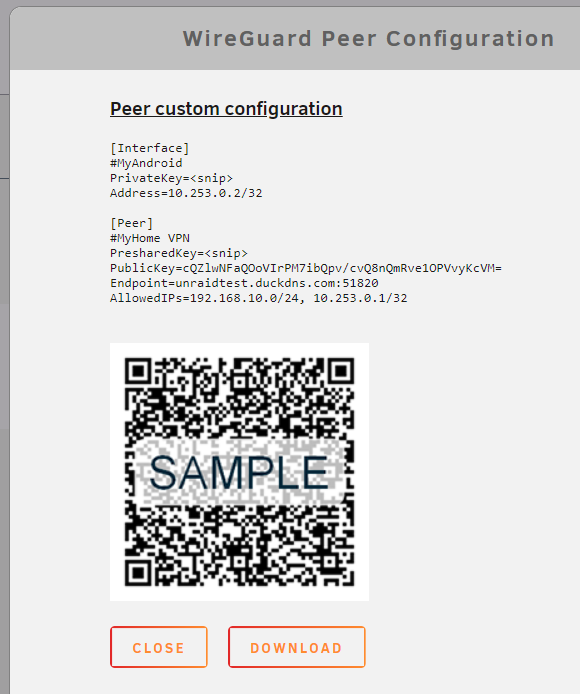
Note: this community guide is offered in the hope that it is helpful, but comes with no warranty/guarantee/etc. Follow at your own risk. What can you do with WireGuard? Let's walk through each of the connection types: Remote access to server: Use your phone or computer to remotely access your Unraid server, including: Unraid administration via the webgui Access dockers, VMs, and network shares as though you were physically connected to the network Remote access to LAN: Builds on "Remote access to server", allowing you to access your entire LAN as well. Server to server access: Allows two Unraid servers to connect to each other. LAN to LAN access: Builds on "Server to server access", allowing two entire networks to communicate. (see this guide) Server hub & spoke access: Builds on "Remote access to server", except that all of the VPN clients can connect to each other as well. Note that all traffic passes through the server. LAN hub & spoke access: Builds on "Server hub & spoke access", allowing you to access your entire LAN as well. VPN tunneled access: Route traffic for specific Dockers and VMs through a commercial WireGuard VPN provider (see this guide) Remote tunneled access: Securely access the Internet from untrusted networks by routing all of your traffic through the VPN and out Unraid's Internet connection In this guide we will walk through how to setup WireGuard so that your trusted devices can VPN into your home network to access Unraid and the other systems on your network. Prerequisites You must be running Unraid 6.8-6.9 with the Dynamix WireGuard plugin from Community Apps or Unraid 6.10+ (which has the plugin built in). Understand that giving someone VPN access to your LAN is just like giving them physical access to your LAN, except they have it 24x7 when you aren't around to supervise. Only give access to people and devices that you trust, and make certain that the configuration details (particularly the private keys) are not passed around insecurely. Regardless of the "connection type" you choose, assume that anyone who gets access to this configuration information will be able to get full access to your network. This guide works great for simple networks. But if you have Dockers with custom IPs or VMs with strict networking requirements, please see the "Complex Networks" section below. Unraid will automatically configure your WireGuard clients to connect to Unraid using your current public IP address, which will work until that IP address changes. To future-proof the setup, you can use Dynamic DNS instead. There are many ways to do this, probably the easiest is described in this 2 minute video from SpaceInvaderOne If your router has UPnP enabled, Unraid will be able to automatically forward the port for you. If not, you will need to know how to configure your router to forward a port. You will need to install WireGuard on a client system. It is available for many operating systems: https://www.wireguard.com/install/ Android or iOS make good first systems, because you can get all the details via QR code. Setting up the Unraid side of the VPN tunnel If UPnP is enabled on your router and you want to use it in Unraid, go to Settings -> Management Access and confirm "Use UPnP" is set to Yes On Unraid 6.8, go to Settings -> VPN Manager Give the VPN Tunnel a name, such as "MyHome VPN" Press "Generate Keypair". This will generate a set of public and private keys for Unraid. Take care not to inadvertently share the private key with anyone (such as in a screenshot like this) By default the local endpoint will be configured with your current public IP address. If you chose to setup DDNS earlier, change the IP address to the DDNS address. Unraid will recommend a port to use. You typically won't need to change this unless you already have WireGuard running elsewhere on your network. Hit Apply If Unraid detects that your router supports UPnP, it will automatically setup port forwarding for you: If you see a note that says "configure your router for port forwarding..." you will need to login to your router and setup the port forward as directed by the note: Some tips for setting up the port forward in your router: Both the external (source) and internal (target/local) ports should be the set to the value Unraid provides. If your router interface asks you to put in a range, use the same port for both the starting and ending values. Be sure to specify that it is a UDP port and not a TCP port. For the internal (target/local) address, use the IP address of your Unraid system shown in the note. Google can help you find instructions for your specific router, i.e. "how to port forward Asus RT-AC68U" Note that after hitting Apply, the public and private keys are removed from view. If you ever need to access them, click the "key" icon on the right hand side. Similarly, you can access other advanced setting by pressing the "down chevron" on the right hand side. They are beyond the scope of this guide, but you can turn on help to see what they do. In the upper right corner of the page, change the Inactive slider to Active to start WireGuard. You can optionally set the tunnel to Autostart when Unraid boots. Defining a Peer (client) Click "Add Peer" Give it a name, such as "MyAndroid" For the initial connection type, choose "Remote access to LAN". This will give your device access to Unraid and other items on your network (there are some caveats to this covered below) Click "Generate Keypair" to generate public and private keys for the client. The private key will be given to the client / peer, but take care not to share it with anyone else (such as in a screenshot like this) For an additional layer of security, click "Generate Key" to generate a preshared key. Again, this should only be shared with this client / peer. Click Apply. Note: Technically, the peer should generate these keys and not give the private key to Unraid. You are welcome to do that, but it is less convenient as the config files Unraid generates will not be complete and you will have to finish configuring the client manually. Configuring a Peer (client) Click the "eye" icon to view the peer configuration. If the button is not clickable, you need to apply or reset your unsaved changes first. If you are setting up a mobile device, choose the "Create from QR code" option in the mobile app and take a picture of the QR code. Give it a name and make the connection. The VPN tunnel starts almost instantaneously, once it is up you can open a browser and connect to Unraid or another system on your network. Be careful not to share screenshots of the QR code with anyone, or they will be able to use it to access your VPN. If you are setting up another type of device, download the file and transfer it to the remote computer via trusted email or dropbox, etc. Then unzip it and load the configuration into the client. Protect this file, anyone who has access to it will be able to access your VPN. Complex Networks The instructions above should work out of the box for simple networks. With "Use NAT" defaulted to Yes, all network traffic on Unraid uses Unraid's IP, and that works fine if you have a simple setup. However, if you have Dockers with custom IPs or VMs with strict networking requirements, you'll need to make a few changes: In the WireGuard tunnel config, set "Use NAT" to No In your router, add a static route that lets your network access the WireGuard "Local tunnel network pool" through the IP address of your Unraid system. For instance, for the default pool of 10.253.0.0/24 you should add this static route: Destination Network: 10.253.0.0/24 (aka 10.253.0.0 with subnet 255.255.255.0) Gateway / Next Hop: <IP address of your Unraid system> Distance: 1 (your router may not have this option) If you use pfSense, you may also need to check the box for "Static route filtering - bypass firewall rules for traffic on the same interface". See this. If you have Dockers with custom IPs then on the Docker settings page, set "Host access to custom networks" to "Enabled". see this: https://forums.unraid.net/topic/84229-dynamix-wireguard-vpn/page/8/?tab=comments#comment-808801 There are some configurations you'll want to avoid, here is how a few key settings interact: With "Use NAT" = Yes and "Host access to custom networks" = disabled (static route optional) server and dockers on bridge/host - accessible! VMs and other systems on LAN - accessible! dockers with custom IP - NOT accessible (this is the "simple network" setup assumed by the guide above) With "Use NAT" = Yes and "Host access to custom networks" = enabled (static route optional) server and dockers on bridge/host - accessible! VMs and other systems on LAN - NOT accessible dockers with custom IP - NOT accessible (avoid this config) With "Use NAT" = No and no static route server and dockers on bridge/host - accessible! VMs and other systems on LAN - NOT accessible dockers with custom IP - NOT accessible (avoid this, if "Use NAT" = No, you really need to add a static route in your router) With "Use NAT" = No and "Host access to custom networks" = disabled and static route server and dockers on bridge/host - accessible! VMs and other systems on LAN - accessible! dockers with custom IP - NOT accessible (You've come this far, just set "Host access to custom networks" to enabled you're set) With "Use NAT" = No and "Host access to custom networks" = enabled and static route server and dockers on bridge/host - accessible! VMs and other systems on LAN - accessible! dockers with custom IP - accessible! (woohoo! the recommended setup for complex networks) About DNS Everything discussed so far should work if you access the devices by IP address or with a Fully Qualified Domain Name such as yourpersonalhash.unraid.net. Short names such as "tower" probably won't work, nor any DNS entries managed by the router. To get those to work over the tunnel, return to the VPN Manager page in Unraid, switch from Basic to Advanced mode, and add the IP address of your desired DNS server into the "Peer DNS Server" field (don't forget to put the updated config file on the client after saving it!) You may want to use the IP address of the router on the LAN you are connecting to, or you could use a globally available IP like 8.8.8.8 ** "WireGuard" and the "WireGuard" logo are registered trademarks of Jason A. Donenfeld.


 1 point
 -
I did squids idea but it didnt work. I'm awaiting the server rebooting just now and hopefully that will have worked. IT WORKED!!! thank you, i can sleep now lol1 point
-
Wollte euch mitteilen, dass ich soweit erstmal fertig bin mit meinem Server & Rack 🙂. Die nächsten Wochen heißt es dann Leerrohre für KNX und Ethernet einziehen. 😉
 1 point
 -
guacamole, RDP or VNC html1 point
-
Disregard...I am an idiot. Everything works now.1 point
-
Any USB flash that the motherboard can boot from will work provided it returns a unique GUID Older drives tend to be more reliable as the manufacturers weren't cutting corners on manufacturing costs back then to the same extent that they are now (USB manufacturers hope for and expect for you to lose them) There is zero benefit to using a flash device that is USB3.1 vs 2.0 (or even 1.1) as the OS runs completely from RAM and only accesses the flash during the initial load of the archives at boot time (and the odd settings change)1 point
-
New release. Over the last few weeks I have been tracking down a problem where the cron purge of aged files has been failing. I tracked it down to the trashsizes cron and the purge cron both running at the exact time on the hour and conflicting with each other. I've sorted it out, so it works now. This mostly showed up with large recycle bin contents. After upgrading and the cron purge removing aged files, you may see a significant decrease in the size of your Recycle Bin contents. This will happen if the cron purge of aged files has been failing. It will now catch up and purge aged files properly. It is nothing to be concerned about as it is only the aged files being purged catching up.1 point
-
@doron JFYI smartctl is updated to 5.3 and no longer spins up Seagates for -n option. Should be in RC5.1 point
-
I would recommend that you create a Github issue like described here: They are pretty quick answering and helping, maybe also include the docker run command output from your container. I'm only the template maintainer, if there is something wrong with the template I will fix it instantly...1 point
-
Remark: the upcoming Unraid version 6.10-rc5 has a new setting to enable or disable SMB multi-channel (it is disabled by default).1 point
-
It will detect it but since each array disk is an individual filesystem it can't fix it, you can restore the affect file(s) from backups, it can detect and fix it for redundant pools. Like mentioned bitrot is way the down list of things to worry about, data corruption due to bad RAM or other hardware hardware issues, is much more common.1 point
-
That's not rot, that's an error. URE's would still be logged (in theory) as an error by the drive and can be immediately recognized if monitored by the OS. The theory is that it will pretty much guarantee the death of a normal RAID implementation since drives are well above 12~ TBs now, and read failures during a, for example, RAID 5 array will drop a disk during rebuild and thus the array will be lost. It's only theory tho, as the MTBURE is not set in stone. It's a guess as to the chance, and even then the drive is likely to recover from the error anyway. IMHO, bit rot and URE are WAAAAAAY less important to worry about than just keeping backups of your important data, and verifying your backups1 point
-
Hey everyone, we've got a new version of the My Servers plugin ready, please go to the Plugins tab and check for updates! You'll definitely want to update if you plan to install Unraid 6.10.0-rc5 later tod... I mean Soon(TM). It also has some fixes for Unraid 6.9.2, so I'd recommend upgrading even if you aren't ready to run an RC. Plus we've added another customization option for those of you that want more control over the look and feel of the header. ## 2022.04.22 ### This version resolves: - Incorrect urls being shown on the My Servers dashboard for Unraid 6.9.2 - UpdateDNS making unnecessary rebind test checks - Flash backup log file getting unnecessarily large ### This version adds: - Compatibility with 6.10.0-rc5 - Ability to disable the background fade the UPC places on your header image. This should only be used if your header image has a solid background, otherwise the text will not be readable. See Settings → Display Settings → Show banner background color fade - Back-ported the version of updatepkg from Unraid 6.10.0-rc5, to prevent other plugins from downgrading the version of git that comes with Unraid1 point
-
So to answer your questions: OS Version: 6.9.2 Non Beta Plugin I reinstalled the plugin and the hooks file has been changed now, so I figured the VM manager was disabled when I first installed it. It is probably pretty rare that the VM manager is disabled during installation but maybe add a note somewhere that that the VM manager has to be enabled during the installation? Unfortunately I can't test the hotplugging now because libvirt service wont start after I disabled and enabled the vm manager again. I'll have to restart the server tomorrow. But I think my issue is fixed, thanks for the reply.1 point
-
By deleting Theme Engine and rebooting do you mean that you uninstalled it and then rebooted? Try in safe mode. Also try using incognito mode in the browser if an extension is interfering1 point
-
Just hit 330 MB/s. The connection still says "unknown" for my WAN, but based on what I've read that is just the way it is with the Intel X550-T2 NBASE-T when it connects at 2.5Gb or 5Gb. I guess since I am hitting over 300MB/s the connection must be properly negotiating at 5Gb. EDIT: Evidently it's a known issue with the FreeBSD drivers for the Intel X550. The connection is reported 'unknown' when negotiated at 2.5GB or 5GB. I have since hit and maintained 350 MB/s at times when my ISP has the available bandwidth, so I am pretty certain the Intel X550 and modem are connected to each other at 5GB. This is cool! craigr1 point
-
I don't remember the magic sauce, but if you format them in UD, you should be able to remove them and add data in any other distro that understands XFS. All root folders on all the drives will become user shares with their content merged in the /mnt/user/folder structure, so you can set up shares at the same time by judiciously using root folders.1 point
-
The easiest thing would be to plug the drives into Unraid as Unassigned Devices and use the UD plugin to partition and format them correctly for Unraid (as XFS or BTRFS) drives. You can then use them on other systems to add files and when you add them to Unraid (as long is there is no current parity drive) then Unraid will accept them and leave their data intact.1 point
-
delete docker Container Variable vaule DROPBOX_SKIP_UPDATE
 1 point
 -
According to the MB's manual you won't loose any of the SATA ports when running a NVMe SSD in the m.2 socket1 point
-
Yes, JRE is already part of the Docker image and I ready to be used by MakeMKV.1 point
-
The 5950X will provide less PCIe lanes than one single Xeon. Certainly a good CPU, within the use case it's been designed for. And it's probably not designed for a ton of peripherals.1 point
-
@Asgard da du dich für meinen Verbrauch interessiert hast.1 point
-
If anyone is trying to get this working with SWAG i managed to get it working with the following config. I adapted the one on the socket.io website to listen on 443 as SWAG wouldnt allow the HTTP set with the socket.io template. Make sure to put your unraid IP address where i have put in caps below. Also make sure you name your file as below and put in your SWAG proxy-confs folder audiobookshelf.subdomain.conf server { listen 443 ssl; listen [::]:443 ssl; server_name audiobookshelf.*; include /config/nginx/ssl.conf; location / { proxy_set_header X-Forwarded-For $proxy_add_x_forwarded_for; proxy_set_header Host $host; proxy_pass http://YOURUNRAIDIPADDRESS:13378; proxy_http_version 1.1; proxy_set_header Upgrade $http_upgrade; proxy_set_header Connection "upgrade"; } }1 point
-
On Friday, August 30th, using random.org's true random number generator, the following 14 forum users we're selected as winners of the limited-edition Unraid case badges: #74 @Techmagi #282 @Carlos Eduardo Grams #119 @mucflyer #48 @Ayradd #338 @hkinks #311 @coldzero2006 #323 @DayspringGaming #192 @starbix #159 @hummelmose #262 @JustinAiken #212 @fefzero #166 @Andrew_86 #386 @plttn #33 @aeleos (Note: the # corresponds to the forum post # selected in this thread.) Congratulations to all of the winners and a huge thank you to everyone else who entered the giveaway and helped us celebrate our company birthday! Cheers, Spencer1 point
-
Hi, After searching around I found a blog here which listed the steps to get System Temp Running. I'll place a bit more instructions here though for anyone else looking: Install Nerd Tools following the post here Install Perl by opening the Nerd Tools plugin and selecting the slider Open the System Temp Plugin The detect button should be active now, so press it and save Select the applicable sensors Press Apply Press Done You can uninstall Perl by going back to the Nerd Tools plugin Grab a drink and stay cool P.S. Also found author's instructions here ?1 point