Leaderboard


Popular Content
Showing content with the highest reputation on 04/29/22 in all areas
-
Try this, looks like the same issue, and it worked also on a Dell: https://forums.unraid.net/topic/119502-bzimage-checksum-error/?do=findComment&comment=11204882 points
-
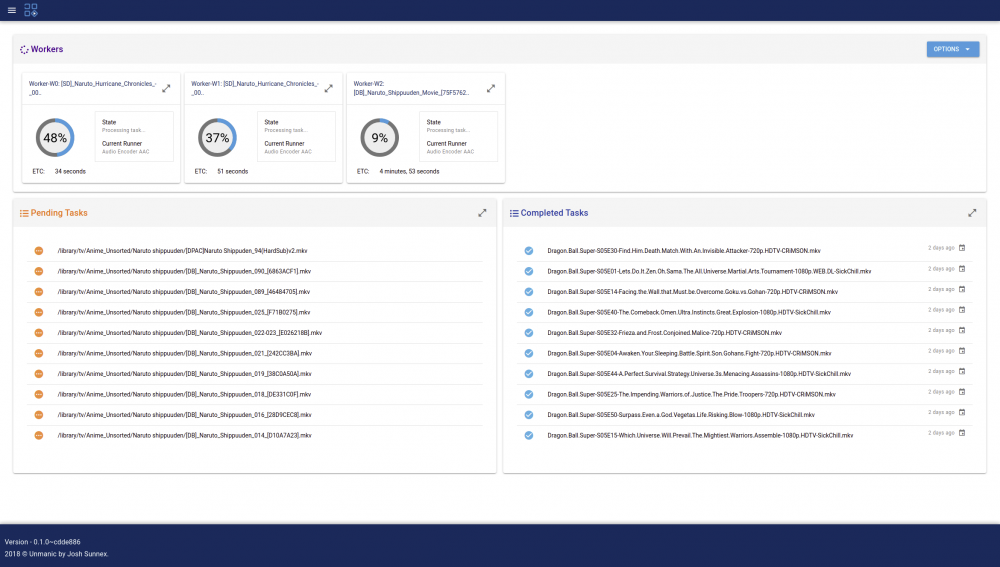
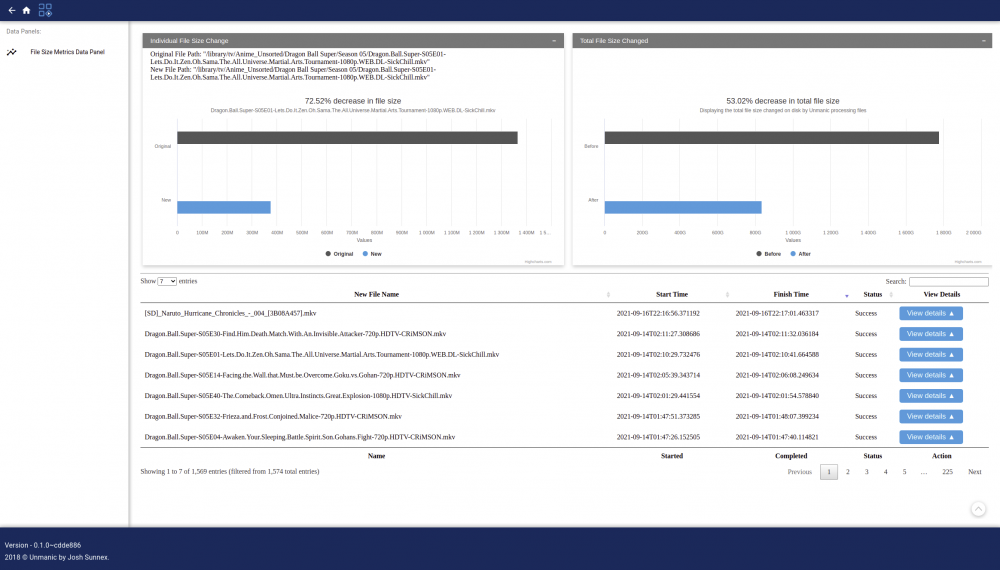
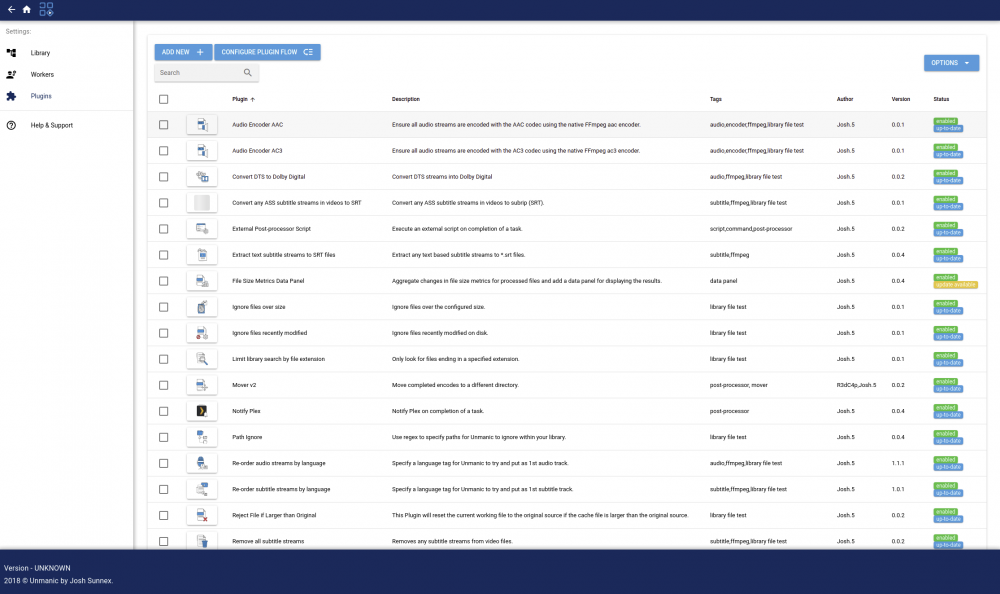
Application Name: Unmanic - Library Optimiser Application Site: https://unmanic.app/ Docker Hub: https://hub.docker.com/r/josh5/unmanic/ Github: https://github.com/Unmanic/unmanic/ Documentation: https://docs.unmanic.app/ Discord: https://unmanic.app/discord Description: Unmanic is a simple tool for optimising your file library. You can use it to convert your files into a single, uniform format, manage file movements based on timestamps, or execute custom commands against a file based on its file size. Simply configure Unmanic pointing it at your library and let it automatically manage that library for you. Unmanic provides you with the following main functions: A scheduler built in to scan your whole library for files that do not conform to your configured presets. Files found with incorrect formats are then queued for conversion. A folder watchdog. When a video file is modified or a new file is added in your library, Unmanic is able to check that video against your configured video presets. Like the first function, if this video is not formatted correctly it is added to a queue for conversion. A handler to manage running multiple file manipulation tasks at a time. A Web UI to easily configure, manage and monitor the progress of your library optimisation. You choose how you want your library to be. Unmanic can be used to: Modify and/or trans-code video or audio files into a uniform format using FFmpeg Move files from one location to another after a configured period of time Execute FileBot to automatically batch rename files in your library Extract ZIP files (or compress files to .{zip,tar,etc}) Resize or auto-rotate images Correct missing data in music files Run any custom command against files matching a certain extension or above a configured file size The Docker container is currently based linuxserver.io Ubuntu focal image. Video Guide: Screenshots: (Dashboard) (File metrics) (installed plugins) Setup Guide: Unmanic Documentation - Installation on Unraid Thanks To/Credits Special thanks to: linuxserver.io (For their work with Docker base images): https://www.linuxserver.io/ Cpt. Chaz (For providing me with some updated graphics and his awesome work on YouTube): https://forums.unraid.net/profile/96222-cpt-chaz/

 1 point
 -
Thanks, this was my issues. Thanks for your time.1 point
-
To go into more detail... the exact behavior depends on the value of "Use SSL/TLS" from Settings -> Management Access. Assuming you have provisioned a myunraid.net certificate, then: If "Use SSL" is set to Auto, then you WILL get the redirect from http://ipaddress to https://ip.hash.myunraid.net However, this behavior makes it more difficult to access your server when DNS is unavailable (i.e. your Internet goes down). If that happens see https://wiki.unraid.net/My_Servers#How_to_access_your_server_when_DNS_is_down When "Use SSL" is set to Yes, then http://ipaddress redirects to https://[servername].[localTLD] as that will likely work even if your Internet goes down. When "Use SSL" is set to No, then http://ipaddress loads directly. (Note the very careful use of "http" vs "https" in the text above) Personally, I prefer the "Auto" setting as my Internet is pretty stable. For more details on your particular server, download your diagnostics.zip file (from Tools -> Diagnostics) and open it up, then take a look at system\urls.txt1 point
-
post the docker run command for sonarr, delugevpn, and sabnzbd. Be sure to redact passwords if they show up.1 point
-
1 point
-
Yes, they were referring to the software. You don't need any APC software for unRAID. Just configure it as desired in Settings --> UPS Settings.1 point
-
Ha NVidia FINALLY fixed the Mellanox 4 LX flashing bug from November in this update. Thanx again @ich7771 point
-
same here after latest update...1 point
-
Their software is windows only, the software options for linux that may support it are third party, not supported by APC. http://www.apcupsd.org/ (built in to Unraid) https://networkupstools.org/ (available as a plugin for Unraid)1 point
-
Hi again Good news for you so i did upgrade the firmware of the new card to latest without bios and its seem to work rock solid i'm able to do a parity check with all hdd connected. So thx a lot i will return the other card1 point
-
I resolved with reinstall of Dockers and restoring config / data, and posted in the Docker specific support as all were from one repository1 point
-
Yeah, I figured I could read them as part of array. In my case I was cleaning house on my old server when I realized the drives I just removed from the array could not be re-mounted as stand alone devices under assigned devices... I would like to make this clean and clear in the future if I can, as I'm at the right point on new server to make changes/test before I fully cut over! I did enter a bug report, hopefully this is correct: https://forums.unraid.net/bug-reports/stable-releases/4kn-devices-formatted-with-xfs-unraid-reports-the-device-as-512b-at-mkfs-time-and-thats-what-xfs-uses-r1847/1 point
-
Changed Status to Solved1 point
-
Different type of encryption. Windows does file by file, you can choose to encrypt just one file. Unraid (linux LUKS) encrypts the whole drive. Not possible to do in place encryption without significant risk to all the data on the drive. https://securedmind.com/post/how-to-encrypt-a-disk-in-place-with-luks/1 point
-
If I remember right, Tom had mentioned looking into it, around the time of release originally. Haven't heard anything about it since though.1 point
-
Physical hardware or firmware changes can rearrange bus assignment numbers. You probably had something at that bus number passed through, then the HBA was added and started using that number.1 point
-
True. However I do not think there are any plans to implement ‘in-place’ encryption (or even if it is technically possible)1 point
-
Thank you! I must be brain dead this morning. Totally forgot about the Wiki...1 point
-
EDIT I didn't read correctly and I just launched a RAID-1 conversion
 1 point
 -
The Parity Check Tuning plugin has a lot more options than the built-in parity check functionality, and this allows you to do advanced scenarios, if this is your interest. The built-in function does have a simple mechanism to pause or resume a running parity-check operation, by calling /usr/local/emhttp/webGui/scripts/parity_control pause|resume1 point
-
Latest firmware yes, BIOS is not important since it's not used with Unraid.1 point
-
Click on settings in front of the disk you want to enable that: Then enable "Share" P.S. next time please use the existing plugin support thread.
 1 point
 -
To save you starting completely from basics you could try installing the Parity Check Tuning plugin to see if the CLI interface it provides as part of the installation will help. The current implementation provides the following: Usage: parity.check <action> where action is one of pause Pause a running array operation resume Resume a paused array operation analyze Analyze results from an array operation check Start a parity check with scheduled settings correct Start a correcting parity check nocorrect Start a non-correcting parity check status Show the status of a running parity check cancel Cancel a running parity check Version: 2022.04.12 There are some undocumented options not listed above that I use during testing but they are less likely to be of interest I would think as they are very plugin specific. I am receptive to any suggestions for additions that might be worth adding or making changes/improvements to the above existing CLI options. The source for the plugin is available on github if you want to consider delving under the covers to see how the above are achieved. It includes some design notes that might be of interest if you do not want to use the plugin CLI interface. You mentioned Python as the scripting/programming language You may want to consider PHP instead (which is what the plugin uses) as that is a standard part of Unraid as it what is used for most of the GUI functionality.1 point
-
If you start the VM Unraid will lose connection with all disks connected to the HBA.1 point
-
This worked, thank you very much!1 point
-
Great tip cheers...1 point
-
I would rather recommend that you take a look at the Nvidia T400 because you can get such a card brand new for about $ 135,- is low profile, doesn‘t need external power and can only consume about 35W. In terms of transcoding it is the same as a 1050Ti if not even better.1 point
-
You're stubbing the HBA to isolate it from a VM 24:00.0 Serial Attached SCSI controller [0107]: Broadcom / LSI SAS2008 PCI-Express Fusion-MPT SAS-2 [Falcon] [1000:0072] (rev 03) Subsystem: Dell SAS2008 PCI-Express Fusion-MPT SAS-2 [Falcon] [1028:1f4f] Kernel driver in use: vfio-pci Kernel modules: mpt3sas Since it doesn't look like you're doing this through Tools - System Devices, is one of your VM's referencing this card in "Other Devices" or the like?1 point
-
Same issue here.1 point
-
Thankyou. emulated files are back! New drive installed to slot10. rebuilding now. Thank you again!1 point
-
You may need to use other settings as well. Here is my settings from SMB configurations extras- #macOS config start [Global] vfs objects = catia fruit streams_xattr fruit:nfs_aces = no fruit:zero_file_id = yes fruit:metadata = stream fruit:encoding = native spotlight backend = tracker [Media] path = /mnt/user/Media veto files = /._*/.DS_Store/ delete veto files = yes spotlight = yes [Media] is the name of the share these settings are being applied to. You will need to change this to fit your needs.1 point
-
Just a small point you can still spin down individual disks by clicking on the spindown option there even though the global option is not enabled. I assume that what you are seeing is because an assumption was made that it does not normally make sense to spin down the disks in the middle of a parity check1 point
-
I would wait a little longer, proper iGPU support for Alder Lake is maybe introduced in 6.11 RC series... The issue with Linux and bleeding edge hardware is always that it works properly because Intel is always a bit behind submitting patches to the Kernel...1 point
-
You need to add the .yaml extension to the list of known extensions. Edit the file editor.cfg in the /config folder on your flash device, this can be done with the file manager itself.1 point
-
@limetech The Plex devs have come back this morning and said that the fix to the Alder Lake iGPU for Plex transcodes will be part of the 5.18 Kernal release. With the 5.18 kernal being released end of May, im hoping that you might be able to include 5.18 as part of your 6.11 RC1 release https://forums.plex.tv/t/plex-media-server-on-ubuntu-21-10-with-intel-12th-gen-alder-lake/768123/121 point
-
@flyize yeah im in the same boat as you are 😞 but at least there is light at the end of the tunnel haha 🙂 Im also following the Linux Kernel release schedule for 5.18 and it looks to be released by the end of May so im hopeful that @limetech will be able to update the 6.11 RC1 release with this latest Kernal 🙂1 point
-
According to this, its 5.18 I kinda almost regret picking up an Alder Lake at this point. 😅 https://forums.plex.tv/t/plex-media-server-on-ubuntu-21-10-with-intel-12th-gen-alder-lake/768123/301 point
-
Ok...I thought I was able to move items from column to column. Either way, rc5 seems to have fixed the position retention within the columns. Glad BRiT thought it was funny.1 point
-
But are you sure that the container caused this? I have no issues to run the container with my Intel iGPU with HW transcoding on my main server and with a Nvidia P400 on my test server with HW transcoding. Maybe also your GPU crashed but that's only a guess and I really can't tell what happened. Are you sure that it completely hung if so this it is also possible that after you've finished the setup that the initial media scan and processing from the thumbnails caused a crash because for whatever reason that I really can't tell. Maybe try to only add a single path to the container with only one file in it an see if this is working. As said above, I have no issue on my main Server and on my test Server running the container one with a Intel iGPU and one with a Nvidia P400 through NVENC.1 point
-
Unraid 6.10.0-rc5 is released, which does automatic route adding for containers on custom network br0.1 point
-
Anyone have this script working under 6.10.0-RC5? The command "mdcmd status" doesn't appear to output rdevLastIO anymore. Also, from what I can tell ,"mdcmd spinup" does not work either.1 point
-
目前为止 我的服务器已经运行了四天 目前为止硬件解码没有出现不稳定性 期间因为配置其他服务 重新启动过几次 还没有进行长期稳定性测试 后续进行测试后 我会跟进这个问题1 point
-
No, the plan is to release 6.10 'stable' on the 5.15 kernel and then back to updating to the latest kernel in Unraid 6.11.1 point
-
Hi @EnemyLemon, I'm not trying to be snarky but to use an analogy, what you have said is... "I want to speak Italian but I don't want to have to go to any classes or learn the language." Macinabox is a fantastic solution that lowers the bar to get into Hackintosh but is unavoidably brittle due to the constantly changing environment of hardware, software and MacOS versions. My honest advice to most people who actually want to run MacOS long term is allow yourself the time to build your Hackintosh from scratch using the OpenCore Install Guide. But in your case, if you have managed to get any version of MacOS to boot in a VM then you have already solved 90% of the problem. Getting iMessage to work once you have a booting system is pretty straight forward. Without knowing the exact nature of your issue here is some generic advice that should get you over the line; So the definitive guide for getting iMessage working is from the OpenCore team. Just keep in mind that it was not written with Unraid virtualization in mind so you need to make some adjustments. Step 1: Make sure your interface en0 is "built-in". The only sane way to do this is to move it to bus 0x00 (the internal virtual PCIe bus). You can find more information about how to check and correct it in this post. Don't use the OpenCore technique because this is only necessary if you have physical hardware that you can't just remap in a VM. Step 2: Make sure the MAC address (ROM) of your virtual ethernet card is from a valid range that is in use by Apple in the real world. I use 60:03:08:xx:xx:xx but you can use any Apple range (change the xx to something random). Don't use the Macinabox default. This then needs to be updated in both your VM XML and your EFI config.plist file. Step 3: Generate your own serial number and check it against the Apple Check Coverage page to make sure it is not valid. There is often confusion around the serial number requirement. Contrary to the guide and public opinion, there is no requirement to have a valid serial number. The options are; Valid Purchase date - This means the serial number is real and has been registered to a real machine. If you use it, then many things will break for you and the other user who owns the machine, which is bad and will draw attention to you and the Hackintosh community as a whole, so don't do it. Purchase Date not Validated - This means that it is a valid serial number that has not (yet) been registered as purchased. It may be attached to a machine in the future and then it will break as per above. We’re sorry, but this serial number isn’t valid - The serial number is not real and thus can never be assigned to a real machine. Currently Apple do not check the validity of serial numbers so this is the best option. Of course this could change in the future but for now it works so this is what you should use. The wording of the Dortania guide is just a bit confusing. Now, although Apple don't check the validity of serial numbers, there are things they do check. The serial number is not random, it is calculated via a formula that incorporates the machine model and date of manufacture. So you need to use a tool such as GenSMBIOS to generate an appropriate serial for the type of machine you are virtualizing (use iMacPro1,1 unless you know what you are doing). Make sure to use the matching MLB, SystemProductName, SystemSerialNumber and SystemUUID that GenSMBIOS generates and add to your config.plist So if you step through the OpenCore guide with the above 3 points in mind, you should be able to get iMessage working without any real issues. As for your stretch goal of Airdrop, this can also work but it needs a compatible Broadcom WiFi/Bluetooth card. The gotcha with this is that the WiFi will connect over PCIe but the bluetooth requires a little cable connecting to a spare USB port. Hope this helps.1 point
-
I think you are onto something here. I was having the same problem when i needed to replace my usb. I turned off virtualization support and was able to boot. I went further, the kernel panic was about iommu. So I tried adding this to the boot args: intel_iommu=on iommu=pt I can now boot with virtualization on. Hope this helps.
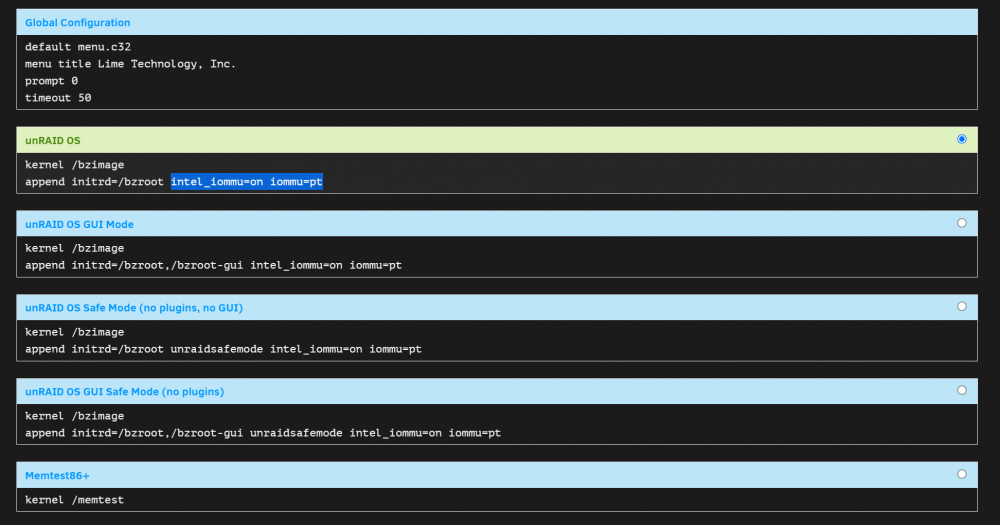 1 point
 -
I have isolated the problem to be something with the hardware virtualization that is used by UNRAID to support VMs. I started by resetting my BIOS on my T610, created a fresh USB install and booted 6.10.0 RC3 and it booted successively. I then copied over all my configurations, plugins, etc. and booted again - again, it booted successfully. I went through to see if everything was working. I noticed that my VM's hadn't come online. At the top of the web-gui, it indicated that the hardware did not support KVM. I figured at this point that the resetting of the BIOS must have disabled the virtualization options. I went in the BIOS and enabled the virtualization technology on the processor and rebooted. The UNRAID boot splash came up and continued to boot normally until it hits the bzroot checksum failed. This is the ONLY change I made, so it must be related to the enablement of the virtualization technology in the BIOS. Now what???1 point
-
Just thought I'd share my experience setting up a Valheim server with this docker app from @ich777(thank you!) You don't need to worry about Steam authentication for Valheim, the default anonymous user can download and host a server (yay!), so no fuss with Steam users or Steam Guard to worry about. Deploy the docker as provided, leaving username & password blank. The Server Name field is important, this is how your name will appear in the public server list in Valheim. (as of this writing there are 7 "Valheim Docker" server names, good luck finding yours! So choose something unique that you and your friends can find. World Name is the name of your world, this can be anything, if you wish to import a single-player or self-hosted save file in your docker, this name must be set to the same name/spelling as your save game world. Save the docker/let it install. You'll want to make sure your firewall or router has UDP ports 2456-2458 forwarded to your Unraid server's IP so the game can work as intended. In 10-15 minutes typically you should see your server name in the public server list in Valheim, you're done! * if you wish to import a previous save file, you need to make sure the Docker is Stopped first. Then browse your local computer's profile, typically in "%appdata%\..\LocalLow\IronGate\Valheim\worlds" you will find your save games. You'll want to take a copy of your world files, database, everything named the same as your world name over to your docker data files, by default with this docker settings should be: \\<your unraid server IP or name>\appdata\valheim\.config\unity3d\IronGate\Valheim\worlds Place your save game files in there, and overwrite any existing newly generated world of the same name with your save game. Start the Docker, wait for it to appear in Valheim, join & play! I hope this was helpful for someone, took a bit to figure out the exact steps to follow1 point
-
Edit the vm and change from form view to xml view, and remove the section that references the device from the xml1 point