Leaderboard


Popular Content
Showing content with the highest reputation on 04/30/22 in all areas
-
After multiple recent support issues with SanDisk brand USBs, we don't recommend buying SanDisk USBs for Unraid at this point. Either due to counterfeit devices being sold or a manufacturing change directly from SanDisk, multiple users have attempted to boot SanDisk USBs and found out that they do not register a unique GUID and therefore, cannot be properly licensed with Unraid. Multiple attempts at contacting SanDisk on this issue have gone nowhere. For a great rundown on the best USBs for Unraid, @SpaceInvaderOne made an exhaustively researched video on the topic: (Spoiler) Some of the best flash drives were: Samsung bar plus USA ---- https://amzn.to/32TtQyp UK ---- https://amzn.to/3004ooU DE --- https://www.amazon.de/Samsung-MUF-32BE4-EU-Flash-Speicherstick/dp/B07CVVHCTG/ Samsung Fit Plus USA --- https://amzn.to/3hFboha UK --- https://amzn.to/39vSsOR DE --- https://www.amazon.de/Samsung-Flash-Drive-MUF-32AB-APC/dp/B07HPWKS3C BONUS Ones confirmed to work @ich777 recommendation for Amazon.de users: https://www.amazon.de/Transcend-JetFlash-Extreme-Speed-32GB-USB-Stick/dp/B002WE6CN6 Kanguru - tested and recommended by @AlastorX50 https://www.kanguru.com/products/kanguru-flashblu30-usb3-flash-drive https://www.kanguru.com/products/kanguru-ss3 https://www.kanguru.com/products/kanguru-flashtrust-secure-firmware-usb-3-0-flash-drive1 point
-
@jimmy898 and @Froberg, you both were right. Wasn't container based. It was addons with Firefox causing conflicts. It worked on chrome so started digging into the browser. Now it's working as intended. All good on my end.1 point
-
How do you handle the HUGE number of people with auto updating for their containers? (I'm not one of those BTW, I make sure the forums aren't buzzing with issues about a specific container before I hit update)1 point
-
apctest works to reset the date on most, and is included in Unraid https://apcupsd-users.narkive.com/ndUBrLfk/how-do-i-reset-my-battery-s-date-like-in-power-chute1 point
-
I'm going to try and stop this back and forth debate At the end of the day, templates being updated has been troublesome. We're trying an experiment to see how things go without updating them. IMO, Templates very, very rarely change and I don't see that changing all that much in the future, and the number of templates that needed to be set to not update was very steadily increasing. But, if this change in 6.10 proves to be troublesome again then we'll revisit the whole thing again and try a different solution. In the meantime, we're not putting in updates to the templates...1 point
-
Thanks. I got in contact with him and he had me use "294420 -beta Alpha20.3" without the quotes and that worked for me.1 point
-
For those of us that are just buying these Seagate drives and have a windows machine handy to "fix" the drives. Download Seatools and install it in the default directory. Open admin command prompt and do the following, just the bolded commands cd C:\Program Files\Seagate\SeaChest This sets the prompt to the correct folder. SeaChest_Basics_x64_windows --scan Scans for the Seagate HD, get the Disk Number to fill in for XX, should be PDXX SeaChest_Basics_X64_windows -d PDXX -i Gives you the info on the disk. SeaChest_PowerControl_X64_windows -d PDXX --EPCfeature disable disables the EPC Feature SeaChest_Configure_X64_windows -d PDXX --lowCurrentSpinup disable disables the Low Current Spinup. REBOOT the Seagate Drive. Once the drive is back up, do the following to ensure that the 2 features are disabled. 1. Open an admin command prompt 2. cd C:\Program Files\Seagate\SeaChest 3. SeaChest_Basics_x64_windows --scan Scans for the Seagate HD, get the Disk Number to fill in for XX, should be PDXX 4. SeaChest_Basics_X64_windows -d PDXX -i Gives you the info on the disk. The info should be in the middle for the Low Current Spinup and near the end for EPC.1 point
-
Did a backup of the save files, deleted the docker and image, re-installed it and pasted back the save files. Now it works. I have no idea why it could not update it self, but now it works! Thanks for the help ich777.1 point
-
@Dmitry Spikhalskiy Hi, thanks for this container. I love Zerotier, it works perfect and is exactly that lightweight VPN P2P solution I was looking for! Thumbs up1 point
-
Thanks for the guide ich777.1 point
-
You have to add a additional path to your container wherever you like it, for example: In this case you would download the files in the Firefox container to: /mnt/downloads and you can access the files through the folder Downloads, of course the share on your host Downloads have to exists (you can change the Host path to whatever path you like). Hope that helps.
 1 point
 -
Same for me. It’s as if there isn’t any link there. @SimonF I do see all the readings in tools>ipmi.1 point
-
Going via the User Share does have the advantage that it is independent of where the share files are located on the drives. However many people have found they get better performance if they by-pass the User Share system and go directly to the physical device/pool. You have to decide which matters most to you, the convenience of using the User Share v the possible speed advantage of going direct.1 point
-
Yep, that works.1 point
-
After trying to get this terror of a service up and running again (after having spent hours some months ago and losing my docker backup), I managed to do it again. I've done all the hard work of downloading the OFFICIAL docker container of this and then generating the updated config files. You need the following, minimum to proceed. matrix_files.zip Follow the instructions in the readme.txt Make sure to make the /appdata/matrix folder yourself via samba and copy the files over, or at least ensure that the permissions are correct. The container doesn't really have proper permissions set so it often cannot access files. Especially if you made them eg. via terminal as root. Now remember to add the registration_shared_secret variable to your homeserver.yaml like so, it's around line 1300: registration_shared_secret: "s0mekind0fmassive:::9generatedSTRINGhere!!" Now you can install the matrix container from the Apps tab in Unraid. After which you can register an admin user so you can actually make changes. Then you can remove the shared registration token. $ register_new_matrix_user -c /data/homeserver.yaml http://0.0.0.0:8008 New user localpart [matrix]: <youradminusername> Password: Confirm password: Make admin [no]: yes Sending registration request... Success! $ Now you can register accounts and such using the OTHER app element-web. God that was a pain... now it's 6:45am and I am going to sleep.1 point
-
Is it in a slot that is winding up being disabled in the BIOS. There's no mention of it in the diagnostics, so as far as the OS is concerned, it doesn't exist at all.1 point
-
Optimally, you want SSD Trim to run after mover completes.1 point
-
No need for that. You can run them directly like: bash /boot/config/plugins/user.scripts/scripts/<name>/script1 point
-
OK, that worked flawlessly! Thanks for the help!!!1 point
-
During testing I noticed that the Key Path is NOT a variable. This is wrong and must be corrected. I will adjust the template as soon as possible. Update: Fixed the template There are several ways to setup SSL. Im using Swag as a reverse proxy to get my letsencrypt certificates. The certificates are saved in the following path: /mnt/user/appdata/swag/etc/letsencrypt/live/example.com/cert.pem /mnt/user/appdata/swag/etc/letsencrypt/live/example.com/privkey.pem /mnt/user/appdata/swag/etc/letsencrypt/live/example.com/chain.pem /mnt/user/appdata/swag/etc/letsencrypt/live/example.com/fullchain.pem /mnt/user/appdata/swag/etc/letsencrypt/live/example.com/priv-fullchain-bundle.pem That means I use letsencrypt as SSL_TYPE and Mount SSL Path: Host path: /mnt/user/appdata/swag/etc/letsencrypt/ Container: /etc/letsencrypt/ It is important with the letsencrypt option that the domain is recognized in the directory name. The mail server checks for <example.com> or <mail.example.com> depending on what was configured. Something like: /etc/letsencrypt/live/<example.com>/fullchain.pem or /etc/letsencrypt/live/<mail.example.com>/fullchain.pem If this is not possible, then choose SSL_Type as manual. Then it is important to specify where the certificates are located in the container. The variables already in Show more settings ... 1. Path: Mount SSL Path Host: /mnt/user/appdata/swag/etc/letsencrypt/ Container: /etc/letsencrypt/ 2. Environment Variable: SSL_Type = manual SSL_CERT_PATH = /etc/letsencrypt/live/example.com/fullchain.pem SSL_KEY_PATH = /etc/letsencrypt/live/example.com/privkey.pem1 point
-
I think this would be the applicable fix: https://github.com/binhex/documentation/blob/master/docker/faq/vpn.md You may also be hitting the Docker network configuration default security model, where containers on the default network cannot communicate directly with the host (Unraid).1 point
-
Bingo! I spent the last 24h pulling my hair out trying to troubleshoot this. Thank you!!!1 point
-
This should finally enable stable iGPU transcoding on Alder Lake 12 series processors. This will be a huge release for a lot of folks if that works right.1 point
-
I just wiped unraid and did a fresh install like 4 hours ago...I wish this was like 6 hours earlier lol1 point
-
Hi first post here - not sure this is the best place but figure it might help someone else out as this thread is what saved me with my first Unraid build. I just recently built my new Unraid media server with an 12th Gen Intel 12500 and was able to successfully get hardware transcoding (QuickSync) to work. To provide a step by step guide for noobs likemyself who might be struggling - this is what I did: Enabled iGPU in bios (I have a Asus B660 Plus-D4 and the iGPU was actually disabled by default. Install Unraid 6.10 rc4 or latest revision (important to be in 6.10 as 6.9 won't recognize your iGPU on your 12th gen cpu in my experience. Scratched my head on that one for a while before coming across this thread.) configured all of my media services per the Trash Guides (Ibracorp Atomic moves video). I Used the Linuxserver version of the Plex Docker - I read multiple places that it plays nicer with QuickSync Transcoding but did not verify this through experimentation of my own. Install Intel GPU Top by ich777 Install and configure gpu statics by b3rs3rk (this adds a gpu usage to your dashboard so you can see if your iGPU is working and also gives you neat info on how bogged down your server is getting) I rebooted the server at this point, don't know if it's necessary open a console and input: echo "blacklist i915" > /boot/config/modprobe.d/i915.conf reboot again Following the guide here as reference (a lot of this is copy pasted with a couple steps removed that i didn't use or need): https://forums.unraid.net/topic/77943-guide-plex-hardware-acceleration-using-intel-quick-sync/ in console: cd /dev/dri in console: ls you should see something like the below in a new terminal window type: chmod -R 777 /dev/dri Now go back to your dockers and in your Plex Docker setting add /dev/dri as a device - I followed the linked guide verbatum Enable transcoding in plex, Again follow the guide (pretty much just click a couple check boxes on the transcode tab in your plex server settings). test your server to see if it works! Select a video to play, play it and make sure to change the quality: in plex app on computer: while playing video, click the settings icon > click on the quality> show more >choose one that is different than the original file quality click down arrow in top left, then the squigly line in the top right and go to your activity dashboard. If in the description of the transcode you see (hw) it means you are hardware transcoding Another way to check is to go to the dashboard on your Unraid server and look at the GPU stats that you previously installed At this point, I was done. I did not need to do any of the other steps listed in the guide to get the settings to persist. Hope this helps someone and doesn't confuse anyone. I haven't tried converted any HDR or 4k stuff yet, but Generally my transcodes spike at first to like 25% gpu usage and then drops to nothing. If someone knows a way to benchmark transcoding performance or anything like that, let me know and I can post the results later for people curious how the 12500 performs.1 point
-
Hi @Frank1940 I do not have any GPU's and my Hard Drives are set to spin down after 30 mins (except my SAS drives never do as I believe there is an issue with these being able to spin down on linux/unraid?) Also my servers are in the detached garage so not benifiting from any heat! 😄 My HP Microserver with i5-3470T 4X Mech Drives & 1 X SSD is about 50W idle I have not measured my 2nd unraid server independantly I am just measuring the whole cabinet with the 2nd server in it and it is drawing 500W but consist of the following -------------------------------------------------------------------------------------------------------------------- Unraid Server 2 Gigabyte X399 Designare Motherboard 2950X Threadripper 48GB RAM 24 Mechanical Disks 2 X NVME Drives Mellanox MCX311A 10gbe Network Card External Devices MikroTik CRS305-1G-4S 10gbe switch Zyxel GS1900-24 Network Switch Huawei B535-333- 4G+ Router --------------------------------------------------------------------------------------------------------------------- So considering neither of my unraid servers have GPU's does 500W sound wrong? is something a bit off here?1 point
-
Installing the dependencies worked for me. There is however a typo in the above script which has to do with the install of freetype-2.6.3. Find the line below in the above script and you will notice it's slightly off from what I've shown below. Replace that line with what I've included below. It will now install all dependencies properly or you can install freetype after the script has run by itself. Look at the install output in your terminal and notice that freetype has not installed properly. upgradepkg --install-new freetype-2.6.3-x86_64-1.txz If you're doing it after running the script, then just use this at the command line. Then refresh the browser window and the graphs should show up. #!/bin/bash wget https://slackware.uk/slackware/slackware64-14.2/slackware64/l/freetype-2.6.3-x86_64-1.txz upgradepkg --install-new freetype-2.6.3-x86_64-1.txz1 point
-
currently because of dependency changes from 6.9 to 6.10, this plugin isnt fully working by itself at least the image outputs arent. in order to fix the outputs you would have to install the missing dependencies. After discussion with others i dont think this plugin should do dependency management for this because of the dependencies its needs. That being said here is a scrip tthat you can run install stall the missing dependencies. #!/bin/bash wget https://slackware.uk/slackware/slackware64-14.2/slackware64/l/gd-2.2.1-x86_64-1.txz upgradepkg --install-new gd-2.2.1-x86_64-1.txz wget https://slackware.uk/slackware/slackware64-14.2/slackware64/x/fontconfig-2.11.1-x86_64-2.txz upgradepkg --install-new fontconfig-2.11.1-x86_64-2.txz wget https://slackware.uk/slackware/slackware64-14.2/slackware64/l/harfbuzz-1.2.7-x86_64-1.txz upgradepkg --install-new harfbuzz-1.2.7-x86_64-1.txz wget https://slackware.uk/slackware/slackware64-14.2/slackware64/l/freetype-2.6.3-x86_64-1.txz upgradepkg --install-new freetype-2.6.3-x86_64-1.txz wget https://slackware.uk/slackware/slackware64-14.2/slackware64/x/libXpm-3.5.11-x86_64-2.txz upgradepkg --install-new libXpm-3.5.11-x86_64-2.txz wget https://slackware.uk/slackware/slackware64-14.2/slackware64/x/libX11-1.6.3-x86_64-2.txz upgradepkg --install-new libX11-1.6.3-x86_64-2.txz wget https://slackware.uk/slackware/slackware64-14.2/slackware64/x/libxcb-1.11.1-x86_64-1.txz upgradepkg --install-new libxcb-1.11.1-x86_64-1.txz wget https://slackware.uk/slackware/slackware64-14.2/slackware64/x/libXau-1.0.8-x86_64-2.txz upgradepkg --install-new libXau-1.0.8-x86_64-2.txz wget https://slackware.uk/slackware/slackware64-14.2/slackware64/x/libXdmcp-1.1.2-x86_64-2.txz upgradepkg --install-new libXdmcp-1.1.2-x86_64-2.txz1 point
-
Just to add my experience to this; I’m running an i5-12400 with an Asrock H670M Pro (DDR4 and 1Gbe Intel Ethernet). Everything seems to be working great on 6.10rc2, including networking and iGPU passthru to dockers. Plex is able to do hw transcoding except HDR tone mapping does not work, which appears to be a bug that’s still present since Rocket Lake days. Jellyfin is able to do hw transcoding just fine with HDR tone mapping enabled. Overall, I’m happy with this setup which was a fairly inexpensive upgrade these days from my i7-3770 system. ($170 CPU, $140 MB, $90 32GB) and idles ~ 40W at the wall with 8 HDD, 2 SSD, and one LSI 9211-8i, which is about 10w lower than my old system. MB also has a PCI gen4x16 for a GPU in addition to the gen3x16 HBA slot, 6 fan headers, and 2 Gen4 NVME slots.1 point
-
Honestly I would absoluty Love to see all of these features. But it would also be nice to have a Two-Factor Authentication for the Web-Gui, I've got it set up for my ssh connections to the server, But Would Ideally like to have 2FA on the Web-Gui. Thank's Ellie Just another HomeLabber1 point
-
This is an intentional design decision by Docker and is the default for unRAID. However, have you tried enabling host access to custom networks in Docker Settings?
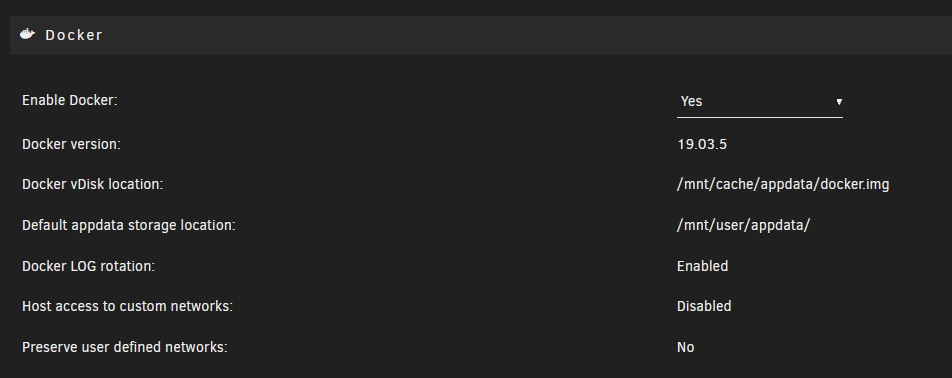 1 point
 -
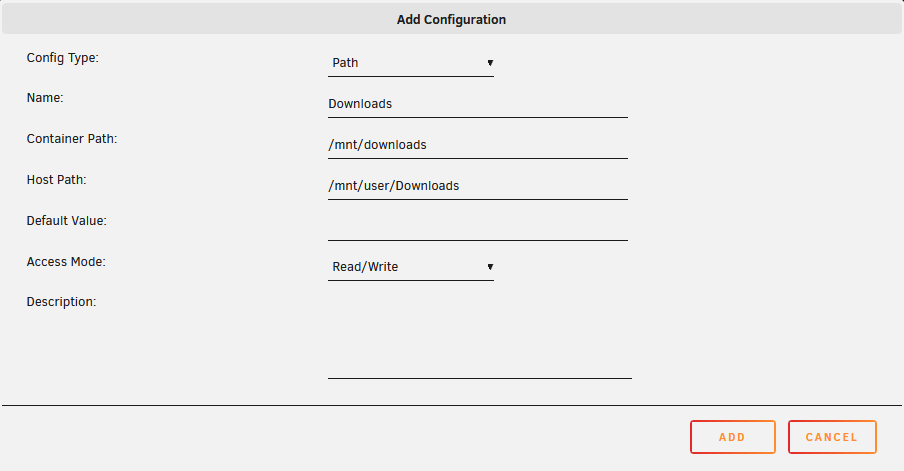
I've successfully setup ONLYOFFICE to work in my self hosted Nextcloud instance. Like many others here I use NginxProxyManager to setup reverse proxy and get a certificate from Let's Encrypt for my subdomains. As already mentioned here you don't need to create any config files and copying certificate and private key to a newly created folder certs in appdata ...... I think anyone who added at least one proxy host to NginxProxyManager with SSL certificate from Let's Encrypt pointing to the newly created subdomain will be able to configure OnlyOffice Document Server to work properly with Nextcloud. If not I will gladly provide some assistance. My main intention here is creating a brief HOW TO in order to restrict the access to ONLYOFFICE Document Server (for security reasons and data integrity) with encrypted signature, known as Secret Key. Let me emphasize that I don't own the credit for this tutorial, I'm just posting something found among user comments in @SpaceInvaderOne YouTube video tutorial How to Install and Integrate Only Office with Nextcloud. Many, many thanks to @SpaceInvaderOne for providing great tutorials for us "nerds" and make our experience with unRAID easier. HOW TO add and configure Secret Key in ONLYOFFICE: Stop the OnlyOffice Document Server container. In the "edit" option for the OnlyOffice Document Server docker, do "+ Add another Path, Port, Variable, Label or Device". Config Type: Variable Name: JWT_ENABLED (can be whatever you want to see in the UI, I used the key) Key: JWT_ENABLED Value: true Description: Enables use of Secret key [press ADD] Then add another variable: Config Type: Variable Name: JWT_SECRET (same thing, up to you) Key: JWT_SECRET Value: [WhateverSecretKeyYouWantToUse]. You can use the following command in Terminal (without quotes) to create a random Secret Key: "openssl rand -base64 48" and press Enter Description: Defines the Secret key value [press ADD] [press APPLY] Start OnlyOffice Document Server container. Go to Nextcloud > Settings > ONLYOFFICE page. Enter the Secret Key and click Save (you should get the message: Settings have been successfully updated ..... No restart of the Nextcloud docker was needed.1 point
-
Con la ayuda de @chalboly y @zspearmint, feliz de presentar unraid.net en español.1 point
-
@xabi Si tienes alguna pregunta de algún recurso o video que está en ingles, lo puedo revisar y tratar de explicar en español.1 point


.thumb.gif.a2f8da6f49230b47aa57c8121cc1dca3.gif)