Leaderboard


Popular Content
Showing content with the highest reputation on 05/03/22 in all areas
-
Sounds like a new poll topic: Are you an Innie or an Outie? 😜4 points
-
Thank you for the deep dive into inner workings of btrfs. Back when we implemented VM manager we indeed wanted to provide vdisk redundancy via btrfs raid1 profile. Our early testing showed a very obvious performance hit with a COW vdisk vs. NoCOW. This was circa 2016/2017? and we were aware of the discussion and patch set that ultimately arose. Actually my assumption was that btrfs metadata would keep track of which chunks were successfully committed to storage - apparently this is not the case? Also it has always bugged me that btrfs would not maintain checksums across NoCOW chunks. I can't think of a logical reason why this decision would be made in the code. edit: I guess to avoid read/modify/write. Sure, we can change the default to COW for the domains share. I think your testing shows that best performance in this case happens when vdisk files are also pre-allocated correct? Also, changing the default will have no effect on an existing domains share. To get rid of existing NoCOW flags, one must empty the domains share, delete it, and then recreate it. Moving forward into Unraid 6.11 we plan to introduce a "LVM" pool type of up to 3 mirrored devices. This will be used to create logical volumes to be used as vdisks in VM's. This should provide near bare-metal storage performance since we bypass completely any intermediate file system where vdisk (loopback) files are stored.3 points
-
I'm not running anny of the plugins mentioned by SimonF and everything works great Took the gues on this custom kernel yesterday, It is still working grreat here (Plex Transcoding) server is up for more then 12 hours without one crash and multiple streams on plex done with and without transcoding: For those needing a bit of a direction with the parameter overwrite mentioned on the github page: Go to your flash drive --> syslinux configuration section and under Unraid OS (green bar) You will see: kernel /bzimage append isolcpus=15 initrd=/bzroot Modify to: kernel /bzimage append isolcpus=15 initrd=/bzroot md_mod.unraid_patch=22 (number according to post number --> unraid version translation) It seems to work great gonna experiment with Unmanic today2 points
-
Not sure what your end game is, but DevPack plugin might fit the bill for you. It's from same author as Nerdtools but aimed at advanced users, compiling etc2 points
-
Will review tomorrow may be able to download and then run modprobe i915 in go file from here https://git.kernel.org/pub/scm/linux/kernel/git/firmware/linux-firmware.git/tree/i9152 points
-
Hi guys, i got inspired by this post from @BRiT and created a bash script to allow you set media to read only to prevent ransomware attacks and accidental or malicious deletion of files. The script can be executed once to make all existing files read only, or can be run using cron to catch all newly created files as well. The script has an in-built help system with example commands, any questions let me know below. Download by issuing the following command from the unRAID 'Terminal' :- curl -o '/tmp/no_ransom.sh' -L 'https://raw.githubusercontent.com/binhex/scripts/master/shell/unraid/system/no_ransom/no_ransom.sh' && chmod +x '/tmp/no_ransom.sh' Then to view the help simply issue:- /tmp/no_ransom.sh Disclaimer:- Whilst i have done extensive tests and runs on my own system with no ill effects i do NOT recommend you run this script across all of your media until you are fully satisfied that it is working as intended (try a small test share), i am in no way responsible for any data loss due to the use of this script.1 point
-
Best to use the DOS or UEFI tools to do any crossflashing and/or other more advanced options, e.g., for some reason erasing the BIOS doesn't work with the Linux version, but if you just need to update firmware it can be easily done with Unraid. Download the MSDOS firmware package form Broadcom's support site (https://www.broadcom.com/support/download-search), for example for the 9300-8i it currently is this one: 9300_8i_Package_P16_IR_IT_FW_BIOS_for_MSDOS_Windows Note: Downloads for SAS2 HBAs like for example the 9211-8i are usually under "Legacy Products" and then "Legacy Host Bus Adapters". Now download the Linux Installer, also from the firmware section, again for the 9300-8i it currently is: Installer_P16_for_Linux From the DOS package we only need the firmware: 9300_8i_Package_P16_IR_IT_FW_BIOS_for_MSDOS_Windows\Firmware\SAS9300_8i_IT\SAS9300_8i_IT.bin Optional: if the HBA has a BIOS installed and we want to updated it also copy the BIOS file: 9300_8i_Package_P16_IR_IT_FW_BIOS_for_MSDOS_Windows\sasbios_rel\mptsas3.rom From the installer package we only need sas3flash (sas2flash for SAS2 models): Installer_P16_for_Linux\sas3flash_linux_x64_rel\sas3flash Copy both files to your Unraid server, you can copy them to flash first but still need to copy them elsewhere since the executable can't be run from the flash drive, we also don't want them in the array since it should be stopped before flashing. For this example I first copied both files to folder called "lsi" in the flash drive then copied them to a temp folder I created called /lsi (this folder will be stored in RAM and gone after a reboot), use the console and type: mkdir /lsi cp /boot/lsi/* /lsi After copying the files navigate to that directory, in this case: cd /lsi We now need to make sas3flash executable with: chmod +x sas3flash Before flashing we can confirm the adapter (or adapters) are being detected and check what is the firmware currently installed: ./sas3flash -listall Avago Technologies SAS3 Flash Utility Version 17.00.00.00 (2018.04.02) Copyright 2008-2018 Avago Technologies. All rights reserved. Adapter Selected is a Avago SAS: SAS3008(C0) Num Ctlr FW Ver NVDATA x86-BIOS PCI Addr ---------------------------------------------------------------------------- 0 SAS3008(C0) 16.00.01.00 0e.01.00.07 08.37.00.00 00:01:00:00 1 SAS3008(C0) 16.00.01.00 0e.01.00.07 08.37.00.00 00:02:00:00 Make sure the array (and any UD devices using the HBA) is stopped and unmounted and now we can proceed with the upgrade, just use the standard sas3flash command, but remember that Linux is case sensitive, e.g.: ./sas3flash -o -f SAS9300_8i_IT.bin Optional: if you also want to flash the BIOS use ./sas3flash -o -f SAS9300_8i_IT.bin -b mptsas3.rom After it's done confirm the new firmware (and bios if also flashed) is installed: ./sas3flash -listall Avago Technologies SAS3 Flash Utility Version 17.00.00.00 (2018.04.02) Copyright 2008-2018 Avago Technologies. All rights reserved. Adapter Selected is a Avago SAS: SAS3008(C0) Num Ctlr FW Ver NVDATA x86-BIOS PCI Addr ---------------------------------------------------------------------------- 0 SAS3008(C0) 16.00.10.00 0e.01.00.07 08.37.00.00 00:01:00:00 1 SAS3008(C0) 16.00.01.00 0e.01.00.07 08.37.00.00 00:02:00:00 If there are multiple adapters like in this case only the first one will be flashed, to flash the other one use -c to specify the adapter#, e.g.: ./sas3flash -c 1 -o -f SAS9300_8i_IT.bin ./sas3flash -listall Avago Technologies SAS3 Flash Utility Version 17.00.00.00 (2018.04.02) Copyright 2008-2018 Avago Technologies. All rights reserved. Adapter Selected is a Avago SAS: SAS3008(C0) Num Ctlr FW Ver NVDATA x86-BIOS PCI Addr ---------------------------------------------------------------------------- 0 SAS3008(C0) 16.00.10.00 0e.01.00.07 08.37.00.00 00:01:00:00 1 SAS3008(C0) 16.00.10.00 0e.01.00.07 08.37.00.00 00:02:00:00 Finished Processing Commands Successfully. Exiting SAS3Flash. Now both are updated. P.S. to see more detailed info from an adapter we can use: ./sas3flash -list Avago Technologies SAS3 Flash Utility Version 17.00.00.00 (2018.04.02) Copyright 2008-2018 Avago Technologies. All rights reserved. Adapter Selected is a Avago SAS: SAS3008(C0) Controller Number : 1 Controller : SAS3008(C0) PCI Address : 00:02:00:00 SAS Address : 500605b-0-0b1c-2d00 NVDATA Version (Default) : 0e.01.00.07 NVDATA Version (Persistent) : 0e.01.00.07 Firmware Product ID : 0x2221 (IT) Firmware Version : 16.00.10.00 NVDATA Vendor : LSI NVDATA Product ID : SAS9300-8i BIOS Version : 08.37.00.00 UEFI BSD Version : 06.00.00.00 FCODE Version : N/A Board Name : SAS9300-8i Board Assembly : H3-25573-00H Board Tracer Number : SP60700521 Finished Processing Commands Successfully. If there's more than one we can again use -c, e.g.: ./sas3flash -c 1 -list1 point
-
Hi All, I've been trying to get the mastodon dockerhub docker running, but no luck. Anyone willing to unRAIDify this one? https://hub.docker.com/r/tootsuite/mastodon/ https://github.com/tootsuite/documentation/blob/master/Running-Mastodon/Docker-Guide.md Much appreciated! Matt1 point
-
Everything says that it's full, except for the script (not sure why though). Rebooting is your only recourse, and then see if it happens again.1 point
-
I'm not sure if this will help anyone, but I ran into this same issue today. So I started playing around with different Machine and Bios settings (specifically the Bios). I was having the issue with my VM setup with i440fx-4.2 and Seabios, But was able to successful pass through my PCIe USB controller using i440fx-4.2 and 'OVMF'.1 point
-
Wrote a long thank you and i pressed "Mark as solution" to your post and all my text vanished =). Anyway. Thank you again, Funny thing is that after i made the change to cqow2 i got the same result and landed in UEFI Interactive Shell and "No mapping found". On a hunch i also changed bus form SCSI to VirtIO which led to a boot into 'Windows recovery" something something, and an inaccessible boot device. I shut it down and changed it back to SCSI and thought why not try another start and behold, it booted normally I've done 5-6 restart and everything seems to work fine with no abnormal errors so far. Thanks, you probably saved me a lot of time recreating this machine, don't know why the shift between SCSI and VirtIO did anything, i was probably just impatient.1 point
-
This is fixed in rc6, which imports all keys, but you can post your config file for validation purposes.1 point
-
I did it like you siad and know it is working perfectly, thank you very much! I would like to donate for your amazing and fast job. You earned it!1 point
-
Thanks, I tested the latest update.wireguard.php from github and it is importing my file properly, including the PersistentKeepalive value.1 point
-
I'm sure it's user error. I would prefer the GUI, but it appears not to be in the cards. I'll probably setup a cron job once my initial backups finish.1 point
-
Used 5.18rc2 vers of firmware from github. computenode kernel: i915 0000:00:02.0: [drm] Transparent Hugepage mode 'huge=within_size' computenode kernel: i915 0000:00:02.0: vgaarb: changed VGA decodes: olddecodes=io+mem,decodes=io+mem:owns=io+mem computenode kernel: i915 0000:00:02.0: [drm] Finished loading DMC firmware i915/adls_dmc_ver2_01.bin (v2.1) computenode kernel: i915 0000:00:02.0: [drm] GuC firmware i915/tgl_guc_69.0.3.bin version 69.0 computenode kernel: i915 0000:00:02.0: [drm] HuC firmware i915/tgl_huc_7.9.3.bin version 7.9 computenode kernel: i915 0000:00:02.0: [drm] HuC authenticated computenode kernel: i915 0000:00:02.0: [drm] GuC submission disabled computenode kernel: i915 0000:00:02.0: [drm] GuC SLPC disabled computenode kernel: [drm] Initialized i915 1.6.0 20201103 for 0000:00:02.0 on minor 0 computenode elogind-uaccess-command[13899]: Failed to reset ACL on /dev/dri/card0: Operation not supported Looks better.1 point
-
Getting PIA working is as simple as using this utility to generate a config file. It took me a few attempts trying different endpoints before finding one that worked (or perhaps there is some failure rate), but it is possible to create a standard wg config file with PIA.1 point
-
Delete the .txz from /config/plugins/snmp (or whatever the folder is) Reboot If the .txz does not re-appear in the folder after rebooting then the author now knows why its failing to reinstall on a reboot.1 point
-
i ordered 3 variants and will give you a feedback. I hope it will work *cross fingers* 🙂1 point
-
No hard feelings, but tech heads aren't known to stop tech chatter willy-nilly. 👻1 point
-
alles gut, den user den du angelegt hast in unraid ist für den NAS Zugriff, und da dieser nur im LAN (Local ...) läuft ist alles gut, hat auch nichts miteinander zu tun um extern direkt darauf zugreifen zu können bedarf es spezieller Port Weiterleitungen um beispielsweise SMB öffentlich (extern) verfügbar zu machen.1 point
-
warum sollte dies so sein wenn du nichts aktiv machst ? ist dein Server von außen zu erreichen, Ports freigegeben ? wenn ja welche ? wenn ja weißt du was du da machst ? wenn Nein ... dann Nein1 point
-
I compromised by removing all unnecessary plug-ins. I haven't had reboot since, now at +18 days uptime which is the longest I have had in a long time. @JorgeB Thank you1 point
-
I had. Although have literally just got it working. I needed to add a ROUTE variable to my local network IP and now I can reach things that aren't being routed through the VPN docker.1 point
-
@D0bby Probier mal folgende Einstellungen unter Firewall / Settings / Advanced.
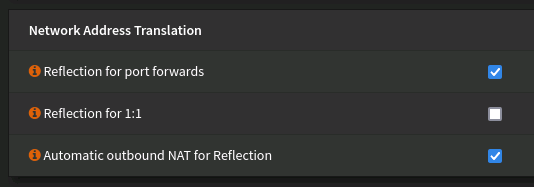 1 point
 -
ich nutze zwar weder noch, würde aber auf DNS Rebind Protection setzen wenn der Rest passt ...1 point
-
@JSE thank you for taking the time to do the testing and provide this incredibly detailed write-up. As you can probably imagine, we are prepping for the release of 6.10 and I don't think we would want to try to make this change to the default behavior in this release, but this is something that deserves attention and review by our team and I will be sure to make that happen. Please be patient as this will likely require us to block of some time on the schedule to specifically address this, so I will get back to you once we've made that happen. Thanks again!!!1 point
-
Can confirm working as expected now
 1 point
 -
Finally having this working consistently by... Setting up a user in Unraid that matched my host machine's user credentials. Setting up that same user info with same credentials in KDE Plasma's System Settings > Network Settings > Window Shares. Logging in to SMB in Dolphin with the path: smb://myuser@myserver/share. Any of those things being off seems to make login inconsistent, but all of them being the same and it works on logout and reboot. Hope this helps someone else in the future!1 point
-
Checked my servers this morning and all were good, thanks for the update.1 point
-
Because These are open by Docker and VM Manager, which must be disabled in Settings so the img can be moved1 point
-
WireGuard needs its own port forward, it defaults to 51820 but you can choose something else if you want. When setting up WireGuard you need to use the same port both internally and externally. See this for help getting it set up: Once the WireGuard tunnel is up you would access the server's webgui as though you were on the local LAN, using whatever url/port you would normally use when on the local LAN. Note that there can be issues with MDNS / DNS, for the most trouble-free usage it helps if you have a (my)unraid.net SSL certificate.1 point
-
I've replaced the PSU and ran extended tests on all the drives, they seem to be functioning as expected now. I did the new configuration stuff as you described and I'm currently waiting on the rebuild (~11h to go). Thanks for all of the help to everyone who contributed. ❤️1 point
-
Please please report back and let us know how it goes!1 point
-
Yay. Up and running on 5.18rc5 kernel. Gonna give it a day, just to make sure the kernel is stable.1 point
-
The original font was changed because this font doesn't support all the different languages, specifically Cyrillic. Since the introduction of multi-language support, the fonts must support the different languages we have added to Unraid. You can make a feature request for a future font improvement (needs research).1 point
-
Sorry to say, the Intel ixgbe driver is causing problems for other people and we will have to revert to in-tree driver. Something on our list to implement for 6.11 is a "system plugin" feature that will let you select via CA third-party modules (drivers) to install very early in system startup, e.g., before networking is initialized. This will permit you to install the Intel driver if that works for you.1 point
-
Looks like someone already compiled it https://github.com/thor2002ro/unraid_kernel/releases/tag/202205021 point
-
Thanks for you replies! Sorry for starting a new topic instead of asking in the support thread, I'm new to posting in forums but I'll adhere to it in the future 👍.1 point
-
In the "WireGuard configuration file generator > Advanced settings > Tunnel traffic" set it to "Only IPv4" That solved the problem for me.1 point
-
RC5 has now been released, I installed it yesterday. Got the chance to configure a commerial VPN today alongside my WG VPS Tunnel. (Set as "Remote Access To Server", which is also selectable now through the Docker Network Type dropdown) And things are working wondrously! My NZBVpn docker was acting up, installed de LS.io one, hooked it up through my WG commerical VPN config which I simply imported, and bam, stuff is working, confirmed it with curl inside the container. Thanks UnRAID and Community!1 point
-
But that doesn't always works perfectly fine as you already pointed out and this is not the only issue... This was also the way on how it worked on Unraid, but that also introduces other issues. I don't think that your idea is disagreeable, as @Squid pointed out this is more kind of a experiment and if it doesn't work out it will be changed back how it was and maybe with some additions like a global option to turn updates on/off <- at least this would be my suggestion...1 point
-
Windscribe also support WireGuard, I've been using them for years without any problems. There's a config generator for WireGuard/IKEV2/OpenVPN so you can use it anywhere you want (not locked to their app). You can even make your own plan. I currently pay 3$CAD per month for all USA location + unlimited bandwidth + free location. I used an affiliate link, if for some reason you don't want to use it just remove everything after .com. I'm also not working for them... It's really the one that I use and highly recommend and I used a lot. Perfect for users like us. I'll stop selling them and let see by yourself 😆, I really just love them ! EDIT: If you use my link you also get 1GB of extra bandwidth for the free plan. Note that you need a paid account to use WireGuard. EDIT: I found out that the PresharedKey is not imported from the config file, you need to enter it manually in the Unraid/Wireguard interface. Work like a charm. Thank you very much Fixed In 6.10.RC61 point
-
One of the main reasons why the Unraid community is so great is due to our many Community Rockstars who go above and beyond to help others out. 🤘 In this blog series, we want to put a spotlight on key community members to get to know them a little better and recognize them for all that they've done for the Unraid community over the years. For this inaugural blog, we begin with two outstanding forum Moderators, @trurl and @JonathanM, who have helped out countless new Unraid users over the years: https://unraid.net/blog/rockstars-trurl-jonathanm If either have helped you out over the years here, please consider buying them a beer or lunch! trurl JonathanM
 1 point
 -
Since updating to 6.10 my Mac can no longer backup using TimeMachine. I can mount the share manually in Finder and see my backup but it hasn't been able to back up since I updated to 6.10 in November. I've tried changing the SMB settings, removing the disk and re-adding it on the Mac, nothing seems to work. Can't downgrade at the moment since I'm running Windows 11 VM and need the virtual TPIM. Logs attached nicknas2-diagnostics-20220101-1534.zip1 point
-
I didnt find a solution to this problem with the SMB share, but I have found a work around for now. on my Mac I had to go into Settings --> Security & Privacy --> Full Disk Access and approve Terminal.app. That is in prep for the next part. Mount your Unraid SMB share ("SMB-TM-UNRAID" in this example) to the Mac client. open terminal and run: sudo hdiutil create -size 300g -type SPARSEBUNDLE -nospotlight -volname "SMBTimeMachine" -fs "Case-sensitive Journaled HFS+" -verbose /Volumes/SMB-TM-UNRAID/$HOST_TimeMachine.sparsebundle Navigate to the directory /Volumes/SMB-TM-UNRAID/ in finder and click the .sparcebundle file to mount it as a disk. This will mount a new disk called SMBTimeMachine to your Mac. open terminal and run: sudo tmutil setdestination -a "/Volumes/SMBTimeMachine/" open Time Machine utility and configure. Youll need to configure Mac to remount these shares at boot. Settings --> Users & Groups --> Your User --> Login Items. Drag the mounted drives SMB-TM-UNRAID and SMBTimeMachine into the login items window.1 point
-
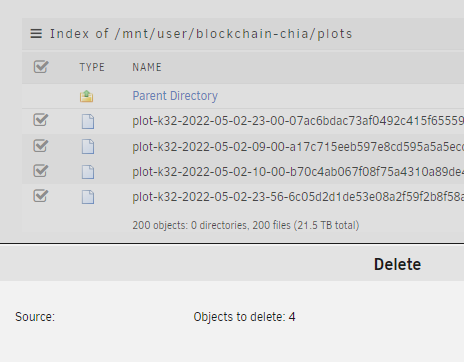
I feel like the steps should be, go to settings / vm manager and switch Enable VM's to no, then do same in settings / docker, Then stop the array, Then uncheck the drive, Then start the array, Then stop the array, Then re-add drive, start the array (it starts to rebuild) Then go and re-enable vm's and docker. (The only difference is the additional steps of stopping libvert and docker before) If you don't do that then libvert never starts and you'll end up stopping and restarting the array repeatedly trying to get the vm's to come back (even if my vm's and libvert are not part of the array)(I keep libvert and docker on a 2nd cache pool and vm's are passthrough only)1 point
-
As you noticed, it is not installed. You can open a shell in the container and install it manually: cd /opt/shinobi npm install discord.js node tools/modifyConfiguration.js addToConfig='{"discordBot":true}' Then you copy your conf.json and package.json from /opt/shinobi to /config. Then docker script copies everything from your mounted config folder into the shinobi folder. That way discord will be installed when you restart the container. When you update the container you should check if package.json got an update1 point
-
Oddly enough I just release/started working on this plugin and does exactly what you are looking for. Open to any and all feedback.1 point
-
SSH into the server or use the console and type: mover stop1 point