Leaderboard


Popular Content
Showing content with the highest reputation on 05/27/22 in all areas
-
This release contains Security fixes, a Data Corruption mitigation, bug fixes and other minor improvements. To upgrade: First create a backup of your USB flash boot device: Main/Flash/Flash Backup If you are running any 6.4 or later release, click 'Check for Updates' on the Tools/Update OS page. If you are running a pre-6.4 release, click 'Check for Updates' on the Plugins page. If the above doesn't work, navigate to Plugins/Install Plugin, select/copy/paste this plugin URL and click Install: https://unraid-dl.sfo2.cdn.digitaloceanspaces.com/stable/unRAIDServer.plg Bugs: If you discover a bug or other issue in this release, please open a Stable Releases Bug Report. Thank you to all Moderators, Community Developers and Community Members for reporting bugs, providing information and posting workarounds. Please remember to make a flash backup! Data Corruption possible with tg3 driver when Intel VT-d is enabled. The combination of Linux 5.15 kernel, tg3 driver, and Intel VT-d enabled appears to be causing data corruption. This has been verified on several platforms which include a Broadcom NetXtreme Gigabit Ethernet NIC (note: there may be others). This release includes the following workaround: Very early in server startup (rc.S) if Intel VT-d is detected enabled, then the script will unconditionally create the file: /etc/modprobe.d/tg3.conf with following content: blacklist tg3 Hence by default if VT-d is enabled, which is to say, it has not been disabled in either bios or via kernel "intel_iommu=off", then we are going to blacklist the tg3 driver on all platforms. What if someone has a platform where tg3 does not give them any trouble with VT-d enabled? In this case they must create an empty file on their flash device: config/modprobe.d/tg3.conf When the startup sequence continues it will get to the point where it executes: install -p -m 0644 /boot/config/modprobe.d/* /etc/modprobe.d A blank tg3.conf file stored on the flash then effectively un-blacklists it. There will be users who will lose network connectivity because their NIC is blacklisted. If you are running on a problematic platform you should go into your bios and disable VT-d. If this is a platform without issue, then you will need to create the blank tg3.conf file on your flash config/modprobe.d directory. It may take some time to identify and integrate a proper fix for this issue, at which point we will remove the auto-blacklisting code. I want to thank @JorgeB for his incredible help in identifying and isolating this issue. Security-related Changes The Firefox browser and has been updated to version 100.0.2 to address a very nasty security vulnerability. If you use Firefox we also suggest upgrading on all platforms. We fixed an issue where webGUI login could accept a password from a user other than 'root', if that username included the string 'root'. The Linux kernel was updated to 5.15.43 to address a "security bypass" vulnerability. Other Changes On Management Access page, for the "Use SSL/TLS" setting we changed the word "Auto" to "Strict" in the drop-down menu. This better describes the action of this setting. Docker manager now uses Docker label for icons as fallback. VM manager now gives the option of using LibVirt networks in addition to bridges without having to edit the VM's XML. Improved handling of custom SSL certificates. [6.10.1] Fix regression: support USB flash boot from other than partition 1 other misc. bug fixes Version 6.10.2 2022-05-27 Base distro: firefox AppImage: version: 100.0.r20220519220738 (CVE-2022-1802 CVE-2022-1529) Linux kernel: version 5.15.43-Unraid (CVE-2022-21499) Management: nginx: avoid appending default port number to redirect URLs nginx: self-signed cert file: accept common name and all alternate names startup: fix multiple network interfaces being assigned the same MAC address startup: blacklist tg3 by default if Intel VT-d is enabled webgui: Management Access: Use SSL/TLS setting: change the word 'Auto' to 'Strict' webgui: Fixed: smGlue not included when selecting a controller webgui: Fixed: allow share names with embedded ampersand webgui: add LXC terminal support (for LXC Plugin) webgui: Docker Web UI to use Docker label for icons as fallback webgui: VM Manager: support libvirt networks (make libvirt networks accessible via gui) webgui: fix issue where 'root' login works with password from another username which includes string 'root' webgui: Update OS page spelling corrction: warninging -> warning webgui: helptext review: minor corrections Version 6.10.1 2022-05-21 Management: startup: fix regression: support USB flash boot from other than partition 14 points
-
I upgraded to 5.18 (Unraid 6.10.0) and tried hardware encoding in Plex. Played a film for about 20 mins and it didn't crash. (In 6.9.2 when I tried it, it would crash the server after about a minute.) I'll see how stable it is over the next few days.3 points
-
Just wanted to point out a newly added docker Time Machine based on a project whose goal is to provide stable Time Machine backups in a constantly changing environment (I'm paraphrasing). I hesitate to recommend it since I just started using it about an hour ago but it was fairly easy to get it installed and working. You might want to check it out.2 points
-
Found it - good value for £15.30/pm!
 2 points
 -
This thread is meant to provide support for issues related to the Time Machine Application Template view on GitHub How does this Application work? This application is based on the docker container mbentley/docker-timemachine. It will create its own share for TimeMachine clients and thus does not use the existing network share functionality in Unraid. What is the best way to start using this Application? I think the best way would be to start with the parameters left at their default and work your way up from there. You will need to map a path on your host to the container for persistent data storage. For that path, you will need to execute the following command so that the container can write to it (in this example /mnt/user/timemachine is the path on the host that is used by TimeMachine): sudo chown -R 1000:1000 /mnt/user/timemachine/ Where can I get more information about configuration options? As mentioned above, this application is based on mbentley/docker-timemachine. Therefore the most extensive and up to date information is available in the documentation of that project . Why the frequent Updates (daily?!)? As this template is based on the docker image from mbentley/docker-timemachine, all updates that are pushed to docker hub from the maintainer of mbentley will also appear as updates for Unraid. Frequent updates on docker images can have many reasons. Even if no changes to the core implementation of dockerized application are made, any docker image is based on a base image. This base image usually is in turn based on an operating system like ubuntu, arch, debian etc. If a maintainer wants to always provide an image with all security patches of the underlying base image, he may choose to automatically build and push new images for his own application, everytime an updated base image becomes available.1 point
-
I first posted regarding this in the prerelease section here but just testing and reporting for 6.10. See the initial bug report for more details. Summary: TimeMachine completes one backup but then cannot mount that sparsebundle for future backups. This error is being reported by multiple unraid and synology users.1 point
-
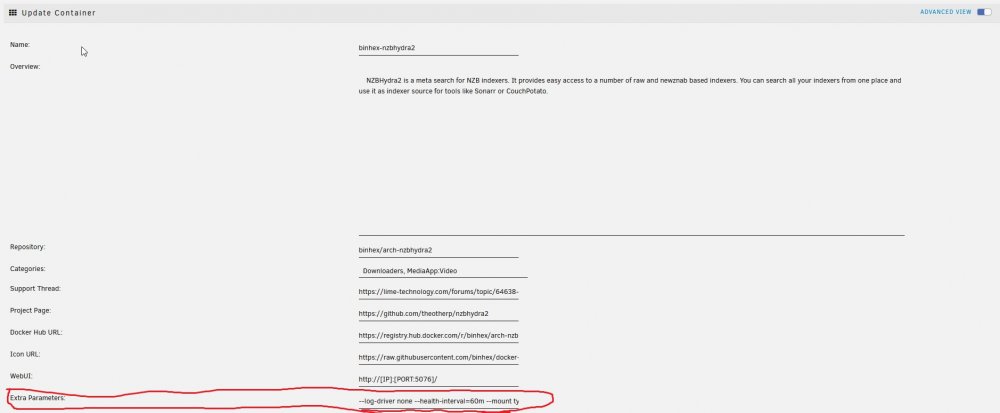
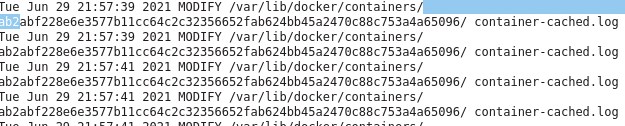
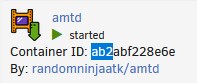
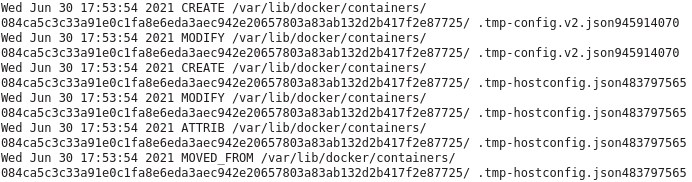
------------------------------------------------------------------------------------------------------------------ Part 1, unraid write amplification ------------------------------------------------------------------------------------------------------------------ To start out with, this is just a journal of my own experiences dealing with these writes, you do any and all of these commands at your own risk! Always make a backup of any data/drives you will be messing with. I would recommend getting a fresh backup of your cache drive and docker/appdata before starting any of this, just in case. Honestly it is a good excuse to update your complete backup. Ok, so as many have started to realize unraid had a serious issue with massively inflated writes to the cache SSD for the last few years. To the point it has killed a number of SSD's in a very short amount of time and used up a hefty amount of the life of many other drives. A lot of it was documented here: but instead of reading all that I am going to give you the results of all the testing that went on in that thread. My writes when starting this journey with far less dockers then I have now was around : ~200gb+/day IIRC (forgot exact numbers and lot my notes from that long ago but it was a LOT) The first step to reducing writes is to update to upraid 6.9+ and then move all the data off your cache SSD's to the array temporarily. You will then erase the cache pool using the built in erase option and reformat it when you restart the array. This fixes the core unraid side of the excessive writes. It fixes some partition and mounting issues with the filesystem. After that move the data back to the cache from the array. This dropped my writes to around ~75-85gb/day using a single BTRFS formatted drive with BTRFS image. Formatted as XFS with BTRFS image my writes dropped to ~25gb/day but you can't have redundancy then and has it's own issues. The excessive writes still persist as you see just to a lesser extent after this, the remaining writes will be dependent on what dockers you are using and is an issue with docker. ------------------------------------------------------------------------------------------------------------------ Part 2: Docker logs causing write inflation ------------------------------------------------------------------------------------------------------------------ All the docker commands I will put below need to be entered into the Extra Parameters: section of the docker template in unraid (you will need to go to the advanced view in the top right corner) To match up a long container ID with container in unraid GUI, simply use crtl+f to search the docker page in unraid for the container ID you see in the activity logs. Generally the first 3 or 4 characters are enough to find the right container. There are a few basic places writes come from with docker and each has it's own fix. ------------------------------------------------------------------------------------------------------------------ The first step is to run the inotifywait command from mgutt: This command will watch the internal docker image for writes and log them to /mnt/user/system/recentXXXXXX.txt inotifywait -e create,modify,attrib,moved_from,moved_to --timefmt %c --format '%T %_e %w %f' -mr /var/lib/docker > /mnt/user/system/recent_modified_files_$(date +"%Y%m%d_%H%M%S").txt An alternate and less effective method is to use this command to return the 100 most recently modified files in the docker image find /mnt/user/system/docker -type f -print0 | xargs -0 stat --format '%Y :%y %n' | sort -nr | cut -d: -f2- | head -n100 I chose to make a userscript with the first command and then use the "run in background" option so I don't have to keep the terminal open. To kill the inotifywait run this: pkill -xc inotifywait ------------------------------------------------------------------------------------------------------------------ For me the first and most common writes came from the internal logging mechanism in docker. It basically logs all the messages that would show up in the terminal if it was run directly and not in docker among other stuff. These writes will be to: /var/lib/docker/containers/{containerid}/{containerid}-json.log These are stopped by the following command while leaving the unriad GUI logs in tact: --log-driver syslog --log-opt syslog-address=udp://127.0.0.1:541 ------------------------------------------------------------------------------------------------------------------ The next type of writes are from: /var/lib/docker/containers/{containerid}/container-cached.log These are the logs you see when you click the log option in the unraid gui, these require a stronger version of the above command: --log-driver none This disables both the above type of logs. ------------------------------------------------------------------------------------------------------------------ Next up are the helthcheck logs, these are seen as writes to these files: /var/lib/docker/containers/{containerID}/.tmp-hostconfig.json{randomnumbers} /var/lib/docker/containers/{containerID}/.tmp-config.v2.json{randomnumbers} These are solved by either extending the health checks or disabling them. I prefer extending them to ~1 hour. --health-interval=60m They can be disabled completely with: --no-healthcheck ------------------------------------------------------------------------------------------------------------------ The next type of writes are internal logs from the program in the container to the /tmp directory of the container /var/lib/docker/containers/{containerid}/tmp/some type of log file Or /var/lib/docker/containers/{containerid}/var/tmp/some type of log file or /var/lib/docker/subvolumes/{Randomstring}/tmp/some type of log file This last one is hard to figure out as it can be difficult to connect the subvolume to a container, sometimes opening the log file in question can clue you into what docker it is for. This is a more advanced rabbit hole that was not really nesscary to chase in my case This is from a program thinking it is writing to a ramdrive but by default docker does not map a ramdrive to the /tmp directory. You can do it yourself easily though with the following command (can be adapted to other dirs and use cases as well). This command creates a ramdrive in /tmp with full read/write permissions and a max size of 256mb (much larger then needed in most cases but it only uses ram as needed so should not hurt anything in most cases, you can make it smaller as well): --mount type=tmpfs,destination=/tmp,tmpfs-mode=1777,tmpfs-size=256000000 And thats pretty much it for properly created containers. Doing these commands to the worst offending containers dropped my writes down to around ~40gb/day I left a few containers logs in tact as I have needed them a few times. ------------------------------------------------------------------------------------------------------------------ Part 3: Dealing with appdata writes ------------------------------------------------------------------------------------------------------------------ After this things get a bit more complicated. Each container will behave differently and you will kinda have to wing it. I saw random writes to various files in containers, sometimes you could change the logging folder in the program to the /tmp folder and add a ramdisk to the container. Others you cap map another ramdrive to some other log folder and still others can use other workarounds unique to that specific program. It takes some know-how and digging to fix writes internally in the dockers. The alternate and universal option (and required option in many cases) is to simply copy the appdata folder to a ramdisk on unraid and sync it back to the SSD hourly. This works with any docker and vastly reduces writes from logs / constant database access. Like above first you need to log the appdata folder to see where the writes come from: This command will watch the appdata folder for writes and log them to /mnt/user/system/appdata_recentXXXXXX.txt inotifywait -e create,modify,attrib,moved_from,moved_to --timefmt %c --format '%T %_e %w %f' -mr /mnt/user/appdata/*[!ramdisk] > /mnt/user/system/appdata_recent_modified_files_$(date +"%Y%m%d_%H%M%S").txt From here it will take some detective work to find the misbehaving containers and see what and where they are writing to. In my case all the *arr's (sonarr etc) were causing a lot of writes and there was nothing that could be done internally to fix it. After figuring out which appdata needs to move to the ramdisk is to create the ramdisk itself and then copy the appdata into it from the SSD. First create a folder in /mnt/cache/appdata/, Very important to create the folder on the drive itself and NOT in /user. mkdir /mnt/cache/appdata/appramdisk chmod 777 /mnt/cache/appdata/appramdisk after this I use a very basic user script that is set to "run at array start", adjust the max size of the disk to suite your use case, it only uses ram as needed so there is not a lot of harm in making it too big as long as it leaves enough room for everything else to run. You will need to customize the rsync commands with the folders you want to copy naturally. #!/bin/bash #description=This script runs at the start of the array creating the appdata ramdisk and rsyncing the data into it echo ---------------------------------Create ramdisk for appdata---------------------------------- mount -vt tmpfs -o size=8G appramdisk /mnt/cache/appdata/appramdisk echo ---------------------------------rsync to ramdisk in appdata---------------------------------- rsync -ah --stats --delete /mnt/user/appdata/binhex-qbittorrentvpn /mnt/user/appdata/appramdisk rsync -ah --stats --delete /mnt/user/appdata/binhex-nzbhydra2 /mnt/user/appdata/appramdisk rsync -ah --stats --delete /mnt/user/appdata/*arr /mnt/user/appdata/appramdisk I then have a separate script set to run hourly that rsync's everything in the ramdisk back to the SSD, it only copied the data that was changed to save writes: #!/bin/bash #description=This script syncs the ramdisk appdata back to the ssd rsync -ahv --progress --delete /mnt/user/appdata/appramdisk/* /mnt/user/appdata/ You will also need to apply a delay to the first docker container that is set to autostart in the unraid GUI (enable advanced view, right side of the container). Preferably put a container that is not being run out of the ramdisk first and put the delay on it as the delay takes effect after the selected container has started. The delay needs to be long enough for the ramdisk rsync to complete. UPDATE THE DOCKER APPDATA FOLDER TO USE THE NEW "appramdisk" copy of the appdata or it will just keep writing to the cache. Now for a clean shutdown, I created a "stop" file on the USB drive at /boot/config. It is called first thing when you click shutdown/reboot in the GUI and the rest of the shutdown will wait until it is finished. touch /boot/config/stop In the stop file I decided to simply redirect it to a script in user scripts called "Run at Shutdown" to make it easier to manage. #!/bin/bash #Runs the user script "Run at Shutdown" during shutdown or reboot. #it is called before anything else during the shutdown process # Invoke 'Run at Shutdown' script if present if [ -f /boot/config/plugins/user.scripts/scripts/Run\ at\ Shutdown/script ]; then echo "Preparing Run at Shutdown script" cp /boot/config/plugins/user.scripts/scripts/Run\ at\ Shutdown/script /var/tmp/shutdown chmod +x /var/tmp/shutdown logger Starting Run at Shutdown script /var/tmp/shutdown fi The run at shutdown script itself first stops all running docker containers so they can close out open files. It then rsyncs the appramdisk back to the SSD before clearing the ramdisk and unmounting it. #!/bin/bash #description=This script runs first thing at shutdown or reboot and handles rsyncing appramdisk and unmounting it. logger Stopping Dockers docker stop $(docker ps -q) logger Dockers stopped logger Started appramdisk rsync rsync -ah --stats --delete /mnt/user/appdata/appramdisk/* /mnt/user/appdata/ | logger logger rsync finished logger clearing appramdisk data rm -r /mnt/user/appdata/appramdisk/* | logger logger unmounting appramdisk umount -v appramdisk | logger And thats it, seems to be working good, no hang-ups when rebooting and everything is working automatically. Risks are minimal for these containers as worst case I loose an hours worth of data from sonarr, big deal. I would not use this on a container that has data you can't afford to loose an hours worth of. The writes are finally low enough that I would be ok putting appdata and docker back onto my main SSD's with redundancy instead of the single piece of junk drive I am using now (which has gone from ~98% life to 69% in the last year doing nothing but handling docker on unraid) I am really impressed with how well this is working. So to recap: unraid 6.8 > BTRFS image > BTRFS formatted cache = ~200gb++/day unraid 6.9 > BTRFS image > separate unprotected XFS SSD everything stock = ~25GB/day unraid 6.9 > BTRFS image > BTRFS SSD everything stock = 75-85GB/day unraid 6.9 > Docker Folder > BTRFS SSD everything stock = ~60gb/day unraid 6.9 > BTRFS image > BTRFS SSD > Disabled the low hanging fruit docker json logs = ~48gb/day unraid 6.9 > BTRFS image > BTRFS SSD > Disabled all misbehaving docker json logs for running containers except those I want to see + added ramdrives to /tmp in containers that do internal logging = ~30gb/day unraid 6.9 > BTRFS image > BTRFS SSD > Disabled all misbehaving docker json logs for running containers except those I want to see + added ramdrives to /tmp in containers that do internal logging + moved appdata for the *arr's and qbittorrent to a ramdisk with hourly rsyncs to the ssd appdata = ~10-12gb/day Since most of the writes are large writes from the rsync, there is very little write amplification which vastly improves the total writes from the day even though that is possibly more raw data being written to the drive. I dont use plex but it and database dockers are known for being FAR worse then what I run in writes. People were regularly seeing hundreds of GB in writes a day from these alone. They could be vastly improved with the above commands.


 1 point
 -
Only disappointment here, is that the Unraid upgrade process wrote to the USB stick and did not verify checksum of the new OS files after writing... Because they were totally borked.1 point
-
I confirm there's a problem that needs to be investigated. Will update.1 point
-
Does not meet your GUI requirement as this runs via script, but once you set it up it is set it an forget it. I have been backing up one unraid server to another this way for about three years now. It is all automated via a User Scripts cron job. Also check out this option with LuckyBackup which is a combination of CLI and GUI: https://unraid.net/blog/unraid-server-backups-with-luckybackup1 point
-
Hi together, welcome👋 Might be the Fix has changed something? Did you try with 10.0?1 point
-
Internal Server Error The server encountered an internal error and was unable to complete your request. Please contact the server administrator if this error reappears multiple times, please include the technical details below in your report. More details can be found in the server log. sometimes when i reboot the nextcloud will show this. i am so confused about ti. the sql is postgresql14 wish somebody can help me thank you1 point
-
Ohne Kommandozeile: - Container über das Menü > remove inkl Images entfernen - mit dem appdata clean up plugin den Plex Ordner löschen (alternativ ab unRAID 6.11: File Manager Plugin und den entsprechenden Unterordner von allen Disks und Pools entfernen) - über add Container den Eintrag im Dropdown auswählen und mit dem X löschen (das löscht die XML vom Stick)1 point
-
I would suggest redoing the flash drive done manually: Backup config folder from flash, then in Windows open a command prompt window as administrator, then type, in this order: -diskpart -list disk -select disk x (x=your flash drive) -clean -create partition primary -format fs=fat32 label=UNRAID quick -active -assign -exit -close cmd window -unzip new Unraid install to flash -restore the previously backed up config folder -execute make_bootable as admin1 point
-
1 point
-
Are you using a Windows or MAC PC to access the share? Looks like it should work fine. The share will be at \\tower\shared. The only thing I see that might be causing a problem is the mount point ('shared') is the same as the source name. You might try changing the mount point to another name.1 point
-
As I currently tried to support a buddy of mine with excatly this error I can confirm that - this NOT ONLY happening to Dell Servers. - intel_iommu=on iommu=pt did not work for him but changed the error massage from bzimage checksum error to bzroot checksum error - intel_iommu=off did not work too What we tried until now: - Updated all plugins, OS Update Check from Fix common problems was OK - Updated within GUI - Restart: --> bzimages checksum error - copied bz* files inlcuding crc files from the 6.10.1 zip to the USB -> bzimages checksum error - Tried the add the command intel_iommu=on iommu=pt to start cfg but that changed the error message from bzimage checksum error to -> bzroot checksum error - We rolled back to 6.9.2 everything is working fine - tried to update again as we thought it was an error in the update process --> Same error as before. - We rolled back to 6.9.2 everything is working fine His Hardware MB: Intel DG45ID CPU: Intel Core2Due E8400 RAM: 8`GB DDR2 GPU: Intel 82G45 onboard Grafik SATA Controller: Onboard NIC: Onboard1 point
-
Not sure but it only happens with Dell servers, so likely some BIOS/driver issue.1 point
-
See Q4:- https://github.com/binhex/documentation/blob/master/docker/faq/plex.md1 point
-
Try reaching out to CrashPlan customer support. They were able to help me when I had a similar problem.1 point
-
I never used seabios, so I don't know, but it could be that you need to enable bootmenu and add a timeout to your xml. Anyway, I'm seeing that the vm is using seabios 1.15: I compiled the latest version (1.16.0-4-gdc88f9b), maybe you can try this version (attached). Extract file bios.bin from the zip and save it somewhere on unraid (i.e. /path/to/bios.bin). Open the vm settings in xml view and change from: <os> <type arch='x86_64' machine='pc-i440fx-6.2'>hvm</type> </os> to: <os> <type arch='x86_64' machine='pc-i440fx-6.2'>hvm</type> <loader type='rom'>/path/to/bios.bin</loader> <boot dev='hd'/> <bootmenu enable='yes' timeout='30000'/> </os> Try to boot. As you can see I enabled the bootmenu with a timeout of 30 seconds, so you should have enough time to see what boot options it proposes. Seabios-1.16.0-4-gdc88f9b.zip1 point
-
Please ignore me. Don't let a 2 year old unplug and plug back in your computer to the wrong spot.... back to speedy transfers.1 point
-
Solved all of this: bottom line was that i implemented the wrong way of getting dockers to use the vpn docker's network instead of their own: 1. I made a custom network via the command line pointing to the VPN docker 2. in each of the docker's pull down lists I selected this network to use. This causes problems when updating (custom network does not seem to be refreshed with the new docker ID of the VPN docker) and portmapping problems somehow. Instead, I should've done the following: 1. for each docker, set network to 'none' 2. for each docker, add extra parameter "--net=container:[your vpn dockername - only lowercase allowed!!!]" And bingo: updating the vpn dockers refreshes the relying dockers automatically and portmapping is transparently working without errors. super!1 point
-
If it's a Dell server see here: https://forums.unraid.net/topic/119502-bzimage-checksum-error/?do=findComment&comment=11083541 point
-
Figured it out. If anyone needs to know, it's adding the version number at the end of the docker name like so: "binhex/arch-minecraftbedrockserver:1.18.33.02-01"1 point
-
I guess that you can adjust most of the settings through some trickery in Unraid as well. For any fixes or incompatibility issues however, you will be relying on Unraid/Limetech to update the corresponding components of their system. And from what I read, it can be a hazzle to get TimeMachine up and running reliably as is. Therefore I think there is a certain advantage of running TimeMachine as a Docker image. The docker image used (https://github.com/mbentley/docker-timemachine) is in active development and quick to fix issues. The focus of that project is clear - TimeMachine and nothing but TimeMachine. I have been using this solution for a couple of months and it has been rock solid.1 point
-
In the php.ini file at "/etc/php" I added "memory_limit = 512MB" to the end and saved. I'm still currently running the task but it has not failed yet!1 point
-
You never met my wife. 😀 Other than that small point, the rest of your post is spot on. I am a firm believer that fewer larger drives is better than many smaller drives. I have consolidated twice. First it was 3TB to 8TB drives and now I am starting to move from 8TB to 14TB and 16TB drives.1 point
-
Labels - net.unraid.docker.icon working only for local path and only .PNG format - net.unraid.docker.icon=/mnt/user/appdata/icons/icons.png1 point
-
Installier dir das Plugin "User Scripts", damit kannst du Skripte automatisiert nach einem gewünschten Zeitplan ausführen lassen (cron). Das Skript könnte bei der Verwendung von WOL (Wake On Lan support-Plugin erforderlich) z.B. so ausschauen: #!/bin/bash # WOL Backup-Server etherwake mac:adresse:des:Servers:zum:Sichern # Warte 600s=10min damit Server booten kann sleep 600 # Luckybackup arbeitet Profil "server-backup" im Konsolenmodus ab docker exec -i luckyBackup luckybackup --no-questions server-backup # Warte 60s=1min zur Sicherheit (wahrscheinlich unnötig) sleep 60 # Fahre Backup-Server herunter docker exec -i luckyBackup ssh root@IP-des-Backup-Servers poweroff1 point
-
1 point
-
Update UD. I think I may have found it.1 point
-
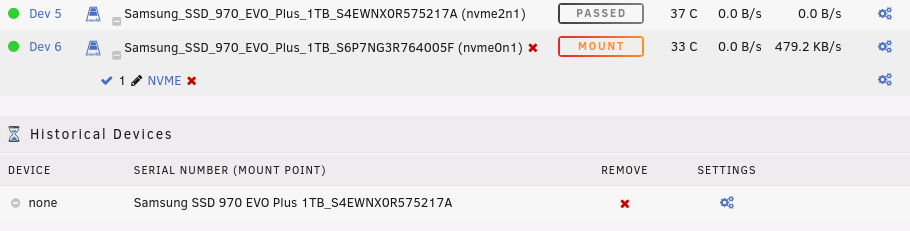
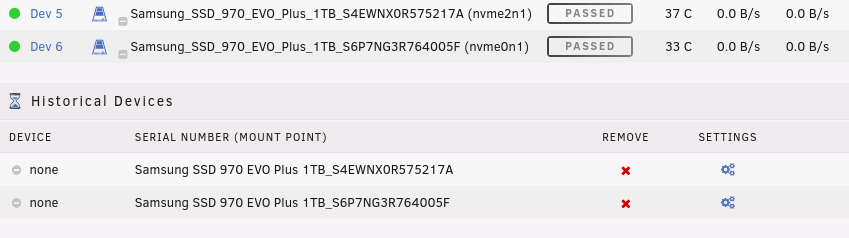
I have done this already twice, here is a screenshot after the removal: Here is a screenshot after applying the new setting (only Passed through was enabled and show Partitions disabled): And here after I've assigned it to the second device: If I remove the devices from the Historical Devices and re add it it's the same over and over again. Should I send you my ini file, haven't looked at it yet...

 1 point
 -
Hey guys, I'm getting this error and I tried a couple of things to no avail, does anyone have an idea? Thanks 2022-05-16 05:25:16,378 DEBG 'plexmediaserver' stderr output: Jobs: Exec of /config/Plex Media Server/Codecs/EasyAudioEncoder-1785-linux-x86_64/EasyAudioEncoder/EasyAudioEncoder failed. (13)1 point
-
Having the same issue. First backup runs without issue. After that all attempts fail. Logs show that time machine couldn’t unmount the disk. Have you had any luck fixing this?1 point
-
Seagate. Cheaper than WD's and IMO better quality. I won't touch WD themselves, but have no trouble with Hitachi. The average lifespan I get from Seagate Barracuda's is around 9.5 years1 point
-
The direct answer to your question is the range is SID range on the local unraid box is used by Samba to map domain users and groups to local file ownership. There is FAR more to this that I've been meaning to add. I have 2 test machines and 10+ production unraid boxes that I manage myself and third parties. There are different ways to map domain users to the local SID's on in Samba. By default Unraid uses idmap_hash and it specifically says DO NOT USE THIS BACKEND https://www.samba.org/samba/docs/current/man-html/ I don't know why Unraid did this is. Someone please post so we all can know. You end up with all those log entries, but things seem to work fine for the most part. Makes it hard to troubleshoot when you have something obvioulsy wrong in the log files. I learn by trial and error so I went though the man pages and tried each type of Backend listed here. One thing I did learn is you need to set the starting range above the highest SID of local users on the Unraid box. Look at the file /etc/passwd and look for the number after the second : eg. scans:x:1092:100:ftpuser 1092 is what you need to start above. If you don't, file ownership get screwed up. DomainUser1 gets assigned the SID 1092 and command line file level viewing is impossible to understand. A file for DomainUser1 is now shown as belonging to local user scans. The domain knows the SID on that file is for DomainUser1 and the ownership functions for that user as expected, but it is also assigned to the matching local user SID from the view of the Unraid box which could cause an issue. The fix for this was changing the starting range, reboot, reassign all permission. Not fun in some cases. I had one instance where switching to the tbd backend did mess up file ownership after a reboot but only for domain accounts. Any local accounts below the starting range were not affected and none of the ACL's were not affected. This *MAY* of been caused but the owner of this unraid box adding a user at the same time I was working on it. Generally this fix works as long as the range is set correctly OR you don't use any local accounts on your unraid box beyond the ones it comes with. If I'm wrong on any of this someone please correct me, but I'm speaking from results of things I've actually done. EDIT: setting the starting range to 1000000-2000000 did work for me in all instances.1 point
-
Hi, Looks like there is a missing step and a missing field in the Unraid UI in order to fully configure the Telegram agent. I think we need to put the telegram chatid somewhere. When you read the /boot/config/plugins/dynamix/notifications/agents/Telegram.sh script, you see that it references a /boot/config/plugins/dynamix/telegram/chatid file containing the chatid number. But in the Unraid telegram agent configuration UI, there is no chatid field (I'm using 6.9.2) In order for the Telegram agent to work, I had to create the file with my bot chatid: echo "MyChatIDnumber" > /boot/config/plugins/dynamix/telegram/chatid (Just replace MyChatIDnumber by your chat ID number including the minus (-) sign if any) Then clicked the test button in the Telegram agent configuration page and it worked. How to retrieve chatid : How to obtain Telegram chat_id for a specific user? - Stack Overflow How to retrieve token : https://core.telegram.org/bots#generating-an-authorization-token1 point
-
I got this error once - deleting the custom_ovmf folder (along with /appdata/Macinabox and the folder in Domains), the scripts, and reinstalling the container did the trick. rm -r /mnt/user/system/custom_ovmf1 point
-
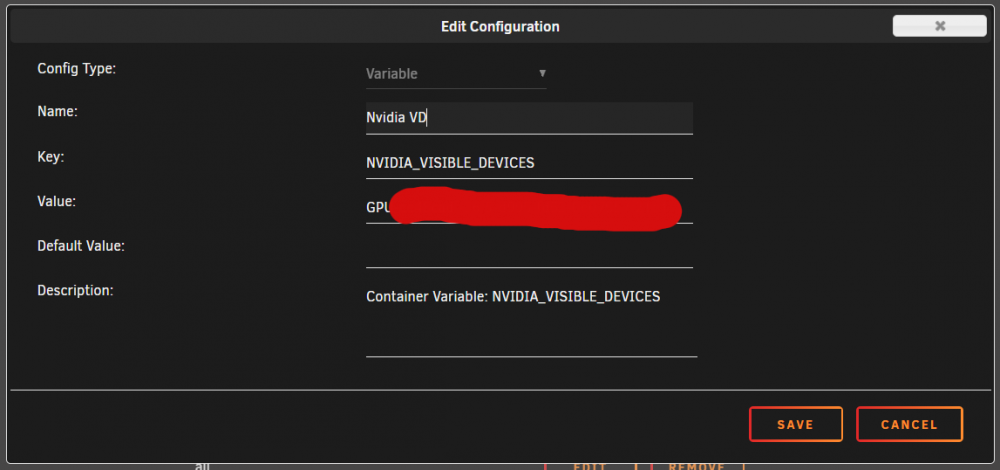
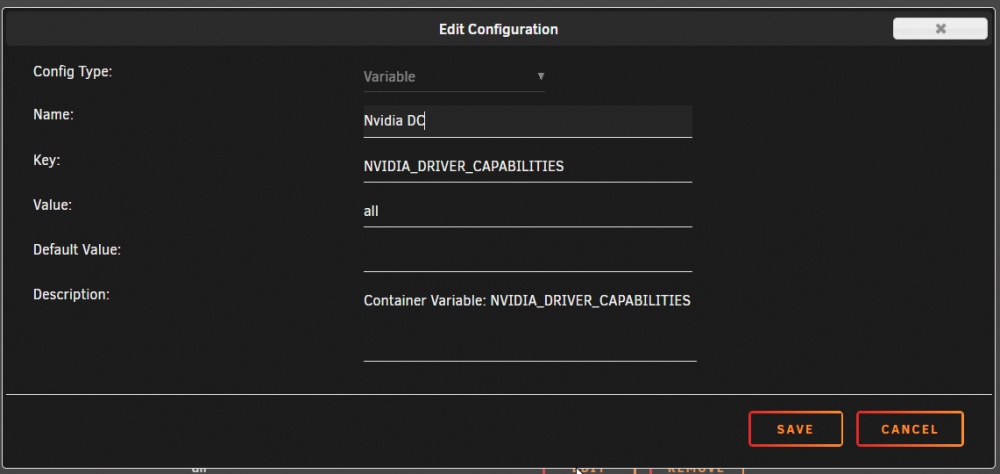
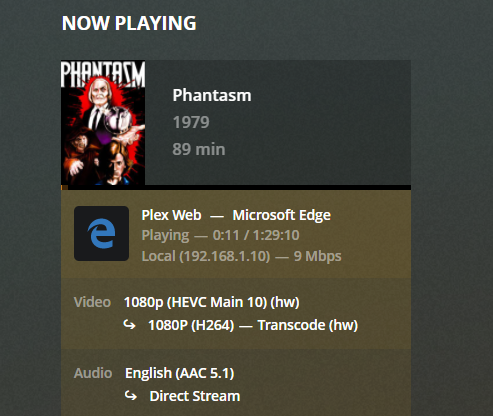
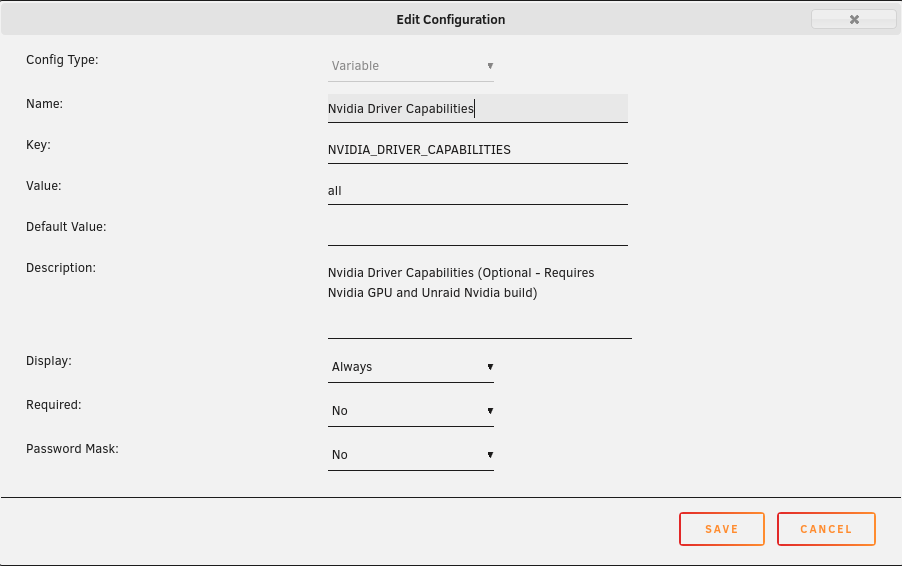
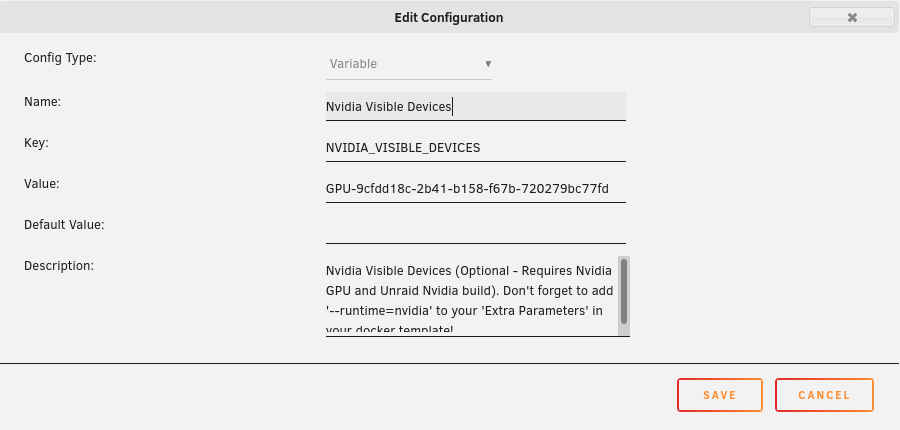
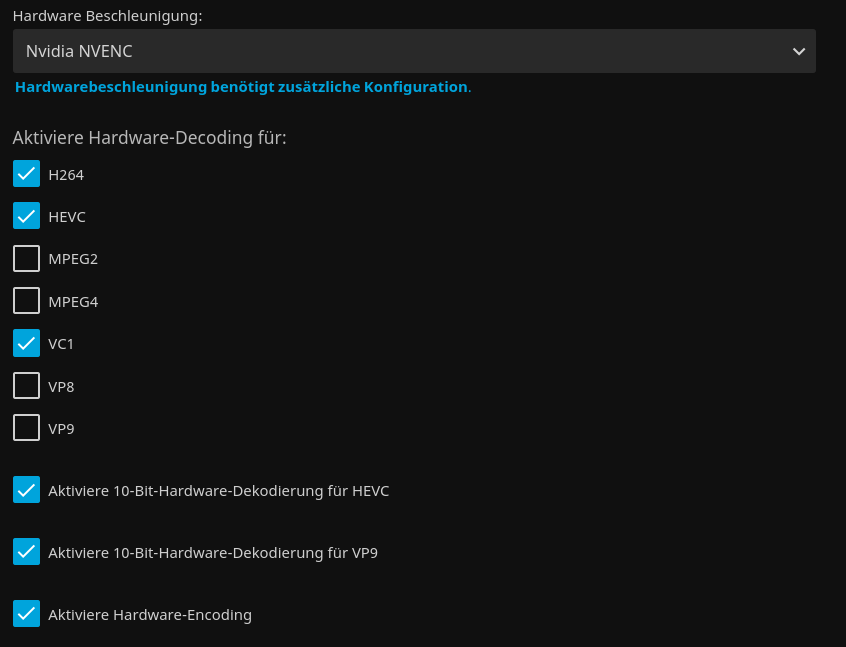
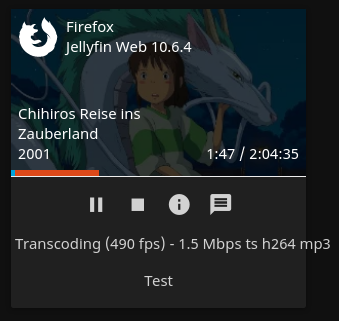
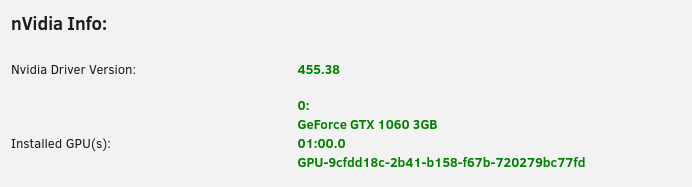
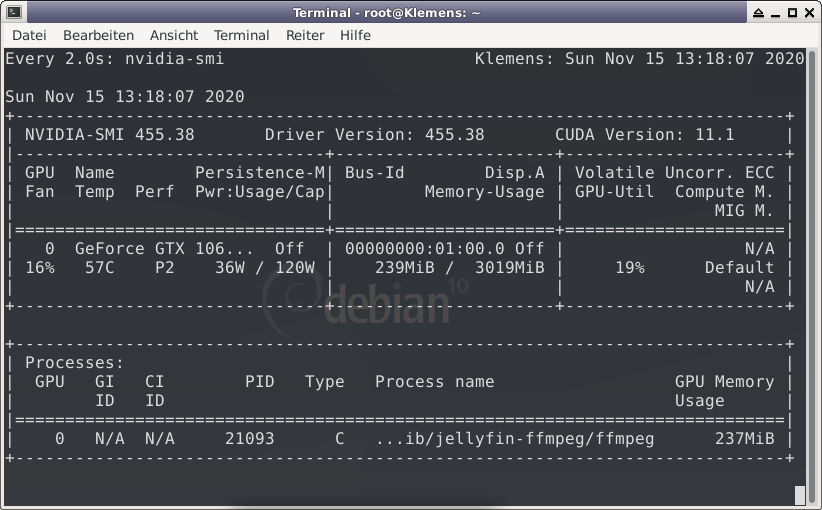
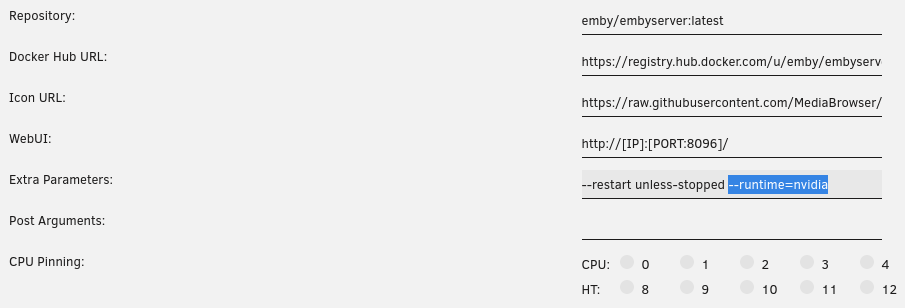
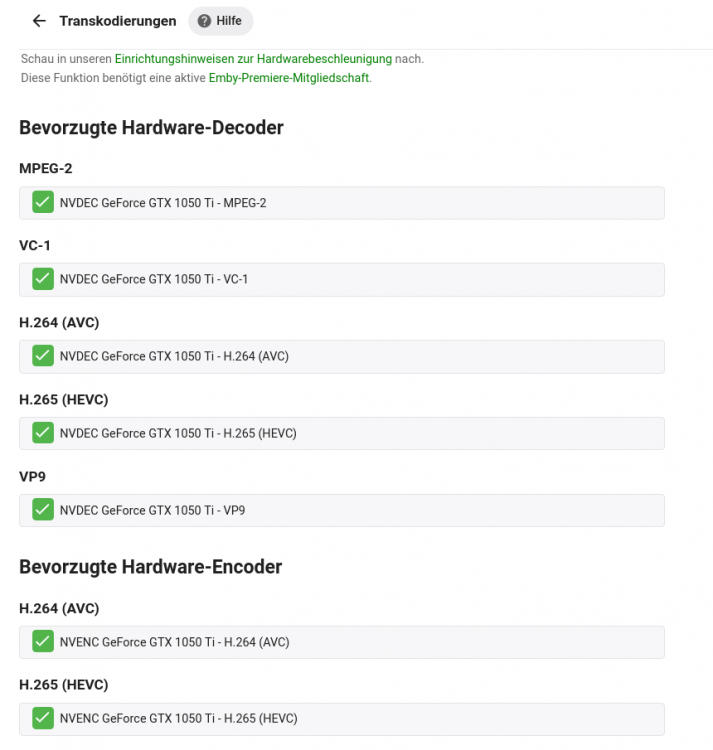
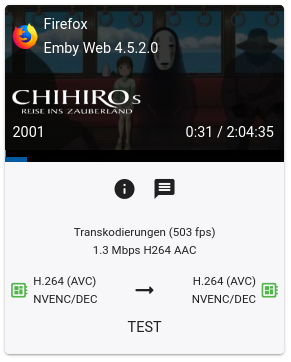
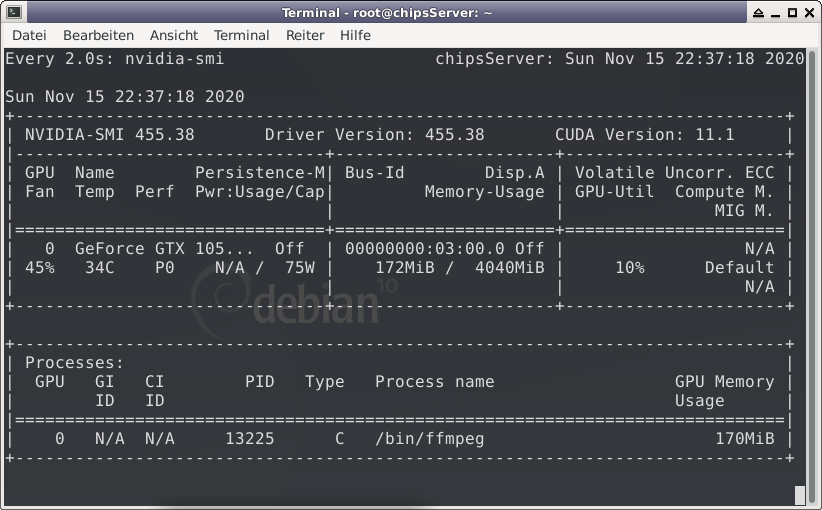
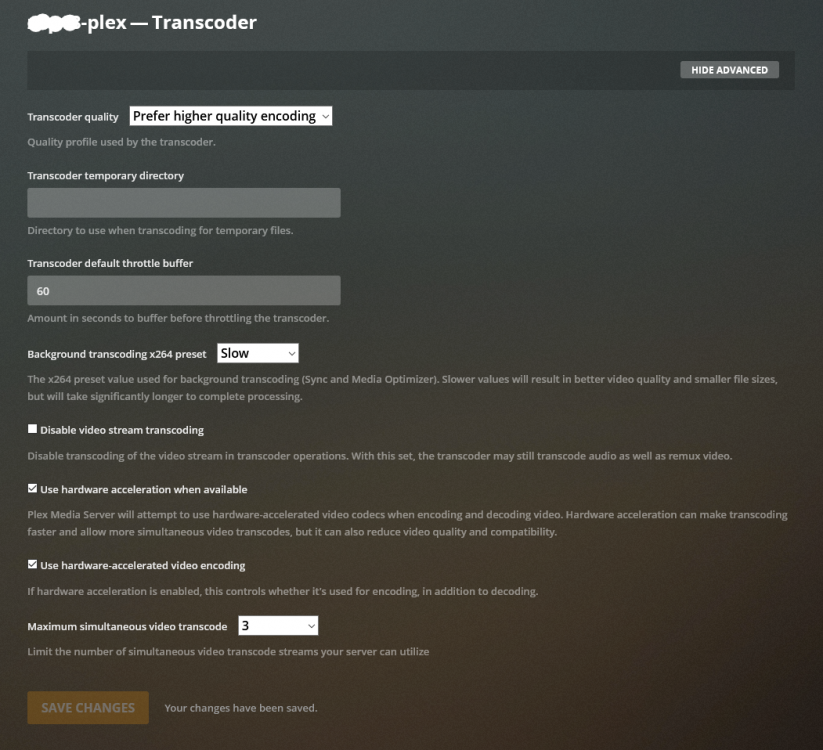
To utilize your Nvidia graphics card in your Docker container(s) the basic steps are: Add '--runtime=nvidia' in your Docker template in 'Extra Parameters' (you have to enable 'Advanced view' in the template to see this option) Add a variable to your Docker template with the Key: 'NVIDIA_VISIBLE_DEVICES' and as Value: 'YOURGPUUUID' (like 'GPU-9cfdd18c-2b41-b158-f67b-720279bc77fd') Add a variable to your Docker template with the Key: 'NVIDIA_DRIVER_CAPABILITIES' and as Value: 'all' Make sure to enable hardware transcoding in the application/container itself See the detailed instructions below for Emby, Jellyfin & Plex (alphabetical order). UUID: You can get the UUID of you graphics card in the Nvidia-Driver Plugin itself PLUGINS -> Nvidia-Driver (please make sure if there is no leading space!) : NOTE: You can use one card for more than one Container at the same time - depending on the capabilities of your card. Emby: Note: To enable Hardware Encoding you need a valid Premium Subscription otherwise Hardwar Encoding will not work! Add '--runtime=nvidia' to the 'Extra Parameters': Add a variable to your Docker template with the Key: 'NVIDIA_VISIBLE_DEVICES' and as Value: 'YOURGPUUUID': Add a variable to your Docker template with the Key: 'NVIDIA_DRIVER_CAPABILITIES' and as Value: 'all': Make sure to enable hardware transcoding in the application/container itself After starting the container and playing some movie that needs to be transcoded that your graphics card is capable of you should see that you can now successfully transcode using your Nvidia graphics card (the text NVENC/DEC is indicating exactly that) : Jellyfin: Add '--runtime=nvidia' to the 'Extra Parameters': Add a variable to your Docker template with the Key: 'NVIDIA_VISIBLE_DEVICES' and as Value: 'YOURGPUUUID': Add a variable to your Docker template with the Key: 'NVIDIA_DRIVER_CAPABILITIES' and as Value: 'all': Make sure to enable hardware transcoding in the application/container itself After starting the container and playing some movie that needs to be transcoded that your graphics card is capable of you should see that you can now successfully transcode using your Nvidia graphics card (Jellyfin doesn't display if it's actually transcoding with the graphics card at time of writing but you can also open up a Unraid terminal and type in 'watch nvidia-smi' then you will see at the bottom that Jellyfin is using your card) : PLEX: (thanks to @cybrnook & @satchafunkilus that granted permission to use their screenshots) Note: To enable Hardware Encoding you need a valid Plex Pass otherwise Hardwar Encoding will not work! Add '--runtime=nvidia' to the 'Extra Parameters': Add a variable to your Docker template with the Key: 'NVIDIA_VISIBLE_DEVICES' and as Value: 'YOURGPUUUID': Add a variable to your Docker template with the Key: 'NVIDIA_DRIVER_CAPABILITIES' and as Value: 'all': Make sure to enable hardware transcoding in the application/container itself: After starting the container and playing some movie that needs to be transcoded that your graphics card is capable of you should see that you can now successfully transcode using your Nvidia graphics card (the text '(hw)' at Video is indicating exactly that):


 1 point
 -
See here to enable syslog server/mirror, then post syslog after a crash, it might catch something1 point
-
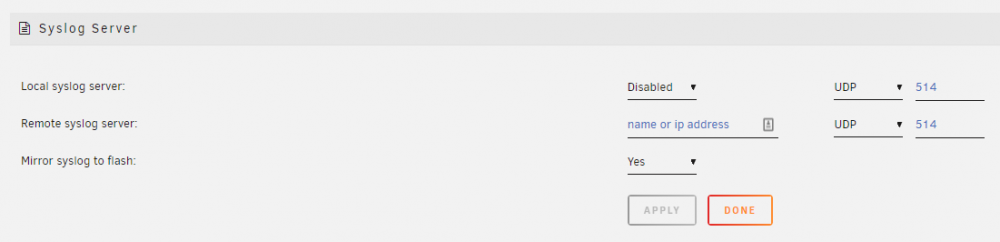
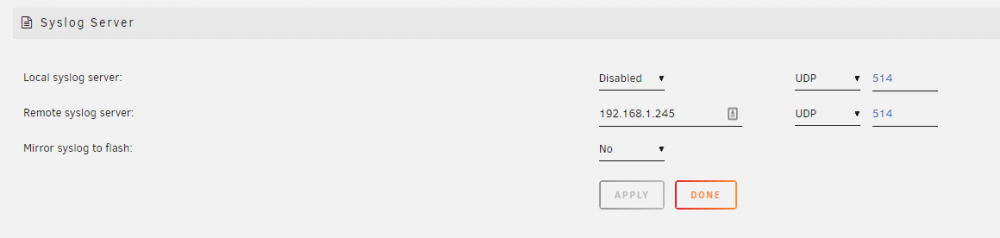
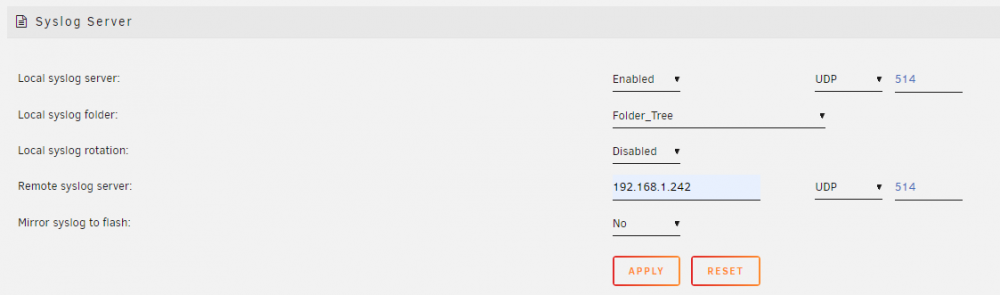
How do I use the Syslog Server? Beginning with release 6.7.0, there has been a syslog server functionality added to Unraid. This can be a very powerful diagnostic tool when you are confronted with a situation where the regular tools can not or do not capture information about about a problem because the server has become non-responsive, has rebooted, or spontaneously powered down. However, getting it set up to use has been confusing to many. Let's see if we clarify setting it up for use. Begin by going to Settings >>> Syslog Server This is the basic Syslog Server page: You can click on the 'Help' icon on the Toolbar and get more information for all of these three options. The first one to be considered for use is the Mirror syslog to flash: This one is the simplest to set up. You select 'Yes' from the dropdown box and click on the 'Apply' button and the syslog will be mirrored to logs folder/directory of the flash drive. There is one principal disadvantage to this method. If the condition, that you are trying to troubleshoot, takes days to weeks to occur, it can do a lot of writes to the flash drive. Some folks are hesitant to use the flash drive in this manner as it may shorten the life of the flash drive. This is how the setup screen looks when the Syslog Server is set up to mirror to the flash drive. The second option is use an external Syslog Server. This can be another Unraid server. You can also use virtually any other computer. You find the necessary software by googling for the syslog server <Operating system> After you have set up the computer/server, you fill in the computer/server name or the IP address. (I prefer to use the IP address as there is never any confusion about what it is.) The Click on the 'Apply' button and your syslog will be mirrored to the other computer. The principal disadvantage to this system is that the other computer has be left on continuously until the problem occurs. The third option uses a bit of trickery in that we use the Unraid server with the problem as the Local syslog server. Let's begin by setting up the Local syslog server. After changing the Local syslog server: dropdown to 'Enabled', the screen will look like this. Note that we have a new menu option-- Local syslog folder: This will be a share on the your server but chose it with care. Ideally, it will be a 'cache only' or a 'cache preferred' share. This will minimize the spinning up of disks due to the continuous writing of new lines to the syslog. A cache SSD drive would be the ideal choice here. (The folder that you see above is a 'cache preferred' share. The syslog will be in the root of that folder/share.) If you click the 'Apply button at this point, you will have this server setup to serve as a Remote Syslog Server. It can now capture syslogs from several computers if the need should arise. Now, we added the ip address of this server as the Remote syslog server (Remember the mention of trickery. So basically, you send data out-of-the-server and it comes-right-back-in.) This is what it looks now: As soon as you click on apply, the logging of your syslog will start to a file named (in this case) syslog-192.168.1.242.log in the root of the selected folder (in this case-- Folder_Tree). One very neat feature is that each entry are appended onto this file every time a new line is added to the syslog. This should mean if you have a reboot of the server after a week of collecting the syslog, you will have everything from before the reboot and after the reboot in one file! Thanks @bonienl for both writing this utility and the guidance in putting this together.

 1 point
 -
I can only speculate, but I think if unRAID has multiple IP on multiple VLAN, the docker subsystem gets confused with regards to using a different VLAN per interface.perhaps its a bug with the automatic creation of the docker networks on VLANs where unRAID has an IP and network information. What you can try and its what I'm using is to have no unRAID IP on the VLAN so that unRAID is not accessible on that VLAN; this disables the auto creation of the docker network br0.x, which you then manually create and fill out the desired details.1 point