Leaderboard


Popular Content
Showing content with the highest reputation on 06/05/22 in Posts
-
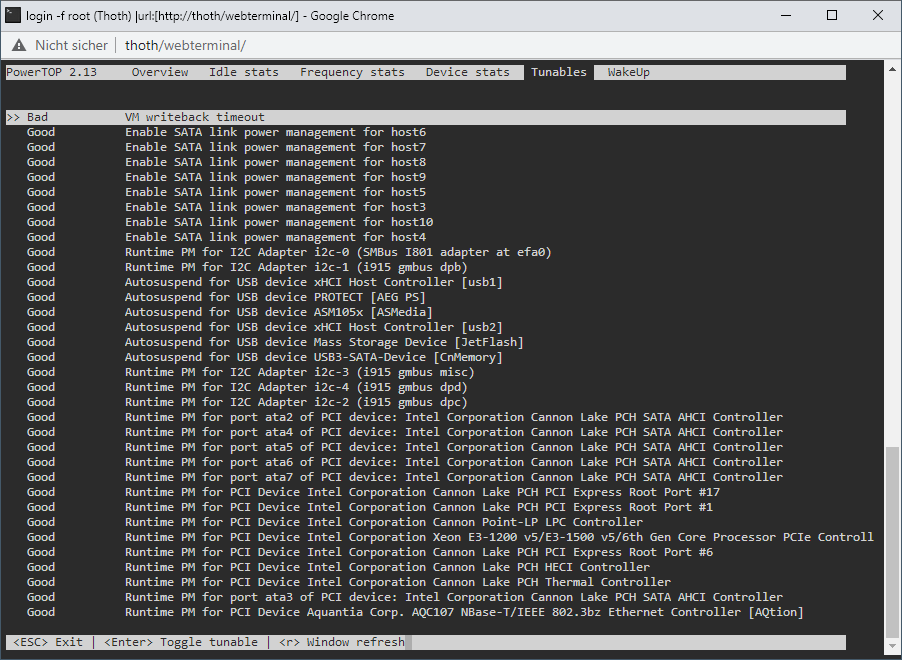
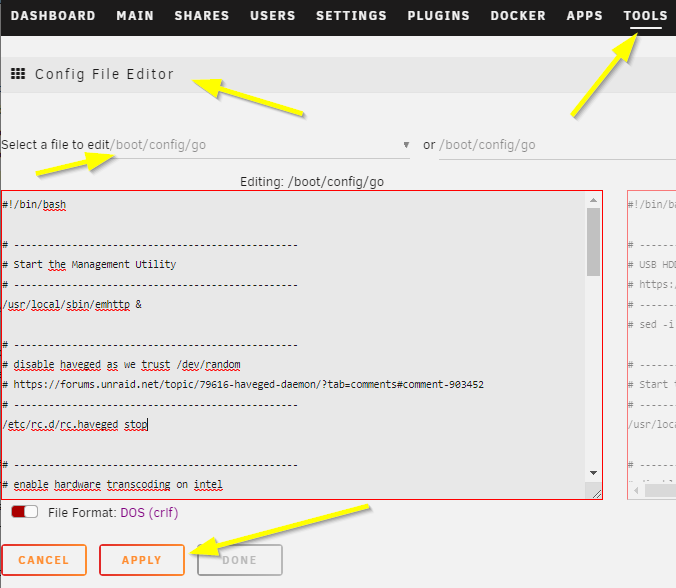
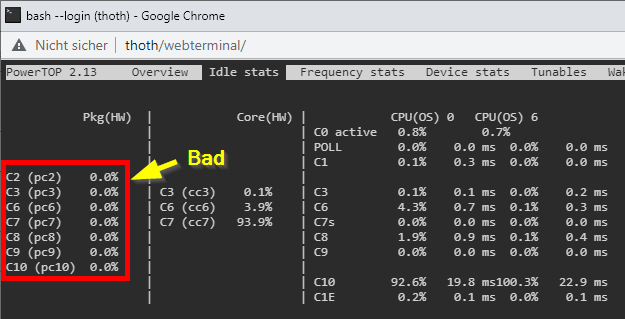
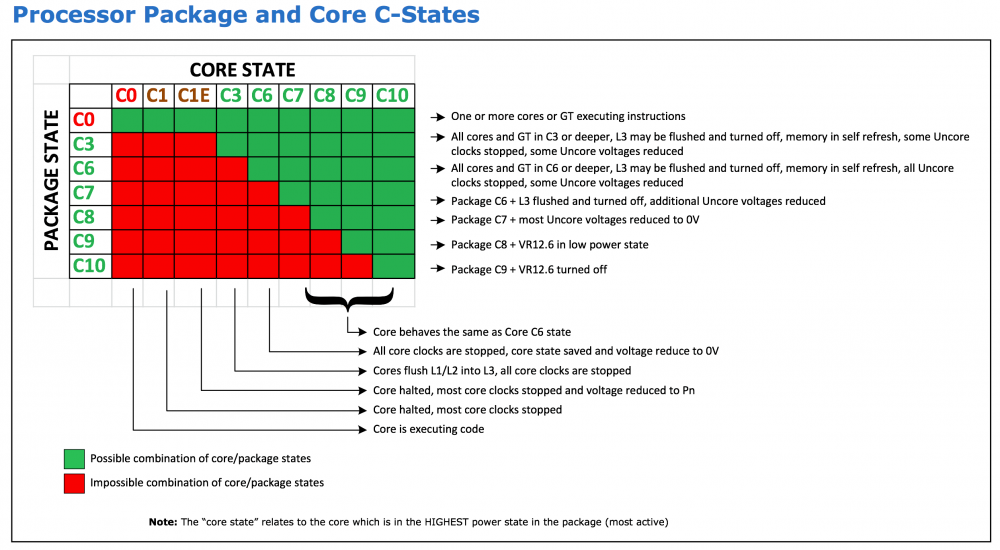
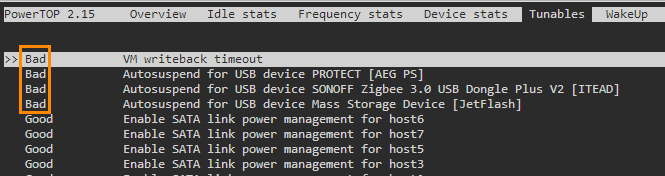
Powertop [Support auf Deutsch] Powertop is an Intel tool (yes, works for AMD, too) to check power consumption states of sata, pcie, usb, etc devices. You can download powertop as follows, then restart your server and it will be automatically installed: mkdir /boot/extra cd /boot/extra wget https://github.com/mgutt/unraid-packages/raw/main/6.11.0/powertop-2.15-x86_64-1.txz Then open your terminal and execute: powertop Now press "TAB" until you reach "Idle Stats" and check your CPU Pkg (HW). Depending of the brand and model of your CPU you can reach different C-States. If your system isn't optimized, you will see this: If you press "TAB" you will see additional information about standby states of different hardware components of your system. In the tab "Tunables" you will see multiple devices which have the state "Bad", which means powertop found devices which do not allow standby/sleep states: Now you can execute the following command to optimize this: WARNING Many SATA controllers (JMB xxx or ASM xxxx) do not support link power management and your disks loose connection after reaching spindown! Read further before executing --auto-tune! powertop --auto-tune &>/dev/null By that all compents will return "Good": Now, your server should reach better C-States. Package C-States This table shows the dependency between CPU Core and CPU Package C-States: Several things are important to reach Package (Pkg) C-States C3, C7, C9 or even C10: Accurate power measurement - do some research how accurate your power meter is (UPS integrated power meters are usually bad) - close your Unraid WebGUI and wait 1 minute! (this closes many background jobs, which cost your energy, use your PC's terminal and "ssh root@tower" to monitor your C-States with powertop) - don't use Unraid in GUI mode (you should avoid this mode, if you want low power consumption) Powertop shows only C1, C2 and C3 Pgk-States This happens if powertop does not recognize your CPU (happens for most AMD CPUs and recent Intel CPUs). Your CPU could still reach C9 or even C10, but powertop is not able to obtain this and shows only C3. BIOS - only Gigabyte 8th or 9th Intel: enable CEC2019 - enable ASPM (Active-State Power Management) in the PCI settings - enable all C-States like C7/C9/C10 in the CPU settings ("auto" usually means "disabled", so select "enable") - disable Audio - disable RGB LED controller - disable Turbo in the CPU settings PCIe cards Some PCIe cards prevent states other than C0 or C3 (Intel). As an example my Qnap Aquantia 10G card allowed only C3 while all my Intel 10G cards allowed C7. Without any installed card I'm able to reach C10. iGPU Install the iGPU driver plugin through unRAID Apps if your CPU has an iGPU hpet Set hpet=disable as a Kernel setting if you have an 8th, 9th or 10th Intel CPU as there is a bug which can cause crashes (shouldn't be necessary anymore since unRAID 6.10) CPU governor Use the tips & tweaks Plugin to set the CPU governor to "powersave" or use the below commands in the Go file. 10G networking SFP+ DAC consumes less power than SFP+ SR/LR and both less than 10G RJ45. Depending on your internet connection the most efficient scenario is not to use a 10G switch. Instead directly connect your client with your server and use a second 1G cable to connect with your internet router. By that your 10G controller/card goes to sleep while your client is powered off. In comparison an active connection to a 10G switch never allows sleep states. MTU Surprisingly a user was not able to reach any C-State other than C1E after setting the MTU to 9000. SATA Controller Some mainboards or pcie cards provide SATA ports through an additional SATA controller. Sadly some of the most popular and usually well supported JMB xxx and ASM xxxx controllers have an incompatibility to "powertop --auto-tune" because it sets all SATA ports to "med_power_with_dipm". To bypass this problem, you should not use "powertop --auto-tune". Instead read the "Commands" paragraph to set the commands manually. Then you can remove the line with the "med_power_with_dipm" setting or you can set each hostX individually. Example: # Enable SATA link power management (this skips SATA host3 and host4) echo med_power_with_dipm | tee /sys/class/scsi_host/host1/link_power_management_policy echo med_power_with_dipm | tee /sys/class/scsi_host/host2/link_power_management_policy echo med_power_with_dipm | tee /sys/class/scsi_host/host5/link_power_management_policy echo med_power_with_dipm | tee /sys/class/scsi_host/host6/link_power_management_policy If you are using the ASM1166 you could even try to update the firmware. NVMe A user found out that a specific NVMe SSD allowed only C2, while with a Samsung Evo Plus the system reached C10. Power supply An unnecessary high-power and/or inefficient power supply can raise the power consumption by 5 to 15W. Choose wisely: - as low power (watt) as possible - as efficient as possible (like Titanium grade) - avoid dual power supply setups (server grade hardware is not build for efficiency) If you plan to build a setup with extremely low power consumption, consider these power supplies: - PicoPSU (up to 200 watts, but is limited to ~4 SSDs as it has low 5V output) - Corsair RM550x (2021) (this looses only 1 watt more than a PicoPSU at 10W to 20W load!) - BeQuiet Pure Power 11 FM 550W (similar to the Corsair, but 2 watts more than a PicoPSU, but cheaper than the Corsair) Notes: - As of writing this post all other power supplies are much more inefficient. So don't think for example a Corsair SF450 is more efficient than the Corsair RM550x (2021) although the former is Platinum grade . It's not. I have both and the Platinum looses 4W more at 10W load. The reason is that some of the most recent power supplies include a new technology to reach the future ATX12VO standard, which has the requirement of being extremely efficient at low loads. For example Seasonic told me in 06/2022 that power supplies for ATX12VO are still in development. - An HDD can consume up to 30W if you switch on your server, but in this state the other server components do not reach their maximum load. So summarize wisely to obtain the correct power supply size. - Do not buy the Corsair / BeQuiet if you don't reach a power consumption under 30W: Above this, usual Platinum / Titanium power supplies are more efficient. Commands Instead of using "powertop --auto-tune" you could add the following power-saving commands to your /boot/config/go file (stop your array and execute them through your terminal to test them first) with the Config File Editor Plugin: # ------------------------------------------------- # Set power-efficient CPU governor # ------------------------------------------------- /etc/rc.d/rc.cpufreq powersave # ------------------------------------------------- # Disable CPU Turbo # ------------------------------------------------- [[ -f /sys/devices/system/cpu/intel_pstate/no_turbo ]] && echo "1" > /sys/devices/system/cpu/intel_pstate/no_turbo [[ -f /sys/devices/system/cpu/cpufreq/boost ]] && echo "0" > /sys/devices/system/cpu/cpufreq/boost # ------------------------------------------------- # Enable power-efficient ethernet # ------------------------------------------------- # enable IEEE 802.3az (Energy Efficient Ethernet): Could be incompatible to LACP bonds! for i in /sys/class/net/eth?; do dev=$(basename $i); [[ $(echo $(ethtool --show-eee $dev 2> /dev/null) | grep -c "Supported EEE link modes: 1") -eq 1 ]] && ethtool --set-eee $dev eee on; done # Disable wake on lan for i in /sys/class/net/eth?; do ethtool -s $(basename $i) wol d; done # ------------------------------------------------- # powertop tweaks # ------------------------------------------------- # Enable SATA link power management echo med_power_with_dipm | tee /sys/class/scsi_host/host*/link_power_management_policy # Runtime PM for I2C Adapter (i915 gmbus dpb) echo auto | tee /sys/bus/i2c/devices/i2c-*/device/power/control # Autosuspend for USB device echo auto | tee /sys/bus/usb/devices/*/power/control # Runtime PM for disk echo auto | tee /sys/block/sd*/device/power/control # Runtime PM for PCI devices echo auto | tee /sys/bus/pci/devices/????:??:??.?/power/control # Runtime PM for ATA devices echo auto | tee /sys/bus/pci/devices/????:??:??.?/ata*/power/control Note: EEE can cause problems with 2.5G Intel Ethernet. Config File Editor: Debugging Here are some helpful terminal commands. Spin down all disks (Unraid only) for dev in /dev/sd?; do /usr/local/sbin/emcmd cmdSpindown="$(grep -zoP "(?<=name=\")[a-z0-9]+(?=\"\ndevice=\"${dev: -3})" /var/local/emhttp/disks.ini | tr -d '\0')"; done Obtain ASPM status of all devices: lspci -vv | awk '/ASPM/{print $0}' RS= | grep --color -P '(^[a-z0-9:.]+|ASPM )' Watch CPU frequency: watch -n3 "cpufreq-info | grep 'current CPU'"
 1 point
 -
Since the 6.10.0 update, logs are only displayed in black and white via the logterminal pop-up window. Even though this might improve the readability at first glance, the different coloring of info, warn and error messages have unfortunately also disappeared with this change. This made it very easy to see if something is wrong or to filter out relevant info. For me and probably many others, this was a crucial feature that I now miss very much. Now all I see is a pile of text that becomes even more unreadable on longer lines due to the larger font with line breaks. If you go to Tools/System log you can see what it looked like before.1 point
-
From a computer that does have access to the Internet, go to the UnRAID downloads page and download the latest version of unRAID. This will download a *.zip file. If necessary, transfer that *.zip file to a computer that has access to your unRAID server (if the computer from which you downloaded unRAID zip file does not have access to the unRAID server). Extract the zip file and copy all the bz* files to the unRAID server USB flash boot drive overwriting the existing files. Reboot your server and you are upgraded. Unfortunately, this does not help with plugin and docker container upgrades and there is not a similar method for doing these upgrades.1 point
-
Thanks for the suggestion. I'll add it to my whiteboard, but I also wouldn't hold your breath on it.1 point
-
...lass die Finger von diesen Spielzeugen. Du musst über die Kommandozeile arbeiten, direkt auf den Disks (/mnt/diskXX/)...nicht auf dem Overlay Dateisystem (/mnt/user/....) Edit: ..und SMB-, Docker-, VM-Dienste stoppen vorher....nur das Array online lassen.1 point
-
Und wenn Du es mit dem Modify Flag startest, so daß es auch die gefunden Fehler schreibend korrigieren darf?1 point
-
Das ist dein Problem. Das Dateissystem ist korrupt. Array in den Wartungsmodus versetzen und xfs_repair ausführen (durch klicken auf Disk6 bzw am besten bei allen durchführen). Warum gibt es unter appdata überhaupt einen Ordner "admin"? Normal ist /containername/unterordner1 point
-
1 point
-
That's what I thought as well. (See my earlier post about it trying to work with the andriod app). A bit of background, I had audiobookshelf installed directly on my host machine (a ubuntu server) and wanted to move it to a docker container. After much banging of head on wall, I finally got it to work, with an incorrect mapping of the audiobooks folder. Everything was hunky dory. And then you left a comment and it got me thinking. I did a little more digging in the config folder to see what was going on. All my audiobooks had their full path mapped within the *.json files (IE /usr/share/audiobookshelf/audiobook/Paradise Lost/ ). Which works fine for the bare metal install, however, the docker container tried to read those json and went "Hey, there is no /usr/share/audiobookshelf folder, permission denied". By mapping my audiobooks to /usr/share/audiobookshelf/audiobooks in the container, everything worked out. However, to have the container match the documentation of volume mapping -v <my audiobook folder>:/audiobooks I had to do two things: I had to tweak fullpath in /config/Libraries/data/data.0.json to point to /audiobooks instead of /usr/share/aduiobookshelf/audiobookshelf run a Force Rescan of the library in the gui (gear wheel -> Libraries -> Force Rescan under the proper library) I'll fix my answer above to reflect this.1 point
-
Thx a lot ghost82, I've allowed unsafe interrupt and after an update with "Geforce Experience", it finally works.1 point
-
Clayton, Are you aware you're asking questions related to a forum thread from over 12 years ago...? However, as a long time user (since 2011, version 4.7) I can also confirm that parity calculation has always been done on the fly as new files are added to the array. Are you perhaps confusing parity updates with array updates from a cache drive (if installed)? Data written to a cache drive is not parity protected. Data written directly to the array is protected with parity at that time. If using a cache drive, data is transferred to the array at a later time, either on demand from the UI or according to a schedule, and would then become parity protected at that time. I also suggest NOT using an email address as your username on any forum - that is asking for a major increase in spamming to your email account.1 point
-
sata cable change and went through rebuilding process smoothly. thanks1 point
-
Thanks, also worked for me.1 point
-
Ich lass mein NAS das Backup erledigen. Somit ist hoch und runter fahren kein Thema1 point
-
Hi, first Post and an than a solution if any one have this error like me: update_known_hosts: hostfile_replace_entries failed for /root/.ssh/known_hosts: Operation not permitted I found this work for me: ssh-keyscan -H TARGET_HOST >> ~/.ssh/known_hosts on both systems and the error is gone.1 point
-
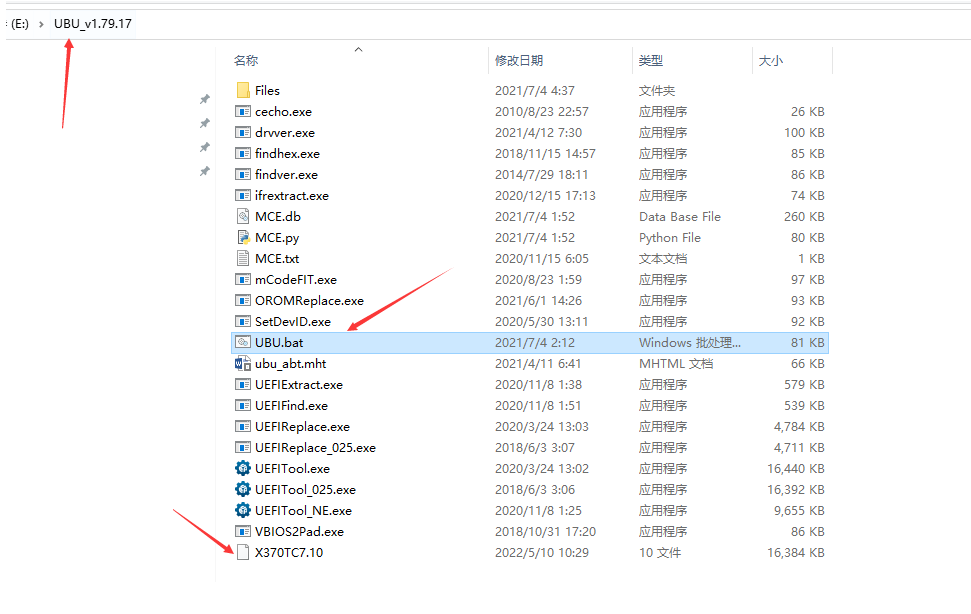
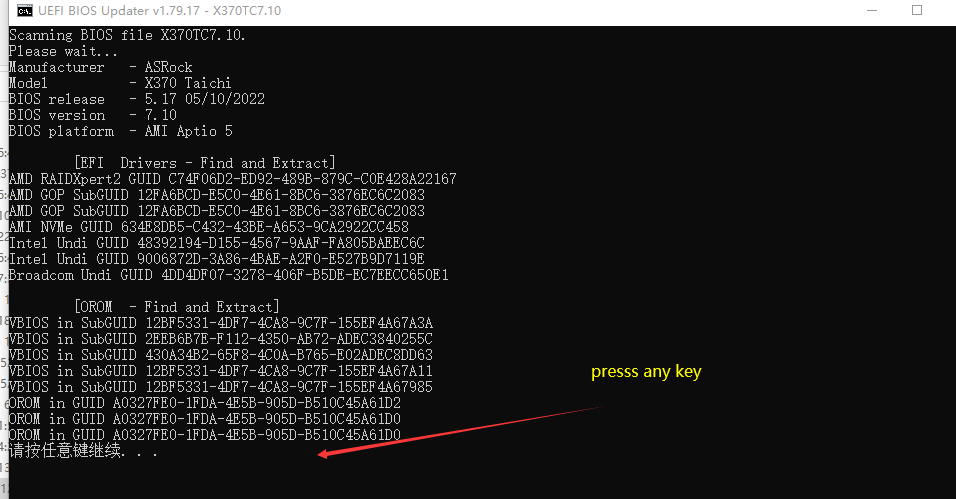
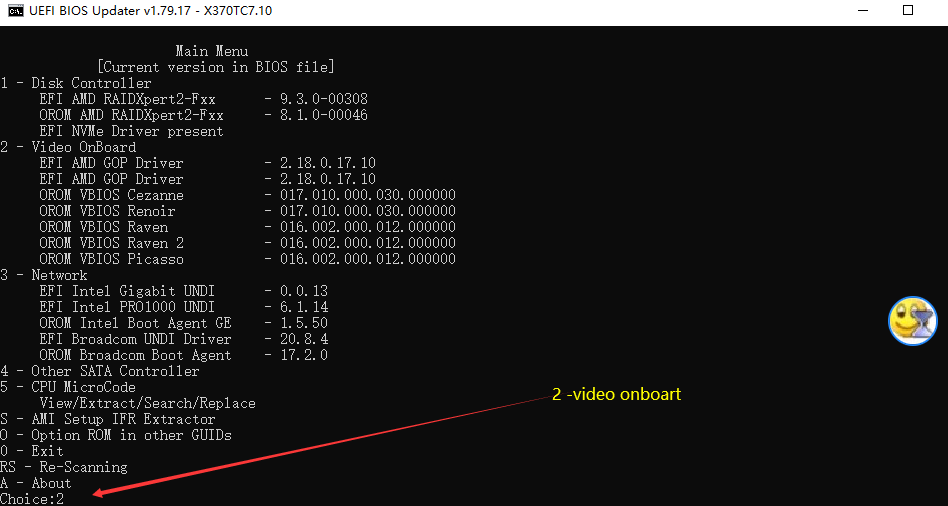
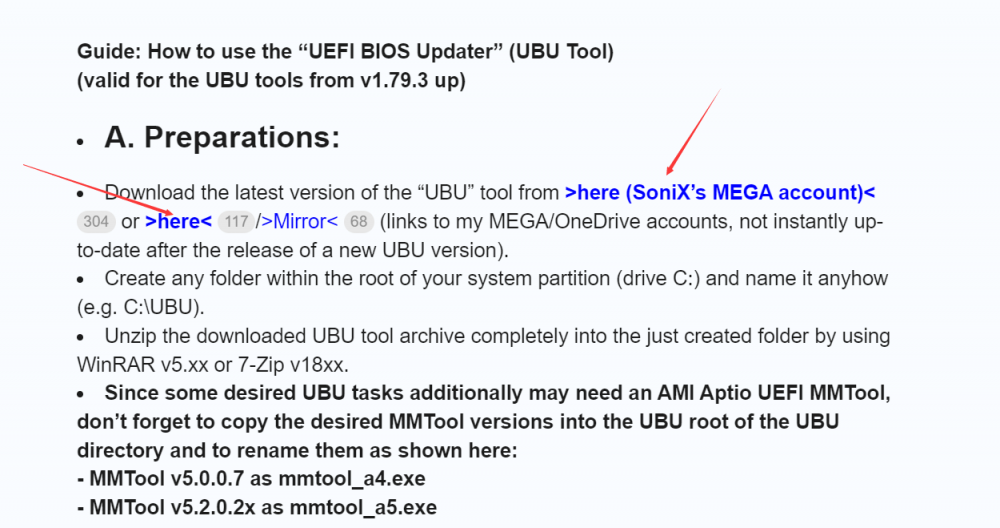
down UBU_v1.79.17.rar https://winraid.level1techs.com/t/tool-guide-news-uefi-bios-updater-ubu/30357 Unzip the English directory For example E:\UBU_v1.79.17 Copy X370TC7.10 into E:\UBU_v1.79.17 Double click UBU.bat Wait for the prompt to press any key chioce 2 enter S enter choice 0 exit or just close At the same time you can open E:\UBU_v1.79.17\Files\AMD\VBIOS\_List_vbios.txt # 504349520210 vbis_xxx.dat rb " OROM VBIOS Rembrant - " 5043495202103F16 vbios_163F.dat vg " OROM VBIOS Van Gogh - " 5043495202103816 vbios_1638.dat ce " OROM VBIOS Cezanne - " 5043495202103616 vbios_1636.dat re " OROM VBIOS Renoir - " 504349520210D815 vbios_15D8.dat pi " OROM VBIOS Picasso - " 526176656E322047656E vbios_15DD_2.dat ra2 " OROM VBIOS Raven 2 - " 526176656E2047656E vbios_15DD_1.dat ra1 " OROM VBIOS Raven - "


 1 point
 -
Indeed, I saw that there was a problem. I just corrected it.1 point
-
From the logs: Jun 3 12:07:41 MYDEEDEE kernel: pci 0000:0a:00.0: vgaarb: setting as boot VGA device The 1060 is choosen as boot vga by the host. However, after this, it is successfully attached to vfio, so it should work. The vm is correctly configured and also the vfio options. I would try to add also allow unsafe interrupts in settings --> vm Did you try to install the latest nvidia drivers with the gpu passed through connecting to it through remote desktop installed inside the vm? If you have old nvidia drivers or no drivers installed there could be no output. Are you 100% sure the vbios is working? Even if the infamous nvidia error 43 could be caused by nvidia detecting the gpu running in a vm (only with old drivers), you may also change in the xml from this: <features> <acpi/> <apic/> <hyperv mode='custom'> <relaxed state='on'/> <vapic state='on'/> <spinlocks state='on' retries='8191'/> <vendor_id state='on' value='1234567890ab'/> </hyperv> <ioapic driver='kvm'/> </features> to this: <features> <acpi/> <apic/> <hyperv> <relaxed state='on'/> <vapic state='on'/> <spinlocks state='on' retries='8191'/> <vendor_id state='on' value='1234567890ab'/> </hyperv> <kvm> <hidden state='on'/> </kvm> <vmport state='off'/> <ioapic driver='kvm'/> </features>1 point
-
You should probably read the release details : Certain combinaison of hardware, drivers and possibly BIOS were corrupting data. 6.10.2 was pushed to prevent data loss for the users at risk while investigations are on going. If you require more information, ask away. I will not be able to answer, but someone with more knowledge probably can.1 point
-
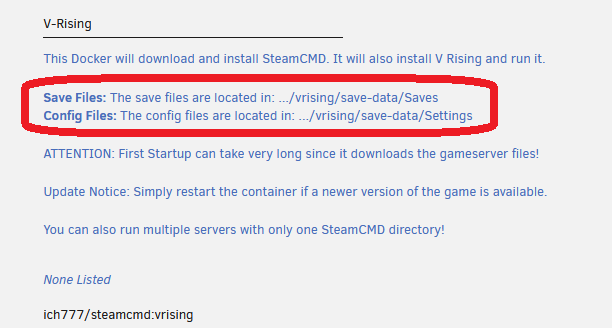
Did someone from you even read the description from the container? Please keep in mind, you have to set the name from the server in the Docker template because is it overrides the config file.
 1 point
 -
Are you using rclone to mount your gdrive by any chance? If so, then rclone is most likeliy running as root and screwing up your permissions. Add this to your rclone mount script: --uid 99 --gid 99 Btw, you should have mentioned rclone and gdrive (if I'm right and your'e using that) in your posts as this is vital information and that's why nobody was able to help you. I'm only guessing here because your host path in your screenshot says mergerfs/gdrive...1 point
-
新建一个文件,/boot/config/stop 写上 #!/bin/sh virsh shutdown 虚拟机名字 stop和go文件一样,一个是启动执行,一个是关机执行1 point
-
Is the BIOS set up to boot automatically ? In any case, you can start to check the power states and update BIOS if its not the latest. I see that you did set up a syslog server, I did not see anything relevant there, but maybe someone else can.1 point
-
Well, got it working, tho dunno how I probably changed "PCIe ACS override" to downstream, group *.nvidia and reboot.1 point
-
Zip and attach the saved logs along with your diagnostics1 point
-
联系了官方人员,问题已解决,感谢1 point
-
I tried to install resolvconf in the container, but that does not help. Some process keeps /etc/resolv.conf locked/writable, so resolvconf cannot update the content of /etc/resolv.conf. Something with the scripts in this container is definitely broken. Using a fixed DNS server as in --dns 8.8.8.8 is a work-around, and it would be better if the problem got fixed. I may take a look at the scripts this weekend but don't hold your breath.1 point
-
- Pterodactyl documentation has been updated to reflect recent change requiring Redis as a requirement. Thanks to @FizzyFrys for updating the documentation: https://docs.ibracorp.io/pterodactyl-docker-1/1 point
-
If anyone else wants to try @thor2002ro's latest kernel, its very simple. Backup your USB drive. You're very unlikely to screw up, but you should be doing this anyway Download the latest kernel from https://github.com/thor2002ro/unraid_kernel/releases Download the latest firmware file from https://github.com/thor2002ro/unraid_kernel/releases. Note: this isn't always included with every release. As of this writing, the latest firmware file is found under 5.18rc2 20220412 o3 clang14 thin LTO 6.9.2. Power down your Unraid server and plug the USB drive into your computer. In the root of the drive, move or rename the following files: bzimage, bzimage.sha256, bzmodules, bzmodules.sha256, bzfirmware, bzfiremware.sha256 Unzip and move all the downloaded files into the root of the USB drive. Open /syslinux/syslinux.cfg in a text editor. Look for the following entry: label Unraid OS menu default kernel /bzimage append initrd=/bzroot and add md_mod.unraid_patch=22 to the append section. It should look like this: label Unraid OS menu default kernel /bzimage append initrd=/bzroot md_mod.unraid_patch=22 Note: Pay attention to the release notes from @thor2002ro as that Unraid patch number may change! 8. Plug the USB drive back into the server and start her up! 9. Profit.1 point
-
Is unraid a Linux distribution? If so, where is the code for the open source part of the kernel, for example? If not, can it be understood that unraid is a collection of slackware-based packages rather than an OS? In this case, since unraid distributes installation packages that include slackware, in order to comply with the GPL License, unraid should also provide its own distribution of the linux kernel and other GPL software source code it uses. You know, not open source linux is not legal, I will not buy it before confirming the legality of unraid1 point
-
But just for my inner monk... your bequit logo is up side down This would drive my crazy. 🤣1 point
-
I don't think this is under active development - I send at least 20 crash reports to them, and never got a single update the entire time. Seems like it's a dead product at this point.1 point
-
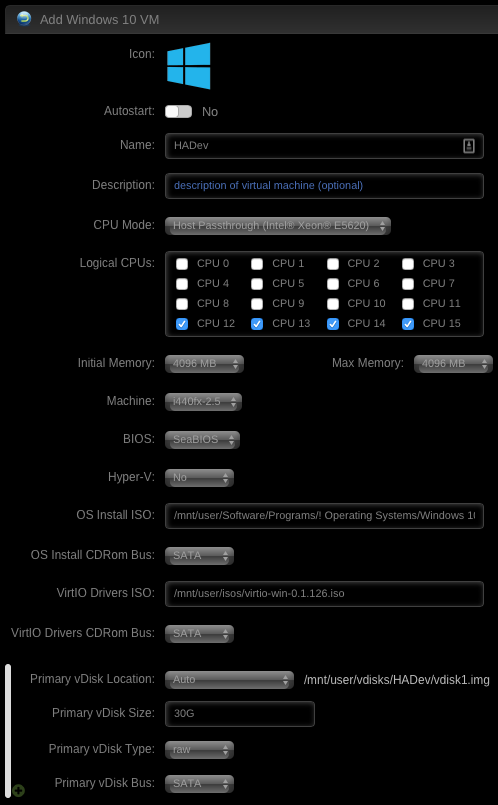
I've found that using these settings appears to allow the VM to install normally. Key is the SeaBIOS and SATA settings.
 1 point
 -
I have been waiting a LONG time for this combo. Seeing this Plug-in with the new features of unRaid 6, I'm now ready to buy a pro key and go to town. I can actually make my storage server (which does pretty much nothing 90% of the time), move all my lower CPU Powered VMs and physical machines (Plex, pfSesnse, ect) and sell my other servers and recoup the costs while having a simpler setup. unRaid6 + ZoL = Profit! Why is BTRFS there but not ZoL!? LimeTech... Give the customer what it wants and they will come.1 point
-
/boot/config/plugins/dockerMan/templates-user for the user templates and /boot/config/plugins/dockerMan/templates for all of the templates in a repository (if you use repositories)1 point