Leaderboard


Popular Content
Showing content with the highest reputation on 06/07/22 in Posts
-
@JorgeB is who even other very helpful forum members refer questions to when it comes to disks and controllers. He is like the experts expert for many things (probably not just disks and controllers). I have seen @ich777 go out of his way to try and find solutions to issues raised in this forum. They are among several members of this forum that answer the bulk of all the posted questions. The others being @trurl, @JonathanM, @Squid, @itimpi, @ChatNoir, @SimonF, @bonienl, @Frank1940. Unfortunately, I have probably left a few off that list unintentionally Others such as @dlandon, @binhex, @Djoss, the gang at @linuxserver.io and many others are very active in supporting their plugins and docker containers which are a great addition to the unRAID ecosystem. @ich777 belongs on that list as well. As has been mentioned several times, the community is one of the best things about unRAID thanks to those (and others) mentioned above.6 points
-
In this blog series, we want to put a spotlight on key community members to get to know them a little better and recognize them for all that they've done for the Unraid community over the years. This next blog features two outstanding community members who have helped out countless new Unraid users over the years: @JorgeB and @ich777 https://unraid.net/blog/rockstars-jorgeb-ich777 If either have helped you out over the years here, please consider buying them a beer or lunch! JorgeB ich777
 5 points
 -
I picked up a QNAP to run unRAID on last month, within days @ich777 gave me a test plugin to try based off a github project that fell behind due to unRAID compilation issues and just like that I had fan control (through scripts) and mobo temperatures reporting. Now, there's a regularly compiled plugin that I can expect to use thanks to his work on making it available. The service @ich777 provides to the community is substantial and valued. Thanks for all you do!3 points
-
Sorry , i forgot that @JorgeB was also very helpfull when i was need to buy my first HBA Card with his topic "RECOMMENDED CONTROLLERS FOR UNRAID and HOW TO UPGRADE AN LSI HBA FIRMWARE USING UNRAID" and also was very quick replay like we can get in topics of @ich777 ...2 points
-
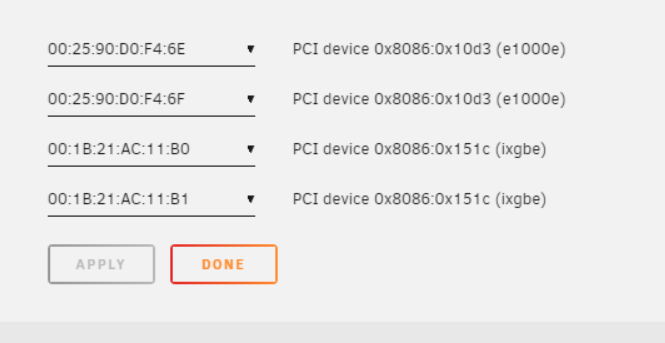
You can change the eth assignments in the interface rules, set the main NIC as eth0: Reboot required to take effect.
 2 points
 -
Like to say Thank You to both @JorgeB and @ich777 for your dedication and support in this forum, much appreciated 🎺2 points
-
I have asked Ich777 a lot of questions and he has always answered quickly. I am running multiple gameservers and the support for them is great! A well deserved place in the spotlight!2 points
-
can confirm that ich777 is the one of the best and fastest answers from him you can get for help if needed ...2 points
-
Indeed, thank you both. The Community and Unraid will not be the same without the great work you do. 🤘2 points
-
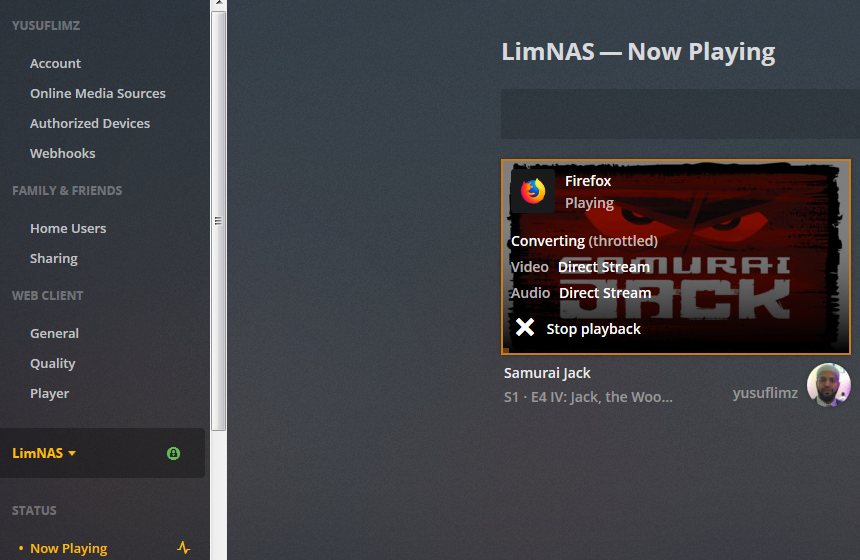
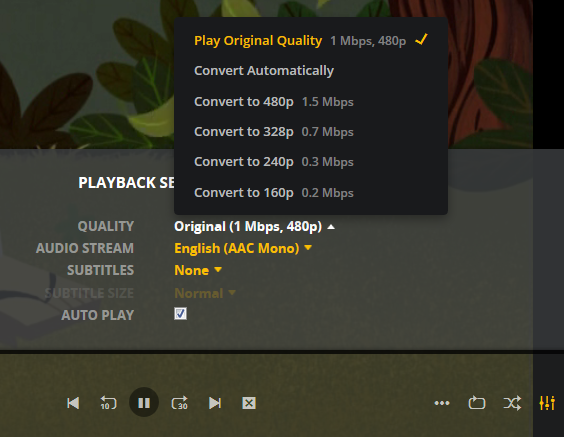
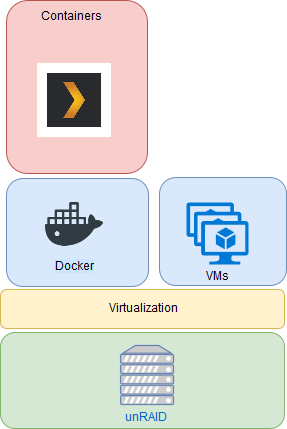
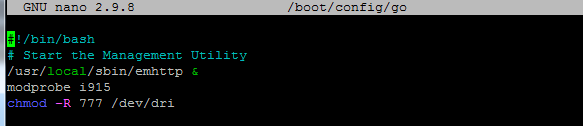
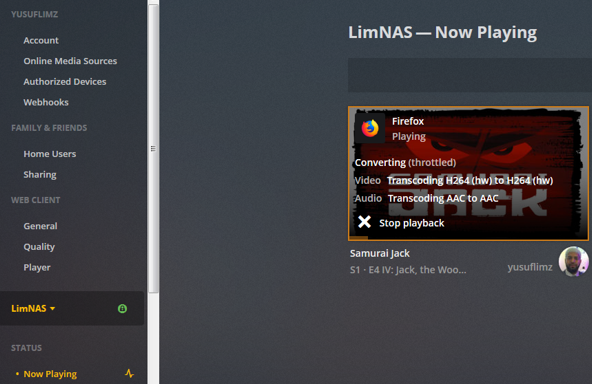
***Update*** : Apologies, it seems like there was an update to the Unraid forums which removed the carriage returns in my code blocks. This was causing people to get errors when typing commands verbatim. I've fixed the code blocks below and all should be Plexing perfectly now Y =========== Granted this has been covered in a few other posts but I just wanted to have it with a little bit of layout and structure. Special thanks to [mention=9167]Hoopster[/mention] whose post(s) I took this from. What is Plex Hardware Acceleration? When streaming media from Plex, a few things are happening. Plex will check against the device trying to play the media: Media is stored in a compatible file container Media is encoded in a compatible bitrate Media is encoded with compatible codecs Media is a compatible resolution Bandwith is sufficient If all of the above is met, Plex will Direct Play or send the media directly to the client without being changed. This is great in most cases as there will be very little if any overhead on your CPU. This should be okay in most cases, but you may be accessing Plex remotely or on a device that is having difficulty with the source media. You could either manually convert each file or get Plex to transcode the file on the fly into another format to be played. A simple example: Your source file is stored in 1080p. You're away from home and you have a crappy internet connection. Playing the file in 1080p is taking up too much bandwith so to get a better experience you can watch your media in glorious 240p without stuttering / buffering on your little mobile device by getting Plex to transcode the file first. This is because a 240p file will require considerably less bandwith compared to a 1080p file. The issue is that depending on which format your transcoding from and to, this can absolutely pin all your CPU cores at 100% which means you're gonna have a bad time. Fortunately Intel CPUs have a little thing called Quick Sync which is their native hardware encoding and decoding core. This can dramatically reduce the CPU overhead required for transcoding and Plex can leverage this using their Hardware Acceleration feature. How Do I Know If I'm Transcoding? You're able to see how media is being served by playing a first something on a device. Log into Plex and go to Settings > Status > Now Playing As you can see this file is being direct played, so there's no transcoding happening. If you see (throttled) it's a good sign. It just means is that your Plex Media Server is able to perform the transcode faster than is necessary. To initiate some transcoding, go to where your media is playing. Click on Settings > Quality > Show All > Choose a Quality that isn't the Default one If you head back to the Now Playing section in Plex you will see that the stream is now being Transcoded. I have Quick Sync enabled hence the "(hw)" which stands for, you guessed it, Hardware. "(hw)" will not be shown if Quick Sync isn't being used in transcoding. PreRequisites 1. A Plex Pass - If you require Plex Hardware Acceleration Test to see if your system is capable before buying a Plex Pass. 2. Intel CPU that has Quick Sync Capability - Search for your CPU using Intel ARK 3. Compatible Motherboard You will need to enable iGPU on your motherboard BIOS In some cases this may require you to have the HDMI output plugged in and connected to a monitor in order for it to be active. If you find that this is the case on your setup you can buy a dummy HDMI doo-dad that tricks your unRAID box into thinking that something is plugged in. Some machines like the HP MicroServer Gen8 have iLO / IPMI which allows the server to be monitored / managed remotely. Unfortunately this means that the server has 2 GPUs and ALL GPU output from the server passed through the ancient Matrox GPU. So as far as any OS is concerned even though the Intel CPU supports Quick Sync, the Matrox one doesn't. =/ you'd have better luck using the new unRAID Nvidia Plugin. Check Your Setup If your config meets all of the above requirements, give these commands a shot, you should know straight away if you can use Hardware Acceleration. Login to your unRAID box using the GUI and open a terminal window. Or SSH into your box if that's your thing. Type: cd /dev/dri ls If you see an output like the one above your unRAID box has its Quick Sync enabled. The two items were interested in specifically are card0 and renderD128. If you can't see it not to worry type this: modprobe i915 There should be no return or errors in the output. Now again run: cd /dev/dri ls You should see the expected items ie. card0 and renderD128 Give your Container Access Lastly we need to give our container access to the Quick Sync device. I am going to passively aggressively mention that they are indeed called containers and not dockers. Dockers are manufacturers of boots and pants company and have nothing to do with virtualization or software development, yet. Okay rant over. We need to do this because the Docker host and its underlying containers don't have access to anything on unRAID unless you give it to them. This is done via Paths, Ports, Variables, Labels or in this case Devices. We want to provide our Plex container with access to one of the devices on our unRAID box. We need to change the relevant permissions on our Quick Sync Device which we do by typing into the terminal window: chmod -R 777 /dev/dri Once that's done Head over to the Docker Tab, click on the your Plex container. Scroll to the bottom click on Add another Path, Port, Variable Select Device from the drop down Enter the following: Name: /dev/dri Value: /dev/dri Click Save followed by Apply. Log Back into Plex and navigate to Settings > Transcoder. Click on the button to SHOW ADVANCED Enable "Use hardware acceleration where available". You can now do the same test we did above by playing a stream, changing it's Quality to something that isn't its original format and Checking the Now Playing section to see if Hardware Acceleration is enabled. If you see "(hw)" congrats! You're using Quick Sync and Hardware acceleration [emoji4] Persist your config On Reboot unRAID will not run those commands again unless we put it in our go file. So when ready type into terminal: nano /boot/config/go Add the following lines to the bottom of the go file modprobe i915 chmod -R 777 /dev/dri Press Ctrl X, followed by Y to save your go file. And you should be golden!


 1 point
 -
GOT IT Now i need help to create a repo or container for CA i think
 1 point
 -
From Unraid 6.9 and up btrfs volumes are supposed to be mounted with the discard=async mount option which should mean that trim isn't needed. However, I have found that if I stop using trim, after a few days the performance of my nvme cache drive drops dramatically so I have left it installed. It could just be my use case, I don't know. My cache drive has several hundred GB's of writes daily with the files being then moved from the cache onto either my array or sent to my TrueNAS server running on another machine. I still see, the details of how much space was recovered every time trim executes and do not have any conflicts with it and V-Rising or any other games I host. How is your drive connected to your system? Is it nvme? Connected to onboard sata port? Or is it connected to a HBA or another way?1 point
-
I installed the latest Spigot 1.19 as follows: 1.) Install Minecraft Basic Server container with "jre17" as Runtime, "spigot" as serverfile name and "custom" as Game Version 2.) Open the container console and execute: apt update apt install git cd /serverdata/serverfiles/runtime/jre17/bin wget https://hub.spigotmc.org/jenkins/job/BuildTools/lastSuccessfulBuild/artifact/target/BuildTools.jar ./java -jar BuildTools.jar --rev 1.19 This creates /serverdata/serverfiles/runtime/jre17/bin/spigot-1.19.jar 3.) Now move it to your Minecraft appdata root dir: mv /serverdata/serverfiles/runtime/jre17/bin/spigot-1.19.jar /serverdata/serverfiles/spigot.jar 4.) Restart the container Alternatively to point 3, you could download my spigot-1.19.jar and paste it into your appdata dir: https://www.dropbox.com/s/w8p745uysdt1cqq/spigot-1.19.jar?dl=01 point
-
You might be able to rename the share at the command line. I think I would just create a new user share with an allowed name, and use mc to move the contents of /mnt/user/rootshare to /mnt/user/whatever.1 point
-
That last screenshot seems to confirm1 point
-
I run trim hourly on my cache drive and have no issues with stuck threads, or anything else. The world has been up 12 days since the last reboot and everything is fine. The one difference I do notice between us tho is that my cache is formatted btrfs not xfs, not sure why it would matter but perhaps that is the issue if it is somehow related to trim.1 point
-
Thank you very much for your test result. I also tested by myself later. The reason is that the new version of EMby has a decline in decoding performance, which has nothing to do with UNRAID1 point
-
Does anyone know if the TRIM SSD plugin, by default, trims all SSD's regardless if their file system is XFS or BTRFS? Or, does it only trim XFS SSD's since I've read that performing TRIM on a BTRFS SSD can be bad? There is no way to exclude BTRFS in the settings of this plugin.1 point
-
@olehj Yay that worked! I now see all 30+ drives after spinning them up and scanning. Now to reload the backup I made and sort them to their slots. Thank you for all your hard work! Enjoy some beer1 point
-
Please remove the plugin, reboot and after that install it again from the CA App. The Plugin Update Helper should work for 6.10.1 and 6.10.2. In 6.10.0 is actually a bug that prevents it from working properly.1 point
-
Update 2022.06.07 Commit #182 - BUG: Picked up wrong array from SMART data, Commit #182 should work now (hopefully). Added additional debugging lines and made NVMe drives be ignored from the standby check during scanning. @BlinkerFluid try now, thanks!1 point
-
Just rebooting usually won't help, a power cycle might, though as mentioned I would recommend replacing or at least checking the cables first.1 point
-
Clicking anywhere on the card (or the info button) brings up the sidebar which will tell you that it requires Unassigned Devices, and that requirement isn't met (hovering over the + on the card will also tell you that it requires UD installed)1 point
-
I was able to bring myself back online. Turns out that not only was the OS upgrade a problem wreaking havoc on my system, but it revealed that my flash drive was also not usable anymore. After trying to recreate the drive using the USB Tool I would get an error message once the process was complete, and then if I attempted to copy the config file over it would stop saying I did not have write permissions to the drive. So after getting a new flash drive and following your instructions I was able to get back up and running! Thank you!1 point
-
忘了,但之前那个server确实没了,怎么搞我给忘了,是不是自动的我也忘了。1 point
-
Ich würde das Array stoppen und in den Disk Einstellungen den Autostart deaktivieren. Dann die Platten ruhig angeschlossen lassen und mit gestopptem Array warten was passiert.1 point
-
I installed the kernel with these instructions Linked /dev/dri device to my docker plex container using the linuxserver variant (lscr.io/linuxserver/plex). I don't have force_probe=i195 in my boot config. I do have "blacklist i915" in /etc/modprobe.d/i915.conf I have intel_gpu_top installed. After that I enabled transcoding but left HDR tone mapping disabled.1 point
-
Did you install Unassigned Devices before trying to install it's optional 'preclear' option ? I suspect that it might be a pre-requisite.1 point
-
Hi JorgeB Thank you for pointing out that the issue was indeed with the onboard SATA, not the JMB controller. I've reset the MOBO's BIOS to its default settings and the onboard SATA drives re-appeared. Then I assigned the data disks back to their places within the Unraid array and started the server. Once the data disks were mounted successfully, I put the parity disk back in and completed a parity check. The server is up and running again with no issues. I guess I had a case of a tunnel vision not being able to see what was right in front of me. Thank you once again, issue resolved.1 point
-
In the terminal what do you get when you execute "modprobe nvidia"?1 point
-
No, I am hitting it directly from the IP of the unraid server.1 point
-
I included more translations. Thanks.1 point
-
If you change the files in the directory that the documentaion says, then each time the game gets an update via Steam it would ultimately wipe your settings because they would be overwritten by the default ones. I would always recommend to read the description and also the variable text, if something is made different than usual I write it in there. I've decided to create a dedicated directory where the saves and your settings are located because as said above if I would have let them where the usually stored they would get overwritten on a game update, at least your settings.1 point
-
Update 2022.06.05 Commit #182 - BUG: With SCSI enclosures/SAS drives, SMART data behaves slightly different and ignores the drives as the plugin couldn't find them. Added new variables required to detect disks in enclosures. @BlinkerFluid1 point
-
I am running into an issue with Minio and not sure how to resolve it. I am unable to upload more than a few hundred KB files. So far the largest successful file was 112KB. Anything bigger keeps failing. I think it has something to do with these errors that keeps repeating in the logs API: SYSTEM Time: Sat Jun 04 2022 02:22:17 GMT-0700 (Pacific Daylight Time) DeploymentID: 3fc1b408-8f2b-462c-87fe-d859dda27ccd RequestID: RemoteHost: UserAgent: Error: Storage resources are insufficient for the write operation .minio.sys/buckets/.usage-cache.bin (cmd.InsufficientWriteQuorum) Backtrace: 0: internal/logger/logger.go:278:logger.LogIf() 1: cmd/erasure-single-drive.go:3076:cmd.(*erasureSingle).nsScanner.func1() API: SYSTEM Time: Sat Jun 04 2022 02:25:18 GMT-0700 (Pacific Daylight Time) DeploymentID: 3fc1b408-8f2b-462c-87fe-d859dda27ccd RequestID: RemoteHost: UserAgent: Error: srcVolume: .minio.sys/tmp, srcPath: 52346e68-2ad4-4da9-bc05-534b035c485e, dstVolume: .minio.sys/buckets:, dstPath: public/.usage-cache.bin - error file not found (*errors.errorString) Backtrace: 0: internal/logger/logger.go:278:logger.LogIf() 1: cmd/xl-storage.go:2071:cmd.(*xlStorage).RenameData.func1() 2: cmd/xl-storage.go:2331:cmd.(*xlStorage).RenameData() 3: cmd/xl-storage-disk-id-check.go:356:cmd.(*xlStorageDiskIDCheck).RenameData() 4: cmd/erasure-object.go:707:cmd.renameData.func1() 5: internal/sync/errgroup/errgroup.go:123:errgroup.(*Group).Go.func1() I have tried looking at permissions for the share and rebuilding the container a few times with no luck. My /data is pointed to /mnt/user/object_storage/ which is a just a share I created, nothing special. Anyone know how to fix this?1 point
-
AWSOMEEEEEEE
 1 point
 -
Is someone here interested in something like a "Button" on the create container page where a Debian Bullseye container is set up with a pretty basic Desktop environment (XFCE4) in conjunction with TurboVNC and noVNC so that you can connect to the container via a WebBrowser or a VNC Client?1 point
-
Oh my god I love you so much. You have no idea how much I have been praying for LXC support on unraid. Thank you so, so, so much!1 point
-
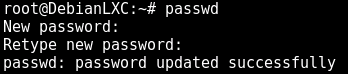
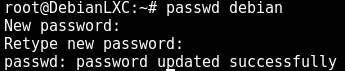
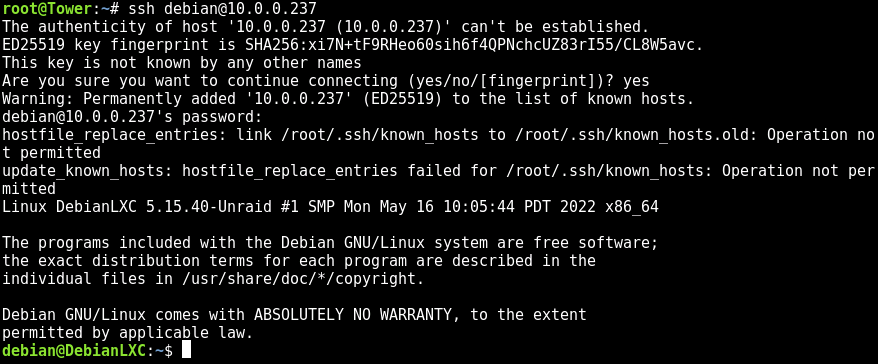
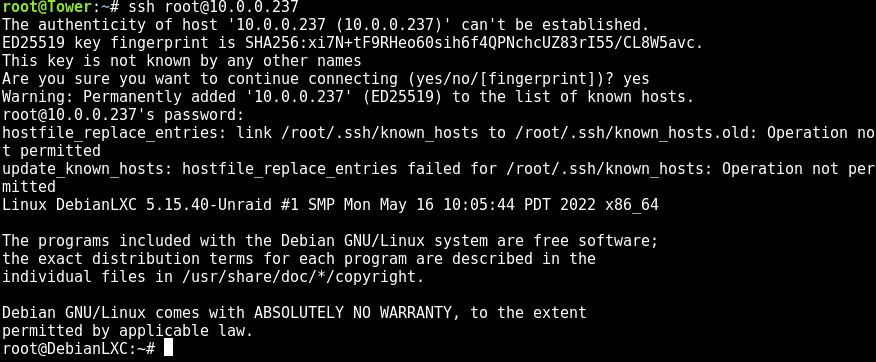
Install SSH Server in Debian based containers: Method 1 (recommended) : Attach to the container with "lxc-attach DebianLXC /bin/bash" (replace DebianLXC with your container name) : I would first recommend that you add a password for the user root, to do so enter "passwd" and enter your preferred root password two times (there is nothing displayed while typing) : Now Create a user with the command "useradd -m debian -s /bin/bash" (in this case the newly created username is "debian") : In the next step we will create a password for the user "debian" with the command "passwd debian" (replace "debian" with your preferred username) type in the password two times like above for the root user: Now install the openssh-server with "apt-get -y install openssh-server": After it successfully installed you can close the terminal window from the LXC container, connect via SSH to the container via Putty or your preferred SSH client through the IP from your container and the username "debian" and the password set for the user "debian" (in this example we will connect through a Linux shell with the command "ssh [email protected]" you see the IP address in the LXC tab in Unraid) : Now you are connected through SSH with the user "debian" to your LXC container. Method 2 (not recommended - root connection) : Attach to the container with "lxc-attach DebianLXC /bin/bash" (replace DebianLXC with your container name): I would first recommend that you add a password for the user root, to do so enter "passwd" and enter your preferred root password two times (there is nothing displayed while typing) : Now install the openssh-server with "apt-get -y install openssh-server": Now issue the command: "sed -i "/#PermitRootLogin prohibit-password/c\PermitRootLogin yes" /etc/ssh/sshd_config" (this will basically change your SSH configuration file so that you can login with the root account through SSH) : Restart the sshd service with the command "systemctl restart sshd" to apply the new settings: After that you can close the terminal window from the LXC container, connect via SSH to the container via Putty or your preferred SSH client through the IP from your container and the username "root" and the password set for the "root" user (in this example we will connect through a Linux shell with the command "ssh [email protected]" you see the IP address in the LXC tab in Unraid) : Now you see that you are connected through SSH with the user "root" to your LXC container.


 1 point
 -
yeah i think im going to rework it and just use XX instead of the version, as it will no doubt change again in the not too distant future.1 point
-
If anyone else wants to try @thor2002ro's latest kernel, its very simple. Backup your USB drive. You're very unlikely to screw up, but you should be doing this anyway Download the latest kernel from https://github.com/thor2002ro/unraid_kernel/releases Download the latest firmware file from https://github.com/thor2002ro/unraid_kernel/releases. Note: this isn't always included with every release. As of this writing, the latest firmware file is found under 5.18rc2 20220412 o3 clang14 thin LTO 6.9.2. Power down your Unraid server and plug the USB drive into your computer. In the root of the drive, move or rename the following files: bzimage, bzimage.sha256, bzmodules, bzmodules.sha256, bzfirmware, bzfiremware.sha256 Unzip and move all the downloaded files into the root of the USB drive. Open /syslinux/syslinux.cfg in a text editor. Look for the following entry: label Unraid OS menu default kernel /bzimage append initrd=/bzroot and add md_mod.unraid_patch=22 to the append section. It should look like this: label Unraid OS menu default kernel /bzimage append initrd=/bzroot md_mod.unraid_patch=22 Note: Pay attention to the release notes from @thor2002ro as that Unraid patch number may change! 8. Plug the USB drive back into the server and start her up! 9. Profit.1 point
-
currently because of dependency changes from 6.9 to 6.10, this plugin isnt fully working by itself at least the image outputs arent. in order to fix the outputs you would have to install the missing dependencies. After discussion with others i dont think this plugin should do dependency management for this because of the dependencies its needs. That being said here is a scrip tthat you can run install stall the missing dependencies. #!/bin/bash wget https://slackware.uk/slackware/slackware64-14.2/slackware64/l/gd-2.2.1-x86_64-1.txz upgradepkg --install-new gd-2.2.1-x86_64-1.txz wget https://slackware.uk/slackware/slackware64-14.2/slackware64/x/fontconfig-2.11.1-x86_64-2.txz upgradepkg --install-new fontconfig-2.11.1-x86_64-2.txz wget https://slackware.uk/slackware/slackware64-14.2/slackware64/l/harfbuzz-1.2.7-x86_64-1.txz upgradepkg --install-new harfbuzz-1.2.7-x86_64-1.txz wget https://slackware.uk/slackware/slackware64-14.2/slackware64/l/freetype-2.6.3-x86_64-1.txz upgradepkg --install-new freetype-2.6.3-x86_64-1.txz wget https://slackware.uk/slackware/slackware64-14.2/slackware64/x/libXpm-3.5.11-x86_64-2.txz upgradepkg --install-new libXpm-3.5.11-x86_64-2.txz wget https://slackware.uk/slackware/slackware64-14.2/slackware64/x/libX11-1.6.3-x86_64-2.txz upgradepkg --install-new libX11-1.6.3-x86_64-2.txz wget https://slackware.uk/slackware/slackware64-14.2/slackware64/x/libxcb-1.11.1-x86_64-1.txz upgradepkg --install-new libxcb-1.11.1-x86_64-1.txz wget https://slackware.uk/slackware/slackware64-14.2/slackware64/x/libXau-1.0.8-x86_64-2.txz upgradepkg --install-new libXau-1.0.8-x86_64-2.txz wget https://slackware.uk/slackware/slackware64-14.2/slackware64/x/libXdmcp-1.1.2-x86_64-2.txz upgradepkg --install-new libXdmcp-1.1.2-x86_64-2.txz1 point
-
I think I remember seeing somewhere that the trim plugin, and scheduling trim is no longer necessary or recommended after upgrading to 6.9. I am not sure if I actually read this, or not. Hoping someone could verify this info for me.1 point
-
my two cents (but I'm a noob). I had to do this a few times as the docker stop commands didn't result in an actual container stop. Get you docker container id using docker container list then ps auxw | grep yourcontainerid to get the pid then kill -9 yourpid If that doesn't work, you've got a zombie process and I'm afraid you'll need a reboot to unlock it1 point
-
Configuration stored in /etc/rc.d/rc.nfsd changed with Unraid 6.10.0-rc1. nfs_config() should be updated to: nfs_config() ( set -euo pipefail sed -i ' s/^#RPC_STATD_PORT=.*/RPC_STATD_PORT='$STATD_PORT'/; s/^#LOCKD_TCP_PORT=.*/LOCKD_TCP_PORT='$LOCKD_PORT'/; s/^#LOCKD_UDP_PORT=.*/LOCKD_UDP_PORT='$LOCKD_PORT'/; ' ${DEFAULT_RPC} sed -i ' s/^\s\{4\}\/usr\/sbin\/rpc\.mountd$/ \/usr\/sbin\/rpc\.mountd -p '$MOUNTD_PORT'/; /if \[ \-x \/usr\/sbin\/rpc.mountd \]/ i RPC_MOUNTD_PORT='$MOUNTD_PORT'; ' ${RC_NFSD} /etc/rc.d/rc.rpc restart sleep 1 /etc/rc.d/rc.nfsd restart ) The above should cover both 6.10.0-rc1 while still keeping compatibility with prior versions.1 point
-
I had looked over some different threads (listed below) that discuss how the cache pool is currently implemented in unRAID and its current limitations. Those being that btrfs RAID-0 can be setup for the cache pool, but those settings are not saved and "revert" back to the default RAID-1 after a restart. I also found a much older topic related to pre 6.0 that states that you can setup a BIOS RAID-0, however "unRAID will not be able to spin it down, or get the disk temperatures..." With that in mind, I really have 0 concerns about having parity or redundancy on my cache drives as I regularly backup my VMs and mover pushes over any cached data to the main array nightly. So, I would like to have my SSDs setup with RAID-0 (btrfs or BIOS) if possible, but have a few different questions in regards to this. Is everything above still the current situation regarding RAID arrays as cache drives in unRAID? Does anyone have a BIOS RAID-0 array set as their unRAID cache drive currently, and if so do you have any issues with it? I know JonP made mention of not seeing the efficacy of having btrfs RAID-0 over "single", but I don't know enough about how that's implemented to be able to say I want one over the other. Has LT made any new comments as to when the btrfs RAID-0 option will be added (if it will be added)? Will we only be seeing "single"? What are the pro's and con's of "single" vs. 0? Adding a second SSD under /mnt/cache WITHOUT RAID1 (Read 449 times) https://lime-technology.com/forum/index.php?topic=35394.msg329612#msg329612 btrfs cache pool (Read 11135 times) http://lime-technology.com/forum/index.php?topic=34391.30 BTRFS vs. ZFS comparison (Read 12147 times) http://lime-technology.com/forum/index.php?topic=42068.msg405365#msg405365 Topic: Combine disk in an RAID-0 cache disk. (Read 4510 times) https://lime-technology.com/forum/index.php?topic=7640.msg75397#msg753971 point
-
If you have disk shares enabled (under Settings >> Global Share Settings) then you can see each drive across the network just like any other share. You can then use whatever tool you like on the PC/Mac to move the files (e.g. Windows Explorer/Finder). This tends to be slower than doing it locally on the Unraid server but many people are more comfortable doing it that way. One important rule to follow however you decide to do it is to do the copy/move diskX to diskY, and not diskX to User Share. Mixing disk shares and User shares in the same copy/move command can lead to data loss.1 point
-
Haven't messed with bonding for a long while, but you want to turn bonding off on eth1, so that it becomes available for bonding with eth01 point
-
Click the name of the VM on the VMs page and a section will expand underneath the VM showing the size of the vdisk. Click that size and rename it to your new size, then press enter. Should do the resize command for you pretty easily.1 point
-
*Running RC4. I just came across this post because I too have the need to grow a VM .img file a little. I have always been used to doing this from the command line BUT I was interested to try the GUI route. However, no matter what menu I selected no matter where I clicked I couldn't find the size setting of the "existing" .img file to change. Has this been removed recently or am I just blind. qemu-img resize vdisk1.img +5G That command worked like a charm. I DID have to do some partition fiddling within the Windows 10 VM as Windows created a recovery partition after the main system partition which stopped me from extending. AND for some reason Windows 10 doesn't want to let me delete it. So for those who come across this post who have a similar issue I used this free tool. http://www.easeus.com/partition-manager/epm-free.html They "Push" their paid versions obviously but this free version (not trial) should work fine.1 point