Leaderboard


Popular Content
Showing content with the highest reputation on 06/28/22 in Posts
-
I made a fix in uploading binary files using Dynamix File Manager, please update.3 points
-
Overview: Support for Docker image arch-plex in the binhex repo. Application: Plex - https://plex.tv/ Docker Hub: https://hub.docker.com/r/binhex/arch-plex/ GitHub: https://github.com/binhex/arch-plex Documentation: https://github.com/binhex/documentation If you appreciate my work, then please consider buying me a beer For other Docker support threads and requests, news and Docker template support for the binhex repository please use the "General" thread here1 point
-
Pulseway is a great tool that allows you to remotely monitor servers from iOS, Android, and the web. I mainly use it on iOS for the notifications about loss of network, high CPU usage or my server being shutdown. It was one of the few things I missed when I switched my server to unRAID. Luckily, I figured out how to get it installed and working. Here's the steps I took: 1. Download the Pulseway Agent for Slackware from Pulseway's website 2. Copy the pulseway_x64.txz to /boot/extra (this is also the flash smb share so flash/extra) 3. Create a new folder,pulseway, in the /boot directory 4. Reboot unRAID 5. SSH into server and copy config.xml.sample to config.xml: cp /etc/pulseway/config.xml.sample /etc/pulseway/config.xml 6. Edit the config.xml file you just copied, you'll need to add your Pulseway username/password and setup any notifications you want to receive (change the Enabled flag from False to True). I enabled Network interface monitoring (change interface name to br0) as well as WhenOffline, HighCpuUsage and MemoryLow notifications. 7. Start Pulseway service: /etc/rc.d/rc.pulseway start 8. Copy the id file generated by Pulseway to the /boot/pulseway directory (if you don't do this, the server will show up as a new machine in Pulseway every time unRAID boots): cp /var/pulseway/pulseway.id /boot/pulseway/pulseway.id 9. Copy your config file to /boot/pulseway cp /etc/pulseway/config.xml /boot/pulseway/config.xml 10. Add the following lines to /boot/config/go cp /boot/pulseway/config.xml /etc/pulseway/config.xml cp /boot/pulseway/pulseway.id /var/pulseway/pulseway.id /etc/rc.d/rc.pulseway start 11. Reboot unRAID and make sure everything works! Explanation: unRAID's OS is stored in RAM so any changes you make do not persist after a reboot/shutdown. That's why we need to move everything to the /boot drive (the flash drive unRAID boots from). On startup, we're installing Pulseway, copying the config and id files to their respective locations and then starting the service. Troubleshooting: If the Pulseway service fails to start, you can look in the syslog for clues as to why: cat /var/log/syslog | grep pulseway Typically, the problem is a misconfigured config.xml file Changelog 1/19/2021: Removed unneeded symlink commands1 point
-
Even with macvlan support, using a central DHCP management solution for all clients and hosts in your network is not possible for Dockers in unraid. This is a docker plugin, that promises to solve that: https://github.com/devplayer0/docker-net-dhcp ...from the readme.md: docker-net-dhcp docker-net-dhcp is a Docker plugin providing a network driver which allocates IP addresses (IPv4 and optionally IPv6) via an existing DHCP server (e.g. your router). When configured correctly, this allows you to spin up a container (e.g. docker run ... or docker-compose up ...) and access it on your network as if it was any other machine!1 point
-
So I had done all of this, but interestingly, the only way I could get it working was by setting "ListOnMasterServer": true on only one of the instances. If it was true on both, joining the server would either fail to load, or would join the wrong server when using the "Continue" menu in game. Works now though!1 point
-
My VM did not crash last night so it looks like that corrected my issued. Thank you for the help.1 point
-
I made some progress. I'm using these in game parameters; +server.maxplayers 10 +server.secure 0 +server.encryption 0 +rcon.web 1 +rcon.port 28016 +rcon.password ***** Note on the rcon port - container has "eg: '+rcon.port 27016 +rcon.password YOURPASSWORD". I used 28016 as its the game port +1. I also added 28016 as a port variable in the container. I also added myself as an admin through rcon and set server.eac to 0 and gave the server.writecfg command after to save it. (used http://rcon.io/) Error's I get now are relating to steam: (Steam Status "Invalid") (Steam Status "InvalidAuthSession") Still working on a fix for these.1 point
-
Du meinst den Link in dem Post für das neue Plugin von Darkside: Neues S3 Sleep von Darkside Davor das alte S3 Sleep bitte deinstallieren. Gruss, Joerg1 point
-
I finally got around to power cycling the server. The m.2 came back this time around and was added to the cache pool again. Hopefully no more issues...1 point
-
Ok, I'll do some more research and if I find a fix I'll update here for anyone else looking to do this.1 point
-
Please turn off validation, it has no benefit in your case. I would like you to start over please by doing the following things: Remove the container Remove the projectzomboid folder from your appdata directory Pull a fresh copy from the CA App and try it again without changing anything and leave it sometime to start up1 point
-
And other reasons such as you are experiencing1 point
-
Sorry for the late answer, i managed to rebuild disk 5 and resync my parity 2 disc. Unfortunately i lost the data on disk 5, but the important stuff is still there. I learned a lot Anyhow, thank you for your support, you were very helpful !1 point
-
Wie gesagt das mach ich nicht... Sicher: DATA_DIR=/root/powertop LAT_V=2.14 cd ${DATA_DIR} git clone https://github.com/fenrus75/powertop cd ${DATA_DIR}/powertop git checkout v${LAT_V} ./autogen.sh ./configure LDFLAGS='-pthread' --prefix=/usr make -j$(nproc) DESTDIR=${DATA_DIR}/powertop${LAT_V} make install cd ${DATA_DIR}/powertop${LAT_V} makepkg -l y -c y ../powertop-2.14-x86_64-1.txz rm -rf ${DATA_DIR}/powertop ${DATA_DIR}/powertop${LAT_V} Die Variablen hab ich jetzt mal einfach so am Anfang definiert damit es ein wenig klarer wird...1 point
-
It’s fairly straight forward took about 20 minutes for me. Might be a little longer if you’re on wifi.1 point
-
I think this will help you- https://support.apple.com/en-us/HT2049041 point
-
@MPC561 Das Problem ist jetzt übrigens weg, seitdem ich den 2. LAN Port im BIOS deaktiviert habe. Liegt also an dem Bug. Vermutlich hat Unraid später noch versucht auf den LAN-Port zuzugreifen und da war der Server dann schon halb gecrasht und der Verbrauch ging deswegen hoch. Jetzt durchgehend 13W 😋1 point
-
See this thread---- https://forums.unraid.net/topic/124701-v6102-randomly-losing-access-to-smb-shares-via-active-directory Your problem could be related.1 point
-
Just wanted to let you know, I successfully installed the basic key and upgraded to PRO. Thank you! Now placed the USB away till I gather my last parts. Look forward to join very soon!1 point
-
Thank you for all your support, and everything you do for the Unraid community! I have gone ahead and opened an issue on the GitHub. Take care.1 point
-
ich hab das Thema MacOS lange beerdigt, aber schau mal hier nach, liegt ja anscheinend an der MacOS smb Integration. im letzten Post ist noch zusätzlich ein Link zu einem anderen Thread1 point
-
Ahh I see, I’ll just assign to the usb and upgrade! Thank so much!1 point
-
Wer mag kann powertop aus dem NerdPack deinstallieren und sich powertop 2.14 wie folgt installieren: ( @DOM_EU) Unraid 6.9 cd /tmp && wget https://github.com/mgutt/unraid-packages/raw/main/6.9.2/powertop-2.14-x86_64.tgz && upgradepkg --install-new powertop-2.14-x86_64.tgz Unraid 6.10 cd /tmp && wget https://github.com/mgutt/unraid-packages/raw/main/6.10.3/powertop-2.14-x86_64.txz && upgradepkg --install-new powertop-2.14-x86_64.txz Das Paket habe ich wie folgt gebaut: Voraussetzungen (bei Unraid 6.10 habe ich alle Pakete von Hand installiert, da die Pakete im Dev Pack meine ich nur für 6.9 gedacht sind): - per NerdPack die Pakete installieren: perl - per DevPack die Pakete installieren: autoconf, automake, gcc, gcc-gplus, gettext, libtool, m4, make, pkg-config - außerdem: gettext-tools, autoconf-archive, ncurses, pciutils (Kopien davon in meiner Github Repo) Dann folgende Befehle ausgeführt: cd /tmp git clone https://github.com/fenrus75/powertop.git cd /tmp/powertop ./autogen.sh ./configure --prefix=/usr make install DESTDIR=/tmp/powertop/PACKAGE cd /tmp/powertop/PACKAGE makepkg -l y -c n /tmp/powertop/powertop-2.14-x86_64.tgz upgradepkg --install-new /tmp/powertop/powertop-2.14-x86_64.tgz1 point
-
Sometimes an update kills a docker container. A good example is the InfluxDB container. The InfluxDB team changed the location of the database from /var/lib/influxdb to /var/lib/influxdb2 and the unraid template maintainer missed this part, so updating this container removes the files from appdata. But there are other examples like the MariaDB 10.6 update which broke several Nextcloud installations. Of course everyone should create backups, but most of them work only on daily basis on not exactly at the time when the user hits the update button My feature request: - a user hits the update button - unraid reminds the container version - container is removed - appdata folder files of this container are copied on the same disk/pool through "cp --reflink=always /mnt/diskX/appdata/containername/ /mnt/diskX/appdata/containername-<containerversion>-YYYYMMDDTHHIISS/" (reflink guarantees, that it won't consume (much) additional storage space) - recent container images are installed Now the user gets a note that he is able to rollback for the next three days. The rollback can be started through the usual container menu. If a rollback is done, the container repository name is automatically set to containername:<containerversion>.1 point
-
It is impossible to keep these up-to-date and applicable to everyone everywhere. Best approach is to post in the appropriate subforum, tell us what you are considering buying, and see if anyone has any suggestions.1 point
-
Thanks man! Awesome you put a working solution here! Was looking for an solution on github and other sites for hours, and was suffering for months!1 point
-
It needs to be released but not currently in base os awaiting validate and merge by limetech.1 point
-
Here is a space themed banned I created
 1 point
 -
Congrats guys. Thank you to everybody that recognizes their efforts and the efforts of all that keep this place moving as smoothly as it does.1 point
-
FYI, default username/pw are detailed in the getting started doc. https://wiki.craftycontrol.com/en/4/docs/Getting Started#logging-in Logging In Once you reach the Crafty webpage you will be greeted with a login screen. The default credentials in config.json are: Username: admin Password: crafty We highly recommend changing this immediately after logging in.1 point
-
It came online! i've set the files to 664 but folder to 777 and it works now.\ Thanks1 point
-
I've run the chown and chmod on the docker container, output from named: 06-Jun-2022 07:47:50.274 general: info: loading configuration from '/etc/bind/named.conf' 06-Jun-2022 07:47:50.275 general: error: directory '/etc/bind' is not writable 06-Jun-2022 07:47:50.275 config: error: /etc/bind/named.conf:6: parsing failed: permission denied 06-Jun-2022 07:47:50.276 general: critical: loading configuration: permission denied 06-Jun-2022 07:47:50.276 general: critical: exiting (due to fatal error) and ls -la after: #ls -la /etc/bind total 8 drwxr-xr-x 1 99 users 42 Jun 3 02:43 . drwxr-xr-x 1 root root 746 Jun 6 01:02 .. -rw-rw-r-- 1 root root 170 Jun 3 02:43 local.hosts -rw-rw-r-- 1 root root 513 Jun 3 02:38 named.conf and from the UNRAID cli: # ls /mnt/user/appdata/bind9/ -la total 8 drwxr-xr-x 1 nobody users 42 Jun 3 02:43 ./ drwxrwxrwx 1 nobody users 230 Jun 6 05:02 ../ -rw-rw-r-- 1 root root 170 Jun 3 02:43 local.hosts -rw-rw-r-- 1 root root 513 Jun 3 02:38 named.conf should i chown the bind9 folder as root:root?1 point
-
网络类型选择custom:br0,然后把那2个防火墙的变量删了,peerport设置为514131 point
-
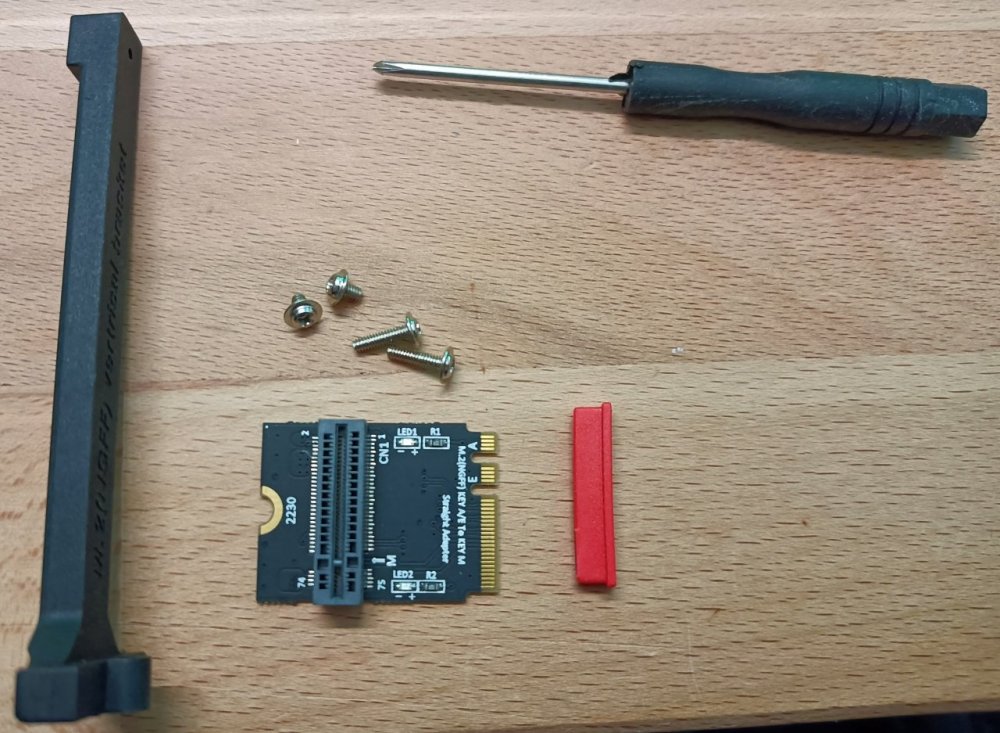
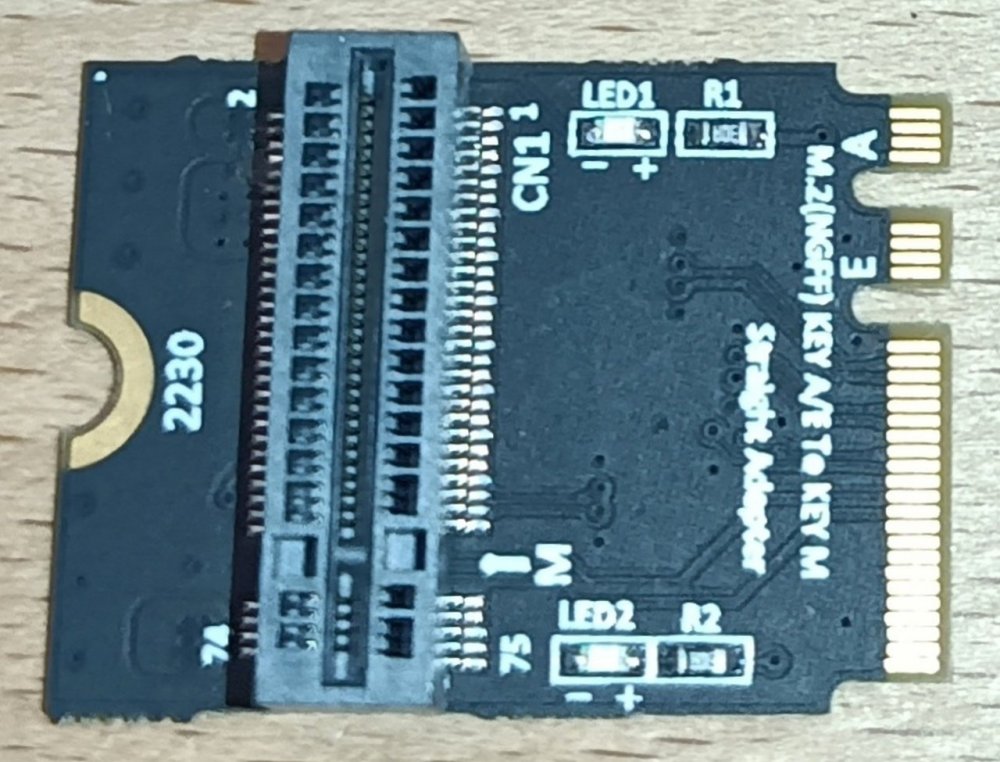
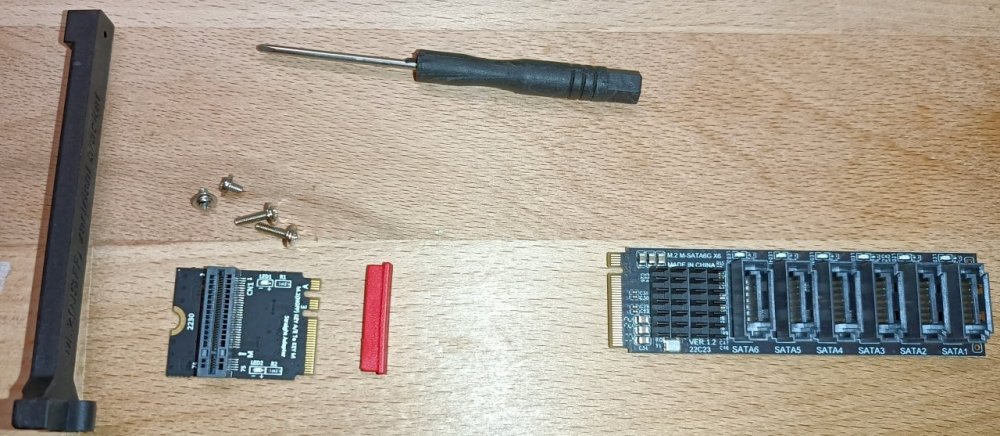
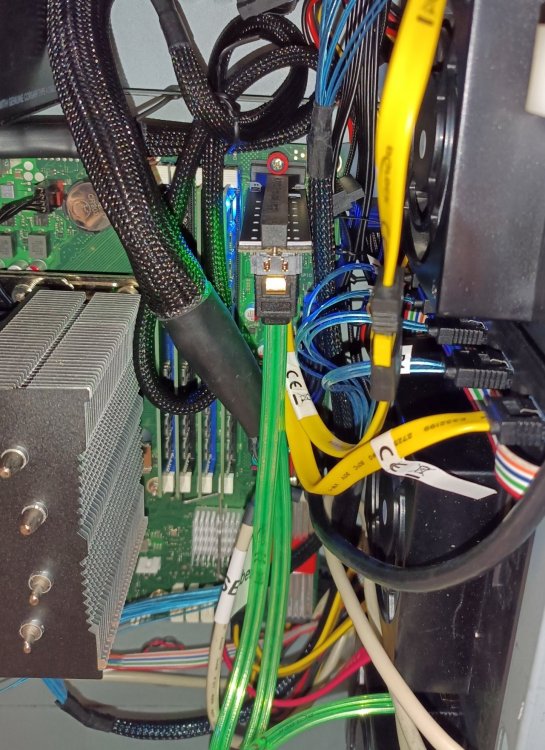
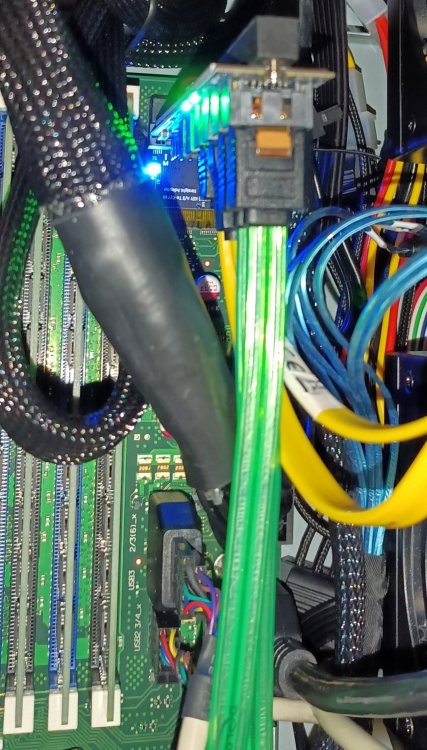
Ich habe eine Aktualisierung durchgeführt: Im oberen PCIe Slot X16 habe ich per UEFI/BIOS Bifurication auf 8x4x4x einstellen können und dort nun eine x4x4x4x4 M.2 Karte drin. Eine NVMe Samsung 970 Evo Plus 2TB spielt darauf nun Cache und wird im Laufe der Zeit (und je nach verfügbarem Geld) um maximal 2 weitere M.2 SSD erweitert (wegen der 8x4x4x Aufteilung sind dort keine 4 SSD auf der Karte nutzbar). Zusätzlich: In dem M2 Key-E Slot war ja ein JMB582 2Port SATA Kontroller drin. Den habe ich entfernt. Dort habe ich nun einen Adapter von Key A/E auf Key-M eingebaut und dieser hat eine M.2 Key-M 6Port SATA Karte aufgenommen. Aufgrund eines Kunststoffhalters ist die Kontruktion nicht so wackelig, wie befürchtet. Da der Key-E Slot nur mit einer PCIe Lane (vermutlich 3.0) angebunden ist, macht es keinen Sinn mehr als 4 der SATA Ports für Festplatten gleichzeitig zu verwenden. Aber das sind immer noch 2 Ports mehr, als mit dem vorherigen JMB582 Adapter. Somit kann ich nun in Summe 18 SATA Geräte anschliesen. 12 SATA Ports über Kontrollersteckkarten mit je ca. 250MByte/s gleichzeitig und 6 SATA Ports onBoard, die sich mutmaßlich 2GByte/s teilen. Hier noch ein paar Bilder Dies ist der Adapter, der in einen KEY E/A Sockel passt und nach oben/senkrecht auf Key M adaptiert. Dabei links die Kunstsoffhalterung, die die 2280 M.2 Karte festhalten soll. Dies ist der Adapter in Großaufnahme, der in einen KEY E/A Sockel passt und nach oben/senkrecht auf Key M adaptiert. Links noch einmal der Key A/E auf Key M Adapter rechts die ASM1166 SATA Karte, die eigenltich PCIe3.0 x2 auf 6 SATA Ports adaptieren soll. Leider hat mein Mainboard an dem M.2 Key E Slot nur eine PCIe Lane, wodurch die Bandbreite sich besser nur auf 4 Ports aufteilt. Die rstlichen beiden SATA Ports lasse ich einfach frei. Hier der die eingebaute Kombination (mit 2 gelben und 2 grünen Kabeln zu den Wechselrahmen für Festplatten). Das Selbe aus einem leicht anderen Winkel.
 1 point
 -
Unrelated to this I've been recommending for a long time monitoring any btrfs fs for errors, and it also help with this, since it's likely were any corruption issues will first be visible.1 point
-
Answered my own question: Open the Console of the container Edit: /etc/supervisor.d/vnc.ini Change both of the "5900" to "5909" or similar, your choice, just don't be the same port one of your VMs is running on.1 point
-
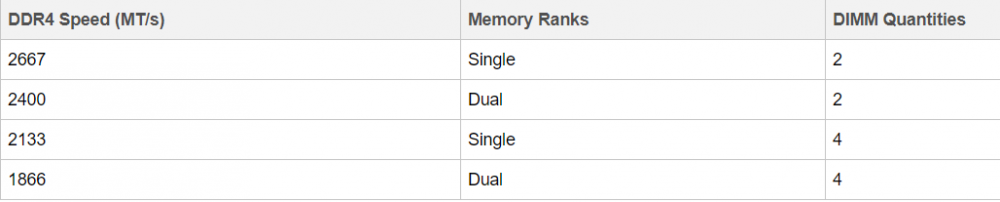
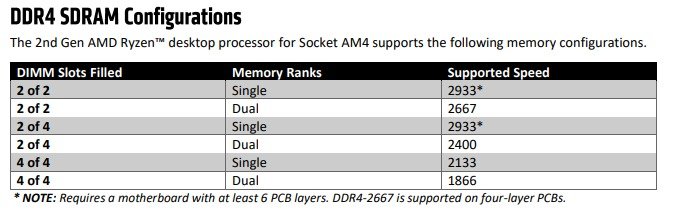
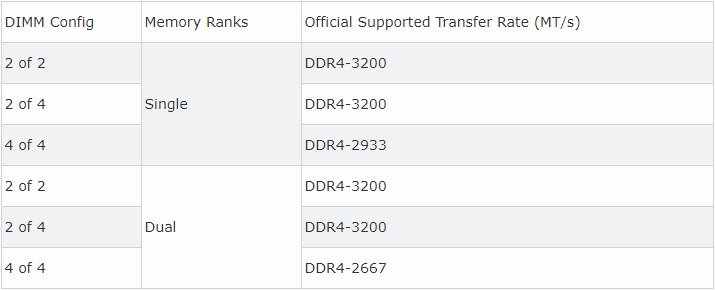
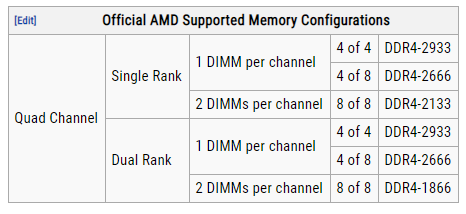
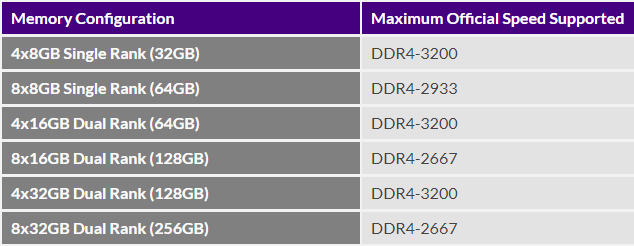
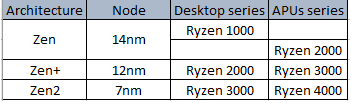
What can I do to keep my Ryzen based server from crashing/locking up with Unraid? Ryzen on Linux can lock up due to issues with c-states, and while this should mostly affect 1st gen Ryzen there are reports that 2nd and even 3rd gen can be affected in some cases, make sure bios is up to date, then look for "Power Supply Idle Control" (or similar) and set it to "typical current idle" (or similar). If there's no such setting in the BIOS try instead to disable C-States globally, also note that there have been some reports that with some boards the setting above is not enough and only completely disabling C-States brings stability. Also many of those servers seem to be running overclocked RAM, this is known to cause stability issues and even data corruption on some Ryzen/Threadripper systems, even if no errors are detected during memtest, server and overclock don't go well together, respect max RAM speed according to config and CPU listed on the tables below. Note: Ryzen based APUs don't follow the same generation convention compared to regular desktop CPUs and are generally one generation behind, so for example Ryzen 3200G is a 2nd Gen CPU: 1st gen Ryzen: 2nd gen Ryzen: 3rd gen (3xxx) and Zen3 (5xxx) Ryzen : Threadripper 1st Gen: Threadripper 2nd Gen: Threadripper 3rd Gen:

 1 point