Leaderboard


Popular Content
Showing content with the highest reputation on 07/01/22 in Posts
-
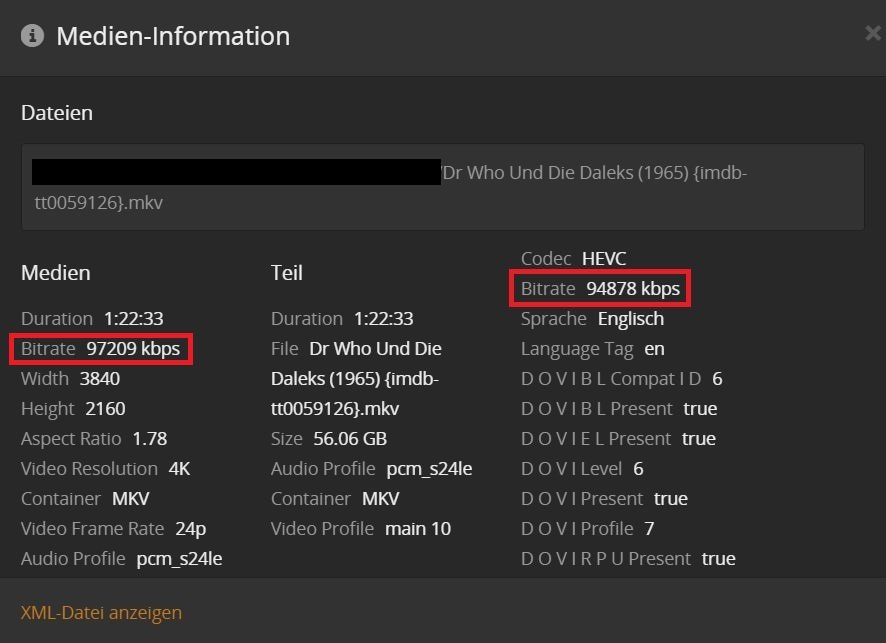
Wenn Du auf Dein NAS via SMB o.ä. zugreifst, dann öffnet das Programm (z.B. Kodi) eine Datei auf direktem Wege und liest aus dieser dateibasiert. Beim Streaming (z.B. Plex) öffnet der Server die Datei und stellt Dir den Inhalt via eines Streaming Protokolls zur Verfügung, Das kann HTTP, RTP, RTSP, WebRTC, etc. etc. sein. Diese können auch geroutet werden. Um bei Plex zu bleiben: Die bieten z.B. auch einen Relay-Server. Wenn Du keine direkte Verbindung zwischen Server und Klient leisten kannst, dann vermitteln die über ihren Relay (max 2 MBit/s) den Content zwischen Server und Klient. Kurz gesagt: Bei Streaming handelt es sich um eine Klient/Server Umgebung. Beim lokalen Abspielen hingegen ist kein Server im klassischen Sinne involviert. Gut der SMB-Server ist auch ein Server. Aber der stellt Dir nur die Datei zur Verfügung. Mehr macht der nicht. Bei lokaler Nutzung kümmert sich also das Programm selbst um alles (Verwaltung/Abspielen). Beim Streaming kümmert sich der Server um die Verwaltung und die Aufbereitung für den Klienten und die Klienten nur noch um die Präsentation. Du musst Dir das vorstellen wie bei einer Datenbank. Du kannst mit Deinem Programm eine Datenbank öffnen und mit Deinem Programm selbst daran rumfummeln. Oder Du installierst einen Datenbank-Server und übermittelst dem Anweisungen - der kümmert sich dann um alles. Also mir war das klar. Wurde da etwas falsch vermittelt? Die a.) Bandbreite des Anschlusses in Deinem Krankenhauszimmer, b.) der VPN Anbieter, c.) Dein Upstream und d.) die Bandbreite des Content passten dann halt zusammen. Wenn nur eines nicht passt --> Ruckeln. Die oben im Bild gezeigte Bandbreite kann weder mein Upstream (40 Mbit/s) noch (beim letzten Aufenthalt bei Orthoparc) der Anschluss des Krankenhauses. Deshalb ist in meinem Gepäck (Krankenhaus, Urlaub) immer ein Fire-TV Stick mit installiertem Plex. Und wenn ich dann in z.B. Ägypten mit 1 MBit/s bedient werde, dann gucke ich mir trotzdem den im Screenshot gezeigten Content an. Aber dafür wird dann Transcoding benötigt, darüber wollten wir ja nicht reden. *** Nachtrag*** Es wurde nicht danach gefragt, aber hier noch weitere Vorteile einer Klient/Server Umgebung: Mehr oder weniger identisches Aussehen über alle Klienten und Plattformen hinweg. Zusätzlich eine zentrale Abspiel-History über alle Klienten hinweg (Auszug aus Plex Liste):
 3 points
 -
Nur der Vollständigkeit halber. Hier die Doku von Plex zu dem Thema. Es gibt noch viel mehr Varianten als wir aufgeführt haben (Umwandlung inkompatibler Container Formate on the fly, etc): https://support.plex.tv/articles/200250387-streaming-media-direct-play-and-direct-stream/ Jetzt muss aber gut sein2 points
-
wie @hawihoney schon perfekt erklärt hat. kleiner Nachtrag noch, auch eine Client/Server Lösung wie Plex unterscheidet dann Direct Play -> analog lokalem abspielen Direct Stream -> hier wird idR dann evtl Audio transcoded und mit dem Bild remuxed (gerne TV Apps ... da die z.Bsp. DTS-HD nicht verstehen) ... Subs, ... Transcoded Stream -> wird bei Plex auf Wunsch sogar per DASH bereitgestellt, sprich, adaptiv, je nach Verbindungsqualität ... Dein VPN Beispiel, hier noch kleine Anmerkung, wenn ich heute mobil (LTE, ...) schaue, wollen die meisten Nutzer ja nicht ~ 10 (HD) oder sogar 50+ (4k remux) mbit "verbraten" da bei den Meisten sonst der Tarif recht schnell aufgebraucht wäre2 points
-
I may speed things up and buy a nvidia card. As soon as I do, unraid and plex will have the iGPU working perfectly. 🤪2 points
-
Great news! I've been trucking along with software transcode for a few months now. Just upgraded to symmetrical 1g internet. Ready to start sharing my plex with friends and family.2 points
-
Responding to this thread because I just spend 2 days looking all over the internet for why my USB audio card was still crackling in my macOS Monteray VM. I do not have any additional PCIe USB cards in my system. I went to VM Manager and enabled "downstream" for PCIe ACS Override, then rebooted. (I turned off the auto-start on the array just because I wanted to be extra safe I don't accidentally pull out the SATA controller from my system for any reason..) Anyway, then when it came back up I found the IOMMU group that contained my motherboard's onboard USB 3.0 controller and set it to "bind to VFIO at boot" and rebooted. This IOMMU group contained my motherboards encryption controller as well as the motherboard audio ports. After the last reboot, I started up the array, and set newly isolated USB 3.0 controller to a pci device for my macOS VM, plugged the USB audio card into the port and it worked like a charm. I can now unplug usb devices from the VM while its running with no issue. TL;DR - don't pass the USB Audio card directly to a macOS VM - it will still crackle. The only way to get around the crackle/popping/dropping out audio is to pass an entire USB controller to the VM.2 points
-
Posting this here in the hope that it assists someone in the future. I host my instance of HomeAssistant in a VM on unRAID. I have recently purchased a ConBee II USB-Gateway so I can add Zigbee devices. I added the USB using the unRAID VM GUI, like I imagine most would, by just checking the tick box next to the device. This didn't work. While Home Assistant found the device, the integration would not add (there were communication errors). The trick was to add the device as a serial-usb device. AFAIK you cannot do this via the GUI. So I added the following code to my VM config: <serial type='dev'> <source path='/dev/serial/by-id/<yourusbid>'/> <target type='usb-serial' port='1'> <model name='usb-serial'/> </target> <alias name='serial1'/> <address type='usb' bus='0' port='4'/> </serial> I was then able to add the integration easily. Interestingly, it didn't auto discover, but that's just an aside. Note, <yourusbid> can be found via the command line - it contains the device serial so its not to be posted.1 point
-
Unassigned Devices Preclear (UD Preclear) is an add on plugin to UD that allows you to manage preclearing disks either from the UD page or a separate page (Tools->Disk Utilities->Disk Preclear) meant to manage preclearing unassigned disks. This plugin is derived from the Preclear Disk Plugin authored by gfjardim. Disks that are candidates for preclearing will have a preclear icon next to the disk serial number in UD, and will be listed in the 'Tools->Disk Utilities->Settings->Disk Preclear' page. Only presenting unassigned disks that are eligible candidates for a preclear will prevent accidental data loss. You don't want to preclear a disk with data on it. For a disk to be considered a preclear candidate, it must have one of the following attributes: An Unassigned disk with no partitions. An Unassigned disk with a preclear signature and a partition with no file system. There are two methods available for preclearing: 'Enhanced' preclear written by gfjardim that supports pausing and resuming preclears. This is the recommended script to use. 'Docker' preclear is the preclear docker container authored by binhex using the latest version of the legacy preclear script. The advantage to using the docker container is that preclears are isolated to the docker container. This preclear script cannot be paused and resumed, and doesn't support notifications. The binhex preclear docker must be installed and running before this will show as a preclear choice. Both methods write a preclear signature that is accepted by Unraid. When a disk is precleared by UD Preclear, and subsequently installed in the array, Unraid will accept it as a cleared disk and not perform another lengthy clear operation. You do not have to pre-format the disk before adding it to the array. Unraid accepts a pre-cleared disk and will not do a clear when the disk in added if it sees the preclear signature. Preclears are done in the background so you don't have to leave any consoles open. The Tmux package is included so the preclears can run on background consoles. Please do not update the Tmux package through the NerdPack GUI. The latest version of Tmux has a bug and messes up the status display because the terminal size is defaulted to 24x80 and can't be changed. If you want to format the disk for use in UD or as a Pool device, click the red 'X' next to the preclear status line to remove the Preclear Log, then click the red 'X' next to the serial number to remove the preclear signature and all partitions. You'll then be able to format the disk. The choices for preclear operations are: Clear Disk - The disk is cleared and the Unraid signature is written to the disk. This will create an empty partition on the disk. Erase Disk - Erase the entire disk by writing all zeros. The preclear signature is removed. Erase and Clear Disk - random patterns are written to the disk and then zeroes are written. This is a good choice for a disk to be discard to ensure all traces of files are removed. Verify Signature - The disk signature is checked. Verify Disk - The disk signature is checked and the disk is verified to be zeroed. Post-read Verify - Perform a post read verify to check the disk. This is not available in the 'Enhanced' script. Clear Signature - Remove the preclear signature from the disk. This is not available in the 'Enhanced' script. You can follow the status of preclears in UD, on the UD Preclear page, or by hovering your mouse on the preclear icon in the Unraid footer. While preclearing disks is not necessary with the current Unraid versions, users get a sense of confidence with pre-testing their disks. When the original preclear script was written, Unraid would take the array off line while it cleared a disk if it was not precleared. That's why the script is called 'preclear'. In the old days, preclearing a disk would prepare it for the array and Unraid would not take the array offline when a new disk was added. UD Preclear is a direct replacement for the Preclear Disk Plugin. You will have to remove that plugin before the UD Preclear can be installed. UD must be installed before UD Preclear will install. Go to 'Apps' and search for Unassigned Devices Preclear and install it from there. UD+ is not necessary for preclearing, although you'll need it to delete partitions and format disks. Because UD Preclear uses some features in Unraid starting with 6.9, it is not backwards compatible with any Unraid version older than 6.9.1 point
-
Like many of you, I use my unraid server for plex and media downloading/management. Recently I discovered that hardlinks weren't working properly and found out it was because I was downloading to a different folder mapping than the storage mapping. I set everything to the same /Media path and its working now, but I have a LOT of old data that is now duplicated in the downloads folder(/Media/Sonarr/Downloads) and in the place that Sonarr then organized it after it finished(/Media/TV and /Media/Anime). I've read about some tools like Czkawka(https://github.com/qarmin/czkawka) and DupeGuru(https://github.com/arsenetar/dupeguru) that will help me find the duplicate files, hardlink(or symlink? softlink?) them, and remove the duplicate. I want to do this but I only have enough linux knowledge to do basics or follow instructions. My main concerns are that some files in the downloads folder might be a duplicate, but not be on the same drive anymore (I have 2 drives + 1 parity + cache), and I think that will be an issue? Also I'm not familiar with the inner workings of unraid and how it presents multiple drives as one folder in /mnt/user/, and I don't want to break it running something not intended for this configuration on it. So my question, can any of you help me figure out how to do this properly with any of these(or other) tools?1 point
-
Application Name: Vault Application Site: https://www.vaultproject.io/ Docker Hub: https://hub.docker.com/_/vault Github: https://github.com/hashicorp/docker-vault Manage secrets and protect sensitive data. Create and secure access to tokens, passwords, certificates, and encryption keys. Vault is a tool for securely accessing secrets. A secret is anything that you want to tightly control access to, such as API keys, passwords, certificates, and more. Vault provides a unified interface to any secret, while providing tight access control and recording a detailed audit log. Here is a video about this container. This image is an official one, I do not manage it, though, I will do my best to support it here. The app is going to install HashiCorp Vault with a file backend (default), you can change this backend if you want to, with other parameters in VAULT_LOCAL_CONFIG variable : NOTE : At startup, the container will read configuration HCL and JSON files from /vault/config (any information passed into VAULT_LOCAL_CONFIG is written into local.json in this directory and read as part of reading the directory for configuration files). Please see Vault's configuration documentation for a full list of options. {"backend": {"file": {"path": "/vault/file"}},"listener": {"tcp": {"address": "0.0.0.0:8200", "tls_disable": 1}}, "ui": true} Port : Vault is using port 8200 (default). Volumes : We have two volumes in your installation : - file : mandatory as you want the secrets to persist to your disks. - logs : only if you want to audit logs. (commands in General usage section) Setup : You can setup Vault from the WebUI, but I will go with the CLI. After launching the app, install vault in your OS as a client : https://www.vaultproject.io/downloads Set VAULT_ADDR to your Unraid server IP. export VAULT_ADDR='http://192.168.0.100:8200' Create key shares and set a threshold about how many keys you need to unseal Vault. vault operator init -key-shares=6 -key-threshold=3 e.g output (Keep these keys and Root token safe and do not share them!): Unseal Key 1: xDElr...IofCZFSvPe Unseal Key 2: 2TQgn...vyQ7fSdSWR Unseal Key 3: JALI...EpHFSw7SsI Unseal Key 4: knzg...xEFwfwWSbKQ Unseal Key 5: bJJmA...DSwfsddOTc Unseal Key 6: xft8...aTdVSTYZg5 Initial Root Token: hvs.tnhE...y8NkA Run unseal command 3 times with different keys every time (depends of your threshold number): NOTE : best practice would be to not write the key directly, and only type "vault operator unseal", so the keys is not in your cli history. vault operator unseal xDElr...IofCZFSvPe vault operator unseal 2TQgn...vyQ7fSdSWR vault operator unseal knzg...xEFwfwWSbKQ After 3 times running this command, you should see Sealed false Now Vault is unsealed, you can login to vault : NOTE : best practice would be to not write the token directly, and only type "vault login", so the token is not in your cli history. vault login hvs.tnhE...y8NkA Example Usage : There is many secret engine you can use : https://www.vaultproject.io/docs/secrets/ In this example, I will use the KV Engine as it's the most basic one. Enable the KV (Key Value) Engine https://www.vaultproject.io/docs/secrets/kv : vault secrets enable -version=1 -path=secret kv Create our first secret : vault kv put secret/my-vault/password password=123456 List our secret : vault kv list secret/ vault kv list secret/my-vault/ Read the secret (defaults in table format): vault kv get secret/my-vault/password ====== Data ====== Key Value --- ----- password 123456 Read the secret in json format: vault kv get --format=json secret/my-vault/password { "request_id": "31915c6c-2f8f-f7c4-146c-3dc81e80033c", "lease_id": "", "lease_duration": 2764800, "renewable": false, "data": { "password": "123456" }, "warnings": null } Read only the password value in the secret: vault kv get -field=password secret/my-vault/password 123456 Create a key with multiple secrets : vault kv put secret/nextcloud/db db_name=nextcloud username=nextcloud_user password=secret Read secrets in json : vault kv get --format=json secret/nextcloud/db { "request_id": "db9604e4-f2eb-a529-c7f3-448b2846f565", "lease_id": "", "lease_duration": 2764800, "renewable": false, "data": { "db_name": "nextcloud", "password": "secret", "username": "nextcloud_user" }, "warnings": null } Only read username field : vault kv get -field=username secret/nextcloud/db nextcloud_user Delete our secrets : vault kv delete secret/nextcloud/db If you want to activate the audit logs : vault audit enable file file_path=/vault/logs/vault_audit.log If you want to disable the audit logs : vault audit disable file Vault is pretty fun and there is ton of different usages, from your bash scripts, in your code, in your CI/CD pipeline, SSH OTP, dynamic secrets, cloud provider authentication... have fun! Please post any questions/issues relating to this docker you have in this thread.1 point
-
Support thread for xavierh/goaccess-for-nginxproxymanager docker image. Issues can be opened here as well: https://github.com/xavier-hernandez/goaccess-for-nginxproxymanager/issues (please mention unraid) Known issues: If you add a new proxy in NPM the container needs to be restarted to read the new proxy host file created. I'm hoping to have a solution to this so the container does not need to be restarted.1 point
-
This issue has been solved. Turned out to be only noVNC what was not connecting, and it was due to invalid browser cookies. Clearing my cookies was the solution. Using a standalone VNC client connected without issue. I would like to thank everyone who helped. I would not have been able to figure this out without them, which makes me feel quite silly. ORIGINAL POST: Ok, so, first, I have an admission. I used unRAID as a trial for the full duration, then started a second trial on a new flash drive, but booting the same array. The reason I did this is that the purchase price of unRAID basic is roughly 1.5x a weeks pay for me, so it wasn't easy to save up enough. I have now purchased unRAID, though the purchase was badly bungled, the key is in my server, everything is activated and fine, I'm just screwed if I need to change flash drive at all, ever. That all aside, onto the real issue: On my first trial of unRAID, everything worked great, no issues whatsoever. On my second trial of unRAID, VMs stopped working correctly. They appear to start and run just fine, but the VNC remote simply doesn't connect. I have noticed that the VNC port for the first VM I start is 5900, but the VNC remote is trying to connect to 5700. Manually changing this to 5900 does not help, it still does not connect. I held off seeking support for this issue until after I had purchased unRAID. I now own an unRAID license, and the issue persists. The issue occurs on all VMs that I have tried. This includes Windows sever, pfSense, Fedora, OpenSUSE, Knoppix, VyOS, and various other Linux distros. While writing this post, I decided to take a look at the log. I am not too good with Linux yet, so this makes little to no sense to me, but there was a standout (highlighed in colour) log entry(s) when attempting to connect to the VNC remote. Feb 14 22:51:04 DefectiveServer nginx: 2018/02/14 22:51:04 [error] 7000#7000: *421214 recv() failed (104: Connection reset by peer) while reading response header from upstream, client: 192.168.127.100, server: , request: "GET /wsproxy/5700/ HTTP/1.1", upstream: "http://127.0.0.1:5700/", host: "192.168.127.87" Feb 14 22:52:25 DefectiveServer nginx: 2018/02/14 22:52:25 [error] 7000#7000: *421334 upstream sent no valid HTTP/1.0 header while reading response header from upstream, client: 192.168.127.100, server: , request: "GET /wsproxy/5900/ HTTP/1.1", upstream: "http://127.0.0.1:5900/", host: "192.168.127.87" Feb 14 22:52:25 DefectiveServer nginx: 2018/02/14 22:52:25 [error] 7000#7000: *421334 recv() failed (104: Connection reset by peer) while reading upstream, client: 192.168.127.100, server: , request: "GET /wsproxy/5900/ HTTP/1.1", upstream: "http://127.0.0.1:5900/", host: "192.168.127.87" I have an extremely powerful workstation, and high speed internet, so if a video of some sort is required/requested, I can easily provide. Haven't bothered yet, as all I can really think of to show is me attempting to connect and it failing, which shows basically no information. Other information to note; My "server" is an old Acer laptop with a faulty mainboard. Specifically, when an OS loads nVidia drivers, it causes kernel panic, on all OS's, with all nVidia drivers. The nVidia graphics is disabled in BIOS now, to prevent any accidents. All display is handled by the Intel graphics. This laptop does not appear to support any virtualization extensions. There are no relevant settings in the BIOS. I have 2 drives, both 750GB. 1 of which is mounted in the optical drive bay, using an adapter. The second drive was added to the array during the second trial. I did not attempt to load any VMs before adding it. Any help at all would be greatly appreciated. I have no idea where to even start in fixing this, and attempts to search for a solution online have not lead anywhere.1 point
-
You also have to add in the other 2 column totals. Looks like scrutiny logs are pretty large, see if you can do anything about that. Since you have so many containers it wouldn't be unreasonable to increase docker.img allocation, but growth needs to be dealt with.1 point
-
FYI anyone experiencing random slow speeds from google drive, there is starting to be many people report strange throttling behaviour. https://forum.rclone.org/t/rclone-mount-random-slow-speeds/31417/451 point
-
Na ich hab ja gemeint das die meisten Tests von Webseiten nicht geeignet sind um damit ein Mainboard für Unraid zu finden. Geeignete Boards hab ich ja schon geschrieben. Sie sollten min. 6 SATA Ports haben und mindestens eine NVME. Weniger ist hier mitunter mehr. Unnütze Gimmiks kosten kosten Strom. Am besten Gen 8-10 Intel. Ungeeignet bzgl. Stromverbrauch (wenn man nicht gerade einen Server mit Gaming GMs aufsetzt) ist alles mit zusätzlicher Grafikkarte. Das trifft besonders Ryzen System und selbst Ryzen System mit Prozessor mit iGPU sind meistens absolut nicht sparsam. Ältere Server Hardware ist meist auch ungeeignet. Die ist auf Ausfallsicherheit und nicht Stromsparen ausgelegt wie mgutt immer so schön schreibt. Und der Mann hat recht. Deswegen wirst du hier meist Intel Gen 8-10 hören. Ältere Gen 4-7 gehen auch noch (im allgemeinen) Ich hab sogar noch ein Sandy Bridge Board mit 6 Sata Ports das sehr sparsam ist. Aber bei dem hat die iGPU fürs transcoding nur alte Codecs. Aus all diesen Gründen... am besten Gen 10 Intel Prozessor mit Gen 10/11 Mainboard. Gruss, Joerg1 point
-
Dateien über das Netzwerk herunterladen und streamen, ist fast das selbe, allerdings wird beim streamen immer nur ein Teil der Videodatei geladen zb "Gib mir die ersten 10MB... OK gibt mir die nächsten 10MB" und der Client hat in der Regel noch einen Buffer, wo er x Sekunden vom Video bereit hält, um Netzwerkschwankungen ruckelfrei zu überwinden. Bist du Single? Weil mit Frau und Kindern, braucht man nicht mehr ankommen mit "geh in den und den Ordner". Die wollen suchen können, die wollen wissen wo man aufgehört hat zu schauen, die wollen immer und überall schauen können. Mein Sohn hat zb für die Urlaub 60 Folgen One Piece auf das Handy gezogen. Pro Folge auf ca 500MB komprimiert. Da das Original nur DVD Rips sind, merkt man qualitativ keinen Unterschied, aber es passt eben massig auf das Smartphone. Meine Tochter hat zb diverse Disney Filme auf das Tablet geladen und einen während dem Flug geschaut. Jedenfalls ist das schon mega komfortabel mit einer Bibliothek und Transcoding. Muss man nicht haben, aber wenn man es mal hatte, will man nicht mehr ohne 😅1 point
-
Data hat das wichtigste schon geschrieben bzgl. der Generation. Gen 11 und 12 Prozessoren haben neuere iGPUs die "noch" nicht "gut" supported sind. Also ein potentielles Problem beim Plex Transcoding etc. Mein Vorschlag bzgl. Gen 11 Mainboard und Gen 10 Prozessor (mit noch "guter" iGPU)hingegen funktionieren gut und Gen 11 Mainboards und Gen 10 Prozessoren sind auch verfügbar (Mindfactory zum Beispiel). Gute Tests von Boards gibt es nicht viele. Die Meisten Tests von Websiten sind meist mit einer Grafikkarte oder anderer HW, dazu noch ohne viele Stromsparmechanismen zu aktivieren so das sie als Bewertungskriterien bzgl. Mainboardwahl für Unraid ungeeignet sind. Aber es gibt einen interessanten thread auf Hardwareluxx. Da werden Boards gemessen unter Bedingungen die für uns interessant und "vergleichbar" sind. Pures Board (MB/CPU/RAM) mit nur einer SSD oder NVME und Tastatur Maus. Da werden dann Idle werte gemessen mit den Stromsparmechanismen aktiv. Auf der ersten Seite des verlinkten Threads findest Du auch eine Excel Liste mit allen vermessenen Boards. Gibt aber nicht viele B560m Boards da. Ich "glaube" meines ist das einzige. Dafür aber einige B460m Boards. Hier der Thread: Klick Mich Gruss, Joerg1 point
-
das ist so nicht ganz richtig, du wirst von mir niemals hören lokal zu transcoden ich bin ein absoluter Verfechter von Direct Play, alles andere ist für mich sinnfrei "wenn es Sinn macht, zum Beispiel zuhause ...." Streaming, nimm es einfach als Definition an, was sind Streaming Anbieter ... Netfl... Prime ... Disney ... usw usw ... sprich, es wird etwas von extern "gestreamed". Ein Beispiel wo ich "streame", ich hab mir einen eigenen LiveTV HLS/DASH Streaming Server geschrieben, hier wird on the fly in 3 Qualitäten transcoded um unterwegs (zum Beispiel im Auto) einen LiveTV Stream zu haben ... das kannst du mobil nicht anders lösen. Jetzt umgekehrt, diese Anbieter versuchen alles um das "Original" in bestmöglicher Qualität nach Hause auf den TV zu bringen und nutzen alle möglichen codecs, ABR, ... dazu um allen gerecht zu werden, auch das ist Streaming. Ob das Kind jetzt Streaming oder transcoded external Playback heißt ... Apple führte HLS ein (HTTP Live Stream), DASH (Dynamic Adaptive Streaming over HTTP) von Mpeg, usw usw ... ja, man kann jetzt über die genaue Definition diskutieren, aber jeder weiß auch was mit einem "Tempo" gemeint ist und wir sagen seltenst "Papiertaschentuch" ... auch hier sollten wir das jetzt bitte zum Abschluss bringen, das kann man auch ewig diskutieren was die Begrifflichkeit angeht ... Danke.1 point
-
Die iGPU ist unter unraid bei 8-10.Gen gut nutzbar. Neuere Intel Gen sind nicht empfehlenswert, wenn man die iGPU nutzen will. Und deshalb: Willkommen in der aktuellen Beschaffungskriese für 'unraid kompatible', empfehlenswerte & sparsame Hardware. SSD (NVME) sind für VM, Docker und Cache gedacht1 point
-
Danke an alle Beteiligten! Insbesondere @mgutt und @ich7771 point
-
Ahh, so it could have been wrong all the time! - makes sense - at least I know I'm not going crazy!!1 point
-
Great! glad it is working now. SSL support has been reworked in 6.10 to be more secure. The LocalTLD setting had minimal impact in 6.9 so you might not have noticed the typo previously. In 6.10 the LocalTLD is used to generate the server's url, so it is much more important.1 point
-
Zu Erstens: Downsizen bringt Dir bei der CPU nix. Den Strom kostet Dich primär der Chipsatz. Zu Zweitens: Macht am meisten Sinn. Wie viel Beispiel zeigen ist es nahezu egal ob man einen i3 oder i7 verwendet was den Idle Stromverbrauch angeht. zu Drittens: Hast ja schon selber geschrieben warum das eigentlich Unsinn ist bei so viele Platten Allgemein: Als meine präferierte Lösung: Zweitens mit einem Prozessor der deinem Anwendungfall entspricht. Ohne VMs reicht ein i3 vollständig. Selbst mit ein zwei VMs geht das noch. Board sollte ein B460m oder B560m sein, da die noch 6 Sata Slots haben, die H410/510 haben zu wenig SATA Ports und die Z490/590 sind nicht so sparsam wie die B460/560. ASROCK B560m Pro4 wenn Du es bekommst mit einem i3-10100. Das Board hab ich mal hier irgendwo getestet. Ist sehr Stromsparend für 10/11 Intel Generation. Ohne HDDs ca. 8,5W im Idle. Dann pro HDD nochmal ca. 0,75-1.2W was bei 6 Platten + NVME zu einem Verbrauch von ca. 13-16W führen dürfte im Idle. Brauchst ja theoretisch auch nur Board und Prozessor, Rest kannst Du wiederverwenden. Sollte dann so 220 Euro kosten zusammen. Gruss, Joerg1 point
-
@SimonFI have confirmed that both devices are showing different serial numbers.1 point
-
Thank you everyone so much! That worked like a charm. I got lucky. That saved a bit of time in reworking my dockers/setup etc... from my previous backup. I was able to assign it to the cache, put it in maintenance mode, run the fs_check/repair, and then start the array and it was all there as if nothing happened.
 1 point
 -
I found my way here by seeing that error having just reinstalled the DirSyncPro container.1 point
-
Thank you, I don't have the power supply Idle control settings, but I did disable global C state and update to the newest BIOS that had an AGESA update for Eypc to 1.0.0.8. Its just weird this issue just started a few weeks ago and before that it was fantastic. I will monitor and if it happens again will enable syslog and post the results.1 point
-
If you can live with software for now, then absolutely get an Alder Lake.1 point
-
Thanks for the fast reply spants. Did create a docker with the guide you wrote. It seems to work like it should. See the log below, this was after a compleet reboot of the unraid server: 1656677854: mosquitto version 2.0.14 starting 1656677854: Config loaded from /mosquitto/config/mosquitto.conf. 1656677854: Opening ipv4 listen socket on port 1883. 1656677854: Opening ipv6 listen socket on port 1883. 1656677854: mosquitto version 2.0.14 running 1656677854: New connection from 10.20.30.245:52995 on port 1883. 1656677854: New client connected from 10.20.30.245:52995 as BlueIris (p2, c1, k20, u'unraidmqtt'). 1656677855: New connection from 172.18.0.1:45068 on port 1883. 1656677855: New client connected from 172.18.0.1:45068 as mqttjs_917b0112 (p2, c1, k60, u'unraidmqtt'). 1656677858: New connection from 172.18.0.1:45084 on port 1883. 1656677858: New client connected from 172.18.0.1:45084 as frigate (p2, c1, k60, u'unraidmqtt'). 1656677858: New connection from 10.20.30.250:49785 on port 1883. 1656677858: New client connected from 10.20.30.250:49785 as 633R90zlgEZTP3erW7B1iZ (p2, c1, k60, u'unraidmqtt'). 1656677886: New connection from 10.20.30.249:51142 on port 1883. 1656677886: New client connected from 10.20.30.249:51142 as mqtt-explorer-0fa062fa (p2, c1, k60, u'unraidmqtt'). 1656678032: Client mqtt-explorer-0fa062fa disconnected. 1656678198: mosquitto version 2.0.14 terminating 1656678198: Saving in-memory database to /mosquitto/data//mosquitto.db. 1656678339: mosquitto version 2.0.14 starting 1656678339: Config loaded from /mosquitto/config/mosquitto.conf. 1656678339: Opening ipv4 listen socket on port 1883. 1656678339: Opening ipv6 listen socket on port 1883. 1656678339: mosquitto version 2.0.14 running 1656678340: New connection from 172.18.0.1:58424 on port 1883. 1656678340: New client connected from 172.18.0.1:58424 as mqttjs_917b0112 (p2, c1, k60, u'unraidmqtt'). 1656678340: New connection from 10.20.30.245:53037 on port 1883. 1656678340: New client connected from 10.20.30.245:53037 as BlueIris (p2, c1, k20, u'unraidmqtt'). 1656678411: New connection from 10.20.30.250:46975 on port 1883. 1656678411: New client connected from 10.20.30.250:46975 as 6vhnjCb23eaQ6hObVOIxmr (p2, c1, k60, u'unraidmqtt'). 1656678445: New connection from 172.18.0.1:52694 on port 1883. 1656678445: New client connected from 172.18.0.1:52694 as frigate (p2, c1, k60, u'unraidmqtt'). 1656678587: New connection from 10.20.30.249:51464 on port 1883. 1656678587: New client connected from 10.20.30.249:51464 as mqtt-explorer-0fa062fa (p2, c1, k60, u'unraidmqtt'). 1656678702: Client mqtt-explorer-0fa062fa disconnected. 1656678756: Client 6vhnjCb23eaQ6hObVOIxmr closed its connection. 1656678812: mosquitto version 2.0.14 terminating 1656678812: Saving in-memory database to /mosquitto/data//mosquitto.db. 1656679036: mosquitto version 2.0.14 starting 1656679036: Config loaded from /mosquitto/config/mosquitto.conf. 1656679036: Opening ipv4 listen socket on port 1883. 1656679036: Opening ipv6 listen socket on port 1883. 1656679036: mosquitto version 2.0.14 running 1656679046: New connection from 172.18.0.1:38806 on port 1883. 1656679046: New client connected from 172.18.0.1:38806 as mqttjs_deb08702 (p2, c1, k60, u'unraidmqtt'). 1656679051: New connection from 172.18.0.1:38808 on port 1883. 1656679051: New client connected from 172.18.0.1:38808 as frigate (p2, c1, k60, u'unraidmqtt'). 1656679056: New connection from 10.20.30.245:49676 on port 1883. 1656679056: New client connected from 10.20.30.245:49676 as BlueIris (p2, c1, k20, u'unraidmqtt'). 1656679103: New connection from 10.20.30.250:49763 on port 1883. 1656679103: New client connected from 10.20.30.250:49763 as 2bt2ghrZam0tCM674kT4SH (p2, c1, k60, u'unraidmqtt'). 1656679199: New connection from 10.20.30.249:51973 on port 1883. 1656679199: New client connected from 10.20.30.249:51973 as mqtt-explorer-0fa062fa (p2, c1, k60, u'unraidmqtt').1 point
-
Hi all, As you are discovering, this docker is quite old and needs to be updated. If you can bear with me, please try the manual steps to get a later version of MQTT and solve permissions problems. Please follow these steps and stop any existing MQTT container. I am using a directory called "/mnt/user/appdata/mos/" for my config - change if you wish. 1) In a shell on unRaid, create the mosquitto directories mkdir -p /mnt/user/appdata/mos/config mkdir -p /mnt/user/appdata/mos/data mkdir -p /mnt/user/appdata/mos/log 2) create a configuration file nano /mnt/user/appdata/mos/config/mosquitto.conf with the following text persistence true persistence_location /mosquitto/data/ user mosquitto # Listen on all interfaces listener 1883 #Allow connection without authentication allow_anonymous true log_dest file /mosquitto/log/mosquitto.log log_dest stdout 3) Set the ownership of the directories to nobody:users chown -R nobody:users /mnt/user/appdata/mos 4) download and start the docker (called mqttnew for testing) sudo docker run -itd -p 1883:1883 -e PUID=1000 -e PGID=1000 \ --name=mqttnew \ --net=bridge \ -v /mnt/user/appdata/mos/config:/mosquitto/config \ -v /mnt/user/appdata/mos/data:/mosquitto/data \ -v /mnt/user/appdata/mos/log:/mosquitto/log \ eclipse-mosquitto If you want to add users and disable anonomous logins: 5) On the running docker icon, right click and choose CONSOLE and type: (replace <username>) mosquitto_passwd -c /mosquitto/config/credentials <username> 6) stop the docker 7) edit the /mnt/user/appdata/mos/config/mosquitto.conf file nano /mnt/user/appdata/mos/config/mosquitto.conf to look like: persistence true persistence_location /mosquitto/data/ user mosquitto # Listen on all interfaces listener 1883 #Allow connection without authentication allow_anonymous false log_dest file /mosquitto/log/mosquitto.log log_dest stdout password_file /mosquitto/config/credentials 8 - test and let me know how you get on. I will template this if it works for all.1 point
-
Just wanted to add my thanks for this post. Worked a treat Just a bit of tape over those 2 pins did the job, who'd have though it.1 point
-
Bitte lies noch mal den Quote auf den ich antwortete. Da ging es nicht darum was er will. Da ging es darum, dass er den Hype über das Transcoding nicht versteht. Und das habe ich versucht zu erklären. Natürlich kann man seinen Content a.) lokal abspielen oder b.) lokal auf Geräte kopieren, die Geräte mitnehmen und dann an entfernter Lokation abspielen. Dafür benötigt man kein Plex und auch kein Transcoding. Ist man aber an einer entfernten Lokation und will seine Geräte/Content nicht mitnehmen, dann kommt Streaming ins Spiel (z.B. Plex). Je nach Verbindung zum Gerät bzw. den Fähigkeiten des Gerätes an entfernter Lokation kommt dann zusätzlich Transcoding ins Spiel. Und im Übrigen hatte ich in meiner oben stehenden Antwort auch den Fall aufgeführt, dass der Content die jeweilige lokale Geräteklasse ebenfalls überfordern kann. Auch dann kommt Transcoding ins Spiel. Bei uns ist das teilweise schon so. Nämlich dann, wenn unser LG Smart-TV in die Nähe von 100 MBit/s über das Ethernet-Kabel kommt. Dann setze ich am TV in Plex den Transcoding-Wert etwas herunter und der Server liefert etwas weniger für die reduzierte Bandbreite. Bleibt nur noch die Frage über das "Warum". Warum dann nicht gleich kleinere Versionen des gleichen Content ablegen? Tja, der nächste TV kommt dann vielleicht damit klar ...
 1 point
 -
je nachdem wo die Kiste steht, so kannst du den Lüfter komplett silent laufen lassen ... falls der Rechner offen steht und geräuscharm sein soll, wobei ich dann sogar den Noctua DS15 in Betracht ziehen würde1 point
-
Thanks ich777 that did it! Just need to be the latest version of Unraid followed by a fresh installation Thanks again, really appreciate your time1 point
-
Ok, dann ist deine Lösung die einzig gangbare. 👍1 point
-
No issue over here: I've also attached the log from my server startup, please keep in mind that this is a completely fresh install: TheForest.log Maybe try to: Remove the container Remove the theforest folder that lives in your appdata directory Pull a fresh copy from the CA App
 1 point
 -
I was being dumb and not editing the docker template correctly. The Docker works fine. Thanks1 point
-
Updated my motherboard BIOS and that resolved the issue.1 point
-
You need disk type='block' (not file) for the passed through disk (by-id).1 point
-
It's the same on my server... Have to look into this but don't hold your breath since now I'm really busy...1 point
-
Super !1 point
-
You should not install things directly on the unRAID host, and this is one of the reasons why. Use a docker container instead https://hub.docker.com/r/linuxserver/ffmpeg. Your script can launch the ffmpeg container just as easily as it could launch a native app.1 point
-
Nur da Dein Satz so klingt, als wäre da eine komplettes Backup des Cache eingebaut und von einem Neuanfaenger mißverstanden werden könnte): Es werden nur die Daten in regelmäßigen Abständen auf das Array verschoben, die man dementsprechend eingestellt hat. Docker und so sind per default eben exklusiv (only) auf dem SSD Cache und auch nur dort performaanter als auf dem Festplattenarray mit Parity. Eine Sicherung dieser Daten ist nicht automatisch enthalten, sondern kann/muß man manuell für sorgen.1 point
-
Hello, I have created a video about this application yesterday and added it in the main message. Enjoy!1 point
-
Ich eröffne diesen Thread mal um einige Probleme/Hürden nach dem Umstieg auf 6.10 zu reporten/umgehen als eine Art Sammelthread an dem sich jeder beteiligen kann. Probleme die mir aufgefallen sind: - Installationspakete aus den Nerdtools waren weg. Ist mir aufgefallen weil mein Server plötzlich mehr Power aus der Steckdose zog. Powertop ist ja auch ein Bestandteil des Nerdpacks und demzufolge war der Aufruf powertop --auto-tune im "go" File nicht erfolgreich. Abhilfe schuf unter Plugins auf den nerdpack zu klicken. Da kam sofort die Meldung das die konfigurierten Packages nicht mehr vorhanden sind und die Frage ob sie wieder installiert werden sollen. Ansonsten aktuell noch keine weiteren Auffälligkeiten bei mir.1 point
-
That is a great idea. I would also be very much interested in this.1 point
-
Mover progress indicator and what files are being moved and a mover summary log (if enabled).1 point
-
I guess I should update this. I've been working really solid for weeks now. I did one test where I enabled "Access to Custom Networks" and within hours it had locked up with the same output as above. So for me, the solution was to disable access to custom networks in the Docker settings.1 point
-
My problem was that the amd64 was throwing me off -- seeing amd made me think that the driver was for a amd chip. The amd64 driver is actually what you are supposed to use for any 64 bit environment. So step by step 1)When you create the VM there is the option to add a drivers iso -- you need to browse to where you put the drivers you downloaded -- if you haven't downloaded the label is actually a link and you can click on it and it takes you to the website with the iso you need. Originally I was using stable but because I wanted a Windows 10 VM I switched to latest and they worked fine. 2)When you get to the part in the Windows install where there is no disk pick Load Drivers and the browse down to the driver iso you setup in step #1. There will be a bunch of directories you want the one that ends in stor -- I think it is the last one but not at the office so don't have my Unraid build to reference. Select that and you'll see a bunch of sub-directories with different versions of windows -- obviously pick what you are installing. That then takes to to a choice of amd64 or x86 -- if it is a 64 bit install pick amd64 even if you have an Intel chip and if it is a 32-bit install pick x86. The driver will load and you'll see something about Red Hat followed by the vdisk appearing as a harddrive. For XP this was a lot more involved -- I got it to work but it involves more steps -- for 7 and 8,1 this is all I did. For 10 I just upgraded from 7 so didn't do a clean install. The latest drivers have a Win10 directory so I assume the same process. The Stable did not appear to have a Win10 but Win8 should work.1 point