Leaderboard


Popular Content
Showing content with the highest reputation on 10/22/22 in all areas
-
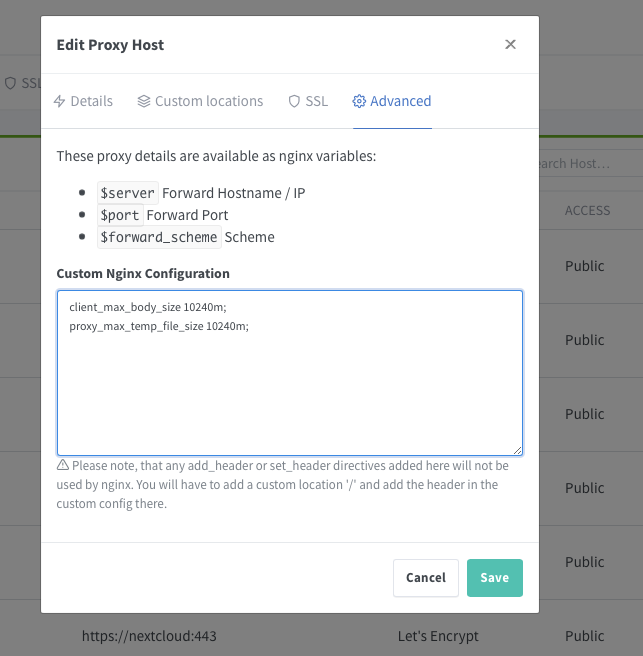
I think I have been having the same issue as you with large files not uploading. In my Nextcloud appdata folder I have a file called php-local.ini located in this directory, /mnt/user/appdata/nextcloud/php. I edited the php-local.ini file and added the following lines. memory_limit = 8G upload_max_filesize = 16G This would allow the large file I wanted to add to start the upload process, however, it failed with a 413 error. This was due to a web server error. This got me looking through the appdata folder again and I eventually ended up in the Nextcloud nginx, specifically in this folder /mnt/user/appdata/nextcloud/nginx/site-confs. Looking in the file called default.conf I had to edit one line to look like this client_max_body_size 10240M; This increased the max file size the web server would accept to 10GB (10240MB). After another restart of the Nextcloud docker the file started to upload again, but this time there was a timeout error. I went back into /mnt/user/appdata/nextcloud/php so that I could edit php-local.ini again. I increased the input time to 600s (10 minutes) and the execution time to 3600s (1 hour). The contents of this file now looked as follows date.timezone = Europe/London # this is my timezone, I am not sure if I added this are it was done on during docker creation memory_limit = 8G post_max_size = 16G upload_max_filesize = 16G max_execution_time = 3600 max_input_time = 600 After another restart of the Nextcloud docker the 4GB file I wanted to add to Nextcloud synced without issue. In summary my changes were as follows 1) Edit this file, /mnt/user/appdata/nextcloud/php/php-local.ini 2) Edit what was there and add additional lines so that it looked like this date.timezone = Europe/London memory_limit = 8G post_max_size = 16G upload_max_filesize = 16G max_execution_time = 3600 max_input_time = 600 3) Edit this file /mnt/user/appdata/nextcloud/nginx/site-confs/default.conf 4) Find client_max_body_size and edit the value as below client_max_body_size 10240M; Locally on my network I use Network Proxy Manager to handle SSL certificates. In the advanced section for my Nextcloud SSL I added the following lines client_max_body_size 10240m; proxy_max_temp_file_size 10240m; I am not sure if they were needed but at some point during my testing I added them. This was before I had changed the client_max_body_size in default.conf, so I am not sure if they made any difference. I just thought it best to include this information as it could be another point of failure for the upload. I hope this helps you fix the issue you are having.
 2 points
 -
it was the notification service…..thank you. i have changed to ipvlan…. Crossing fingers. Thank you.2 points
-
No knock to tar or the plug-in, but with my archive approaching extremely large sizes, the streaming storage method of tar makes for very long access to its internals via MC and the the like. I've ended up moving my backups to restic. While the initial backup (with new built in compression!) took about 14 hours, subsequent backups now take minutes. I can also now opt to run backup scrips to segment backups, so I perform a Plex /appdata backup separately from all the other /appdata contents (which run an hour later). Restic (and Borg) are pretty awesome and perhaps I will fork the existing plug-in to use restic if all parties are good with it. Kev.2 points
-
Application Name: Nextcloud Application Site: https://nextcloud.com/ Docker Hub: https://hub.docker.com/r/linuxserver/nextcloud/ Github: https://github.com/linuxserver/docker-nextcloud Note: Requires MariaDB or MySQL, please note the issues with binlogging detailed here. This is a Nextcloud issue which we have no control over. https://info.linuxserver.io/issues/2023-06-25-nextcloud/ For setup guide please see the article on our website here. Image is now upgrading Nextcloud internally For upgrading the Nextcloud version there are 3 options. 1. Update via the webui when the upgrade shows as available. 2. Update from the terminal when the upgrade shows as available with: docker exec -it nextcloud updater.phar 3. Manual upgrade using occ. ##Turn on maintenance mode docker exec -it nextcloud occ maintenance:mode --on ##Backup current nextcloud install docker exec -it nextcloud mv /config/www/nextcloud /config/www/nextcloud-backup ##Grab newest nextcloud release and unpack it docker exec -it nextcloud wget https://download.nextcloud.com/server/releases/latest.tar.bz2 -P /config docker exec -it nextcloud tar -xvf /config/latest.tar.bz2 -C /config/www ##Copy across old config.php from backup docker exec -it nextcloud cp /config/www/nextcloud-backup/config/config.php /config/www/nextcloud/config/config.php ##Now Restart docker container docker restart nextcloud ##Perform upgrade docker exec -it nextcloud occ upgrade ##Turn off maintenance mode docker exec -it nextcloud occ maintenance:mode --off ## Now Restart docker container docker restart nextcloud Once all is confirmed as working: ##Remove backup folder docker exec -it nextcloud rm -rf /config/www/nextcloud-backup ##Remove Nextcloud tar file docker exec -it nextcloud rm /config/latest.tar.bz2 Please post any questions/issues relating to this docker you have in this thread. If you are not using Unraid (and you should be!) then please do not post here, instead head to linuxserver.io to see how to get support.1 point
-
I have created a discord server for those interested in getting support that way: https://discord.gg/q32QQFf5gs Unraid-Cloudflared-Tunnel The only thing needed to get the container up and running is the token from Coudflare's zero trust dashboard under Acess > Tunnels. Once you create a tunnel you will be given your token. The token will look similar to the string of text seen below. eyJhIjoiNjAwNGU3OTkxMDUzZjc1ZDNkY2e5MWMyZmI5MTViNDMiLCJ0IjoiZDgwZZZmZGUtOTQ3ZS00MWRhLWJmYzgtZmQzZGJmMmNmOTg1IiwiCyI6Ik1TWm1NR1JtWWpBdFlqSXlaQzAWWVRVNExUbGhaV1F0WXpsallqZzNOEEEzTmpoaiJ9 Leave a message on this thread or send a message on Discord and I will support you as well as I can when I get the chance. Cloudflared Docs: https://developers.cloudflare.com/cloudflare-one/connections/connect-apps/ https://hub.docker.com/r/cloudflare/cloudflared https://github.com/cloudflare/cloudflared Github: https://github.com/AriaGomes/Unraid-Cloudflared-Tunnel DockerHub: https://hub.docker.com/r/figro/unraid-cloudflared-tunnel Discord: https://discord.gg/q32QQFf5gs Flood-UI Dont use `:dev` for regular use. Installing the `:latest` container and setting a port should be all you need to do. You should be able to then link an instance using the webUI on the port you are using with the container. Source code building is available with the :dev branch: Setup the appdata path and change the port (if needed). Will take a couple minutes to spin up. Check the logs and you should see when its up and running. You can mess around with the files for the app in the configured path as you can with Leon-AI. Check the bolded portion in Leon-AI above. Those instructions can be replicated to do development work on this container as well. The entire configuration is done once the server is up and running and you can add your torrent client instance and view and manipulate your client using flood-ui. Please let me know if you run into any issues and I will do my best to assist Flood Docs: https://github.com/jesec/flood/wiki Github: https://github.com/AriaGomes/Flood-UI DockerHub: https://hub.docker.com/r/figro/flood-ui Discord: https://discord.gg/q32QQFf5gs1 point
-
I still have some 30% io wait but its no longer hanging my machine. I hope it helps you figure it out.1 point
-
You could have an iowait issue like i had.1 point
-
Das funktioniert tatsächlich: # folgende Testdateien werden erstellt echo "old" > /mnt/disk6/Marc/dest/test.txt echo "old" > /mnt/disk6/Marc/dest/test2.txt sleep 2 echo "newer" > /tmp/source/test.txt echo "newer" > /tmp/source/test2.txt # ich lösche den Linux Cache sync; echo 3 > /proc/sys/vm/drop_caches # über die GUI werden alle HDDs gestoppt, Wartezeit 30 Sekunden, damit sie wirklich stehen # rsync ausführen rsync --archive --remove-source-files --whole-file --delete-after --itemize-changes /tmp/source/ /mnt/user/Marc/dest .d..t...... ./ >f..t...... test.txt >f..t...... test2.txt # der Kopiervorgang ist SOFORT fertig, die HDDs fahren erst danach hoch (!) # keine Datei mehr im Array, aber die neuen auf dem Cache cat /mnt/disk6/Marc/dest/test.txt cat: /mnt/disk6/Marc/dest/test.txt: No such file or directory cat /mnt/disk6/Marc/dest/test2.txt cat: /mnt/disk6/Marc/dest/test2.txt: No such file or directory cat /mnt/cache/Marc/dest/test.txt newer cat /mnt/cache/Marc/dest/test2.txt newer1 point
-
I agree. If it was expanded to ‘contact support’ then it is much less likely to get spurious hits.1 point
-
It seems that there is a new automatic link with support . I feel that is it more confusing than helpful. The word is often used on the forum, but rarely relating to the official Unraid support contact form. Maybe use a less generic expression ?1 point
-
Awesome! Thanks a bunch ich!1 point
-
Nööö! Gott bewahre uns vor dieser Idee!!! Alle Daten, die quittiert wurden, betrachtet der Klient als "erledigt". Das würde bei Unterbrechungen gnadenloses Chaos verursachen. Wieso jedes Mal? Die Platte fährt doch nur einmal hoch, oder hast Du Dein Timeout auf 10s gelegt??? Also das kann ja schon mal vorkommen. Aber er beschwert sich ja nicht über x Dateien, sondern, dass er (natürlich) bei 1000 Dateien nicht vorher wissen kann, ob ein paar davon schon mal vorhanden sind. Und bei denen hakt es dann eben. Ist aber eben nur lästig, kein wirklicher Fehler. Ich hab hier auch manchmal den Effekt, dass ich ein paar Filme verschieben will, und einige davon sind schon vorhanden. Da kommt der Transfer dann etwas ins Stottern. Richtig nervig wird es allerdings, wenn die Dateien größer sind. Z.B. son 200Gb Backup Datei. Da kriegt man schon lange Zähne, wenn sich UNRAID mit quälenden 160-200Mb/s der Daten erbarmt, statt mit 1,02Gb/s in den Cache zu schreiben... Ist halt nur ne Frage des Geschwindigkeitsunterschiedes zwischen Disk, Cache und LAN. Je schneller LAN und Cache, desto mehr nervt es.1 point
-
No problem, Glad it was useful to other people1 point
-
UFS Explorer does not run natively on Unraid, but it has versions for Windows, MacOS and Linux. Never looked into whether it might be possible to make the Linux version run in a docker container but it might be difficult because of the need to access the problem disk directly at the sector level.1 point
-
As i' m stubborn i definitely gave Q35 a chance and it worked .... I don't understand why ?? anyway both Q35 and I440 worked !!1 point
-
Glad its working for you.1 point
-
https://codeberg.org/Unraid-Docker-Templates/Mediathekview-Unraid funktioniert einwandfrei1 point
-
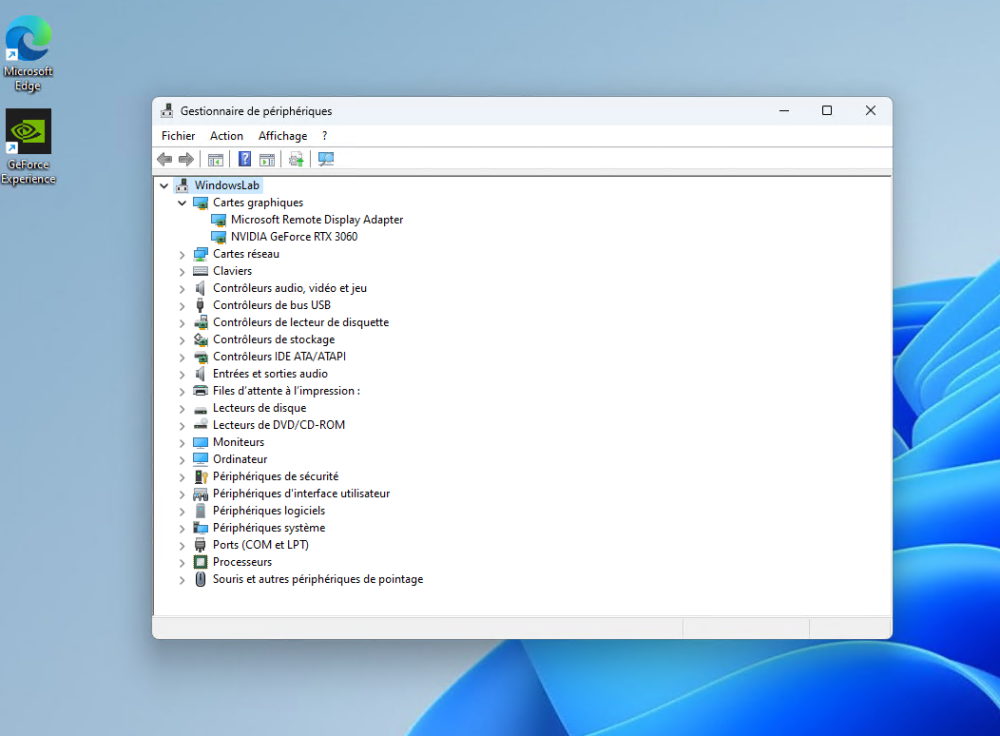
It works. Thank you so much to everyone for your help. Some informations : - i440 is working for me Q35 does not allow me to see the graphics card - I had forgotten on the previous installation to install virtio-win-gt-x64 and virtio-win-guest-tools => Do you think this could have made the difference between this installation and the previous one with Q35 ?
 1 point
 -
I'll give that a shot, thanks. I was hoping that AMD might have figured out how to make that not a necessity on Linux, but I guess not. Or just a new platform like you said. I guess I'll let y'all know after a few days of testing after adjusting idle control settings. Thanks again, Jorge!1 point
-
J'avoue je sèche un peut, globalement ta VM est configurée comme la mienne, je n'ai rien vu dans le XML. Donc je ne pense pas que ça vienne de là. Reste maintenant tout ce qui l'entoure, et là c'est un peu plus complexe. As-tu essayé d'afficher les périphériques cachés dans le gestionnaire de périphériques de Windows 11 ? Sinon tu peux aussi faire un tour sur le discord FR de la section et poster dans la section unraid. Il y a des gents qui maitrisent bien.1 point
-
Have you tried creating a i440 machine type instead of Q35? With the current setup looks like you need a vbios, but others maybe able to help with that.1 point
-
Used to when I first posted in here. Now on 6.11.1. Freezes occur in both versions.1 point
-
Freezes with i440 here. One thing that might worth mentioning is that I have 6 out of 8 cores pinned to the VM. If I isolate all 6 cores in Unraid then the freeze occurs in a matter of minutes. If I isolate 4 out of 6 the freeze might occur after hours.1 point
-
I cannot see any logs for the VM in the diags, are you able to supply after trying to start VM with GPU assisgned?1 point
-
Hi, Thanks for this container, it's seems to work great and very easy1 point
-
@JorgeB That did the trick!!! Thanks so much!!1 point
-
Hey sorry my thing didn't help, but I'm glad you've solved your issue! Thanks for communicating it back, it's super interesting.1 point
-
This works for me. You need the style tags to trick Theme Engine into inserting custom javascript this way. Probably a security hole, tbh. You could also use a browser extension like Violentmonkey or Tampermonkey to load it as a userscript. </style> <script type="text/javascript"> document.addEventListener("DOMContentLoaded", () => { let fansTds = document.querySelectorAll(".fan_view td"); let fansTdsArray = Array.from(fansTds); for (const td of fansTdsArray) { switch (td.innerText) { case "FAN 0": td.innerText = "fan0name"; break; case "FAN 1": td.innerText = "fan1name"; break; case "FAN 2": td.innerText = "fan2name"; break; case "FAN 3": td.innerText = "fan3name"; break; case "FAN 4": td.innerText = "fan4name"; break; case "FAN 5": td.innerText = "fan5name"; break; case "FAN 6": td.innerText = "fan6name"; break; case "FAN 7": td.innerText = "fan7name"; break; case "FAN 8": td.innerText = "fan8name"; break; case "FAN 9": td.innerText = "fan9name"; break; case "FAN 10": td.innerText = "fan10name"; break; default: break; } } }); </script> <style>
 1 point
 -
something like this should work even when you want FAN1 to be different from FAN10. I don't have 10 fans so I can't test it and confirm. @BreakfastPurrito EDIT: go to this post for the code1 point
-
Yes, I'm fixing this. Thanks or reporting.1 point
-
Could you share your bios setting? I only get to c31 point
-
I really do like the PiKVM, great little box. Glad you are back up and running!1 point
-
As an update to this, after much hair-tearing and swapping of cables and waiting for the issue to re-appear I finally decided to replace the PSU on a suspicion after reading some other forum threads. Upgraded to a newer beefier PSU and it looks like the errors have disappeared now, but still have my fingers crossed they won't reappear in the near future. Not sure if my PSU was faulty or I had too many drives on each cable but it turned out to be the culprit.1 point
-
wow... That worked. I forgot most of my drives were small.1 point
-
Pre-clearing is a personal decision, and is a good stress test of a drive before introducing it into an existing array. However in this case the first thing you are going to do is build parity which is going to read every sector off every array drive, and write every sector on the parity drive. If a disk is having problems I would expect you to get errors while trying to build parity so the pre-clear feels a bit superfluous.1 point
-
A simpler procedure since there is no data to preserve would be: use the Settings->New Config tool to allow drives to be changed set drives as you want them start array to build parity based on the new drive set. format the new data drive to get it ready for use (could be done while parity is still building) no need to pre-clear anything.1 point
-
@b1ue @erak @chris smashe @AW139 @Klinkaroo @boardyuk @ZosoPage1963 @Quadrapole @x86intel @proteinart @aqua Good news! We resolved the issue with the missing config values. This will be fixed automatically in the next release, but in the meantime here's what you can do: First, stop the array. Then navigate to Settings -> Network Settings and make any small change that makes the Apply button appear, then undo the change and hit Apply. This will rewrite your network config files and fill in the missing values. Then start the array. Finally, make a dummy change to each of your WireGuard configs to rewrite them with the new values (and undo-any manual changes you might have made) At this point your WireGuard tunnels should start without issue. If you continue to have problems, open a web terminal and type: rm /var/log/wg-quick.log then try to start the tunnel. Go back to the web terminal and type: cat /var/log/wg-quick.log and copy/paste the result back here.1 point
-
Welcome. As most people here will tell you, the forums are one of the best "features" of unRAID. You will find answers to virtually any unRAID-related question here and there are many patient and knowledgeable experts willing to help with even the most basic questions.1 point
-
闪迪酷豆有的有两个guid,自动安装工具有时候会不识别,如果你用苹果版本的安装工具就正常识别,或者就是你说的用手动安装,我刚买的时候也是这个问题,还让客服给我换了新的,最后手动安装了1 point
-
Update: Guess it was a permission issue that Unraid 'permission tool' couldn't fix. Issued these commands via PuTTy This fixed Plex: Stopper Docker ls -la /mnt/user/appdata/PlexMediaServer (View permissions before) sudo chmod -R 777 /mnt/user/appdata/PlexMediaServer/ (Wait a couple mins then check with) ls -la /mnt/user/appdata/PlexMediaServer (view permissions after) Start Docker & Wait a couple mins before attempting to access Plex (does some sort of cleanup routine) This fixed Tautulli: ls -la /mnt/user/appdata/tautulli (View permissions before) sudo chmod -R 777 /mnt/user/appdata/tautulli (Wait a moment then check with) ls -la /mnt/user/appdata/tautulli (view permissions after) Start Docker1 point
-
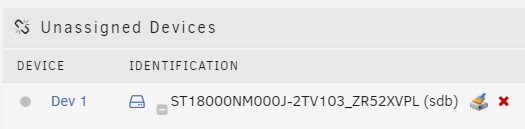
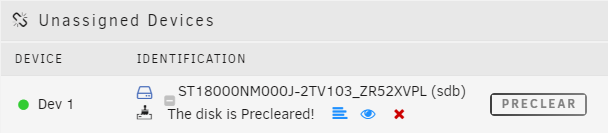
I am not sure if I am using the correct pre-clear. I use the one by clicking the paintbrush on the right side of this graphic: Does that mean I am using the "unassigned devices pre-clear" which is OK, and that I am NOT using the problematic one by gfjardim? UPDATE: I removed the gfjardim preclear plugin, and now the paintbrush is gone, so now I need to figure out how to do the unassigned devices pre-clear. UPDATE: For idiots like me, that have not done a plug in for so long I forgot how: Click on "Apps", then on the text list on the left side click on "plugins", then in the search box near the top type "unassigned" or "unass" and it will be easy to find "unassigned devices pre-clear". After installing the plugin, on main page, you will see, if you look carefully, a very small paint brush (in monchrome blue) on the right as shown on this graphic: I was looking for the big colorful paintbrush, so it took me awhile to notice this. I did not need to reboot to see it. Thanks to dlandon for the plugin. Info at https://forums.unraid.net/topic/120567-unassigned-devices-preclear-a-utility-to-preclear-disks-before-adding-them-to-the-array/?tab=comments#comment-1101719 For the sake of completeness on this set of graphics I am posting here (otherwise I would post this at the link above). I clicked the blue paintbrush and selected "Verify Signature" (as I had done gfjardim preclear months ago) and in 20 seconds it verified the disk was already in a good preclear state. And the graphic changed to this: then I clicked on the black paintbrush which did nothing and clicked on the "PRECLEAR" gray button which did nothing. So I could not run the "Verify Disk" (where the disk signature is checked and the disk is verified to be zeroed).


 1 point
 -
...gib mal ein: cd /mnt/user/appdata chmod a+rwX grafana ...dann probiere es mit dem Docker nochmal, mit dem Verzeichnis /mnt/user/appdata/grafana im template1 point
-
I have a 7700K, 64GB, 2xNVME in Raid-0 cache drive, GTX1070 passed through to Win10... I run the VM's off the Unraid Cache... Make sure the VM is set to Q35-3.1.0 in the Unraid 6.7.0-rc2 or Q35-3.0.0 if you want the Unraid 6.6.6... I had several issues when using the Unraid default of i440fx, some are performance related, some compatibility issues... This is because the i440fx was an ancient chipset for the old Pentium 1+2 that knew about old PCI and AGP slots... and so has to translate everything PCIe into PCI, and other translation overhead... The Q35 chipset actually knows about PCIe, and so skips all this... Not as major as that sounds, it is still fairly fast, but it is noticeable, and as I said, it had compatibility issues for me, especially with UWP apps... Also minor, but I set my VM "Drives" to use the SCSI driver, this allows a "Discard" setting which is the Linux version of SSD TRIM... <disk type='file' device='disk'> <driver name='qemu' type='raw' discard='unmap'/> <source file='/mnt/user/domains/.................... ........ This is a minor speed up, and on some file operations actually slows things down, but allows Windows to pass the TRIM commands all the way down to the actual SSD you are running on... This also shrinks VM image files, which for me actually speeds things up quite a bit... Full SSD's start slowing down alot, and so this is mainly a slowdown prevention measure... Edit: Also avoid QCOW2 at all costs... Probably the main thing is knowing how your processor works, and making sure you pass CPU cores in a way that makes sense for your CPU... Let Unraid as well as the overhead from running KVM/Qemu run on its own core (Core 0)... Don't do something silly like passthrough only the hyper-threading cores and all the main cores to a different VM or something else like that... Edit: I don't have one, but I understand this is especially important with current AMD chips, because they have NUMA nodes as well to make sure they get right... Some other manual edits I made to mine: <cputune> ... ... <emulatorpin cpuset='0'/> </cputune> <cpu mode='host-passthrough' check='none'> ... </cpu> <os> ... <smbios mode='host'/> </os> These make sure that KVM/Qemu share the primary core with the rest of Unraid, tell windows about what your CPU can do (potentially some good improvements here) and the info from your Motherboard BIOS and not the fake info from KVM/Qemu... That is where I am at with my personal training on the subject...1 point
-
Only if you edit an existing VM. On a new VM you are allowed to change the BIOS.1 point