Leaderboard


Popular Content
Showing content with the highest reputation on 10/29/22 in all areas
-
There's another thread about part of this in General Support... -It would be great if we could freely arrange the modules on the Dashboard. Specifically, moving things (like the network graph or RAM usage) horizontally between columns. - Also, having the layout stay where it's put, rather than reverting randomly when the page is refreshed would be fantastic. - Perhaps a [Save Layout] / [Restore Layout] option could be integrated?1 point
-
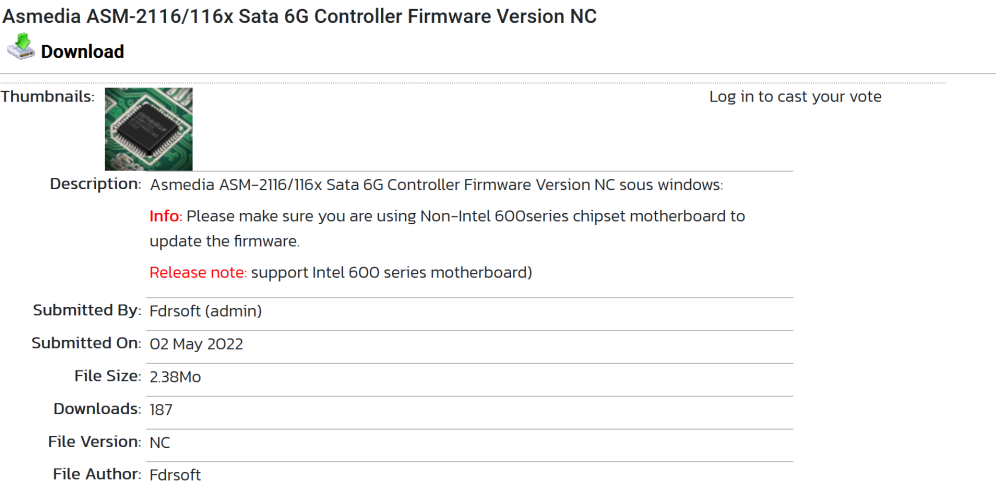
For all the guys looking to find out why the h*** there newly bought ASM1166 based PCIe-SATA expansion card is not even recognized in there PCs - i have a small but very helpful tip for you: There is a compatibility problem between cards with this chip working on an old firmware version and Intel 6xx chipsets. If you got hands on a device that may seem to fall under this problem, try to do the following to get rid of the old firmware and update to the new one: - install the card in a PC which detects the card correctly - google for "Asmedia ASM-2116/116x Sata 6G Controller Firmware Version NC" - download the firmware flash package - flash the firmware according to the manual included. - put the card back into your mb where you initially wanted it to run - voila. As an example: I recently bought a generic ASM1166 based card from Amazon (several sellers sell exactly this (https://www.amazon.de/gp/product/B08L8ZSKXW/) card with old firmware, some with the updated fw). B660 chipset mainboard said no to the card. Put it into my old Ryzen RIG, flashed the card with this generic? ASM1166 fw, now it works flawless in combination with B660 / Proxmox passthrough to Unraid VM without any errors for 3 days now. Notice for all power saving friends (e.g. @mgutt): I did a "powertop --auto-tune", which also activated several power saving features on pcie and sata links. But this is the first card, beside some power hungry LSI raid cards, where I issued that command and nothing breaks afterwards. Until now, I can highly recommend this model for expansion, expecially for working very energy-efficient. Mind the fact that the card is only using PCIe x1. Hope this may help someone in need. Cheers
 1 point
 -
I don’t use wireguard so I may be wrong but I doubt you need to do this. Q21 in the faq describes how to setup wireguard. You can test by downloading any well seeded torrent. Ubuntu is what I usually use.1 point
-
I will look into this ASAP.1 point
-
Die Aqara-Produkte brauchen eine gewisse Zeit, bis sie ihre erste Nachricht mit Spannung etc. senden. Nach spätestens einer halben Stunde sollten die Werte verfügbar sein (meist deutlich schneller). Und noch eine weitere Sache bzgl. Aqara-Steckern (bezieht sich nur auf ZHA. Z2M hat ähnliche Funktionalität): Mit Home Assistant Core 2022.11.0 und neuer gibt es eine Einstellung, dass die Stecker nach Stromausfall den vorherigen Zustand wiederherstellen sollen. Siehe Screenshot von hier: https://github.com/home-assistant/core/pull/80444 Bzgl. BlitzWolf/Tuya-Steckern (bezieht sich nur auf ZHA. Z2M hat ähnliche Funktionalität): Mit Home Assistant Core 2022.11.0 und neuer gibt es eine Einstellung, dass die Stecker nach Stromausfall den vorherigen Zustand wiederherstellen sollen oder automatisch auf "an" schalten: https://github.com/home-assistant/core/pull/80486 Die Funktionalität ist zwischen den Steckern leider etwas unterschiedlich, weil die Hersteller (warum auch immer), nicht die Standard-Attribute verwenden. Die 2022.11.0 Beta läuft aktuell schon schon und wird voraussichtlich am 2. November vollständig released. (Bis jetzt gab's aber keine größeren Probleme mit der Beta / sonstige Beta-Release-Notes hier)1 point
-
A responsive web design for 6 inch screens, 1080p in portrait mode would definitely be a good standard. The current dashboard already uses a card style layout. Having them shrunk down a bit and stacked on top of each other with enlarged fonts would be an excellent start. Compress the top menu inside a hamburger (more) menu. Chrome browser for sure. I looked into using apps from the play store, but it seems that many people complain that they stopped working since 6.9.2 and nothing but complaints after that. I would feel more comfortable just logging straight into my server instead of giving an app my password and having it decide what info I see and who knows what it will do to my server.1 point
-
Have narrowed it down to the Ethernet <model type='e1000-82545em'/> that is used. Without it, the OS loads fine (I updated to OC to 0.8.5 too). Recommended to uninstall Little Snitch as it significantly slows down Wifi. When I disable the Ethernet adapter, the OS loads fine (I have to disable the adapter within a few seconds of after I enter my password on the login screen). Any ideas ?1 point
-
Yep, sometimes the problem is not enough contiguous RAM.1 point
-
So, I did it and everything works... I deleted everything and started completely from scratch. I created a Monterey VM. Which was probably the deciding factor for me: In the previous attempts, I did not enter my AppleID during the setup of the macOS, because I had some special characters in the password. When entering the password, you can't control them because the characters you enter appear as dots. So I always completed the setup WITHOUT logging in with the AppeID. Only when setup was completed I used the on-screen keyboard to help and try to log in. Then my iPhone showed the unlock option and the 6 digit PIN to enter for the MacVM. Then once entered, the error message appeared, "Unable to communicate with server." This time, during the setup of the MacOS, right at the option to register the machine with the AppleID, I first in the email field rather laboriously gathered the input combinations for the special characters of the password. Then I already entered the AppleID in the setup process and thus completed the setup. Then I followed the howto video of spaceinvador one. Already after the software setup was completed, I could see in the settings menu that my AppleID was displayed.... I used the opencore configurator to adjust the settings, stopped the VM, adjusted the XML regarding CPU cores and RAM, ran the helperscript and doing like this: VM boots up and Apple services work!!!! Thanks to all for tips and hints! Greetings and have a nice weekend, Sven1 point
-
There's an OOM error at that time.1 point
-
I’m sure there are multiple ways to accomplish this. I usually just enable sharing for appdata and then drag and drop the file to the appropriate folder in the mounted share. You could also install the Dynamix File Manager plugin. It has an upload option.1 point
-
I had this issue, and found the resolution here: You need to change the data directory mapping to this: /prometheus/data <-> /mnt/user/appdata/prometheus/data1 point
-
Let me give that a crack @ich7771 point
-
The Project Zomboid config is wrong as of Project Zomboid 41.77 (October 4, 2022) https://theindiestone.com/forums/index.php?/topic/60581-4177-released/ The port range for player connection should be changed from TCP 16262-16326 to UDP 16262 Thank you for the work that you do.1 point
-
Leider sind die Daten dieser Karte sehr spärlich. Aber da sie nur "1 x PCI Express x8, V4.0" haben soll, können also nur die ersten 8 Lanes eines PCIe x16 Slot benutzt werden. Die Karte ist also denkbar, aber da sie auf den ersten 8 Lanes des PCIe Slot dann nict weiter splitten kann, wirst Du damit bei einem 8x8x Slot nur eine NVME-SSD darin so, wie gewünscht, nutzen können. Der x16 Slot trennt das Mainboard eben bei Bedarf nur die ersten 8 Lanes von den letzten 8 Lanes. Und damit wird die Karte eben nur mit einmal 8Lane angesprochen und nicht wie eigentlich nötigt mit 4x4x. Wenn Du in einem x16 Slot, welcher nur x8x8 beherrscht 2 NVMe nutzen willst (und die anderen Lanes ruhig unbenutzt lassen kannst/willst), bleibt Dir nur zu sowas zu greifen: https://www.amazon.de/gp/product/B09QWDCTRP was dann in M.2 Steckplatz 1 und 3 jeweils eine M.2 NVMe SSD oder so aufnehmen kann. Die anderen beiden Steckplätze auf der Karte (2 und 4) würden dann die hinteren 4 Lanes der jeweiligen x8 Splittung bekommen und dort ist ohne Unterstützung des Mainboard kein weiteres Gerät/Device nutzbar. Wobei ich jetzt nicht sagen kann ob die Karte bei Amazon (wie die Delock mit dem v4.0 andeutet) auch mit PCIe 4.0 umgehen kann. Aber 4 Steckplatz Bifurcation Karten sollten auch halbwegs günstig zu haben sein. Die Delock ist mit aktuell rund 60 Euro wirklich teuer.1 point
-
Yes! No problem! I really appreciate your work!1 point
-
Holy crap, I got it! It was an absolutely insane fluke. I have _TWO_ cache drives in my pool, "cache" and "large". It turns out Unraid was splitting the data across them so since the container was pointed to "cache" and my files (through SMB) were put on "large", it wasn't seeing them. Ugh. COMPUTERS. Thank you so much for your patience and help, ich777!1 point
-
@jmztaylor Hardlinking is now working as well. Thank you so much.1 point
-
I updated the original post with notes about not currently recommended to purchase until my testing and peer reviewed testing is complete.1 point
-
yeah i think you are right on this one for the 73MB/s that card says it requires 4x lanes but who knows if it really does. I think i am going to install it and run it on one of my test UNRAID servers and see how it does. I am interested to see how it operates on a 24 hard drive system and the speed it will really give. Because if it did give 160MB/s per drive and was stable it is an excellent inexpensive UNRAID solution. Since I have one I might as well find out for others. However I went on the eBay yesterday and purchased a 24i HBA card which was surprisingly inexpensive at only $200 without any cables at all. Therefore my current comment is that no one should run out and buy this for UNRAID until i put it in my system and see how it runs and report back. Appreciate your help and comments thank you.1 point
-
Tu devrais te pencher sur les plugins "gpu statistics" et "Radeon-TOP" je pense que tu trouveras ton bonheur...1 point
-
Yup, this should not be an issue but this is also just a transport stream but should not be an issue. I would really recommend to try unmanic because IIRC I can transcode .ts files just fine with it.1 point
-
This method worked for me as well! thank you.1 point
-
What is your backup destination ?1 point
-
Thanks! I will give this a try tomorrow. Hopefully it will work for me as well! I’ll report back tomorrow and let you know how it goes. Thanks for providing some steps to try! I actually had given up on messing with it, but this gives me hope!1 point
-
Why does it often take 3 separate steps, having to apply each along the way to reveal the next step, to apply share permissions? With any other NAS OS I know of you can do it all in one step and only click "apply" once. Why not just put all the options initially on the same screen instead of slowly revealing them like some kind of shell game?1 point
-
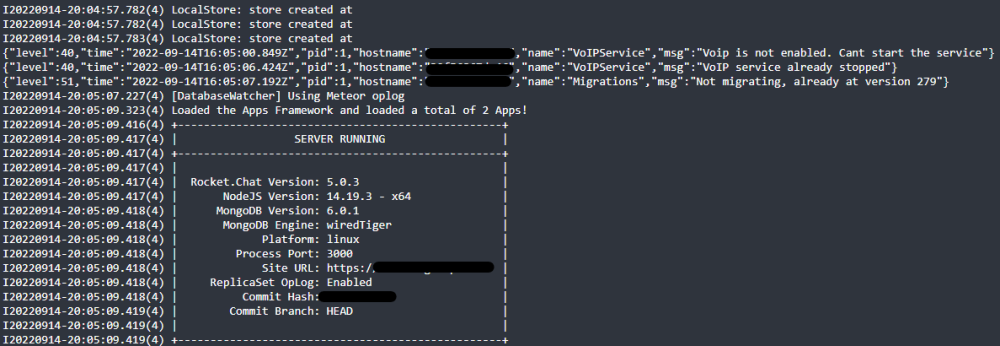
Hi All! I've finally managed to get RC docker working on mongo:5 with all my previous data restored successfully :). Notifications are working now and I can connect to the Rocket.Chat cloud. +--------------------------------------------------+ | SERVER RUNNING | +--------------------------------------------------+ | | | Rocket.Chat Version: 5.2.0 | | NodeJS Version: 14.19.3 - x64 | | MongoDB Version: 5.0.13 | | MongoDB Engine: wiredTiger | | Platform: linux | | Process Port: 3000 | | Site URL: https://my.domain.com | | ReplicaSet OpLog: Enabled | | Commit Hash: 08f03cc9d8 | | Commit Branch: HEAD | | | +--------------------------------------------------+ Posting the steps I followed for anyone who might be facing a similar issue. #1 Stop RC and backup existing data from your current mongodb docker console mongodump --archive --gzip > 2022.10.15_rocketchat_mongo_server.dump.archive.gzip #2 Remove the existing mongodb docker stop the mongodb docker rename the /mnt/appdata/mongodb folder to mongodb-backup remove the mongodb docker. #3 Install mongodb docker (default) with the following changes Repository: mongo:5 (Advanced View) Extra Parameters: --hostname mongodatabase Post Arguments: --bind_ip_all --replSet "rs0" #4 Initialise ReplicaSet in mongodb - open the console and type mongosh then on the prompt test > type rs.initiate( { _id : "rs0", members: [ { _id: 0, host: "<YOUR-SERVER-IP>:27017" }, ] }) - you should see the result as below test> rs.initiate( { ... _id : "rs0", ... members: [ ... { _id: 0, host: "<YOUR-SERVER-IP>:27017" }, ... ] ... }) { ok: 1 } rs0 [direct: other] test> rs0 [direct: primary] test> #5 Restore the backup data to the new mongodb instance copy the backup file from step #1 into the new mongodb appdata folder open the mongodb console and move into the /data/db dir then type mongorestore --archive --gzip < 2022.10.15_rocketchat_mongo_server.dump.archive.gzip You should see something similar to this on a successful restore (this may take a while depending on your backup file size): 2022-10-15T14:54:16.776+0400 159574 document(s) restored successfully. 0 document(s) failed to restore. #6 Edit your RC docker settings as below MONGO_URL mongodb://rocketchat:<Password>@<YOUR-SERVER-IP>:27017/rocketchat?replicaSet=rs0 MONGO_OPLOG_URL mongodb://rocketchat:<Password>@<YOUR-SERVER-IP>:27017/local?replicaSet=rs0 That's it. Start the docker and it should work! Enjoy


 1 point
 -
Any chance for english translation or written instructions?1 point
-
It is covered here in the online documentation accessible via the ‘Manual’ link at the bottom of the GUI or the DOCS link at the top of each forum page.1 point
-
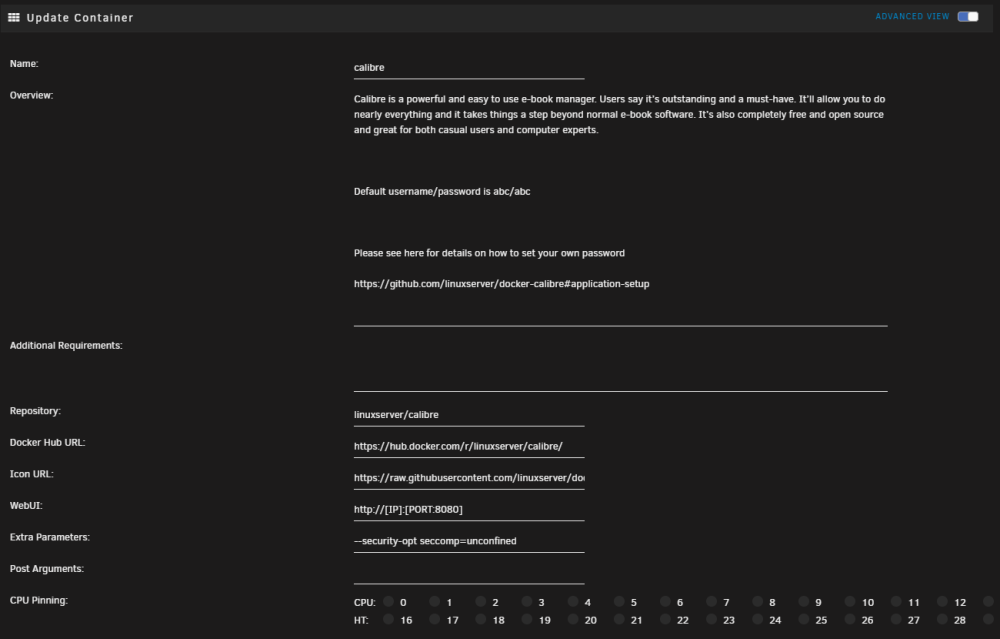
For those trying to figure out how to add this extra variable to the docker template, you need to go to 'advanced' view (slider in the upper-right corner) and then look for the 'Extra parameters' section and enter this in the field: --security-opt seccomp=unconfined Worked for me as well - calibre gui back up and running.
 1 point
 -
Hi all, any chance of a mobile friendly ui being implemented? Current experience on mobile is terrible.1 point
-
还有一种方法在自定义脚本中每次开机执行 wget -qO - https://raw.hellogithub.com/hosts | cat - >> /etc/hosts 会将hosts替换为以下 # Generated 127.0.0.1 54.149.176.35 keys.lime-technology.com # GitHub520 Host Start 140.82.113.25 alive.github.com 140.82.114.26 live.github.com 185.199.108.154 github.githubassets.com 140.82.112.22 central.github.com 185.199.108.133 desktop.githubusercontent.com 185.199.108.153 assets-cdn.github.com 185.199.108.133 camo.githubusercontent.com 185.199.108.133 github.map.fastly.net 199.232.69.194 github.global.ssl.fastly.net 140.82.113.4 gist.github.com 185.199.108.153 github.io 140.82.113.4 github.com 192.0.66.2 github.blog 140.82.112.5 api.github.com 185.199.108.133 raw.githubusercontent.com 185.199.108.133 user-images.githubusercontent.com 185.199.108.133 favicons.githubusercontent.com 185.199.108.133 avatars5.githubusercontent.com 185.199.108.133 avatars4.githubusercontent.com 185.199.108.133 avatars3.githubusercontent.com 185.199.108.133 avatars2.githubusercontent.com 185.199.108.133 avatars1.githubusercontent.com 185.199.108.133 avatars0.githubusercontent.com 185.199.108.133 avatars.githubusercontent.com 140.82.114.9 codeload.github.com 52.217.70.196 github-cloud.s3.amazonaws.com 52.216.139.27 github-com.s3.amazonaws.com 54.231.201.121 github-production-release-asset-2e65be.s3.amazonaws.com 52.217.160.249 github-production-user-asset-6210df.s3.amazonaws.com 52.217.160.249 github-production-repository-file-5c1aeb.s3.amazonaws.com 185.199.108.153 githubstatus.com 64.71.144.202 github.community 23.100.27.125 github.dev 185.199.108.133 media.githubusercontent.com 185.199.108.133 cloud.githubusercontent.com 185.199.108.133 objects.githubusercontent.com # Update time: 2022-02-09T20:06:23+08:00 # Update url: https://raw.hellogithub.com/hosts # Star me: https://github.com/521xueweihan/GitHub520 # GitHub520 Host End 这样也能正常访问github相关网站1 point
-
@bonienl Can you add in to autofan an option to disable logging (preferably disabled by default). Don't think it's really necessary to have it spam logs every 5 minutes with this Sep 7 06:46:55 tidehunter autofan: Highest disk temp is 35C, adjusting fan speed from: 163 (63% @ 1060rpm) to: OFF (0% @ 235rpm) Sep 7 06:52:00 tidehunter autofan: Highest disk temp is 41C, adjusting fan speed from: OFF (0% @ 0rpm) to: 163 (63% @ 1062rpm) Sep 7 06:57:05 tidehunter autofan: Highest disk temp is 35C, adjusting fan speed from: 163 (63% @ 1066rpm) to: OFF (0% @ 202rpm) Sep 7 07:02:11 tidehunter autofan: Highest disk temp is 41C, adjusting fan speed from: OFF (0% @ 0rpm) to: 163 (63% @ 1051rpm) Sep 7 07:07:16 tidehunter autofan: Highest disk temp is 35C, adjusting fan speed from: 163 (63% @ 1073rpm) to: OFF (0% @ 218rpm) Sep 7 07:12:21 tidehunter autofan: Highest disk temp is 41C, adjusting fan speed from: OFF (0% @ 0rpm) to: 163 (63% @ 1057rpm) Sep 7 07:17:26 tidehunter autofan: Highest disk temp is 35C, adjusting fan speed from: 163 (63% @ 1065rpm) to: OFF (0% @ 200rpm) Sep 7 07:22:32 tidehunter autofan: Highest disk temp is 41C, adjusting fan speed from: OFF (0% @ 0rpm) to: 163 (63% @ 1047rpm) Sep 7 07:27:37 tidehunter autofan: Highest disk temp is 36C, adjusting fan speed from: 163 (63% @ 1065rpm) to: 48 (18% @ 368rpm) Sep 7 07:32:42 tidehunter autofan: Highest disk temp is 41C, adjusting fan speed from: 48 (18% @ 334rpm) to: 163 (63% @ 1056rpm) Sep 7 07:37:47 tidehunter autofan: Highest disk temp is 35C, adjusting fan speed from: 163 (63% @ 1061rpm) to: OFF (0% @ 207rpm) Sep 7 07:42:52 tidehunter autofan: Highest disk temp is 41C, adjusting fan speed from: OFF (0% @ 0rpm) to: 163 (63% @ 1055rpm) Sep 7 07:47:58 tidehunter autofan: Highest disk temp is 35C, adjusting fan speed from: 163 (63% @ 1064rpm) to: OFF (0% @ 226rpm) Sep 7 07:53:03 tidehunter autofan: Highest disk temp is 41C, adjusting fan speed from: OFF (0% @ 0rpm) to: 163 (63% @ 1053rpm) Sep 7 07:58:08 tidehunter autofan: Highest disk temp is 35C, adjusting fan speed from: 163 (63% @ 1069rpm) to: OFF (0% @ 214rpm) Sep 7 08:03:13 tidehunter autofan: Highest disk temp is 41C, adjusting fan speed from: OFF (0% @ 0rpm) to: 163 (63% @ 1053rpm) Sep 7 08:08:19 tidehunter autofan: Highest disk temp is 35C, adjusting fan speed from: 163 (63% @ 1072rpm) to: OFF (0% @ 201rpm) Sep 7 08:13:24 tidehunter autofan: Highest disk temp is 41C, adjusting fan speed from: OFF (0% @ 0rpm) to: 163 (63% @ 1049rpm) Sep 7 08:18:29 tidehunter autofan: Highest disk temp is 36C, adjusting fan speed from: 163 (63% @ 1072rpm) to: 48 (18% @ 347rpm) Sep 7 08:23:34 tidehunter autofan: Highest disk temp is 40C, adjusting fan speed from: 48 (18% @ 333rpm) to: 140 (54% @ 934rpm) Sep 7 08:28:39 tidehunter autofan: Highest disk temp is 37C, adjusting fan speed from: 140 (54% @ 938rpm) to: 71 (27% @ 518rpm) Sep 7 08:33:45 tidehunter autofan: Highest disk temp is 39C, adjusting fan speed from: 71 (27% @ 513rpm) to: 117 (45% @ 807rpm)1 point


