Leaderboard


Popular Content
Showing content with the highest reputation on 12/08/22 in all areas
-
1/18/23 UPDATE: As previously announced, we stopped renewing certificates for the unraid.net domain at the beginning of the year. We had initially expected a grace period of a few months where the certificates would continue to work, but due to some necessary infrastructure improvements, the old unraid.net domain certificates are now invalid and will not work. If you still need to migrate from the unraid.net certificate to a myunraid.net certificate, you may have difficulty accessing your server's webgui. Actions for Unraid 6.10 or Newer: If you can't access the server's webgui, use a local keyboard/monitor or SSH into the server and run 'use_ssl no'. (Note: if the system responds "command not found" then jump down to the section for Unraid 6.9 and earlier.) Then, you can access the server via http://ipaddress (or http://ipaddress:port if you have defined a custom http port). Note: these are http URLs, not https URLs. Navigate to the Settings → Management Access page in the Unraid webgui and click the "Upgrade Cert" button. Click on the Certificate URL and verify you can access the server via the ipaddress.hash.myunraid.net certificate. You can change the "Use SSL/TLS" setting back to Yes or Strict if all is well. Note: if you have a high-end router and previously added an exception to allow DNS Rebinding on the unraid.net domain, you will need to add an exception for myunraid.net. This feature is on/off on most consumer routers, so no additional changes are required to support the myunraid.net domain if the unraid.net domain works fine. Be sure to update your bookmarks! The My Servers dashboard will automatically use the appropriate URL if you use the My Servers plugin. Action needed for Unraid 6.9 and earlier: Older versions of Unraid do not support the newer myunraid.net certificates. You should be able to access the webgui using https://ipaddress (or https://ipaddress:port if you have defined a custom https port). Note that these are https URLs, not http URLs, so you'll need to ignore any browser warnings about invalid certificates. Navigate to Settings → Management Access and set "Use SSL/TLS" to No. Then, open a web terminal (>_) and type: rm /boot/config/ssl/certs/certificate_bundle.pem If you plan to stay on an older version of Unraid, uninstall the My Servers plugin, as it will be dropping support for older versions of Unraid. Warning: these older versions of Unraid are outdated concerning security updates and features, so we recommend taking advantage of our free upgrade policy and upgrading your system to the latest version of Unraid. On Jan 1, 2023, we will stop renewing Let’s Encrypt SSL certificates on the unraid.net domain. If you are still using a hash.unraid.net domain to access your server, please switch to the newer myunraid.net certificates that we provide for free. The URLs used with these new certificates will provide increased privacy, particularly for remote access. Upgrade actions for Unraid 6.10 or higher: Navigate to the Settings → Management Access page in the Unraid webgui. If there is an “Upgrade Cert” button, press it. This will update the certificate and change your URL from hash.unraid.net to ipaddress.hash.myunraid.net. You will need to sign back into the webgui with your root password afterward. Note: if you have a high-end router and previously added an exception to allow DNS Rebinding on the unraid.net domain, you will now need to add an exception for myunraid.net. On most consumer routers this feature is simply on/off so no additional changes are required to support the myunraid.net domain if the unraid.net domain worked fine. Be sure to update your bookmarks! If you are using My Servers, the My Servers dashboard will automatically use the appropriate URL. Action needed for Unraid 6.9 and earlier: Older versions of Unraid do not support the newer myunraid.net certificates, so if you don’t wish to upgrade Unraid you’ll need to navigate to Settings → Management Access and set "Use SSL/TLS" to No. Then open a web terminal and type: rm /boot/config/ssl/certs/certificate_bundle.pem If you plan to stay on an older version you should also uninstall the My Servers plugin as it will be dropping support for older versions of Unraid as well. Warning: these older versions of Unraid are out of date with regard to security updates and features, so our recommendation is to take advantage of our free upgrade policy and upgrade your system to the latest version of Unraid. Then, switch to the myunraid.net certificate as described above. Note: If you are unable to upgrade your certificate by Jan 1, 2023, the unraid.net certificate will continue to work for another 90 days, although at some point during that time it will expire and your browser will warn that it is insecure. On Apr 1 we will shut down DNS for these certificates and the URLs associated with them will no longer work to access your server. We highly recommend that you avoid this by migrating to the new certificate before Jan 1, 2023. If you have any questions on this or need additional help, comment here or contact support!2 points
-
The purpose of this container is to allow access to unraid itself over tailscale and as such uses host based networking. If you did manage to get this working you would be somewhat on your own.2 points
-
That is a terrible cop-out proving once again that the interest of paying customers doesn't matter until it reaches angry mob status. The official response after an update broke this essential feature to almost everyone running MS systems shouldn't be "Sucks to suck... deal with it". We should not have to start a change.org petition, or get a hoard of twitter and YouTube people to whip the community into a frenzy to get you to do the right thing. You have a 4 page forum post about an issue right in front of you and a bunch more threads elsewhere. That is just the people that actually brought it to your attention. This works like polling, multiply each of our voices by at least 10x and you will start to scratch the surface about how many users are having this issue. Finally, AD is the only way to get proper permissions for any windows based network. It may be an "enterprise feature"... but so was DHCP. That makes your reasoning a very strange excuse to ignore a VERY known (AND FIXABLE) bug in unraid. @dlandon I hope you change your mind of this issue quickly, because your above response is beyond unacceptable and I would expect ALOT of community fallout if that becomes the official hill you folks want to die on. P.S. We can start knocking out the rest of the SAMBA issues that cause terrible overall user quality of life once we get you folks warmed up fixing this mess.2 points
-
I found out that my network card (my pc) was causing the slow internet speed. The initial issue was resolved by switching SATA controller2 points
-
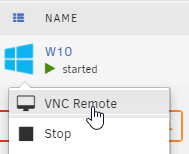
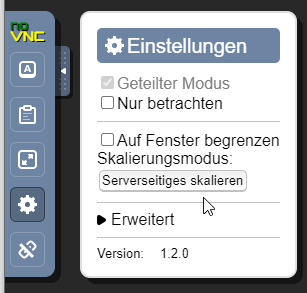
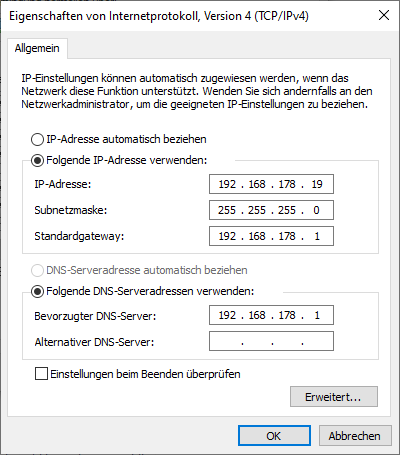
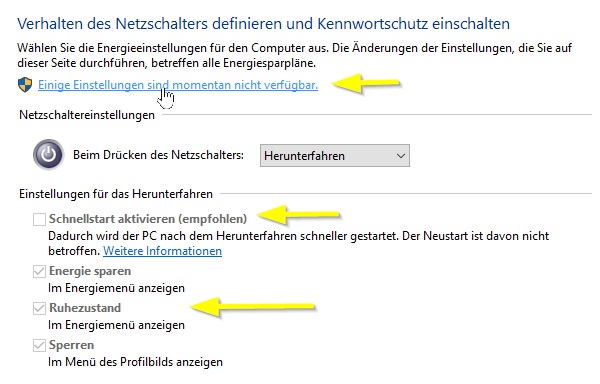
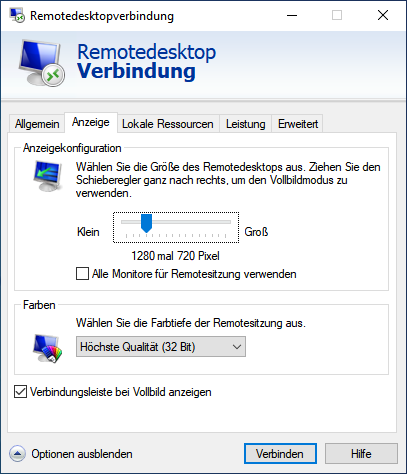
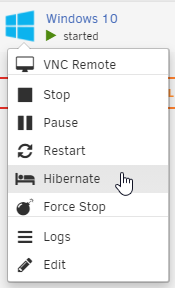
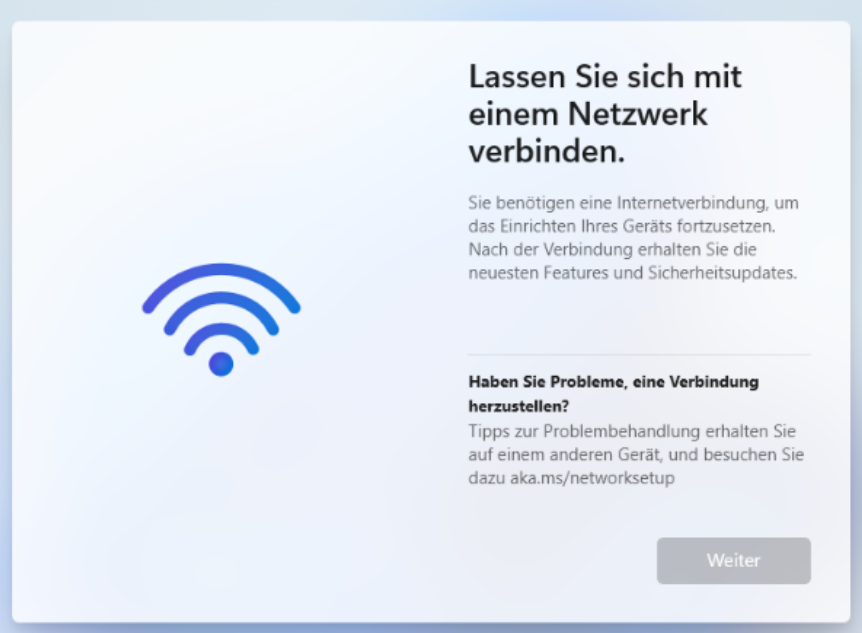
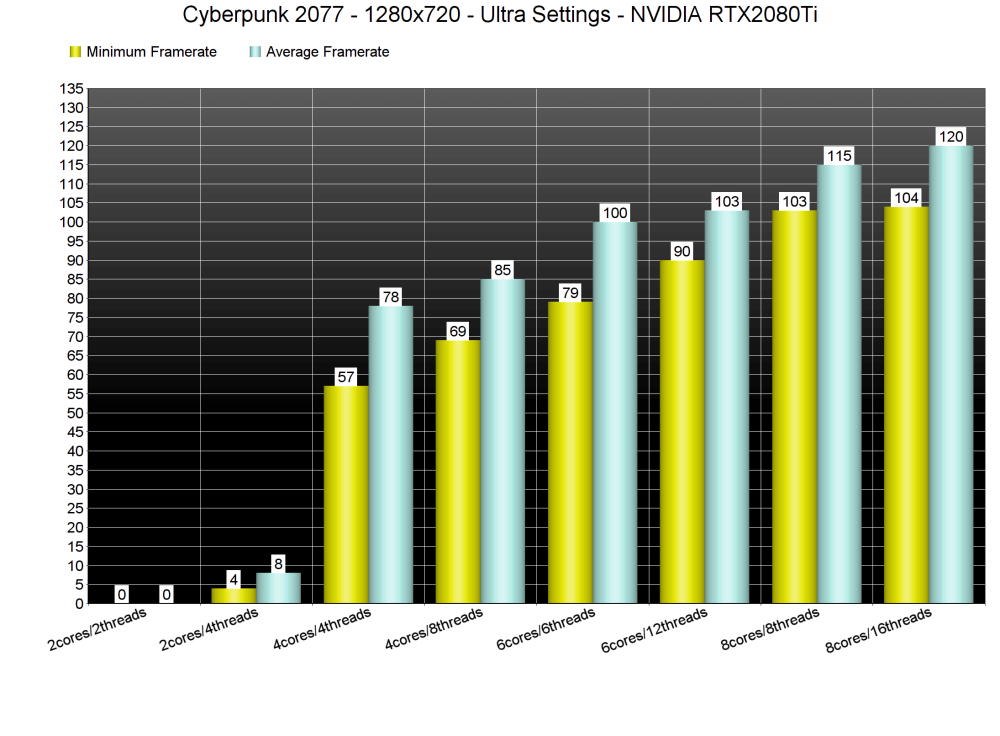
VM erstellen Windows Home / Pro ISO über das Media Creation Tool oder die Windows Enterprise ISO über UUP Dump erstellen. Settings > VM Manager > aktuellstes "Default Windows VirtIO driver ISO" auswählen und herunterladen Optional: Wer eine Grafikkarte durchschleifen möchte (nicht iGPU!): Tools > System Devices > Alle Einträge (VGA, Audio, USB, etc) der Grafikkarte anklicken und an VFIO binden > Unraid Server neu starten Optional: Wer nicht der CPU die Last-Verteilung überlassen möchte, der isoliert über Settings > CPU Pinning > CPU Isolation die Kerne der VM VMS > Add VM > Windows 10 Entweder: Alle Kerne auswählen und der CPU die Last-Verteilung überlassen, Oder: Die isolierten Kerne zuweisen 4096MB RAM, min und max Werte gleich, da unterschiedliche Werte zu Problemen führen können (2GB sind das offizielle Minimum) aktuellste Q35 als Machine, weil es von Intel GVT-g empfohlen wird. Info: Bei Windows 10 brauchte ich Q35-5.1, damit ich den Netzwerktreiber zum Laufen bringen konnte, ansonsten gab es den Fehler Code 56. über "OS Install ISO" die Windows ISO-Datei auswählen 32G vdisk oder größer (32G ist mittlerweile das offizielle Minimum, früher waren es 20G). Hinweis: vdisk.img sind Sparse-Dateien und belegen daher auf dem Datenträger weniger als angezeigt. Man muss aber was tun, damit das so bleibt. VNC Graphics Card auf German stellen Optional: Grafikkarte über das Plus-Symbol hinzufügen Optional: Sound Card auswählen, wer lokal am Server Lautsprecher / Kopfhörer anschließen möchte, bei Grafikkarten den Audio Controller der Grafikkarte auswählen Network Model: Wer keine Docker im "br0" Netzwerk verwendet, sollte für die bessere Performance "virtio" wählen, da "virtio-net" deutlich langsamer ist. Info: Ab Unraid 6.12.4 soll man das Bridge-Netzwerk deaktivieren. In dem Fall wählt man "vhost0" und "virtio" bei einer VM. Optional: Haken bei "Start VM after creation" raus und über GVT-g der VM eine vGPU zuweisen VM erstellen Optional: Über das GVT-g Plugin eine vGPU zuweisen und die VM starten Installation VMS > VM Logo > VNC Remote Wenn man "Press any Key" verpasst hat, dann einfach "reset" in der UEFI Shell eingeben um neu zu starten Am linken Rand "Serverseitiges Skalieren" aktivieren Benutzerdefinierte Installation > Treiber laden > Virtio CD Laufwerk > amd64\w10\ auswählen um den SCSI Controller Treiber für die virtuelle Festplatte zu laden Windows 11: Wer bei dem folgenden Bildschirm hängt, drückt SHIFT + F10, gibt "OOBE\BYPASSNRO" ein und bestätigt den Befehl mit ENTER. Die VM startet neu und nach Auswahl des Tastaturlayouts könnt ihr mit "Ich habe kein Internet" fortfahren. Nach der Installation Optional: Wer möchte aktiviert den Ruhezustand (Hibernate), damit er die VM über das Unraid Menü nicht nur herunterfahren kann. Dazu das Windows Logo klicken > "cmd" eintippen > Rechte Maustaste als Administrator ausführen: powercfg.exe /hibernate on powercfg /h /type full Rechte Maustaste aufs Windows Logo > Ausführen > powercfg.cpl Dann "Auswählen was beim Drücken..." > "Einige Einstellungen sind..." > Schnellstart deaktivieren und wer sich für den Ruhezustand entschieden hat, diesen einschalten Der Schnellstart muss deaktiviert werden, da es sonst zu Problemen kommt, falls man zB die Anzahl der CPU Kerne verändert etc Über das Virtio CD Laufwerk die virtio-win-gt-x64.msi ausführen, was die folgenden Treiber installiert: Balloon, Network, Pvpanic, Qemufwcfg, Qemupciserial, Vioinput, Viorng, Vioscsi, Vioserial, Viostor, Viofs Erst jetzt hat also die VM Internet Über das VirtIO CD Laufwerk die virtio-win-guest-tools ausführen, welches dann auch den VNC Grafiktreiber installiert, so dass wir nun ebenfalls die Auflösung ändern können. Dadurch können wir die VM nun über das Unraid Menü bequem Herunterfahren (Stop) oder in den Ruhezustand (Hibernate) versetzen: Unten rechts rechte Maustaste auf das Netzwerk-Symbol > "Netzwerk-..." > Adapteroptionen ändern > rechte Maustaste Ethernet > Internetprotokoll, Version 4... > Eigenschaften > Feste IP-Adresse vergeben Rechte Maustaste auf das Windows Logo > System > Remotedesktop > Remotedesktop aktivieren Optional: Bei Intel (vGPU) oder Nvidia (Grafikkarte) oder AMD (Grafikkarte) den Treiber herunterladen und installieren Das aktuelle Fenster schließen, auf einem Windows PC nach "Remote..." suchen und "Remotedesktopverbindung" (RDP) öffnen. IP-Adresse und Windows Username hinterlegen. Außerdem unter "Anzeige" die Auflösung anpassen, damit die VM nicht wie euer PC zB in 4K gestartet wird, was eine sehr hohe CPU Last auf dem Server verursachen kann: Hinweis: RDP läuft deutlich flüssiger als NoVNC im Browser und unterstützt auch Sound. Alternativ geht auch Parsec. Optional: PowerShell als Admin öffnen und folgendes ausführen um Windows von Bloatware zu befreien: iwr -useb https://git.io/debloat|iex Optional: Direkter Login-Bildschirm: Rechte Maustaste auf das Windows Logo > Ausführen > regedit KEY_LOCAL_MACHINE > Software > Policies > Microsoft > Rechte Maustaste auf Windows > Neu > Schlüssel > Personalization als Name eingeben > Rechte Maustaste auf Personalization > Neu > DWORD > NoLockScreen > Doppelklick > 1 als Wert > OK Alle Updates installieren (also auch bei Bedarf mehrmals neu starten) Herunterfahren Optional: ISO-Datei und virtio CD Laufwerk aus der VM Konfiguration entfernen Ein Backup von unserer Vanilla Windows vidks1.img erstellen. Das geht über Krusader (Apps), SMB (falls Netzwerkfreigabe vorhanden) oder über das Unraid WebTerminal (">_" oben rechts) mit dem folgenden Befehl (Pfade bei Bedarf anpassen): cp -a --reflink --sparse=auto "/mnt/user/domains/Windows 10/vdisk1.img" "/mnt/user/domains/Windows 10/vdisk1-backup.img" Video

 1 point
 -
Hello, my router tells me i have 2 devices using the same ip. the ip is used by unraid server. I can't find the other one. arp -a on a lan host return unraid ip with an unknown mac address. I can see the mac address in unraid with ip link and it's attached to shim-br0@br0 i use one physical interface i have only one vm running with a different mac address. I have dockers running and one has a different ip (heimdall) what can be this mysterious device? edit: from my understanding, considering the interface shim-br0@br0 it should be a docker on custom network but i can't find it1 point
-
Das ist der Dateipfad innerhalb des Containers.1 point
-
Not sure if this would create this specific error, but are you sure your server has access to the internet in general and the Limetech servers in particular ? It is mandatory for the Trial version.1 point
-
Over 4,400 Unraid users participated in our inaugural customer survey. Thank you to all who participated! Your input is incredibly helpful to our team as we seek to understand our customer's wants and desires more clearly. With your responses and feedback, we have much better clarity on what we need to focus on and prioritize in the months and years ahead! Check out a summary of the results here: https://unraid.net/blog/unraid-customer-survey-results1 point
-
I am sure it will be useful to have a clear view of a large quantity of users are looking for and maybe, what is a vocal minority or the silent majority. Thanks for sharing !1 point
-
Ändere in deiner Config auch den Pfad zu IMPORTER_DIR ="/data/import", dann sollte es gehen.1 point
-
Ich bin erst später wieder vor meinem Rechner. Kann dann erst weiter helfen.1 point
-
Thanks for the reply - the shares are still including the respective pool(s). Assuming new docker and livbert images were created, is there a way to just import the settings from my previously installed containers/vms? Edit: Ended up adding the containers back via templates from the previous installs and creating new VMs just pointing manually to the "old" vdisks. Sorry for my ignorance here!1 point
-
Hi! I has worked!, I tried removing all the unused custom networks and it was still failing, but once I removed the one in use (in my case proxynet) it has started working again. It's a bit weird since I have not touch this custom network in a while. I'll try to reconfigure it again and if it fails at least I know where to look at. I've also set the ipvlan, I've seen that it's the default since 6.11.5 Thanks a lot!1 point
-
A few post back someone else also said it took some time. Possible caching or rate limit? Was nginx crashing due to missing certificates? Possible you where restarting while certbot was doing its job? For me I had 0 issues in the last years. As long as you keep port 80 correctly open the Cerificates should be renewed just fine. Ofc always recommend to add an alert on your certs if you rely on them.1 point
-
Samba support say this is a mis-configuration or problem with how Unraid has compiled the image. I'm not sure who we can tag here?1 point
-
I have a 5900x so I can't tell you for sure but I would think a 5800x3d with the large cache and faster cores would work well. Sent from my SM-G996U using Tapatalk1 point
-
This was enabled. I flipped this off and will monitor. Thank you!1 point
-
It does mount. I had to turn off dockers to unmount it. So copy everything off, figure out how to add it to a cache pool, copy everything back. It is a spinning disk so I put my download containers on it instead of my nvme drive.1 point
-
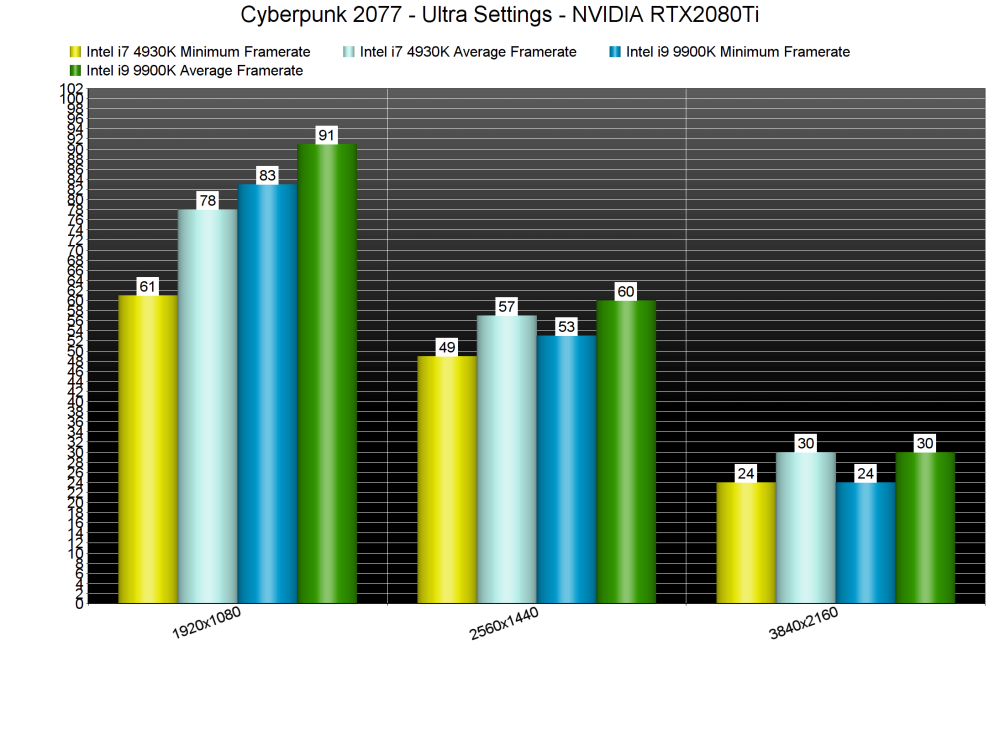
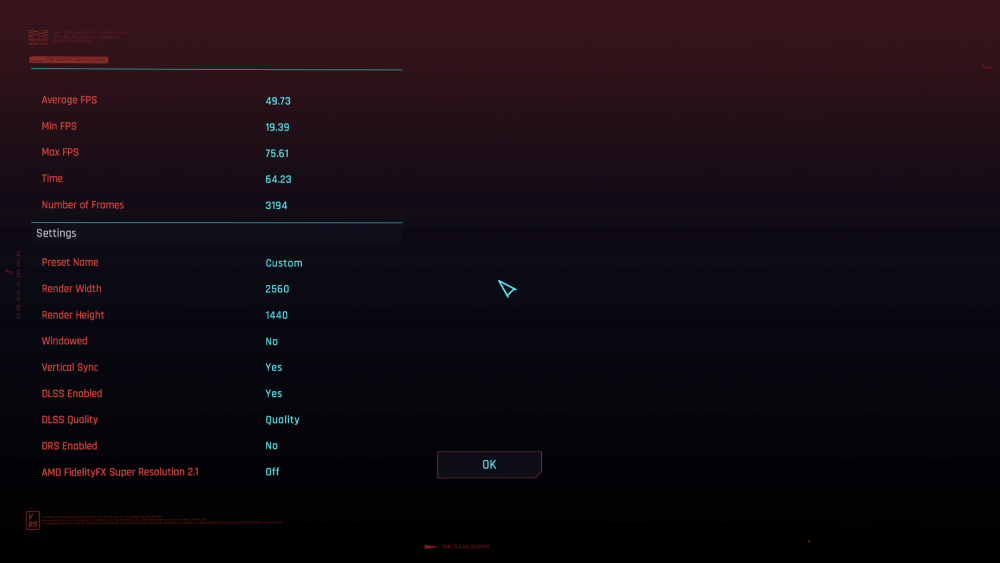
Welp seems I figured it out..... My issue of "low performance" was due to the low amount of cores allocated to my Windows VM. With only 3 cores dedicated to the VM I was getting 41 FPS average. And with 5 cores and 5 threads allocated my ryzen 5 3600x is performing more like an i7 4930k. So my performance is on par on what it should be. I just need to save up some more funds to purchase a higher core processor that can allow me to dedicate more CPU resources to the VM. Because my RTX 3080 is just being bottlenecked. Thanks for all your assistance @hot22shot On to my next Unraid project!
 1 point
 -
I had to do it in the file because, I am not at home, but it worked. Thank you for your help and have a nice day!1 point
-
see here: default menu.c32 menu title Lime Technology, Inc. prompt 0 timeout 50 label Unraid OS menu default kernel /bzimage append initrd=/bzroot video=efifb:off label Unraid OS GUI Mode kernel /bzimage append initrd=/bzroot,/bzroot-gui label Unraid OS Safe Mode (no plugins, no GUI) kernel /bzimage append initrd=/bzroot unraidsafemode label Unraid OS GUI Safe Mode (no plugins) kernel /bzimage append initrd=/bzroot,/bzroot-gui unraidsafemode label Memtest86+ kernel /memtest Start "Unraid OS" (no gui) and that argument will be applied. If it doesn't work attach diagnostics I suggest to modify it from the unraid gui not the file: Main - Boot Device - Flash - Syslinux Configuration Modify the append line (all in the same line) of label "Unraid OS" like this: append initrd=/bzroot video=efifb:off and save and reboot.1 point
-
Man könnt über die Apple Automation App, einmal pro Tag dann die App Automatisch starten.1 point
-
either, whatever you prefer, there are very restrictive iptables rules in place to prevent ip leakage so im confident that whatever that is set to it cannot leak.1 point
-
Also make sure write cache is enabled in the server BIOS, it's disabled by default.1 point
-
As the bug appears to originate within huge_memory.c, would it be worth turning off transparent huge pages and seeing if that cures the issue? There seems to be a lot of issues with hugepages at the moment and looking at the kernel forums there seem to be unresolved issues with splitting pages, particularly with Docker as it also uses hugepages if they are enabled. See this post for details on turning off THP - https://forums.unraid.net/bug-reports/stable-releases/crashes-since-updating-to-v611x-for-qbittorrent-and-deluge-users-r2153/?do=findComment&comment=21761 Alternatively you could add transparent_hugepage=never to the end of your flash drive syslinux config (Main -> Flash -> syslinux configuration -> Unraid OS -> add to end of append statement 'append initrd=/bzroot transparent_hugepage=never')1 point
-
Should be, backup current flash drive and you can also run FCP's update advisor.1 point
-
This should go away if you click "Search for Updates" on the Docker page at the bottom. Nothing to worry about since my containers get only once or twice a year updates.1 point
-
Gotcha. Good to know, everything worked fine but just making sure 😃 Thanks!1 point
-
i managed to get the Creativerse server running pretty quickly with my world that i migrated over so thank you1 point
-
Thanks for the answer when i got time I'll install it on my unraid machine. Tahanks for the work you do.1 point
-
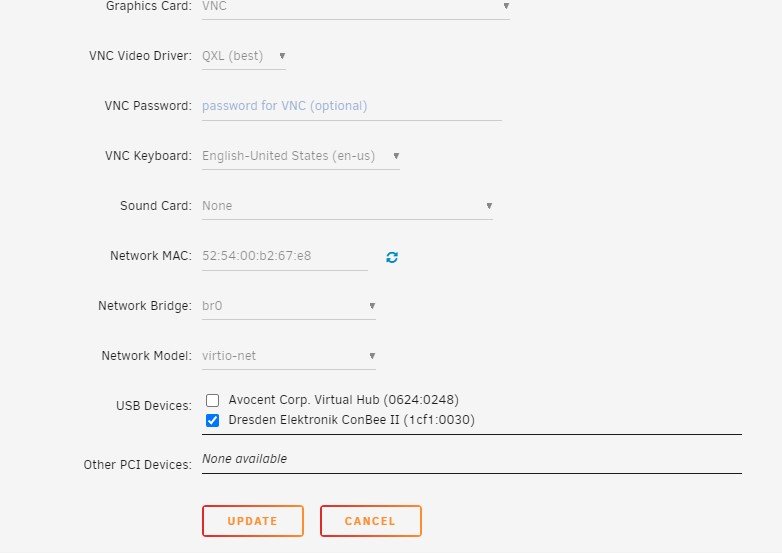
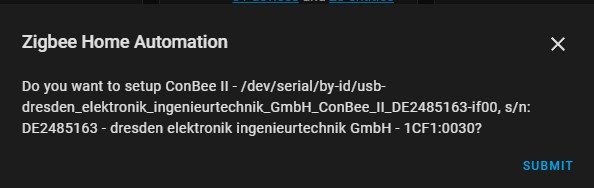
I have home assistant set up in a vm. I am unable to get my conbee ii USB stick to pass through. I am able to select it when I edit the vm but when I launch it home assistant says "fail to probe usb device". I have also tried to add the zigbee2mqtt docker container and get a similar error when launching it. I have tried : ls -l /dev/serial/by-id and the output is lrwxrwxrwx 1 root root 13 Feb 13 12:27 usb-dresden_elektronik_ingenieurtechnik_GmbH_ConBee_II_DE2485163-if00 -> ../../ttyACM0 I am wondering if the usb device keeps disconnecting and reconnecting running: dmesg I get a bunch of usb disconnect and reconnect as seen below [ 3409.307660] cdc_acm 3-1:1.0: ttyACM0: USB ACM device [ 3412.737796] usb 3-1: USB disconnect, device number 21 [ 3413.040548] usb 3-1: new full-speed USB device number 22 using uhci_hcd [ 3413.225687] cdc_acm 3-1:1.0: ttyACM0: USB ACM device [ 3422.660996] docker0: port 7(vethdf69f8f) entered blocking state [ 3422.661000] docker0: port 7(vethdf69f8f) entered disabled state [ 3422.661087] device vethdf69f8f entered promiscuous mode [ 3422.661222] docker0: port 7(vethdf69f8f) entered blocking state [ 3422.661225] docker0: port 7(vethdf69f8f) entered forwarding state [ 3422.661911] docker0: port 7(vethdf69f8f) entered disabled state [ 3422.994792] eth0: renamed from vethc4cbe68 [ 3423.006063] IPv6: ADDRCONF(NETDEV_CHANGE): vethdf69f8f: link becomes ready [ 3423.006144] docker0: port 7(vethdf69f8f) entered blocking state [ 3423.006148] docker0: port 7(vethdf69f8f) entered forwarding state [ 3425.748581] docker0: port 7(vethdf69f8f) entered disabled state [ 3425.748721] vethc4cbe68: renamed from eth0 [ 3425.803994] docker0: port 7(vethdf69f8f) entered disabled state [ 3425.807852] device vethdf69f8f left promiscuous mode [ 3425.807855] docker0: port 7(vethdf69f8f) entered disabled state [ 3456.488675] usb 3-1: USB disconnect, device number 22 [ 3456.874567] usb 3-1: new full-speed USB device number 23 using uhci_hcd [ 3457.051716] cdc_acm 3-1:1.0: ttyACM0: USB ACM device [ 3460.488551] usb 3-1: USB disconnect, device number 23 [ 3460.791429] usb 3-1: new full-speed USB device number 24 using uhci_hcd [ 3460.975699] cdc_acm 3-1:1.0: ttyACM0: USB ACM device [ 3485.705814] docker0: port 7(vethbc81f05) entered blocking state [ 3485.705818] docker0: port 7(vethbc81f05) entered disabled state [ 3485.705904] device vethbc81f05 entered promiscuous mode [ 3485.706028] docker0: port 7(vethbc81f05) entered blocking state [ 3485.706031] docker0: port 7(vethbc81f05) entered forwarding state [ 3485.706506] docker0: port 7(vethbc81f05) entered disabled state [ 3486.054194] eth0: renamed from veth142c26a [ 3486.069672] IPv6: ADDRCONF(NETDEV_CHANGE): vethbc81f05: link becomes ready [ 3486.069742] docker0: port 7(vethbc81f05) entered blocking state [ 3486.069745] docker0: port 7(vethbc81f05) entered forwarding state [ 3488.841137] docker0: port 7(vethbc81f05) entered disabled state [ 3488.841271] veth142c26a: renamed from eth0 [ 3488.917609] docker0: port 7(vethbc81f05) entered disabled state [ 3488.920939] device vethbc81f05 left promiscuous mode [ 3488.920943] docker0: port 7(vethbc81f05) entered disabled state [ 3504.231445] usb 3-1: USB disconnect, device number 24 [ 3504.627399] usb 3-1: new full-speed USB device number 25 using uhci_hcd [ 3504.804631] cdc_acm 3-1:1.0: ttyACM0: USB ACM device [ 3508.231366] usb 3-1: USB disconnect, device number 25 [ 3508.561308] usb 3-1: new full-speed USB device number 26 using uhci_hcd [ 3508.740550] cdc_acm 3-1:1.0: ttyACM0: USB ACM device [ 3548.805387] docker0: port 7(veth6395ec9) entered blocking state [ 3548.805391] docker0: port 7(veth6395ec9) entered disabled state [ 3548.805469] device veth6395ec9 entered promiscuous mode [ 3548.805588] docker0: port 7(veth6395ec9) entered blocking state [ 3548.805591] docker0: port 7(veth6395ec9) entered forwarding state [ 3548.806140] docker0: port 7(veth6395ec9) entered disabled state [ 3549.181817] eth0: renamed from veth6beeb31 [ 3549.191031] IPv6: ADDRCONF(NETDEV_CHANGE): veth6395ec9: link becomes ready [ 3549.191086] docker0: port 7(veth6395ec9) entered blocking state [ 3549.191088] docker0: port 7(veth6395ec9) entered forwarding state ideas please as I am starting to loose my mind
 1 point
 -
And btw, I now have 3 hours uptime on my Valheim servers so disabling the updates fixed it.1 point
-
Thanks again Jorge! Worked like a charm.1 point
-
I created a new flash drive and everything works. I think a file on my flash drive got corrupt or something but everything seems to be working fine now1 point
-
if you REALLY want to ensure this then the only way is packet analysis, so you are into using wireshark and capturing your traffic from your server and ensuring no torrent traffic is going out, this is exactly what i did when developing the docker image to ensure no leaks, its not for the faint hearted though so expect a steep learning curve.1 point
-
You're close. As i'm using env-variables and not the server.yml you need to also use the env-variable version as listed in the table at the bottom of: https://docs.ntfy.sh/config/ But i already exposed that variable, so in the container config in unRaid you can just change NTFY_WEB_ROOT to disabled1 point
-
If you don't have it you can recreate all the VMs on the page and reassign them the existing vdisks.1 point
-
You need to copy libvirt.img from the old cache, or restore from a backup.1 point
-
This was misinformation, the latest driver supports Tesla cards and this is the exact same driver that you can download from Nvidia. Another user with a P100 confirmed that it is working, see this post: ...and the user that reported the issue with it's P4 also solved the issue (he forgot to put in --runtime=nvidia in the template).1 point
-
Getting the following after update to latest version: noVNC encountered an error: Cannot read properties of null (reading 'addEventListener') TypeError: Cannot read properties of null (reading 'addEventListener') at Object.addTouchSpecificHandlers (http://192.168.1.126:6080/app/ui.js:223:13) at Object.start (http://192.168.1.126:6080/app/ui.js:78:12) at http://192.168.1.126:6080/app/ui.js:45:27 Tried downgrading to binhex/arch-krusader:2.7.2-4-01 and same error. Any Ideas? EDIT: SOLVED by force refresh (ctrl+refresh in chrome) of the webpage1 point
-
You need to use network br0 for the container and set a static IP address1 point
-
好的谢谢您,我最后找到原因了,是因为我的conifg下的go文件删除了 /usr/local/sbin/emhttp & 这一行,导致机器无法正常启动,现在已经解决1 point
-
Key: NVIDIA_VISIBLE_DEVICES Value: The ID of your GPU according to the Nvidia plugin page Default Value: leave blank1 point
-
Vielleicht sollte man DIES (https://forums.unraid.net/topic/101283-what-is-the-difference-between-virtio-and-virtio-net/?do=findComment&comment=1021453) aber auch nicht unerwähnt lassen... hatte lange deswegen crashes.1 point
-
nevermind I found a YouTube video. it's not in english but it did the trick1 point
-
Thanks for the quick reply johnnie.black I've run sg_format --format --fmtpinfo=0 /dev/sdb Hopefully it does the trick! **fair warning for anyone reading this, the above command will WIPE your disk!**1 point
-
Worked like a charm for me, glad to find this in the forums... thanks much!1 point
-
I am using letsencrypt as well: maybe you could go like this: 1.st you need a subdomain like filebrowser.yourdomain.com (yourdomain.com/filebrowser will not work) 2.nd put a proxy pass in your / configuration for your subdomain 3.rd have fun! location / { proxy_pass http://192.168.1.24:8123/; proxy_buffering off; proxy_http_version 1.1; proxy_set_header X-Forwarded-For $proxy_add_x_forwarded_for; proxy_set_header Upgrade $http_upgrade; proxy_set_header Connection $http_connection; access_log off; }1 point
-
How do I move or recreate docker.img? The easy way to move or recreate docker.img - 1 Go to Settings -> Docker -> Enable Docker, and set to No, then click the Apply button (this disables Docker support) 2 If recreating your docker.img file, then switch to Advanced View, then check off the box and press Delete, then skip to step 5 3 Using mc or any file manager or the command line, move docker.img to the desired location (/mnt/cache/docker.img is recommended) 4 In Settings -> Docker, change the path for Docker image to the exact location you just copied to 5 Now set Enable Docker back to Yes, and click the Apply button again (re-enabling Docker support) NOTE: If you have created any custom docker networks (eg through docker network create) you will need to recreate them after recreating your image and before reinstalling your applications The standard way to move or recreate docker.img is to stop Docker support, delete the current image, re-enable Docker support The easiest way to reinstall your applications would be to go to the Apps Tab, Previous Apps Section. Then check off all of your previous applications and hit "Install"1 point