Leaderboard


Popular Content
Showing content with the highest reputation on 12/10/22 in Posts
-
Hallo Allerseits. Die Wahl der PCIe basierten SATA Kontroller für unraid (Stand April 2024). Ist zwar schon (sehr) oft durchgekaut worden, aber da immer wieder entsprechende Fragen auftauchen hier einmal ein paar Grundlagen. (Diese spiegeln meine aktuelle Meinung und Erfahrung wieder. Verbesserungsvorschläge willkommen.) Hier incl. PCIe und SATA Grundlagen, damit man hier ggf. drauf verweisen kann und es nicht immer wieder neu tippen muß. Zuerst die übliche Schnittstelle auf dem Mainboard, die diese Kontroller versorgt - PCIe: Zuerst ist es interessant, welchen PCIe Standard das Mainboard bei den zu benutzenden Slots unterstützt, damit man auch abschätzen kann, was ein SATA Kontroller darauf maximal leisten kann: - PCIe 1.0 ist stark veraltet und liefert pro Lane rund 250MByte/s. Das ist nicht zu empfehlen. - PCIe 2.0 ist veraltet und liefert pro Lane rund 500MByte/s. Wenn es nicht anders geht, kann man es nutzen. PCIe SAS-Kontroller mit PCIe 2.0 sind aber oft etwas stromsparender als PCIe 3.0. - PCIe 3.0 ist aktuell (&) gut und liefert pro Lane knapp unter 1Gbyte/s. - PCIe 4.0 oder gar 5.0 sind zu neu. Speziell dafür sind mir aktuell keine SATA Kontroller bekannt. Da PCIe abwärtskompatibel ist, kann man in einem sehr neuen Mainboardslot mit Standard 4.0 oder gar 5.0 dennoch auch Kontroller verwenden, welche beispielsweise nur PCIe 2.0 oder 3.0 beherrschen. Leider ist man dann aber eben auch auf die Geschwindigkeit von PCIe 2.0 oder eben 3.0 pro Lane reduziert. Dafür wird bei der langsamen Taktung oft auch etwas weniger elektrisch Energie benötigt. Dann ist es relevant welche PCIe Steckplätze das Mainboard hat. - Einerseits gibt es die normalen PCIe Slots in verschiedenen Längen und intern unterschiedlich viel belegbaren (elektrisch verbundenen) Lanes. Mechanisch lange Slots (bis x16) können so ausgeführt sein, daß sie elektrisch dennoch nur weniger Lanes verbinden (x1, x4, x8). - Andererseits gibt es seit einiger Zeit M.2 Steckplätze (alt auch NGFF bezeichnet), die entweder selber nur einen einzigen SATA Anschluß bieten oder evtl. (zusätzlich oder exklusiv) den NVMe Standard beherrschen und dadurch auch PCIe Lanes haben. Diese sind mit 1, 2 oder 4 Lanes zu finden. Diese sind mechanisch nicht ganz so robust/stabil, aber mit etwas Vorsicht immer noch gut nutzbar. Nun zu SATA: Der aktuelle SATA-3 Standard kann Datenträger mit bis zu ca. 600MByte/s (6GBit/s) ansprechen. - Große und schnelle Festplatten mit der Drehzahl von ca. 7200 Rpm schaffen heutzutage in der kurzzeitigen Spitze etwas mehr als 280MByte/s von ihrem Scheiben. Im normalen Dauerbetrieb sackt diese Geschwindigkeit über die Festplatte hinweg ab, so daß ich pauschal pro Festplatte von ungefär 250MByte/s ausgehe. - SATA-SSD hingegen schaffen aufgrund ihres Aufbaus in der Spitze durchaus weit höhere Geschwindigkeiten. 550MByte/s sind keine Seltenheit und da kommt man so langsam an die SATA-3 Limitierung ran. Weniger Peformante SATA-SSD sacken nach sehr kurzer Spitze auch gerne schon mal auf 300 MByte/s oder sogar viel weniger ab. Hier nun zu den Kontrollern für SATA-Festplatten und SATA-SSD: Die Kontroller sind in der Regel mit einem (oder mehreren) Chip bestückt, welcher den PCIe Slot (Eingang) nutzt und dann SATA Ports für Festplatten/SSD (Ausgang) bereit stellt. Die Leistungsfähigkeit (und Kompatibilität zu unraid) eines Kontrollers hängt stark von dem verwendeten Chip auf dem Controller ab, weshalb es meist egal ist, wer der Kartenhersteller ist, da dieser meist nur die Funktion des Chips nach außen anbindent. (Deshalb werde ich im weiteren eher von Chiptypen, als von Kontrollerherstellern schreiben). - Einerseits gibt es SATA Kontroller, welche meist nicht so viel Strom verbrauchen, dafür aber auch nur wenige SATA-Anschlüsse (bis 6) haben und passiv gekühlt werden (bei einfachen Chips ist nicht einmal ein Kühlkörper nötig). - Andererseits gibt es SAS Kontroller, welche auch zu SATA kompatibel sind. Diese benötigen mehr elektrische Energie, gibt es aber dafür auch mit hoher SAS/SATA-Portzahl (bis 28). Aufgrund des hohen Stromverbrauches sind bei SAS Kontrollern mindestens Kühlkörper nötig und diverse Hersteller sehen eine zwingende Belüftung mit vorgegebener Luftmenge als notwendig an. Hier sind HBA Kontroller im IT Mode für Unraid in der Regel kompatibel. Raid Kontroller ohne IT Modus sind bei Unraid nicht anzuraten. - Dann gibt es noch eher exotische Lösungen, bei denen verschiedene Chips mit SATA-Multipliern hinter dem eigentlichen SATA Chip oder gar PCIe-Switche dem SATA Chip vogeschaltet sind. (Beide Varianten sind nicht optimal!) Deshalb ganz kurz zu diesen beiden Zusatzkomponenten: - SATA Multiplier sind Verteiler, die die maximalen 600MByte/s eines SATA (Eingangs-)Ports auf bis zu 5 SATA (Ausgangs-)Ports verteilen. Man hat also weitaus mehr Ports gleichzeitig zur Verfügung um Datenträger anzuschließen, aber wenn man alle Datenträger gleichzeitig ansprechen will, teilen sie sie die maximale Bandbreite des einen Ports. Somit schafft man dann pro SATA Port theoretisch maximal ca. 120MByte/s. In der Praxis kommen noch ein paar bremsende Details hinzu. - PCIe-Switche sind vergleichbar mit Netzwerkswitchen. Man hat auch hier einen Eingang (evtl. mit mehr als einer Lane), der versucht die zu transportierenden Datenpakete auf mehrere Ausgänge zu verteilen. Da PCIe weitaus performanter ausgelegt ist und so auch mehrere Eingangslanes gleichzeitig auf verschiedene daran angeschlossene SATA Kontroller mit je einer Lane gesplittet werden können, ist das eine interessante Methode mehrere stromsparende SATA Chips performant an einen breiteren PCIe Slot (beispielsweise mit 4 Lanes) anzubinden. Leider hat die Sache einen großen Haken: die PCIe Switches selber sind auch Stromschlucker und damit macht man die Energiebilanz des nachgeschalteten sparsamen SATA Chips wieder zunichte. Dann kann man gleich überlegen einen SAS Kontroller oder mehrere einfache SATA Kontroller zu nehmen. Und endlich: die SATA Chips auf den Kontrollerkarten (egal ob Standardbauweise oder M.2). Aktuell steht auf dem Markt folgendes zur Verfügung (was auch in unraid gut funktioniert, aber ggf. die vom Mainboard erreichbaren Stromsparzustände (C-States) verändern/verschlechtern kann): ASM1062 Chip – Eingang PCIe 2.0 x2; Somit hat man also rund 1GByte/s Bandbreite (wenn dieser Chip eben zum Mainboard mit mindestens PCIe 2.0 x2 Lanes angebunden ist), die hier auf bis zu 2 SATA Ports verteilt werden. Bei gleichzeitige Nutzung aller 2 Ports sind knapp unter 500MByte/s pro Port nutzbar, wodurch sich dieser Kontroller sich gut anbietet bei älteren PCIe 2.0 basierten Mainboards bis zu 2 SATA Festplatten oder aus SATA-SSD gleichzeitig zu betreiben. Diese Kontroller sind aber auch auf PCIe Steckkarten mit nur einer (x1) Lane Anbindung zu finden. Hier stehen dem Chip also nur maximal rund 500MByte/s zur Verfügung und damit würde es bei 2 guten SATA-SSD gleichzeitig schon wieder zu eng mit der Gesamtbandbreite. JMB582 Chip - Dieser hat baulich 1 eine PCIe 3.0 Lane. Dieser Chip bietet 2 SATA Ports, die sich dann die maximale Bandbreite von rund 1GByte/s teilen, wodurch dann bei gleichzeitiger Nutzung knapp unter 500MByte/s pro SATA Port drin sind. Das reicht auch für gute SATA SSDs. Diese 582 Chips werden sehr gerne für die Nischenlösung der M.2 Key A/E Steckkarte eingesetzt um in solch kurzen A oder E Slots, welche eigentlich für WiFi Karten gedacht sind und auch PCIe 3.0 x1 enthalten, einen zusätzlichen SATA Kontroller einzusetzen. In reinen CNVI M.2 Slots funktionieren diese Kontroller nicht. Nicht unerwähnt sollte sein, daß die JMB 582 (und siehe unten auch 585) kein vernünfitiges ASPM beherrschen und somit der PC in der Regel nicht mehr in tiefere Stromsparmodi wechseln kann. Das kann dann schon einmal einen Unterschied von ein paar Watt im einstelligen Bereich ausmachen. ASM1064 Chip – Eingang PCIe 3.0 x1; Somit hat man also rund 1GByte/s Bandbreite, die hier auf bis zu 4 SATA Ports verteilt werden. Bei gleichzeitige Nutzung aller 4 Ports sind knapp unter 240MByte/s pro Port nutzbar, wodurch sich dieser Kontroller gut anbietet bis zu 4 SATA Festplatten gleichzeitig zu betreiben. Bei performanten SATA-SSD sollten nicht mehr als 2 Stück gleichzeitig benutzt werden, da diese sonst ggf. ausgebremst werden. Edit: Diese Chips haben aber gezeigt, daß Sie beim Einsatz von Powertop im auto tune Modus ggf. die SATA Links verlieren. Diese sind ebenfalls keine gute Empfehlung mehr für unraid. ASM1164 Chip – Eingang PCIe 3.0 x2; Somit hat man also rund 2GByte/s Bandbreite, die hier auf bis zu 4 SATA Ports verteilt werden. Bei gleichzeitige Nutzung aller 4 Ports sind fast 500MByte/s pro Port nutzbar, wodurch sich dieser Kontroller gut anbietet bis zu 4 SATA-SSD gleichzeitig zu betreiben. Steckkarten mit diesem Kontroller sind aber sehr selten, weil sie preislich vergleichbar dem unten erwähnten ASM1166 liegen und dieser sogar 6 SATA Ports bietet. Auch dieser Kontroller ist vereinzelt auch auf x1 Steckkarten zu finden, wobei er sich von der Geschwindigkeit her dann nicht mehr von der ASM1064 Variante unterscheidet. Nicht unerwähnt sollte sein, daß es für die ASM11.. Chips ein Firmweareupdate gibt, welches bei einigen Zusatzsteckkarten evtl. vorhandene Probleme mit den Energiesparmodi verringern. Ob dieses Firmwareupdate bei allen ASM11.. basierten Steckkarten funktioniert kann ich nicht sagen. JMB585 Chip - Dieser hat baulich 2 Stück PCIe 3.0 Lanes, wodurch man seine maximale Bandbreite nur in einem Slot 3.0 mit x2 Lanes (oder mehr) erreichen kann. Dieser Chip bietet 5 SATA Ports, die sich dann die maximale Bandbreite von rund 2GByte/s teilen, wodurch dann bei gleichzeitiger Nutzung knapp unter 400MByte/s pro SATA Port drin sind. Das ist mehr als die aktuell flotteste SATA HDD schafft und auch nicht übel, wenn man SATA SSD verwenden will. Es wird dann bei gleichzeitiger Nutzung performanter SATA-SSD zwar immer noch etwas Transfergeschwindigkeit beschnitten, aber das muß man selber entscheiden, ob man das akzeptieren kann und ob die SSD soweiso nicht selber schon langsamer ist. Auch hier der Hinweis: daß die JMB 585 (und siehe oben auch 582) kein vernünfitiges ASPM beherrschen und somit der PC in der Regel nicht mehr in tiefere Stromsparmodi wechseln kann. Das kann dann schon einmal einen Unterschied von ein paar Watt im einstelligen Bereich ausmachen. ASM1166 Chip – Auch dieser hat baulich 2 Stück PCIe 3.0 Lanes und somit auch maximal 2GByte/s. Er verteilt dies auf bis zu 6 SATA Ports, wodurch dann bei gleichzeitiger Nutzung rund 330MByte/s drin sind. Immer noch mehr als eine Festplatte und auch bei SATA-SSD für den einen oder anderen User interessant. Wenn man nur 4 Ports beschaltet hat man eigentlich das Selbe wie bei einen ASM1164 Chip (siehe oben) nur eben für ggf. zukünftige Erweiterungen oder Umplanungen 2 SATA Ports mehr. Hier gilt auch der Hinweis zu der Firmware bei Stromsparproblemen. EDIT: in den letzten Monaten sind aber auch viele (billige) ASM1166 basierte Zusatzkontroller auf den Markt gekommen, die zwar nicht (wie der ASM1064) die Links verlieren, aber dennoch in den Stromsparmodi (selbst mit angepaßter Silverstone Firmware) nicht mehr so ganz gut mit den Mainboards harmonieren und somit die C-States negativ beeinflußen. Selbst, wenn der Kontroller selber nur so um die 2W schluckt, kasnn es sein, daß das Mainboard dann von sich aus einiges mehr an Energie benötigt. Es ist also hier ein bisschen Glückssache. Diverse LSI Chips (des aktuellen Inhabers Broadcom) – Das sind dann die SAS Chips. Hier gibt es sehr viele Varianten. Am verbreitetsten sind die Chips, welche PCIe x8 zum Mainboard hin anbinden und daraus 8 oder mehr SAS/SATA-Ports machen. Wie schon geschrieben: im IT Mode sind diese für unraid gut nutzbar, aber aufgrund des höheren Strombedarfes, aktiver Kühlung und zur Verfügung stehender PCIe Slots des Mainboard muß man abschätzen, ob man lieber einen SAS Kontroller mit 4, 8 oder mehr Ports oder einen oder mehrere SATA Kontroller mit jeweils weniger Ports einsetzt um die gesamt gewünschte SATA-Portanzahl zu erreichen. Es gibt solche SAS Kontroller die gerne Spitzenwerte von 20-30Watt erreichen. Die aktive Kühlung ist dabei definitiv zwingend! Hier sei ergänzt, daß es auch neuere SAS-Chipentwicklungen gibt, die durch komplett neues Design und Reduzierung ihrer SAS Fähigkeiten wieder etwas weniger Energie benötigen sollen. Aber das Zeugs ist eben noch recht neu und kostet somit einiges mehr. Hier sei ein Broadcom 9500-8i genannt, der nur noch 240 SAS/SATA Festplatten ansteuern kann, dafür auch auf der Deviceseite NVMe/PCIe beherrscht und laut Broadcom mit unter 6W angegeben ist. https://www.broadcom.com/products/storage/host-bus-adapters/sas-nvme-9500-8i oder sein größerer Bruder: HBA 9500-16i mit 8.9W Hier sei angemerkt: Man hat die Steckverbinder zu den Vorgängern wieder einmal geändert SFF-8654 (SlimSAS). Kleine Randnotiz zu den Kontrollern, welche PCIe 3.0 x2 verwenden: Es gibt im breiten Markt keine Standard PCIe x2 (mechanisch) Slots. Aus dem Grund sind diese Kontrollerkarten für maximale Performance immer in Slots einzusetzen, welche länger sind und ggf. sogar mehr Lanes bieten. Ob man nun wirklich bei einem PCIe x4 Slot eine x2 Karte einsetzen will und somit x2 Lanes unbenutzt bleiben, muß jeder User für sich selber entscheiden. EDIT (früher waren ASm1064 angegeben, aber die sind nicht mehr empfehlenswert): Wenn es um 5-6-SATA Ports geht bevorzuge ich 2 Stück PCIE 3.0 x1 ASM1166 (oder wenn billig zu haben ASM1164) in gesamt 2 PCIe x1 Slots eines Mainboards einzusetzen, als nur einen JMB585 (PCIe 3.0 x2) oder ASM1166 (PCIe 3.0 x2) zu verwenden, wodurch ein ganzer PCIe x4 (oder mehr) Slot ver(sch)wendet wird. Aber das ist sehr individuell und nur meine persönliche Meinung. Aufgrund der oben erwähnten stromsparenderen Firmware mag man auch einen oder mehrere ASM1166 oder ASM1164 (ggf. sogar nur als x1 Steckkarte) bevorzugen und darauf hoffen, daß sie sich bei dem eigenen Kontroller einspielen läßt und den Kontroller gesamt noch etwas sparsamer macht. Natürlich sollte man dennoch mit bedacht überlegen wieviele SATA Ports man dann belegt und gleichzeitig nutzen wird. An der PCIe Bandbreite der Steckkarte ändert sich nichts.4 points
-
Extended Tests are now removed from FCP Extended tests had their use a number of years ago, but nowadays No matter what you do it's a given that it will always return issues Those issues are not "real" per se They're primarily tests for SMB compatibility, (and any errors are once again not "real" issues) It takes forever to run3 points
-
I think this is the clue that you need. Now read this paragraph from this original post: Your Fritz router/modem(?) probably is one of those "high-end router" that require an exception to allow DNS rebinding for the myunraid,net domain. Try googling fritzbox dns rebinding and look for a solution. EDIT: When you find the solution, post it up here as Wikipedia indicates that this 'Fritzbox' is a widely used device throughout Europe..2 points
-
Summary: Support Thread for ich777 Gameserver Dockers (CounterStrike: Source & ConterStrike: GO, TeamFortress 2, ArmA III,... - complete list in the second post) Application: SteamCMD DockerHub: https://hub.docker.com/r/ich777/steamcmd All dockers are easy to set up and are highly customizable, all dockers are tested with the standard configuration (port forwarding,...) if the are reachable and show up in the server list form the "outside". The default password for the gameservers if enabled is: Docker It there is a admin password the default password is: adminDocker Please read the discription of each docker and the variables that you install (some dockers need special variables to run). The Steam Username and Password is only needed in templates where the two fields are marked as requirde with the red * Created a Steam Group: https://steamcommunity.com/groups/dockersforunraid If you like my work, please consider making a donation
 1 point
 -
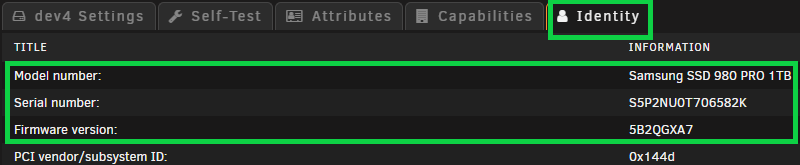
Upgraded some NVMe/SSD firmware today, the process is fairly simple. Running the Utility does not required you to shutdown/stop the array. Upgrades can/were done 'on-the-fly'. -Note your NVMe/SSD model and firmware version you have. -Go to the downloads page, firmware section and locate your drive model and firmware. -Copy link address. -Download firmware files to share/location of choice. wget https://semiconductor.samsung.com/resources/software-resources/Samsung_SSD_980_PRO_5B2QGXA7.iso -P /mnt/user/downloads/temp/ -Firmware files are a .iso and need to be extracted. -I just used 7z, if you don't have it, you can install it from the NerdTools plugin. --Once you have 7z installed. -Change directory to downloaded firmware file location and extract files. cd /mnt/user/downloads/temp/ 7z x Samsung_SSD_980_PRO_5B2QGXA7.iso -aoa && 7z x initrd -aoa && 7z x initrd~ -aoa -Once files are extracted, change directory to firmware file, change permissions and Run. cd /mnt/user/downloads/temp/root/fumagician/ && chmod +x fumagician && ./fumagician -Follow the prompts until completion. -Repeat the steps for each NVMe/SSD model you have downloading the respective firmware for each model. 🖖

 1 point
 -
Application Name: Postfix-Relay Application: https://github.com/loganmarchione/docker-postfixrelay Description : This runs Postfix (as a relay) in Docker. Most home ISPs block port 25, so outbound emails must be relayed through an external SMTP server (e.g., Gmail). This container acts as a single collections point for devices needing to send email. ⚠️ Postfix acts as an open relay. As such, this is not meant to be run on the internet, only on a trusted internal network! You must already have a account on an external SMTP server (e.g., Gmail, AWS SES, etc...). Your external SMTP server must be using encryption (i.e., plaintext is not allowed) Make sure to look at the complete documentation Please post any questions/issues relating to this docker template you have in this thread.1 point
-
been playing EAC games for years on my windows VM and have not had a problem until recently. I have come across someone saying add <smbios mode="host"/> to the <os> section of my xml but it doesnt seem to change anything. not sure if im doing anything wrong or what. here is a copy of my xml. any help would be greatly appreciated. <?xml version='1.0' encoding='UTF-8'?> <domain type='kvm' id='3'> <name>Windows 10</name> <uuid>46148b4e-b243-1e51-805c-cc16725ea2e2</uuid> <description>Gaming VM</description> <metadata> <vmtemplate xmlns="unraid" name="Windows 10" icon="windows.png" os="windows10"/> </metadata> <memory unit='KiB'>25165824</memory> <currentMemory unit='KiB'>25165824</currentMemory> <memoryBacking> <nosharepages/> </memoryBacking> <vcpu placement='static'>20</vcpu> <cputune> <vcpupin vcpu='0' cpuset='2'/> <vcpupin vcpu='1' cpuset='14'/> <vcpupin vcpu='2' cpuset='3'/> <vcpupin vcpu='3' cpuset='15'/> <vcpupin vcpu='4' cpuset='4'/> <vcpupin vcpu='5' cpuset='16'/> <vcpupin vcpu='6' cpuset='5'/> <vcpupin vcpu='7' cpuset='17'/> <vcpupin vcpu='8' cpuset='6'/> <vcpupin vcpu='9' cpuset='18'/> <vcpupin vcpu='10' cpuset='7'/> <vcpupin vcpu='11' cpuset='19'/> <vcpupin vcpu='12' cpuset='8'/> <vcpupin vcpu='13' cpuset='20'/> <vcpupin vcpu='14' cpuset='9'/> <vcpupin vcpu='15' cpuset='21'/> <vcpupin vcpu='16' cpuset='10'/> <vcpupin vcpu='17' cpuset='22'/> <vcpupin vcpu='18' cpuset='11'/> <vcpupin vcpu='19' cpuset='23'/> </cputune> <resource> <partition>/machine</partition> </resource> <os> <type arch='x86_64' machine='pc-q35-5.1'>hvm</type> <loader readonly='yes' type='pflash'>/usr/share/qemu/ovmf-x64/OVMF_CODE-pure-efi.fd</loader> <nvram>/etc/libvirt/qemu/nvram/46148b4e-b243-1e51-805c-cc16725ea2e2_VARS-pure-efi.fd</nvram> <smbios mode='host'/> </os> <features> <acpi/> <apic/> <hyperv> <relaxed state='on'/> <vapic state='on'/> <spinlocks state='on' retries='8191'/> <vendor_id state='on' value='none'/> </hyperv> </features> <cpu mode='host-passthrough' check='none' migratable='on'> <topology sockets='1' dies='1' cores='10' threads='2'/> <cache mode='passthrough'/> <feature policy='require' name='topoext'/> </cpu> <clock offset='localtime'> <timer name='hypervclock' present='yes'/> <timer name='hpet' present='no'/> </clock> <on_poweroff>destroy</on_poweroff> <on_reboot>restart</on_reboot> <on_crash>restart</on_crash> <devices> <emulator>/usr/local/sbin/qemu</emulator> <disk type='file' device='disk'> <driver name='qemu' type='raw' cache='writeback'/> <source file='/mnt/disk1/isos/spaces_win_clover.img' index='2'/> <backingStore/> <target dev='hdc' bus='virtio'/> <boot order='1'/> <alias name='virtio-disk2'/> <address type='pci' domain='0x0000' bus='0x03' slot='0x00' function='0x0'/> </disk> <disk type='file' device='cdrom'> <driver name='qemu' type='raw'/> <source file='/mnt/user/isos/virtio-win-0.1.190-1.iso' index='1'/> <backingStore/> <target dev='hdb' bus='sata'/> <readonly/> <alias name='sata0-0-1'/> <address type='drive' controller='0' bus='0' target='0' unit='1'/> </disk> <controller type='pci' index='0' model='pcie-root'> <alias name='pcie.0'/> </controller> <controller type='pci' index='1' model='pcie-root-port'> <model name='pcie-root-port'/> <target chassis='1' port='0x8'/> <alias name='pci.1'/> <address type='pci' domain='0x0000' bus='0x00' slot='0x01' function='0x0' multifunction='on'/> </controller> <controller type='pci' index='2' model='pcie-root-port'> <model name='pcie-root-port'/> <target chassis='2' port='0x9'/> <alias name='pci.2'/> <address type='pci' domain='0x0000' bus='0x00' slot='0x01' function='0x1'/> </controller> <controller type='pci' index='3' model='pcie-root-port'> <model name='pcie-root-port'/> <target chassis='3' port='0xa'/> <alias name='pci.3'/> <address type='pci' domain='0x0000' bus='0x00' slot='0x01' function='0x2'/> </controller> <controller type='pci' index='4' model='pcie-root-port'> <model name='pcie-root-port'/> <target chassis='4' port='0xb'/> <alias name='pci.4'/> <address type='pci' domain='0x0000' bus='0x00' slot='0x01' function='0x3'/> </controller> <controller type='pci' index='5' model='pcie-root-port'> <model name='pcie-root-port'/> <target chassis='5' port='0xc'/> <alias name='pci.5'/> <address type='pci' domain='0x0000' bus='0x00' slot='0x01' function='0x4'/> </controller> <controller type='pci' index='6' model='pcie-root-port'> <model name='pcie-root-port'/> <target chassis='6' port='0xd'/> <alias name='pci.6'/> <address type='pci' domain='0x0000' bus='0x00' slot='0x01' function='0x5'/> </controller> <controller type='pci' index='7' model='pcie-root-port'> <model name='pcie-root-port'/> <target chassis='7' port='0xe'/> <alias name='pci.7'/> <address type='pci' domain='0x0000' bus='0x00' slot='0x01' function='0x6'/> </controller> <controller type='pci' index='8' model='pcie-root-port'> <model name='pcie-root-port'/> <target chassis='8' port='0xf'/> <alias name='pci.8'/> <address type='pci' domain='0x0000' bus='0x00' slot='0x01' function='0x7'/> </controller> <controller type='virtio-serial' index='0'> <alias name='virtio-serial0'/> <address type='pci' domain='0x0000' bus='0x02' slot='0x00' function='0x0'/> </controller> <controller type='sata' index='0'> <alias name='ide'/> <address type='pci' domain='0x0000' bus='0x00' slot='0x1f' function='0x2'/> </controller> <controller type='usb' index='0' model='ich9-ehci1'> <alias name='usb'/> <address type='pci' domain='0x0000' bus='0x00' slot='0x07' function='0x7'/> </controller> <controller type='usb' index='0' model='ich9-uhci1'> <alias name='usb'/> <master startport='0'/> <address type='pci' domain='0x0000' bus='0x00' slot='0x07' function='0x0' multifunction='on'/> </controller> <controller type='usb' index='0' model='ich9-uhci2'> <alias name='usb'/> <master startport='2'/> <address type='pci' domain='0x0000' bus='0x00' slot='0x07' function='0x1'/> </controller> <controller type='usb' index='0' model='ich9-uhci3'> <alias name='usb'/> <master startport='4'/> <address type='pci' domain='0x0000' bus='0x00' slot='0x07' function='0x2'/> </controller> <interface type='bridge'> <mac address='52:54:00:6e:2f:a7'/> <source bridge='br0'/> <target dev='vnet0'/> <model type='virtio'/> <alias name='net0'/> <address type='pci' domain='0x0000' bus='0x01' slot='0x00' function='0x0'/> </interface> <serial type='pty'> <source path='/dev/pts/0'/> <target type='isa-serial' port='0'> <model name='isa-serial'/> </target> <alias name='serial0'/> </serial> <console type='pty' tty='/dev/pts/0'> <source path='/dev/pts/0'/> <target type='serial' port='0'/> <alias name='serial0'/> </console> <channel type='unix'> <source mode='bind' path='/var/lib/libvirt/qemu/channel/target/domain-3-Windows 10/org.qemu.guest_agent.0'/> <target type='virtio' name='org.qemu.guest_agent.0' state='disconnected'/> <alias name='channel0'/> <address type='virtio-serial' controller='0' bus='0' port='1'/> </channel> <input type='mouse' bus='ps2'> <alias name='input0'/> </input> <input type='keyboard' bus='ps2'> <alias name='input1'/> </input> <hostdev mode='subsystem' type='pci' managed='yes'> <driver name='vfio'/> <source> <address domain='0x0000' bus='0x08' slot='0x00' function='0x0'/> </source> <alias name='hostdev0'/> <address type='pci' domain='0x0000' bus='0x04' slot='0x00' function='0x0'/> </hostdev> <hostdev mode='subsystem' type='pci' managed='yes'> <driver name='vfio'/> <source> <address domain='0x0000' bus='0x08' slot='0x00' function='0x1'/> </source> <alias name='hostdev1'/> <address type='pci' domain='0x0000' bus='0x05' slot='0x00' function='0x0'/> </hostdev> <hostdev mode='subsystem' type='pci' managed='yes'> <driver name='vfio'/> <source> <address domain='0x0000' bus='0x01' slot='0x00' function='0x0'/> </source> <alias name='hostdev2'/> <address type='pci' domain='0x0000' bus='0x06' slot='0x00' function='0x0'/> </hostdev> <hostdev mode='subsystem' type='pci' managed='yes'> <driver name='vfio'/> <source> <address domain='0x0000' bus='0x0a' slot='0x00' function='0x3'/> </source> <alias name='hostdev3'/> <address type='pci' domain='0x0000' bus='0x07' slot='0x00' function='0x0'/> </hostdev> <memballoon model='none'/> </devices> <seclabel type='dynamic' model='dac' relabel='yes'> <label>+0:+100</label> <imagelabel>+0:+100</imagelabel> </seclabel> </domain>1 point
-
There's another thread about part of this in General Support... -It would be great if we could freely arrange the modules on the Dashboard. Specifically, moving things (like the network graph or RAM usage) horizontally between columns. - Also, having the layout stay where it's put, rather than reverting randomly when the page is refreshed would be fantastic. - Perhaps a [Save Layout] / [Restore Layout] option could be integrated?1 point
-
My server normally runs headless but I now have a need to access it via the servers GUI. Is there a command to startup the GUI from the server CLI or do I need to reboot (prefer not too)?1 point
-
Once you have migrated your Unraid system(s) to use the myunraid.net certificate, then DNS Rebinding on the unraid.net domain is no longer a concern. You can remove any special handling of DNS Rebinding for the unraid.net domain from your router.1 point
-
Sure thing, just create a variable in the template woth the Key: JVM_CUSTOM_COMMAND and as Value the custom command, this will override the whole command line, also see this issue: Click Just be sure to not include „java“ and start with the @1 point
-
it solved my problem. Thank you!1 point
-
This was due to an error in the router configuration file Sorry for the inconvenience1 point
-
Wenn Du die PCIe 3.0 x4 Karte in einem (nach hinten offenen) PCIe 3.0 x1 Slot betreibst, hast Du recht, daß er nur 1GByte/s bietet. Simple Rechnung: bei Gleichzeitiger Nutzung ca. 1GByte/s durch 6 SATA Ports = ca. 160MByte/s. Wenn Du daran alte Festplatten (<160MByte/s) betreiben willst, kann das deren "volle Performance" bieten. Ich erwähnte in diesem Forum ja, sowas mit einem M.2 ASM1166 (per Adapter in einem Key A/E-Slot) gemacht zuhaben. Ich nutze davon aber aktuell nur 4 SATA Ports und erreiche damit die erwarteten ca. 240MByte/s pro Port bei gleichzeitiger Nutzung. Ja, so verhält er sich. Wen Du nur ein SATA Gerät gleichzeitig ansprichst, kann das mit den maximalen 600MByte/s angesprochen werden. bei 2 SATA Geräten gleichzeitig nur noch knapp unter 500Mbyte/s pro Gerät, etc... Da shast Du richtig verstanden. Klar. Dann solltest Du die Festplatten aber so aufteilen, daß sie beispielsweis ebei einem Paritycheck/-erzeugung nie gleichzeitig benutzt werden. Also beispielsweise 4 angeschloßene Festplatten in ein Aray und die 2 anderen Anschlüße vielleicht für einen Pool verwenden, der nie gleichzeitig verwendet wird.1 point
-
Offenbar eine NVS310: allerdings würde zuvor geschrieben es wäre eine p400: Eventuell auf ein China Fake hereingefallen?1 point
-
hello, -stop the docker -open up terminal and run /sbin/modprobe iptable_mangle -start container -wait a bit then access the webGUI.1 point
-
Hola "BlackMatou" :p Alors j'ai opté pour une autre solution plus économique et plus pertinente (enfin je pense) niveau place nécessaire/investissement global... ajouter simplement un 8Tb à l'array dans l'immédiat puis par la suite compléter si besoin, pour ce faire ajout d'une carte pci-e 4x de 6 ports SATA, ayant physiquement 11 emplacement 3,5" dans le serveur j'ai de quoi voir venir avec désormais 2 places libres et 2 places occupées par les 4Tb. Par contre suite à nos premiers échanges grosse frayeur le soir même c'était le jour de contrôle de la parité et la 1 des 8Tb en rideau... après recherche de panne, analyse du smart et test du disque qui ne donnaient rien d'anormal explicant son éviction j'ai sorti le disque de l'array, effacé puis rajouter pour lancer la reconstruction. Ca fonctionne impecc... j'avoue ne pas comprendre, mais ça ronronne c'est le principal. PS: j'ai apprécié la simplicité d'UNRAID pour ce faire moi qui est souvent galéré avec mdadm en CLI pour l'entretien/ajout/réparation de mes RAID passés.1 point
-
Yes, if there's free space on the image, but even if there isn't it might still help, because currently it might be using more than 500GiB (despite reporting only 500GiB used)1 point
-
Thank you it worked. Just googled it and found https://en.avm.de/service/knowledge-base/dok/FRITZ-Box-7590-AX/3565_FRITZ-Box-reports-Your-FRITZ-Box-s-DNS-rebind-protection-rejected-your-query-for-reasons-of-security/ Didn't remember that I had to do it before but my router had the old unraid url already entered And I just updated it because of the notice in unraid and didn't read the forum post beforehand. Btw. I could workaround my way to the web interface with a vpn client - just for information if someone has the same issue.1 point
-
Da die verfügbaren Lanes aber identisch sind kann es sehr gut sien, dass nicht alle 5 Slots parallel genutzt werden können. Hier muss man sehr genau gucken was womöglich deaktiviert wird wenn Slot X belegt ist. Die bisherige Erfahrung sagt da gegenteiliges. JE größer das Board umso höher der (Idle-)Verbrauch. Denn idR haben größere Boards auch mehr onboard-Komponenten, die sich dann auch nicht unbedingt deaktivieren lassen. Und selbst wenn die Bestückung identisch ist haben ATX-Board idR dann "größere" Spannungswandler/mehr Phasen wodurch die Energieaufnahme ebenfalls steigt.1 point
-
If the device is in a btrfs pool you can use this: https://forums.unraid.net/topic/46802-faq-for-unraid-v6/?do=findComment&comment=7005821 point
-
Thank you JorgeB. I will try your suggestion.1 point
-
I just wanted to give a feedback and thank you for helping. Everything is working again and I have a SSD which is waiting for being the Cache drive. So thank you for you help and the tipps.1 point
-
Ok apparently I typed the wrong thing in the box I had typed VALIDATE instead of true *facepalm* server updated . . . sorry I feel dumb now.1 point
-
That has fixed it. Thank you! Kevin1 point
-
Thank you so much!1 point
-
Leider wurde dei ASM1166 PCIe 3.0 Standardsteckkarte nicht geliefert. Aber ich habe etwas verghleichbares: eine ASM1166 M.2 Steckkarte (die mit PCIe 3.0 x2 betrieben werden sollte) in meinem 2nd System (Shipon) drin. Dort wird sie per Key-A/E-Adapter in einem M.2 Sockel betrieben, der nur PCIe 3.0 x1 bietet. Aus Spass (und weil ich neugierig zur Performance war) hatte ich dann mal ganz kurz 6 Festplatten angeschloßen und auf die Schnelle per gebootetem Windows grob abschätzen können. Alle 6 Festplatten gleichzeitig lesend ergab leicht schwankende Werte um die 145MByte/s. Erwartet hatte ich Spitze ca. 160MByte/s, aber das mag Fehlertolleranz beim schnellen Messen gewesen sein. Also grob würde ich sagen in meinem Fall bringt der ASM1166 per PCIe x1 angebunden die erwartete Performance von ca. 1GByte/s durch 6 Anschlüße geteilt. Für heutige große 7200RPM Festplatten ist das etwas wenig, die ja real in Spitze schon die 250MByte/s knacken, aber da auch große Festplatten die Spitzengeschwindigkeit nur in einem vergleichbar geringen Teil schaffen, sehe ich für Festplatten auch aktuell noch ca. 250MByte/s als gut ausreichend an und deshalb betreibe ich die Karte zur Zeit mit maximal 4 verkabelten Ports für Festplatten. Die restlichen 2 bleiben aktuell frei.1 point
-
I would guess that the empty filesystem of a new XFS occupies more space on your drive than an old REISERFS. Can't say about the rest.1 point
-
Thanks JorgeB. Have changed. Will report back if any further problems. If not will mark as solved. much appreciated1 point
-
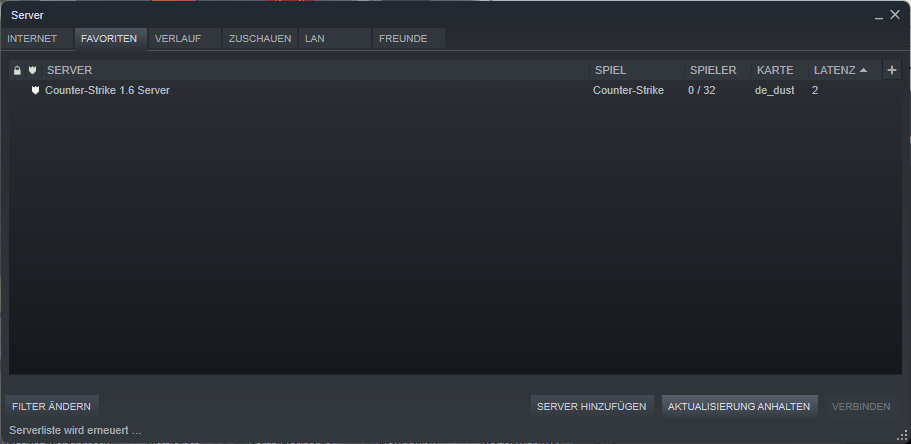
A little bit more information and the log from the first start would be nice. This is already in place. Do you have a cache drive installed? EDIT: I've now tried it and have no issue whatsoever, attached the log and a screenshot from the Steam Server Browser: CS1.6.txt Did you change anything in the template? Is it possible that you've changed /mnt/cache/... to /mnt/user/... or something else? If so please revert that change and point it to the disk where the files are if you have no cache drive then this would be something like /mnt/disk2/... (change the number from the disk to the actual disk where your appdata share is on and the game files for CS1.6 are). /mnt/cache/... is populated in the template on purpose and not by accident.
 1 point
 -
I've found a way to use the latest telegraf docker image while allowing installation of smartmontools and any other packages needed. This is using the "telegraf:alpine" image. This technique can probably be used with the "telegraf:latest" image but the package commands will be different. 1. Create your telegraf configuration file as /mnt/user/appdata/telegraf/telegraf.conf 2. Create the /mnt/user/appdata/telegraf/entrypoint.sh file: #!/bin/sh # Add packages apk update apk upgrade apk add smartmontools nvme-cli lm-sensors lm-sensors-detect perl curl ipmitool # Update smart database /usr/sbin/update-smart-drivedb --no-verify # Start telegraf telegraf --watch-config poll --config '/etc/telegraf/telegraf.conf' 3. Make the file executable: chmod 777 /mnt/user/appdata/telegraf/entrypoint.sh 4. Install atribe's official telegraf docker 5. Set Repository: telegraf:alpine 6. Set Extra Parameters: --user=root --entrypoint=/etc/telegraf/entrypoint.sh 7. Edit "Host Path 7" 7.a. Change "Container Path" to /etc/telegraf 7.b. change "Host Path" to /mnt/user/appdata/telegraf 7.c. change "Default Value" to /mnt/user/appdata/telegraf 7.d. Save the changes. 8. Click Apply to start the container.1 point
-
Enable the syslog server and post that after a crash.1 point
-
Hi everyone, sorry for my absence here. I appreciate that it has not been working since 6.11, I will produce a final update to fix the issue at some point but I don't have much time at the moment with other projects and my job. Then I will deprecate it as I no longer have the time to work on this. I won't remove it from the app store as there are plenty of people who still need it's functionality and although i haven't been active here I have been somewhat active on the discord still. I may leave it active until unraid make their official API available. Plus it still works on older unraid versions. The application is open source so others are welcome to make changes as well!1 point
-
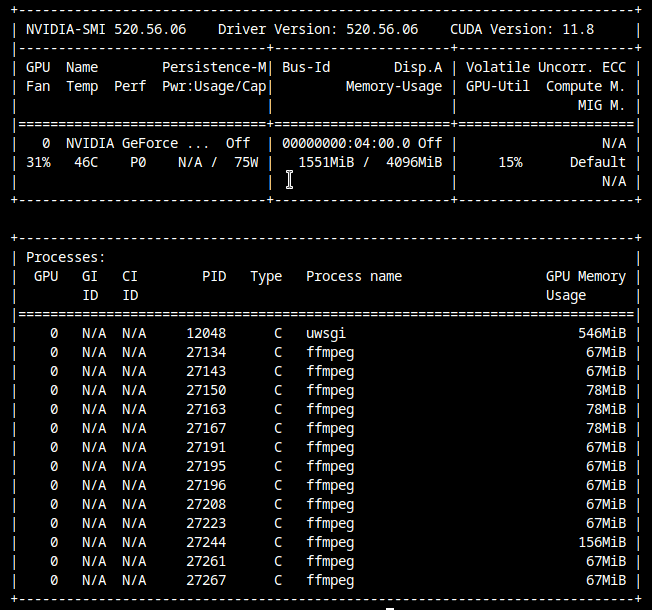
Good day, plugin also stopped working for me. root@Unraid:/usr/local/emhttp/plugins/gpustat# cd /usr/local/emhttp/plugins/gpustat/ && php ./gpustatus.php Fatal error: Uncaught TypeError: Argument 1 passed to gpustat\lib\Main::getParentCommand() must be of the type int, string given, called in /usr/local/emhttp/plugins/gpustat/lib/Nvidia.php on line 90 and defined in /usr/local/emhttp/plugins/gpustat/lib/Main.php:161 Stack trace: #0 /usr/local/emhttp/plugins/gpustat/lib/Nvidia.php(90): gpustat\lib\Main->getParentCommand('ffmpeg\x00-hide_ba...') #1 /usr/local/emhttp/plugins/gpustat/lib/Nvidia.php(355): gpustat\lib\Nvidia->detectApplication(Object(SimpleXMLElement)) #2 /usr/local/emhttp/plugins/gpustat/lib/Nvidia.php(250): gpustat\lib\Nvidia->parseStatistics() #3 /usr/local/emhttp/plugins/gpustat/gpustatus.php(63): gpustat\lib\Nvidia->getStatistics() #4 {main} thrown in /usr/local/emhttp/plugins/gpustat/lib/Main.php on line 161 root@Unraid:/usr/local/emhttp/plugins/gpustat# While the issue is resolved to revert to previous release, just delete the plugin and reinstall manually with below: https://raw.githubusercontent.com/b3rs3rk/gpustat-unraid/6cf1b1e96bc8cd5c1cf7ac8fefea1271d8891e26/gpustat.plg
 1 point
 -
1 point
-
1 point
-
Apologies for opening a VERY old post but is this still the case?1 point
-
...gib mal ein: cd /mnt/user/appdata chmod a+rwX grafana ...dann probiere es mit dem Docker nochmal, mit dem Verzeichnis /mnt/user/appdata/grafana im template1 point
-
There are individual threads on this forum specifically for each container, you can easily find it by clicking on the container's icon on the dashboard and selecting the support option. Once there, click on the "docker hub" link, then click on the "Tags" tab. This brings you to a list of available builds. Once you find the one you want, follow @Squid's directions.1 point
-
You have to add a tag after the repository when editing the template eg: linuxserver/habridge:v5.4.0-ls79 https://hub.docker.com/r/linuxserver/habridge/tags1 point
-
Hey, so I plan to change the motherboard of my unraid system. Everything else is stays the same. Is there anything I have to consider? I'm new to unraid so I thought I better ask before doing anything stupid. Thanks1 point
-
You have to reboot Sent via telekinesis1 point
-
Hilarious enough I found the actual cause and the solution is very simple; for whatever reason the web UI will not accept HTTPS:// connections. To resolve this all I did was cange the URL from "https://tower" to "http://tower", this is what resolved the issue for me.1 point
-
This is a nice tool! Once it is installed it handles the installation of other Plex channels for you. I pretty much followed the instructions from here: https://github.com/dagalufh/WebTools.bundle/wiki/Installation Updated 9/14/2017 Guide to installing the WebTools 2.4.1 channel in Plex High level overview These instructions appear quite long, so here is a high level overview to show that it isn't really that complicated: Download the WebTools zip file, unzip it, and place it in the Plex appdata plugins directory. If the copy fails, fix the permissions and try again. After a delay the channel will automatically be installed and you can access WebTools here: http://<unraid IP address here>:33400/ Short instructions Download WebTools.bundle.zip from https://github.com/dagalufh/WebTools.bundle/releases/latest and extract it to your desktop. Locate the "Webtools.bundle" folder. Copy the Webtools.bundle folder to your Plex Plug-ins directory here: \\<tower>\appdata\<Plex appdata>\Library\Application Support\Plex Media Server\Plug-ins If you get a permission denied error, you'll need to SSH to the server and: cd "/mnt/user/appdata/<Plex appdata>/Library/Application Support/Plex Media Server/" chmod a+w Plug-ins then try copying the directory again When it is done you should be able to navigate to: \\<tower>\appdata\<Plex appdata>\Library\Application Support\Plex Media Server\Plug-ins\WebTools.bundle\Contents If you are able to pull up the Content directory directly under Plug-ins\WebTools.bundle, then everything is in the right place. Wait a few minutes, then login to Plex. Go to the Channels area and you should see WebTools (although if you click the image the wrong url will be displayed.) If it isn't listed, wait longer and try again. If you want to kick-start it, restart the Plex docker, wait some more and check again. Once you see the channel listed, you can access WebTools at this url: http://<unraid IP address here>:33400/ Long instructions: "tower" is the default name of an unRAID server, but you may have renamed yours. Wherever you see <tower> written here, substitute the name of your server, without the <> characters. Open your unRAID webgui and go to the Dockers tab. Click on the Plex icon and choose Edit. Find the "host path" that corresponds to the container path "/config". It will look like this: /mnt/user/appdata/<Plex appdata>/ Make note of the folder name that appears after "appdata" and use that wherever you see <Plex appdata> in this guide. In other words, if your host path looks like this: /mnt/cache/appdata/Plex Media Server/ then your <Plex appdata> is "Plex Media Server". From your desktop computer, navigate to the Plug-ins directory here: \\<tower>\appdata\<Plex appdata>\Library\Application Support\Plex Media server\Plug-ins Download Webtools.bundle.zip from https://github.com/dagalufh/WebTools.bundle/releases/latest and extract it to your desktop. Locate the "Webtools.bundle" folder. Copy the WebTools.bundle directory from step 4 to the Plug-ins directory you located in step 3. If that copy works, great! If you get a permissions error you will need to SSH in to the server to fix it. Once you have SSH'd in, you need to cd to the Plug-ins directory. We'll do this in steps. I recommend copy/pasting what you type and the results into a text file so you can ask for help if there are problems. If you get an error message from mistyping something, it should be fine to simply retry that step. If you get completely lost, type "exit" and start over. You should now be able to copy the WebTools.bundle directory into the Plug-ins directory. To make sure you put the directory in the right place, confirm you can navigate here from your desktop computer: \\<tower>\appdata\<Plex appdata>\Library\Application Support\Plex Media server\Plug-ins\WebTools.bundle\Content If you are able to pull up the Content directory directly under Plug-ins\WebTools.bundle, then everything is in the right place. Wait a few minutes, then wait some more, then login to Plex. Go to the Channels area and you should see WebTools (although if you click the image the wrong url will be displayed.) If it isn't listed, wait longer and try again. If you want to kick-start it, restart the Plex docker, wait some more and check again. Be patient, wait some more Once you see the channel listed, you can access WebTools at this url: http://<unraid IP address here>:33400/ Need Help? If you are still unable to get this working, please provide the following information: A. From step 1 - What is the name of the server you are using in place of <tower>? Also, is your system working fine other than this? If you have underlying issues with Plex or your server, you should resolve those before installing a new channel. B. From step 2 - What is the full host path that corresponds to the container path for "/config"? And what are you using for the <Plex appdata> value? C. From step 3 - Are you able to access \\<tower>\appdata\<Plex appdata>\Library\Application Support\Plex Media server\Plug-ins ? If not, where does it break? i.e. which of the follow does not work: \\<tower>\ \\<tower>\appdata\ \\<tower>\appdata\<Plex appdata> \\<tower>\appdata\<Plex appdata>\Library \\<tower>\appdata\<Plex appdata>\Library\Application Support \\<tower>\appdata\<Plex appdata>\Library\Application Support\Plex Media server \\<tower>\appdata\<Plex appdata>\Library\Application Support\Plex Media server\Plug-ins D. From step 4 - Look in your "Webtools.bundle" folder. It should contain subfolders for "http" and "Contents", plus a few other files. If it doesn't you should re-download / re-extract and try again. E. From step 5 - Do you get any errors when copying Webtools.bundle to the Plug-ins directory? F. From step 6 - If you had to do step 6, attach the text file where you were saving the results of all the commands you typed. G. From step 7 - Are you able to access these directories? \\<tower>\appdata\<Plex appdata>\Library\Application Support\Plex Media server\Plug-ins\WebTools.bundle \\<tower>\appdata\<Plex appdata>\Library\Application Support\Plex Media server\Plug-ins\WebTools.bundle\Content H. Attach "Plex Media Server.log" from the logs directory: \\<tower>\appdata\<Plex appdata>\Library\Application Support\Plex Media Server\Logs If "com.plexapp.plugins.WebTools.log" exists in the the "PMS Plugin logs" sub-directory, attach that as well.1 point
-
I really do think adding array contraction really needs to be looked at added to the core unraid. We have ways to expand our arrays with ease but nothing to safely contract, an oversite in my eyes. Add this to the list with dual parity and a scheduler so you can schedule Parity checks and any other tasks without the need of a plugins but there for another topic and may turn up one day.1 point


.thumb.jpg.bec61e4e919a9235cc4475f8cb53d5e3.jpg)


.thumb.png.3fa5b7abf2e75bf317178d12478bd184.png)
