Leaderboard


Popular Content
Showing content with the highest reputation on 01/06/23 in Posts
-
Welcome to the friendliest server community around! Tl;dr version: Be nice and cordial. Don't be a jerk or post anything illegal. This forum is where our users can collaborate, learn, and provide input on new developments from Lime Technology and its partners. We have a strong team of community moderators, devs, and Lime Technology employees who strive to help as many people as possible. Participating in this forum means agreeing to the following community guidelines and rules. These guidelines and rules must be agreed and adhered to to use this forum. Moderators and Lime Technology staff will enforce the community guidelines at their discretion. Anyone who feels a posted message doesn’t meet the community guidelines is encouraged to report the message immediately. As this is a manual process, please realize that it. may take some time to remove, edit or moderate particular messages. Rules and Community Guidelines To ensure a safe, friendly and productive forum, the following rules and guidelines apply: Be respectful. Respect your fellow users by keeping your tone positive and your comments constructive and courteous. Respect people's time and attention by providing complete information about your question or problem, including product name, model numbers and/or server diagnostics if applicable. Be relevant. Make sure your contributions are relevant to this forum and to the specific category or board where you post. If you have a new question, start a new thread rather than interrupting an ongoing conversation. Remember this is mostly user-generated content. You'll find plenty of good advice here, but remember that your situation, configuration, or use case may vary from that of the individual sharing a solution. Some advice you find here may even be wrong. Apply the same good judgment here that you would apply to information anywhere on the Internet. The posted messages express the author's views, not necessarily the views of this forum, the moderators, or Lime Technology staff. As the forum administrators and Lime Technology staff can’t actively monitor all posted messages, they are not responsible for the content posted by users and do not warrant the accuracy, completeness, or usefulness of any information presented. Think before you post: You may not use, or allow others to use, your registration membership to post or transmit the following: Content which is defamatory, abusive, vulgar, hateful, harassing, obscene, profane, sexually oriented, threatening, invasive of a person’s privacy, adult material, or otherwise in violation of any International, US or State level laws is expressly prohibited. This includes text, information, images, videos, signatures, and avatars. Also: "Rants", "slams", or legal threats against Lime Technology, another company or any person. Hyperlinks that lead to sites that violate any of the forum rules. Any copyrighted material unless you own the copyright or have written consent from the owner of the copyrighted material. Spam, advertisements, chain letters, pyramid schemes, and solicitations are prohibited. (Note: we have an Unraid Marketplace Board that includes a Good Deals section and a Buy, Sell, Trade section, and they have their own rules.) You remain solely responsible for the content of your posted messages. Furthermore, you agree to indemnify and hold harmless the owners of this forum, any related websites to this forum, its staff, and its subsidiaries. The owner of this forum also reserves the right to reveal your identity (or any other related information collected on this service) in case of a formal complaint or legal action arising from any situation caused by your use of this forum. Please Note: When you post, your IP address is recorded. Repeated rule violations or egregious breach of the rules will result in accounts being restricted and or banned at the IP level. The forum software places a cookie, a text file containing bits of information (such as your username and password), in your browser's cache. Cookies are ONLY used to keep you logged in/out. The software does not collect or send any other form of information to your computer. Lime Technology may, at its sole discretion, modify these Rules of Participation from time to time. For Unraid OS software, website and other policies, please see our policies page! If you have any questions, please contact support.7 points
-
This is a Robocopy issue. Ran the following command and all was fine, the destination folder didn't "disappear". Key part is the "/A-:SH" flag at the end. robocopy /E /R:5 /W:2 "D:" "\\NEBULA\Backups\FiLaptop\New 06-01-2023" /XF ._Thumbs.db /XD "D:\$RECYCLE.BIN" /A-:SH Stackoverflow post Blog post with the solution to "unhide" the folder again, and the flag to add to robocopy command to prevent this happening in the first place2 points
-
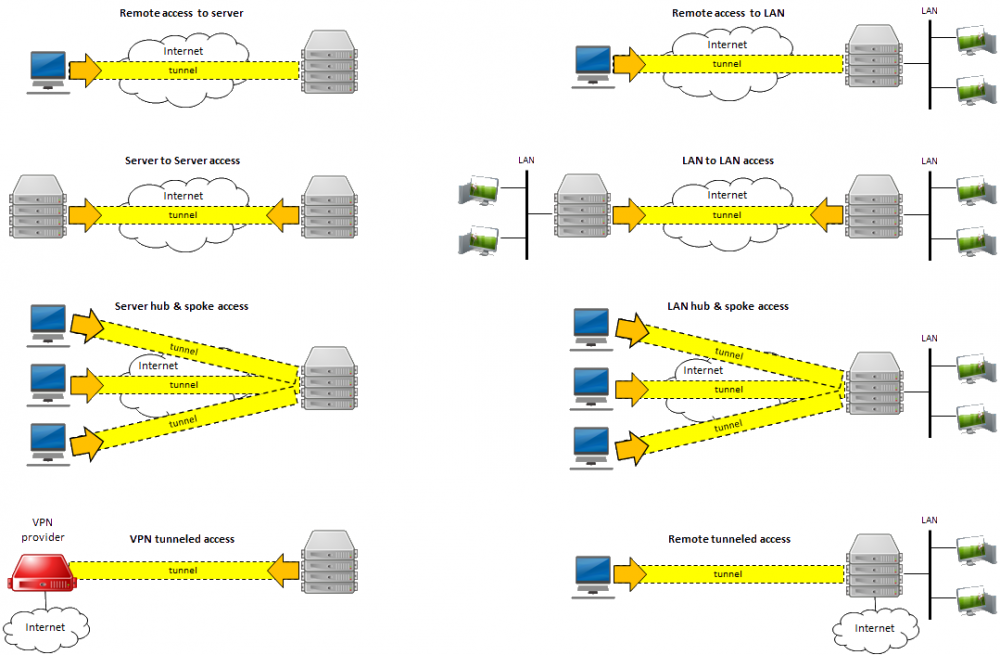
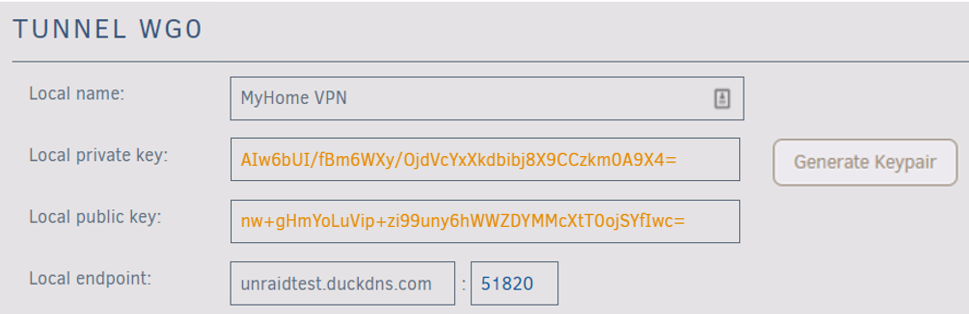
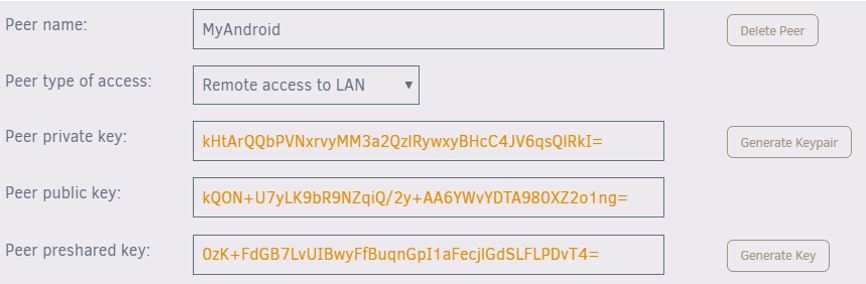
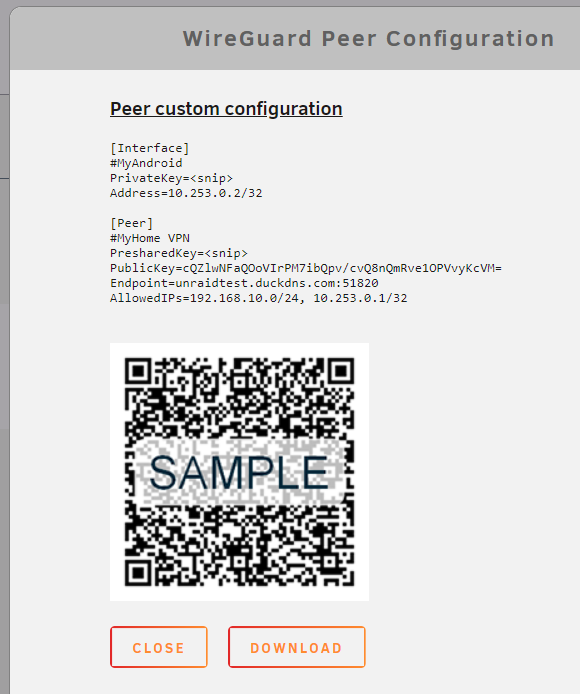
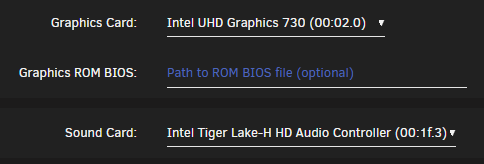
Note: this community guide is offered in the hope that it is helpful, but comes with no warranty/guarantee/etc. Follow at your own risk. What can you do with WireGuard? Let's walk through each of the connection types: Remote access to server: Use your phone or computer to remotely access your Unraid server, including: Unraid administration via the webgui Access dockers, VMs, and network shares as though you were physically connected to the network Remote access to LAN: Builds on "Remote access to server", allowing you to access your entire LAN as well. Server to server access: Allows two Unraid servers to connect to each other. LAN to LAN access: Builds on "Server to server access", allowing two entire networks to communicate. (see this guide) Server hub & spoke access: Builds on "Remote access to server", except that all of the VPN clients can connect to each other as well. Note that all traffic passes through the server. LAN hub & spoke access: Builds on "Server hub & spoke access", allowing you to access your entire LAN as well. VPN tunneled access: Route traffic for specific Dockers and VMs through a commercial WireGuard VPN provider (see this guide) Remote tunneled access: Securely access the Internet from untrusted networks by routing all of your traffic through the VPN and out Unraid's Internet connection In this guide we will walk through how to setup WireGuard so that your trusted devices can VPN into your home network to access Unraid and the other systems on your network. Prerequisites You must be running Unraid 6.8-6.9 with the Dynamix WireGuard plugin from Community Apps or Unraid 6.10+ (which has the plugin built in). Understand that giving someone VPN access to your LAN is just like giving them physical access to your LAN, except they have it 24x7 when you aren't around to supervise. Only give access to people and devices that you trust, and make certain that the configuration details (particularly the private keys) are not passed around insecurely. Regardless of the "connection type" you choose, assume that anyone who gets access to this configuration information will be able to get full access to your network. This guide works great for simple networks. But if you have Dockers with custom IPs or VMs with strict networking requirements, please see the "Complex Networks" section below. Unraid will automatically configure your WireGuard clients to connect to Unraid using your current public IP address, which will work until that IP address changes. To future-proof the setup, you can use Dynamic DNS instead. There are many ways to do this, probably the easiest is described in this 2 minute video from SpaceInvaderOne If your router has UPnP enabled, Unraid will be able to automatically forward the port for you. If not, you will need to know how to configure your router to forward a port. You will need to install WireGuard on a client system. It is available for many operating systems: https://www.wireguard.com/install/ Android or iOS make good first systems, because you can get all the details via QR code. Setting up the Unraid side of the VPN tunnel If UPnP is enabled on your router and you want to use it in Unraid, go to Settings -> Management Access and confirm "Use UPnP" is set to Yes On Unraid 6.8, go to Settings -> VPN Manager Give the VPN Tunnel a name, such as "MyHome VPN" Press "Generate Keypair". This will generate a set of public and private keys for Unraid. Take care not to inadvertently share the private key with anyone (such as in a screenshot like this) By default the local endpoint will be configured with your current public IP address. If you chose to setup DDNS earlier, change the IP address to the DDNS address. Unraid will recommend a port to use. You typically won't need to change this unless you already have WireGuard running elsewhere on your network. Hit Apply If Unraid detects that your router supports UPnP, it will automatically setup port forwarding for you: If you see a note that says "configure your router for port forwarding..." you will need to login to your router and setup the port forward as directed by the note: Some tips for setting up the port forward in your router: Both the external (source) and internal (target/local) ports should be the set to the value Unraid provides. If your router interface asks you to put in a range, use the same port for both the starting and ending values. Be sure to specify that it is a UDP port and not a TCP port. For the internal (target/local) address, use the IP address of your Unraid system shown in the note. Google can help you find instructions for your specific router, i.e. "how to port forward Asus RT-AC68U" Note that after hitting Apply, the public and private keys are removed from view. If you ever need to access them, click the "key" icon on the right hand side. Similarly, you can access other advanced setting by pressing the "down chevron" on the right hand side. They are beyond the scope of this guide, but you can turn on help to see what they do. In the upper right corner of the page, change the Inactive slider to Active to start WireGuard. You can optionally set the tunnel to Autostart when Unraid boots. Defining a Peer (client) Click "Add Peer" Give it a name, such as "MyAndroid" For the initial connection type, choose "Remote access to LAN". This will give your device access to Unraid and other items on your network (there are some caveats to this covered below) Click "Generate Keypair" to generate public and private keys for the client. The private key will be given to the client / peer, but take care not to share it with anyone else (such as in a screenshot like this) For an additional layer of security, click "Generate Key" to generate a preshared key. Again, this should only be shared with this client / peer. Click Apply. Note: Technically, the peer should generate these keys and not give the private key to Unraid. You are welcome to do that, but it is less convenient as the config files Unraid generates will not be complete and you will have to finish configuring the client manually. Configuring a Peer (client) Click the "eye" icon to view the peer configuration. If the button is not clickable, you need to apply or reset your unsaved changes first. If you are setting up a mobile device, choose the "Create from QR code" option in the mobile app and take a picture of the QR code. Give it a name and make the connection. The VPN tunnel starts almost instantaneously, once it is up you can open a browser and connect to Unraid or another system on your network. Be careful not to share screenshots of the QR code with anyone, or they will be able to use it to access your VPN. If you are setting up another type of device, download the file and transfer it to the remote computer via trusted email or dropbox, etc. Then unzip it and load the configuration into the client. Protect this file, anyone who has access to it will be able to access your VPN. Complex Networks The instructions above should work out of the box for simple networks. With "Use NAT" defaulted to Yes, all network traffic on Unraid uses Unraid's IP, and that works fine if you have a simple setup. However, if you have Dockers with custom IPs or VMs with strict networking requirements, you'll need to make a few changes: In the WireGuard tunnel config, set "Use NAT" to No In your router, add a static route that lets your network access the WireGuard "Local tunnel network pool" through the IP address of your Unraid system. For instance, for the default pool of 10.253.0.0/24 you should add this static route: Destination Network: 10.253.0.0/24 (aka 10.253.0.0 with subnet 255.255.255.0) Gateway / Next Hop: <IP address of your Unraid system> Distance: 1 (your router may not have this option) If you use pfSense, you may also need to check the box for "Static route filtering - bypass firewall rules for traffic on the same interface". See this. If you have Dockers with custom IPs then on the Docker settings page, set "Host access to custom networks" to "Enabled". see this: https://forums.unraid.net/topic/84229-dynamix-wireguard-vpn/page/8/?tab=comments#comment-808801 There are some configurations you'll want to avoid, here is how a few key settings interact: With "Use NAT" = Yes and "Host access to custom networks" = disabled (static route optional) server and dockers on bridge/host - accessible! VMs and other systems on LAN - accessible! dockers with custom IP - NOT accessible (this is the "simple network" setup assumed by the guide above) With "Use NAT" = Yes and "Host access to custom networks" = enabled (static route optional) server and dockers on bridge/host - accessible! VMs and other systems on LAN - NOT accessible dockers with custom IP - NOT accessible (avoid this config) With "Use NAT" = No and no static route server and dockers on bridge/host - accessible! VMs and other systems on LAN - NOT accessible dockers with custom IP - NOT accessible (avoid this, if "Use NAT" = No, you really need to add a static route in your router) With "Use NAT" = No and "Host access to custom networks" = disabled and static route server and dockers on bridge/host - accessible! VMs and other systems on LAN - accessible! dockers with custom IP - NOT accessible (You've come this far, just set "Host access to custom networks" to enabled you're set) With "Use NAT" = No and "Host access to custom networks" = enabled and static route server and dockers on bridge/host - accessible! VMs and other systems on LAN - accessible! dockers with custom IP - accessible! (woohoo! the recommended setup for complex networks) About DNS Everything discussed so far should work if you access the devices by IP address or with a Fully Qualified Domain Name such as yourpersonalhash.unraid.net. Short names such as "tower" probably won't work, nor any DNS entries managed by the router. To get those to work over the tunnel, return to the VPN Manager page in Unraid, switch from Basic to Advanced mode, and add the IP address of your desired DNS server into the "Peer DNS Server" field (don't forget to put the updated config file on the client after saving it!) You may want to use the IP address of the router on the LAN you are connecting to, or you could use a globally available IP like 8.8.8.8 ** "WireGuard" and the "WireGuard" logo are registered trademarks of Jason A. Donenfeld.


 1 point
 -
CA Appdata Backup / Restore v2.5 Welcome to a new epsiode of the appdata backup plugin The previous thread is located here: https://forums.unraid.net/topic/61211-plugin-ca-appdata-backup-restore-v2/ IMPORTANT! Starting with Unraid 6.12, this plugin will be deprecated. As already stated, there will be a complete rewrite of it. Please have a look at the new thread for it ----------------------------------------------------------------------------------------- What happened? I stumbled upon some bugs while using Squids plugin and made pull requests. Squid told me, he has only limited time and asked me if I want to publish a new version of the plugin. So we decided to deprecate his version in favor of "my" version. For now, the plugin has fixed for error detection and some other new features (see changelog). More to come. Anything I should consider? YES! Since the updated version shows you error during backup/verification (and even while stopping/starting containers), it COULD happen, that you see errors after update which were not there before. In most cases, these errors/warnings were there before but supressed. Errors like "File changed as we read it" or "Contents differ" (during verification) tells you, that some files are still in use. Post here (with your log) in that case.
 1 point
 -
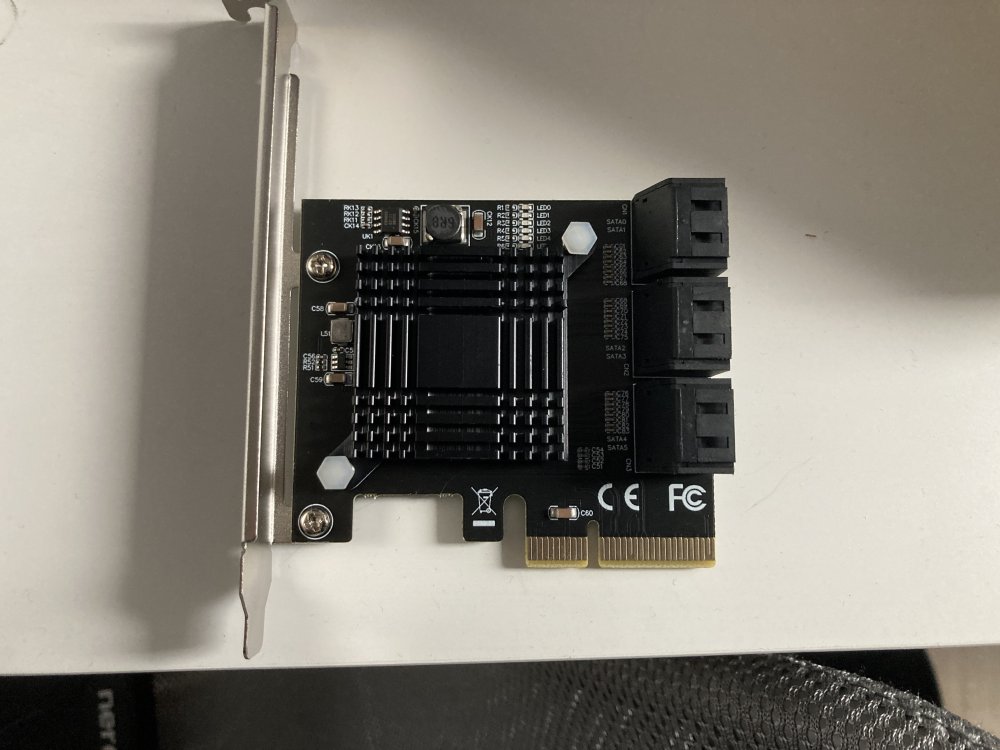
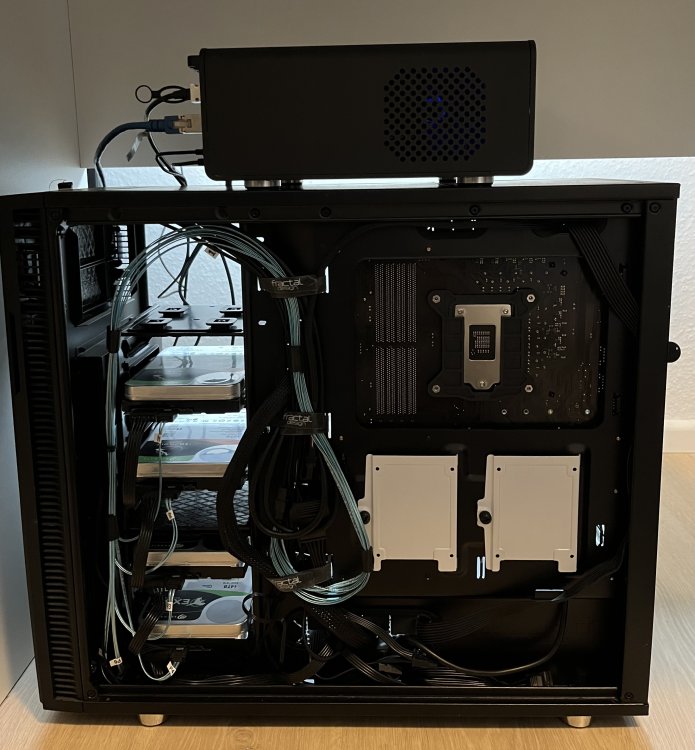
Just a quick warning. Because i wanted a new faster controller card to replace my AAR-1430SA i grabbed a rather cheap (30€) Sata controller card with ASM-1166 chipset from Amazon. Okay they shipped a different model than it was advertised on the photos but okay, nearly all of the ASM1166 are unlabled etc. You can only differ them by the board Layout etc. What i got was that here: Using it resulted in kicked out drives etc. For gods sake with much help here in the Forum the situation was manageable. I dont know if the card is faulty or if the model is crap, but at least i could return it to Amazon. What i ordered now was a bit more expensive model, hopefully it works better: https://smile.amazon.de/dp/B09K4WKHKK?psc=1&ref=ppx_yo2ov_dt_b_product_details
 1 point
 -
Danke, habe es mit meiner auch gerade getestet. Es funktioniert sehr gut. Und sie ist wirklich sehr sparsam.1 point
-
The default is high-water, if a share is set to say split between disk1 and disk2 it'll start writing on disk2 once free space on disk1 is less than half the free space of disk2. So looking at that screenshot if it was the case above it'd start writing on disk2 pretty soon, seems normal.1 point
-
Thanks! The subvolume creation created the new share as you indicated. I then used the UNRAID GUI to finish configurating the new share, moved data into the new share, and took a snapshot successfully.1 point
-
You were both right, I was looking to do too many steps at once, but rebooting after adding the parity then adding the other disks worked fine, all is good now! Thank you1 point
-
have a look at NAME_SERVERS, lots of people have had issues with name resolution, link to comment on delugevpn support thread but its the same code as qbittorrentvpn:- for more detailed comment:- also mention of fixing privoxy by resetting config, so delete /config/privoxy and restart container.1 point
-
So kurzes Update von mir: Habe die NVME's mit der ersten Variante ausgetauscht, ging Problemlos! Den Eintrag "pcie_aspm=off" ist entfernt und das Ergebnis: Hat also (fast) nichts gebracht, nur dass die Fehlermeldung im Gegensatz zur SN 750 nicht mehr im Sekundentakt auftauchen, aber immer noch ärgerlich. Habe mir dann noch nen externes Gehäuse von NVME auf USB gekauft um damit die Firmware der NMVE's zur aktualisieren, aber da hatte ich nen Denkfehler. Denn im System wird die NVME ja dann nur als USB-Controller erkannt, mit dem das WD Dashboard natürlich nix anfangen kann. Als letzten Versuch habe ich mir dann noch ein Windows 10 To Go auf einer Samsung T5 erstellt, auf dem sich dann auch das WD Dashboard installieren lies. Aber zur meiner Befürchtung war schon die aktuellste Firmware auf den SN770 drauf (731100WD) und ebenso auf den vorher installierten SN750 (111110WD). Also Stand heute ist es nicht empfehlenswert auf den Gigabyte Gigabyte C246M-WU4 und auch beim Gigabyte C246M-WU2, WD NVME's vom Typ SN 750 und SN770 in Verbindung mit Linux einzusetzen. Wie es bei der SN 850(x) oder anderen von Western Digital aussieht weiß ich nicht, befürchte aber selbiges.
 1 point
 -
Witzig, genau mit dem Thema hab ich mich auch unabhängig von diesem Thread auseinandergesetzt und bin erst nach Einkauf und Verbau genau dieses U-56n 8GB Sticks auf den Thread gestoßen. Das Ding ist anscheinend rund 175x so haltbar wie ein Samsung Bar Plus (wenn man dem Video von Spaceinvader One folgt), der nur 29 volle Schreib- und Lesevorgänge überlebt hat (< 1 TBW). Der U-500k wäre nochmals DEUTLICH langlebiger, aber ich bin auch auf den Trichter gekommen, dass diese Verbesserung nicht den Preis von 200€ wert ist und denke dass man mit einem U56n extrem gut bedient sein wird. Der Umstieg mit dem Creator Tool ist leicht, die Sticks haben alle eine eindeutige GUID, so dass die Registrierung des Keys keine Probleme darstellt. Ich habe das auch mal für die englischsprachige / internationale Community ausführlich zusammengefasst:1 point
-
Ich nehme an du hast nur ein einzelnes Cache Drive? Bei den beiden genannten shares ist die Cache-Nutzung aktiviert. Alle Daten die im Cache liegen sind NICHT durch die Parity geschützt. Wenn also das Cache Drive ausfällt sind die Daten verloren. Deshalb (wenn nur ein Cache Drive möglich/ gewünscht) ein passendes Backup Konzept überlegen und die Warnung guten Gewissens ignorieren oder halt ein zweites Cache Drive hinzufügen sodass ein RAID1 entsteht und dadurch ein gewisser Ausfallschutz sichergestellt ist. ABER auch hier gilt: "RAID ersetzt kein Backup" und "kein Backup - kein Mitleid"1 point
-
Because it uses 8b/10b encoding, so it becomes 4.8Gbit/s=600MB/s1 point
-
Yep, diags look fine.1 point
-
For all linuxserver containers, the best place to ask for help is via their Discord (Click on the container in question and select Discord)1 point
-
I had an issue this morning but figured it out @binhex, thank you for your support, I found an old post of yours that worked for my issue.1 point
-
It should be possible to leave the hdmi plugged in and: 1. bind to vfio the gpu (both audio, video and usb controller parts, if any) 2. if booting unraid with efi, prevent efifb to attach to the gpu (video=efifb:off in syslinux config)1 point
-
Changing hardware requires the recovery key, which must be created before.1 point
-
Krusader ist nicht die Lösung da er selber auch ein Docker ist. Gehe in die Shell Und öffne dann den MC Unter /mnt/user siehst du dann die Shares Vorteil beim MC du kannst Docker und VMs deaktivieren damit kannst du dann auch Dateien löschen die eigentlich in Verwendung wären. Greets
 1 point
 -
Might be an issue with my motherboard, that's been on my mind for ages, but since the HW where I'm running my system fell into my lap...have to get most of it, even if it means having the same issue as you (no array, no services) To expand a bit, my server is a Dell Precision Tower T7910, in the MB there are several PCIe slots, flagged with different wattage, I have the GPU using one of them flagged as 225w, the controllers are in the ones flagged as 75W. SO MY PROBLEM IS MOST LIKELY THERE I have also pending to test a "temporary solution" which would be see how it reacts if I turn it off and turn it on again (the D800S) using a smartplug once the server is up, but tbh this option scares me a bit. My plan in the future is replace my desktop Ryzen 3700 with a 5900x and move my unraid setup into it, so that's why I didn't give it much thought to the disks issue. Worst case scenario I'm out of Plex until I'm back, but I understand that there's people running more critical stuff than me. Anyway, the main thing is that Unraid supports and detects the expansion unit without issues1 point
-
OK, parity check completed and it indeed corrected the errors. Thank you 🙂1 point
-
Sehr schön, dann frohes schaffen!1 point
-
Habe jetzt eine HP NC522SFP eingebaut aber leider hab ich zu dieser Karte keine Bracket. Bekomme die Tage noch eine Intel X520 DP die ich dann auch mal ausprobieren werde.1 point
-
Mit dem Dynamics File Manager konnte ich alle Daten löschen und somit auch die Shares. Appdata habe ich ebenfalls damit bereinigt. Ich konnte soeben die Nextcloud Installation sauber durchführen. Nochmals vielen Dank.1 point
-
Das ist eine gute Frage, ich seh mir das dann mal an.1 point
-
Hello @KyrVorga, yes, you are able to use mods with this container. It has been quite a while since I set this up so please bare with me, there is more detail somewhere within this forum topic which is how I was able to get this working, if I come across the posts, I will be sure to share them. In the meantime, here is some information on my current setup that has been working for quite some time. Within the Docker setup in the "Extra Game Parameters" you need to make sure to include "-automanagedmods", if you are setting up a cluster you will want to make sure this is only on the first map to startup within the cluster, also make sure that you give the first map plenty of time to startup before the next map in the cluster starts to give the mods enough time to update. You will also need to add extra parameters to the Docker template for the steam workshop, again, this will only be setup on the first map that starts up in the cluster if applicable. Full container path in the below screenshot is: /serverdata/serverfiles/Engine/Binaries/ThirdParty/SteamCMD/Linux/steamapps Full container path in the below screenshot is: /serverdata/serverfiles/Engine/Binaries/ThirdParty/SteamCMD/Linux I hope this information is useful and is able to get you up an running with mods.


 1 point
 -
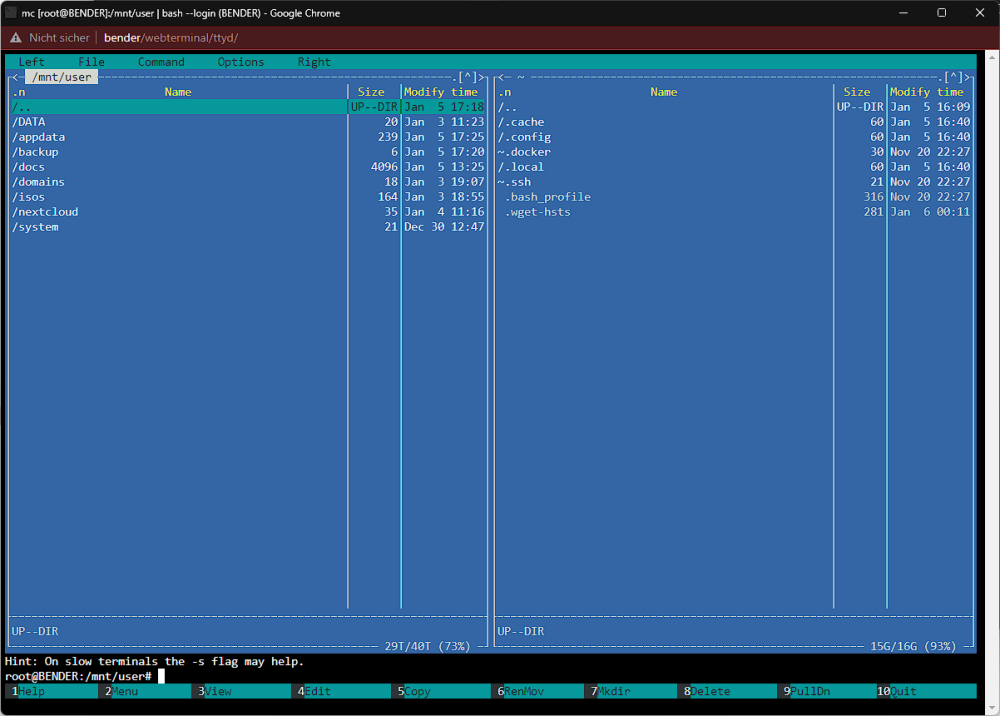
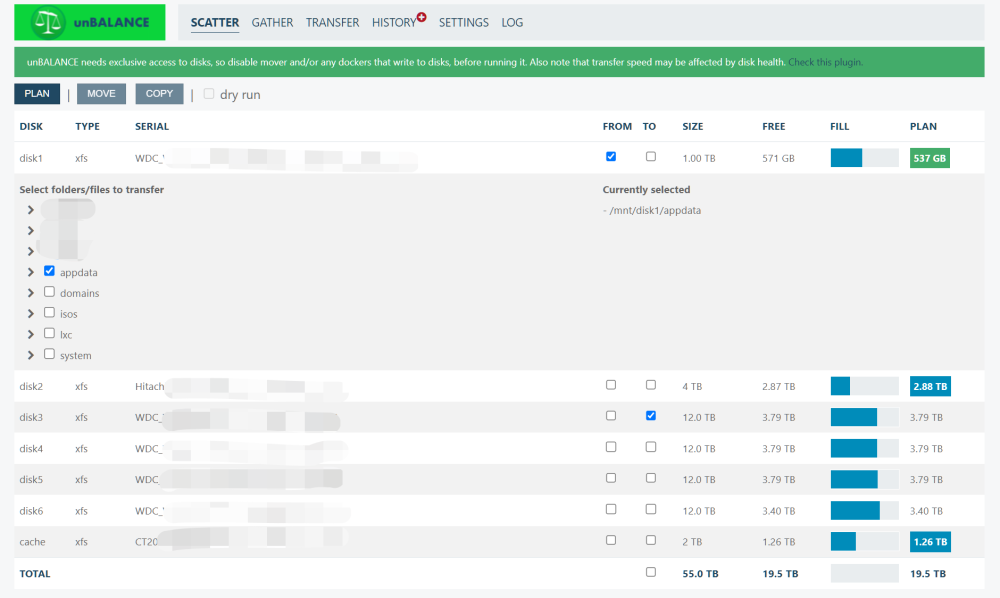
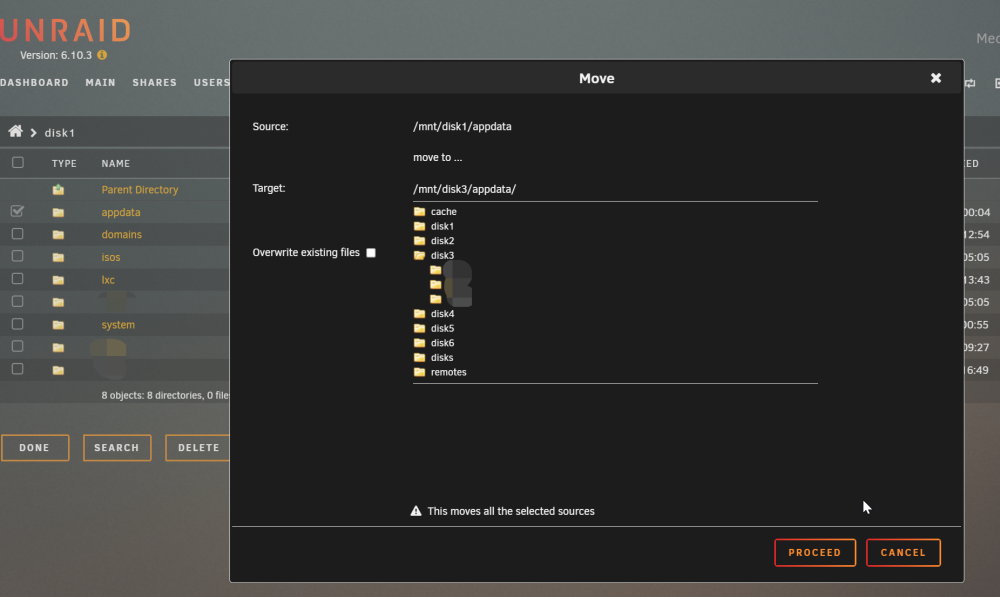
使用 unbalance 插件的分散模式,将一个盘下某个的文件夹平均分散到多个其他盘或者单个其他盘。如下图是把磁盘1的appdata文件夹移动到磁盘3下。 使用 Dynamix File Manager 插件,选择移动即可。如下图是把磁盘1的appdata文件夹移动到磁盘3下。 使用文件管理类 Docker 容器。如 FileBrowser、Krusader 等。需注意要将 /mnt 文件夹映射到容器内。 进入命令行,cd 到 mnt ,执行 move 源目录 目标目录。如下命令是使用绝对路径(不需要 cd )把磁盘1的appdata文件夹移动到磁盘3下。 move /mnt/disk1/appdata /mnt/disk3
 1 point
 -
Frag @ich777. Ich bin cool, ich nutze Englisch. 😁1 point
-
OK. Data rebuild is ongoing. Pretty simple1 point
-
I see its xfs and figured it out. Steps I took; 1. Stop array 2. Removed disk from cachepool 3. Configured the cachepool for XFS. 4. Placed the disk back in the cachepool. Thx for the help.1 point
-
The startup of the container can take some time, especially the step "55-jdownloader2.sh: executing..." if you have a lot of stuff under "/output".1 point
-
Beware that this is one of those "overfilled" boards, which means, you cannot use everything at the same time. For instance, you only get the Sata Ports 5-8 if you disable the onboard wifi! And, if using a "G" type processor, you can only add 3 NVMe SSDs into the 16x slot instead of the 4 that the hyper card could hold. But yes, the board runs fine. I have 128Gigs of RAM, and 5 NVMe drives in use, 10Gbe LAN in Slot and 2*4 Port SATA controllers too. this gives a total of 16 sata connectors.1 point
-
Figured it out, had to change some of the nameservers in deluge vpn. Removed the 209.X IP's1 point
-
Alles eingebaut. Die Intel X710-DA2 für den Server kam heute auch. ASPM ist komplett aktiv: Den C-State C7 erreicht der Server mittlweile zum Glück auch - mal sehen welche VM ich noch irgendwie auslagern kann. Die Tage werde ich nochmal die Kabel etwas schöner verlegen. Die nachträglich eingeklebten Gummi-Matten schlucken die Vibrationen wie gewollt - lautstärke-technisch bin ich aktuell zufrieden.
.thumb.png.d7acbfea610c8b7bb7ee8c4a66728e74.png) 1 point
1 point -
Yes, but only the 2021 model.1 point
-
Tja, das mit Google, Youtube und Konsorten. Ich vertraue da eher auf Manuale und Bedienungsanleitungen der Hersteller. Da gibt es Infos aus erster Hand - ganz ohne Werbung: https://wiki.unraid.net/Manual/Storage_Management#Array_operations Trust me: "New Config" brauchst Du nicht. Ich habe bestimmt schon 200-300 Platten zu Unraid Systemen hinzugefügt. New Config habe ich nur einmal benötigt - bei einem Versuch mit bestehenden Unraid Platten über VirtIO in einer VM. Die Platten hatten plötzlich alle neue IDs. Das löst Du über New Config oder das Entfernen von Platten. Ansonsten brauchst Du es nicht. Nachbemerkung: Du bezeichnest die genannten Informationsquellen als "Meinungen". Mehr ist es auch nicht. Das sehe ich genauso. Es handelt sich um Interpretationen von verfügbaren Fakten. Ich weiß, heute macht man das so. Ich halte das für gefährlich.1 point
-
Yep, that's a host managed SMR drive, while there's some kernel and fs support (at least from btrfs) for those in recent kernels not sure that Unraid supports them, also those drives should only be used with an OS that is aware of them, or performance will be terrible, IMHO you should return it if possible and get a CMR drive, or at least a device managed SMR drive.1 point
-
Um Missverständnissen vorzubeugen: Schau Dir bitte die Erläuterungen zum Cache an. Hier insbesondere die Hinweise zu "neuen" (!!!) Dateien und Ordnern sowie zum Zusammenspiel mit dem Mover. Der Unraid Cache ist kein traditioneller Schreib-/Lesecache sondern wurde ursprünglich als schneller Schreibcache vor das Array geschaltet. Er kann mittlerweile mehr, wird aber oft falsch interpretiert. Hier nur die Erläuterung zum "Yes":1 point
-
Old Topic but maybe someone is interested in my Code: # Get the number of GPUs num_gpus=$(nvidia-smi --query-gpu=count --format=csv,noheader | awk 'NR==1 {sum+=$1} END {print sum}') echo "Found $num_gpus GPUs." # Iterate over the GPUs for ((i=0; i< $num_gpus; i++)); do # Check if there are any processes running on GPU $i if nvidia-smi -i $i --query-compute-apps=pid --format=csv,noheader | grep -q '^[0-9]'; then echo "There are processes running on GPU $i." else echo "There are no processes running on GPU $i. Setting GPU $i to power save mode." nvidia-smi -i $i -pm 1 fi done It first checks how many GPUS are installed and then if there are running processes. If not, Power save mode will be activated.1 point
-
Hi, I wanted to give a little writeup about my journey to getting IGD passthrough working with: - latest LibreELEC 11 nightlies / Kodi 20 Nexus - latest unRAID 6.11.5 --> Both HDMI Video and Audio are working including HDR10 Maybe this will help others to fix their setup! My hardware as follows: - ASRock H570M-ITX - Intel Core i5-11400 (note: This is a Gen11 CPU with UHD 730 graphics which needs Linux 5.12 onwards in both LibreELEC AND unRAID to get Audio passthrough to work!) Be aware of this LibreELEC Wiki entry if you are trying to get passthrough to work. It seems there are quiet a few hardware dependencies (especially with HDR): LibreELEC 10.0 shipped with Linux 5.10 kernel support and Xorg graphics, so it does not have support for HDR or Gen11 hardware. Community created LibreELEC 10.0 images with newer Linux kernels supporting Gen11 hardware and GBM graphics with experimental HDR patches can be downloaded from the LibreELEC forums. LibreELEC 11.0 nightly development images from 21/9/21 onwards also use GBM graphics, include early (pre-Alpha) Kodi 20.0 support for HDR, and an updated kernel supporting Gen11 hardware. IOMMU: Mine look like these: To be able to passthrough the audio device you have to make sure that none of the devices in this group is used by unraid. I actually had one of my two ethernet controllers listed there aswell which was used by unraid. After I switched to the second eth controller in the network settings the group was free to use. I also disabled the first eth controller in the BIOS (that's why it's not listed in group 10 anymore). To passthrough the HDMI audio you need to add all devices in the group EXCEPT interconnects like PCI bridges to the vfio-pci driver via the syslinux.cfg. My entry looks like this (replace the values with the IDs of your controllers): vfio-pci.ids=8086:43c8,8086:43a3,8086:43a4 I also turned on PCIe ACS override - downstream and VFIO allow unsafe interrupts in the VM settings. and added the following in the syslinux.cfg: modprobe.blacklist=i915,snd_hda_intel,snd_hda_codec_hdmi video=efifb:off,vesafb:off To find the modprobe.blacklist value see this post So after all the steps my syslinux.cfg looks like this: kernel /bzimage append pcie_acs_override=downstream vfio_iommu_type1.allow_unsafe_interrupts=1 vfio-pci.ids=8086:43c8,8086:43a3,8086:43a4 modprobe.blacklist=i915,snd_hda_intel,snd_hda_codec_hdmi video=efifb:off,vesafb:off initrd=/bzroot VM creation: I created the VM using i440fx and SeaBIOS. Q35 and OVMF did not work! No ROM Bios and no further xml adjustments needed! See spaceinvaders video if you don't know how to create a LibreELEC VM: Additional BIOS settings for IGD usage: - Primary Graphics Adapter - onboard - iGPU Multi Monitor - enabled - OnBoard HD Audio - enabled - OnBoard HDMI HD Audio - enabled - C.A.M (Clever Access Memory) - disabled (not sure if this is needed but I read somewhere about it) --> The setting is only visible on AsRock Boards when turning on "Above 4G Decoding". C.A.M is also called S.A.M or resizable BAR by other manufacturers! This should be it! Good luck!


 1 point
 -
Vielen Dank für eure Vorschläge! Hat sich aber erledigt, es war wieder einmal das Problem vor dem Bildschirm. Hab vergessen den 4pin CPU am Netzteil anzuschließen 🙄1 point
-
Klick mal auf '?' auf der Seite. Dort ist das beschrieben: Ein Beispiel aus meiner Umgebung: /usr/local/sbin/rc.unassigned mount //192.168.178.102/disk11 point
-
The plugin support was moved! To manage everything a bit better, I created a new thread: https://forums.unraid.net/topic/132721-plugin-ca-appdata-backup-restore-v3/ @ich777 Iam not able to "pin" single posts there, is there anything I need (persmissions)? Could someone close this thread? Plugin support links are getting updated soon - as well as the name.1 point
-
Hallo Allerseits. Die Wahl der PCIe basierten SATA Kontroller für unraid (Stand April 2024). Ist zwar schon (sehr) oft durchgekaut worden, aber da immer wieder entsprechende Fragen auftauchen hier einmal ein paar Grundlagen. (Diese spiegeln meine aktuelle Meinung und Erfahrung wieder. Verbesserungsvorschläge willkommen.) Hier incl. PCIe und SATA Grundlagen, damit man hier ggf. drauf verweisen kann und es nicht immer wieder neu tippen muß. Zuerst die übliche Schnittstelle auf dem Mainboard, die diese Kontroller versorgt - PCIe: Zuerst ist es interessant, welchen PCIe Standard das Mainboard bei den zu benutzenden Slots unterstützt, damit man auch abschätzen kann, was ein SATA Kontroller darauf maximal leisten kann: - PCIe 1.0 ist stark veraltet und liefert pro Lane rund 250MByte/s. Das ist nicht zu empfehlen. - PCIe 2.0 ist veraltet und liefert pro Lane rund 500MByte/s. Wenn es nicht anders geht, kann man es nutzen. PCIe SAS-Kontroller mit PCIe 2.0 sind aber oft etwas stromsparender als PCIe 3.0. - PCIe 3.0 ist aktuell (&) gut und liefert pro Lane knapp unter 1Gbyte/s. - PCIe 4.0 oder gar 5.0 sind zu neu. Speziell dafür sind mir aktuell keine SATA Kontroller bekannt. Da PCIe abwärtskompatibel ist, kann man in einem sehr neuen Mainboardslot mit Standard 4.0 oder gar 5.0 dennoch auch Kontroller verwenden, welche beispielsweise nur PCIe 2.0 oder 3.0 beherrschen. Leider ist man dann aber eben auch auf die Geschwindigkeit von PCIe 2.0 oder eben 3.0 pro Lane reduziert. Dafür wird bei der langsamen Taktung oft auch etwas weniger elektrisch Energie benötigt. Dann ist es relevant welche PCIe Steckplätze das Mainboard hat. - Einerseits gibt es die normalen PCIe Slots in verschiedenen Längen und intern unterschiedlich viel belegbaren (elektrisch verbundenen) Lanes. Mechanisch lange Slots (bis x16) können so ausgeführt sein, daß sie elektrisch dennoch nur weniger Lanes verbinden (x1, x4, x8). - Andererseits gibt es seit einiger Zeit M.2 Steckplätze (alt auch NGFF bezeichnet), die entweder selber nur einen einzigen SATA Anschluß bieten oder evtl. (zusätzlich oder exklusiv) den NVMe Standard beherrschen und dadurch auch PCIe Lanes haben. Diese sind mit 1, 2 oder 4 Lanes zu finden. Diese sind mechanisch nicht ganz so robust/stabil, aber mit etwas Vorsicht immer noch gut nutzbar. Nun zu SATA: Der aktuelle SATA-3 Standard kann Datenträger mit bis zu ca. 600MByte/s (6GBit/s) ansprechen. - Große und schnelle Festplatten mit der Drehzahl von ca. 7200 Rpm schaffen heutzutage in der kurzzeitigen Spitze etwas mehr als 280MByte/s von ihrem Scheiben. Im normalen Dauerbetrieb sackt diese Geschwindigkeit über die Festplatte hinweg ab, so daß ich pauschal pro Festplatte von ungefär 250MByte/s ausgehe. - SATA-SSD hingegen schaffen aufgrund ihres Aufbaus in der Spitze durchaus weit höhere Geschwindigkeiten. 550MByte/s sind keine Seltenheit und da kommt man so langsam an die SATA-3 Limitierung ran. Weniger Peformante SATA-SSD sacken nach sehr kurzer Spitze auch gerne schon mal auf 300 MByte/s oder sogar viel weniger ab. Hier nun zu den Kontrollern für SATA-Festplatten und SATA-SSD: Die Kontroller sind in der Regel mit einem (oder mehreren) Chip bestückt, welcher den PCIe Slot (Eingang) nutzt und dann SATA Ports für Festplatten/SSD (Ausgang) bereit stellt. Die Leistungsfähigkeit (und Kompatibilität zu unraid) eines Kontrollers hängt stark von dem verwendeten Chip auf dem Controller ab, weshalb es meist egal ist, wer der Kartenhersteller ist, da dieser meist nur die Funktion des Chips nach außen anbindent. (Deshalb werde ich im weiteren eher von Chiptypen, als von Kontrollerherstellern schreiben). - Einerseits gibt es SATA Kontroller, welche meist nicht so viel Strom verbrauchen, dafür aber auch nur wenige SATA-Anschlüsse (bis 6) haben und passiv gekühlt werden (bei einfachen Chips ist nicht einmal ein Kühlkörper nötig). - Andererseits gibt es SAS Kontroller, welche auch zu SATA kompatibel sind. Diese benötigen mehr elektrische Energie, gibt es aber dafür auch mit hoher SAS/SATA-Portzahl (bis 28). Aufgrund des hohen Stromverbrauches sind bei SAS Kontrollern mindestens Kühlkörper nötig und diverse Hersteller sehen eine zwingende Belüftung mit vorgegebener Luftmenge als notwendig an. Hier sind HBA Kontroller im IT Mode für Unraid in der Regel kompatibel. Raid Kontroller ohne IT Modus sind bei Unraid nicht anzuraten. - Dann gibt es noch eher exotische Lösungen, bei denen verschiedene Chips mit SATA-Multipliern hinter dem eigentlichen SATA Chip oder gar PCIe-Switche dem SATA Chip vogeschaltet sind. (Beide Varianten sind nicht optimal!) Deshalb ganz kurz zu diesen beiden Zusatzkomponenten: - SATA Multiplier sind Verteiler, die die maximalen 600MByte/s eines SATA (Eingangs-)Ports auf bis zu 5 SATA (Ausgangs-)Ports verteilen. Man hat also weitaus mehr Ports gleichzeitig zur Verfügung um Datenträger anzuschließen, aber wenn man alle Datenträger gleichzeitig ansprechen will, teilen sie sie die maximale Bandbreite des einen Ports. Somit schafft man dann pro SATA Port theoretisch maximal ca. 120MByte/s. In der Praxis kommen noch ein paar bremsende Details hinzu. - PCIe-Switche sind vergleichbar mit Netzwerkswitchen. Man hat auch hier einen Eingang (evtl. mit mehr als einer Lane), der versucht die zu transportierenden Datenpakete auf mehrere Ausgänge zu verteilen. Da PCIe weitaus performanter ausgelegt ist und so auch mehrere Eingangslanes gleichzeitig auf verschiedene daran angeschlossene SATA Kontroller mit je einer Lane gesplittet werden können, ist das eine interessante Methode mehrere stromsparende SATA Chips performant an einen breiteren PCIe Slot (beispielsweise mit 4 Lanes) anzubinden. Leider hat die Sache einen großen Haken: die PCIe Switches selber sind auch Stromschlucker und damit macht man die Energiebilanz des nachgeschalteten sparsamen SATA Chips wieder zunichte. Dann kann man gleich überlegen einen SAS Kontroller oder mehrere einfache SATA Kontroller zu nehmen. Und endlich: die SATA Chips auf den Kontrollerkarten (egal ob Standardbauweise oder M.2). Aktuell steht auf dem Markt folgendes zur Verfügung (was auch in unraid gut funktioniert, aber ggf. die vom Mainboard erreichbaren Stromsparzustände (C-States) verändern/verschlechtern kann): ASM1062 Chip – Eingang PCIe 2.0 x2; Somit hat man also rund 1GByte/s Bandbreite (wenn dieser Chip eben zum Mainboard mit mindestens PCIe 2.0 x2 Lanes angebunden ist), die hier auf bis zu 2 SATA Ports verteilt werden. Bei gleichzeitige Nutzung aller 2 Ports sind knapp unter 500MByte/s pro Port nutzbar, wodurch sich dieser Kontroller sich gut anbietet bei älteren PCIe 2.0 basierten Mainboards bis zu 2 SATA Festplatten oder aus SATA-SSD gleichzeitig zu betreiben. Diese Kontroller sind aber auch auf PCIe Steckkarten mit nur einer (x1) Lane Anbindung zu finden. Hier stehen dem Chip also nur maximal rund 500MByte/s zur Verfügung und damit würde es bei 2 guten SATA-SSD gleichzeitig schon wieder zu eng mit der Gesamtbandbreite. JMB582 Chip - Dieser hat baulich 1 eine PCIe 3.0 Lane. Dieser Chip bietet 2 SATA Ports, die sich dann die maximale Bandbreite von rund 1GByte/s teilen, wodurch dann bei gleichzeitiger Nutzung knapp unter 500MByte/s pro SATA Port drin sind. Das reicht auch für gute SATA SSDs. Diese 582 Chips werden sehr gerne für die Nischenlösung der M.2 Key A/E Steckkarte eingesetzt um in solch kurzen A oder E Slots, welche eigentlich für WiFi Karten gedacht sind und auch PCIe 3.0 x1 enthalten, einen zusätzlichen SATA Kontroller einzusetzen. In reinen CNVI M.2 Slots funktionieren diese Kontroller nicht. Nicht unerwähnt sollte sein, daß die JMB 582 (und siehe unten auch 585) kein vernünfitiges ASPM beherrschen und somit der PC in der Regel nicht mehr in tiefere Stromsparmodi wechseln kann. Das kann dann schon einmal einen Unterschied von ein paar Watt im einstelligen Bereich ausmachen. ASM1064 Chip – Eingang PCIe 3.0 x1; Somit hat man also rund 1GByte/s Bandbreite, die hier auf bis zu 4 SATA Ports verteilt werden. Bei gleichzeitige Nutzung aller 4 Ports sind knapp unter 240MByte/s pro Port nutzbar, wodurch sich dieser Kontroller gut anbietet bis zu 4 SATA Festplatten gleichzeitig zu betreiben. Bei performanten SATA-SSD sollten nicht mehr als 2 Stück gleichzeitig benutzt werden, da diese sonst ggf. ausgebremst werden. Edit: Diese Chips haben aber gezeigt, daß Sie beim Einsatz von Powertop im auto tune Modus ggf. die SATA Links verlieren. Diese sind ebenfalls keine gute Empfehlung mehr für unraid. ASM1164 Chip – Eingang PCIe 3.0 x2; Somit hat man also rund 2GByte/s Bandbreite, die hier auf bis zu 4 SATA Ports verteilt werden. Bei gleichzeitige Nutzung aller 4 Ports sind fast 500MByte/s pro Port nutzbar, wodurch sich dieser Kontroller gut anbietet bis zu 4 SATA-SSD gleichzeitig zu betreiben. Steckkarten mit diesem Kontroller sind aber sehr selten, weil sie preislich vergleichbar dem unten erwähnten ASM1166 liegen und dieser sogar 6 SATA Ports bietet. Auch dieser Kontroller ist vereinzelt auch auf x1 Steckkarten zu finden, wobei er sich von der Geschwindigkeit her dann nicht mehr von der ASM1064 Variante unterscheidet. Nicht unerwähnt sollte sein, daß es für die ASM11.. Chips ein Firmweareupdate gibt, welches bei einigen Zusatzsteckkarten evtl. vorhandene Probleme mit den Energiesparmodi verringern. Ob dieses Firmwareupdate bei allen ASM11.. basierten Steckkarten funktioniert kann ich nicht sagen. JMB585 Chip - Dieser hat baulich 2 Stück PCIe 3.0 Lanes, wodurch man seine maximale Bandbreite nur in einem Slot 3.0 mit x2 Lanes (oder mehr) erreichen kann. Dieser Chip bietet 5 SATA Ports, die sich dann die maximale Bandbreite von rund 2GByte/s teilen, wodurch dann bei gleichzeitiger Nutzung knapp unter 400MByte/s pro SATA Port drin sind. Das ist mehr als die aktuell flotteste SATA HDD schafft und auch nicht übel, wenn man SATA SSD verwenden will. Es wird dann bei gleichzeitiger Nutzung performanter SATA-SSD zwar immer noch etwas Transfergeschwindigkeit beschnitten, aber das muß man selber entscheiden, ob man das akzeptieren kann und ob die SSD soweiso nicht selber schon langsamer ist. Auch hier der Hinweis: daß die JMB 585 (und siehe oben auch 582) kein vernünfitiges ASPM beherrschen und somit der PC in der Regel nicht mehr in tiefere Stromsparmodi wechseln kann. Das kann dann schon einmal einen Unterschied von ein paar Watt im einstelligen Bereich ausmachen. ASM1166 Chip – Auch dieser hat baulich 2 Stück PCIe 3.0 Lanes und somit auch maximal 2GByte/s. Er verteilt dies auf bis zu 6 SATA Ports, wodurch dann bei gleichzeitiger Nutzung rund 330MByte/s drin sind. Immer noch mehr als eine Festplatte und auch bei SATA-SSD für den einen oder anderen User interessant. Wenn man nur 4 Ports beschaltet hat man eigentlich das Selbe wie bei einen ASM1164 Chip (siehe oben) nur eben für ggf. zukünftige Erweiterungen oder Umplanungen 2 SATA Ports mehr. Hier gilt auch der Hinweis zu der Firmware bei Stromsparproblemen. EDIT: in den letzten Monaten sind aber auch viele (billige) ASM1166 basierte Zusatzkontroller auf den Markt gekommen, die zwar nicht (wie der ASM1064) die Links verlieren, aber dennoch in den Stromsparmodi (selbst mit angepaßter Silverstone Firmware) nicht mehr so ganz gut mit den Mainboards harmonieren und somit die C-States negativ beeinflußen. Selbst, wenn der Kontroller selber nur so um die 2W schluckt, kasnn es sein, daß das Mainboard dann von sich aus einiges mehr an Energie benötigt. Es ist also hier ein bisschen Glückssache. Diverse LSI Chips (des aktuellen Inhabers Broadcom) – Das sind dann die SAS Chips. Hier gibt es sehr viele Varianten. Am verbreitetsten sind die Chips, welche PCIe x8 zum Mainboard hin anbinden und daraus 8 oder mehr SAS/SATA-Ports machen. Wie schon geschrieben: im IT Mode sind diese für unraid gut nutzbar, aber aufgrund des höheren Strombedarfes, aktiver Kühlung und zur Verfügung stehender PCIe Slots des Mainboard muß man abschätzen, ob man lieber einen SAS Kontroller mit 4, 8 oder mehr Ports oder einen oder mehrere SATA Kontroller mit jeweils weniger Ports einsetzt um die gesamt gewünschte SATA-Portanzahl zu erreichen. Es gibt solche SAS Kontroller die gerne Spitzenwerte von 20-30Watt erreichen. Die aktive Kühlung ist dabei definitiv zwingend! Hier sei ergänzt, daß es auch neuere SAS-Chipentwicklungen gibt, die durch komplett neues Design und Reduzierung ihrer SAS Fähigkeiten wieder etwas weniger Energie benötigen sollen. Aber das Zeugs ist eben noch recht neu und kostet somit einiges mehr. Hier sei ein Broadcom 9500-8i genannt, der nur noch 240 SAS/SATA Festplatten ansteuern kann, dafür auch auf der Deviceseite NVMe/PCIe beherrscht und laut Broadcom mit unter 6W angegeben ist. https://www.broadcom.com/products/storage/host-bus-adapters/sas-nvme-9500-8i oder sein größerer Bruder: HBA 9500-16i mit 8.9W Hier sei angemerkt: Man hat die Steckverbinder zu den Vorgängern wieder einmal geändert SFF-8654 (SlimSAS). Kleine Randnotiz zu den Kontrollern, welche PCIe 3.0 x2 verwenden: Es gibt im breiten Markt keine Standard PCIe x2 (mechanisch) Slots. Aus dem Grund sind diese Kontrollerkarten für maximale Performance immer in Slots einzusetzen, welche länger sind und ggf. sogar mehr Lanes bieten. Ob man nun wirklich bei einem PCIe x4 Slot eine x2 Karte einsetzen will und somit x2 Lanes unbenutzt bleiben, muß jeder User für sich selber entscheiden. EDIT (früher waren ASm1064 angegeben, aber die sind nicht mehr empfehlenswert): Wenn es um 5-6-SATA Ports geht bevorzuge ich 2 Stück PCIE 3.0 x1 ASM1166 (oder wenn billig zu haben ASM1164) in gesamt 2 PCIe x1 Slots eines Mainboards einzusetzen, als nur einen JMB585 (PCIe 3.0 x2) oder ASM1166 (PCIe 3.0 x2) zu verwenden, wodurch ein ganzer PCIe x4 (oder mehr) Slot ver(sch)wendet wird. Aber das ist sehr individuell und nur meine persönliche Meinung. Aufgrund der oben erwähnten stromsparenderen Firmware mag man auch einen oder mehrere ASM1166 oder ASM1164 (ggf. sogar nur als x1 Steckkarte) bevorzugen und darauf hoffen, daß sie sich bei dem eigenen Kontroller einspielen läßt und den Kontroller gesamt noch etwas sparsamer macht. Natürlich sollte man dennoch mit bedacht überlegen wieviele SATA Ports man dann belegt und gleichzeitig nutzen wird. An der PCIe Bandbreite der Steckkarte ändert sich nichts.1 point
-
Please use the existing plugin support thread:1 point
-
Today we got the driver fully working. Currently the development and testing is being done on Debian and Ubuntu but it works great. You can view temps, fan RPMs, and view and adjust fan PWM values. Code needs a tiny amount of cleanup still and a few odds and ends but it should be ready for prime time pretty soon. Need to write some more documentation about it and figure out how to compile it for Unraid too still.1 point
-
my two cents (but I'm a noob). I had to do this a few times as the docker stop commands didn't result in an actual container stop. Get you docker container id using docker container list then ps auxw | grep yourcontainerid to get the pid then kill -9 yourpid If that doesn't work, you've got a zombie process and I'm afraid you'll need a reboot to unlock it1 point
-
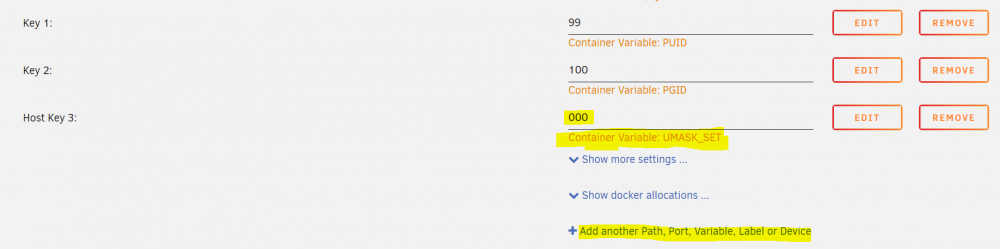
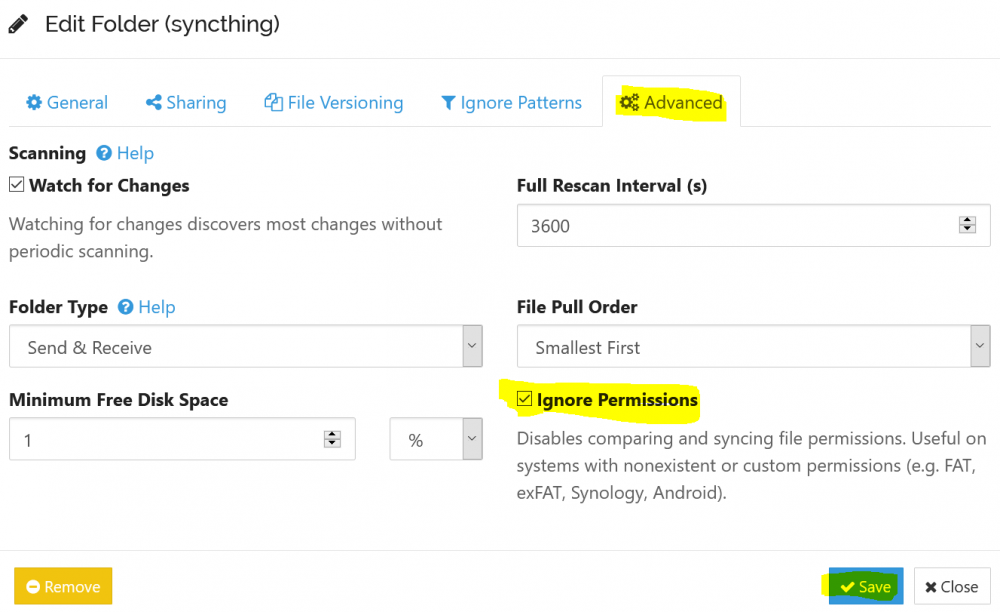
NOTE 01/2024: UMASK_SET has been renamed to UMASK (beware the outdated screenshots!) For anyone experiencing write-permission errors on Samba shares as I did, please make sure that: Syncthing Container (Docker) configuration has a configuration key set as follows: UMASK => 000 (UMASK as "Key" / 000 as "Value") Such a key can be added by clicking on "Add another Path, Port, Variable, Label or Device". to enable "Ignore Permissions" on each individual shared folder inside the Syncthing Web UI on your UNRAID machine. I have been investigating for hours why my files would keep ending up with the wrong permissions despite the supposedly correct UMASK of 000. Syncthing will, by default, try to synchronize the file permissions when exchanging data between two machines - beware of this functionality. Especially if you sync folders between another Linux machine and your UNRAID machine, Syncthing will initially create the file on your UNRAID machine respecting the UMASK 000 but later modify the permissions to reflect those on the original machine. By ensuring that your synced folders are all set to "ignore permissions", you basically tell Synthing to stay out of setting permissions altogether and respect the default local permissions. (which you have previously set by handing the UMASK 000 to the container) Hope this helps anyone experiencing permission troubles on Samba shares. 🙂
 1 point
 -
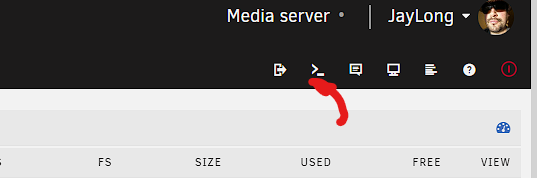
Tools Tab1 point


.png.65b37db8280531a9009b6b2d65c24184.png)