Leaderboard


Popular Content
Showing content with the highest reputation on 03/06/23 in Posts
-
Passt so?
 3 points
 -
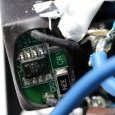
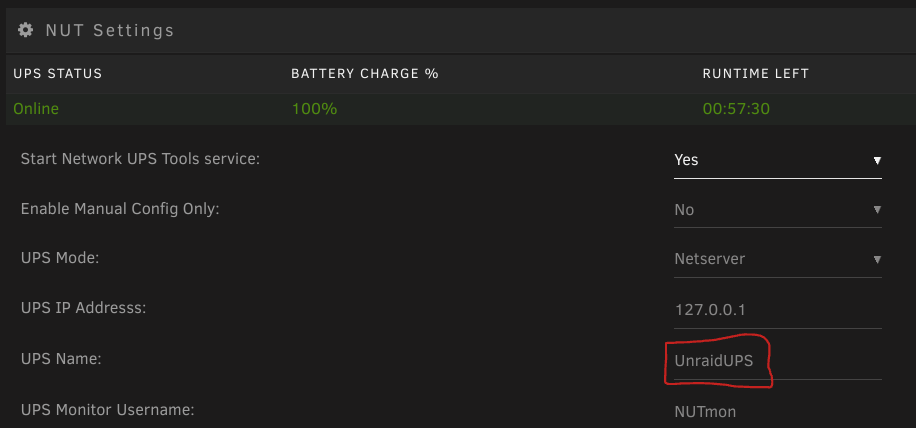
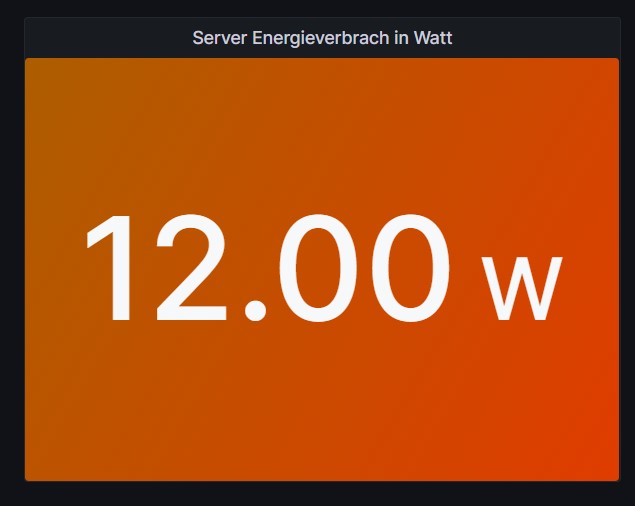
Hier ein kleiner Anfänger Guide/Inspiration für einen automatischen Batterie Test einer USV, welche per NUT Plugin betrieben wird. Das Script lässt einen lautlosen Batterie schnelltest der USV laufen und gibt das Ergebnis per Standard Unraid Nachricht aus. Vorab sollte man einmal testen, ob test.battery.start.quick verfügbar ist. Das ganze per folgendem Befehl im Terminal: upscmd -l UnraidUPS UnraidUPS steht hier für den UPS Name aus dem NUT Plugin: Sollte test.battery.start.quick in der Liste auftauschen, kann man recht einfach folgendes Script per User Script Plugin ausführen lassen: #!/bin/bash ###NUT UPS QUICK BATTERY TEST### ###V1.1 ###https://forums.unraid.net/topic/135969-anleitung-simples-usv-batterie-schnelltest-user-script-mit-nut/ ################################ #vars### u="admin" #username p="adminpass" #password upshost="UnraidUPS" #UPSname@IP:Port - IP and PORT are optional ######## #battery test upscmd -u $u -p $p $upshost test.battery.start.quick upscmd -u $u -p $p $upshost beeper.mute sleep 2s #wait for result result=$(upsc $upshost ups.test.result) while [[ $result == "In progress"* ]] do sleep 0.5s result=$(upsc $upshost ups.test.result) done #unraid notifitcation result_success="$(echo ${result} | grep -E '\b(passed|success|OK|successful)\b')" result_warn="$(echo ${result} | grep -E '\b(warning|WARN)\b')" if [ -n "${result_warn}" ]; then /usr/local/emhttp/webGui/scripts/notify -s "UPS test passed with warnings." -d "$result" -i warning elif [ -n "${result_success}" ]; then /usr/local/emhttp/webGui/scripts/notify -s "UPS test passed." -d "$result" -i normal else /usr/local/emhttp/webGui/scripts/notify -s "UPS test failed!" -d "$result" -i alert fi u, p und upshost sind in dem Script die default Werte des NUT Plugins, können/sollten jedoch angepasst werden, wenn diese verändert wurden.
 2 points
 -
When going through this account migration it reminded me that Unraid still has a very old (and no longer active) email address. I've successfully migrated using that old email address but when I attempt to change the email address I get the message that the email address was changed successfully, but then on logout and login I notice that it will only accept the old email address (which has reverted in the account settings). I've attached a screen recording. Any ideas? Recording 2023-03-06 084040.mp42 points
-
Turbo Write technically known as "reconstruct write" - a new method for updating parity JonP gave a short description of what "reconstruct write" is, but I thought I would give a little more detail, what it is, how it compares with the traditional method, and the ramifications of using it. First, where is the setting? Go to Settings -> Disk Settings, and look for Tunable (md_write_method). The 3 options are read/modify/write (the way we've always done it), reconstruct write (Turbo write, the new way), and Auto which is something for the future but is currently the same as the old way. To change it, click on the option you want, then the Apply button. The effect should be immediate. Traditionally, unRAID has used the "read/modify/write" method to update parity, to keep parity correct for all data drives. Say you have a block of data to write to a drive in your array, and naturally you want parity to be updated too. In order to know how to update parity for that block, you have to know what is the difference between this new block of data and the existing block of data currently on the drive. So you start by reading in the existing block, and comparing it with the new block. That allows you to figure out what is different, so now you know what changes you need to make to the parity block, but first you need to read in the existing parity block. So you apply the changes you figured out to the parity block, resulting in a new parity block to be written out. Now you want to write out the new data block, and the parity block, but the drive head is just past the end of the blocks because you just read them. So you have to wait a long time (in computer time) for the disk platters to rotate all the way back around, until they are positioned to write to that same block. That platter rotation time is the part that makes this method take so long. It's the main reason why parity writes are so much slower than regular writes. To summarize, for the "read/modify/write" method, you need to: * read in the parity block and read in the existing data block (can be done simultaneously) * compare the data blocks, then use the difference to change the parity block to produce a new parity block (very short) * wait for platter rotation (very long!) * write out the parity block and write out the data block (can be done simultaneously) That's 2 reads, a calc, a long wait, and 2 writes. Turbo write is the new method, often called "reconstruct write". We start with that same block of new data to be saved, but this time we don't care about the existing data or the existing parity block. So we can immediately write out the data block, but how do we know what the parity block should be? We issue a read of the same block on all of the *other* data drives, and once we have them, we combine all of them plus our new data block to give us the new parity block, which we then write out! Done! To summarize, for the "reconstruct write" method, you need to: * write out the data block while simultaneously reading in the data blocks of all other data drives * calculate the new parity block from all of the data blocks, including the new one (very short) * write out the parity block That's a write and a bunch of simultaneous reads, a calc, and a write, but no platter rotation wait! Now you can see why it can be so much faster! The upside is it can be much faster. The downside is that ALL of the array drives must be spinning, because they ALL are involved in EVERY write. So what are the ramifications of this? * For some operations, like parity checks and parity builds and drive rebuilds, it doesn't matter, because all of the drives are spinning anyway. * For large write operations, like large transfers to the array, it can make a big difference in speed! * For a small write, especially at an odd time when the drives are normally sleeping, all of the drives have to be spun up before the small write can proceed. * And what about those little writes that go on in the background, like file system housekeeping operations? EVERY write at any time forces EVERY array drive to spin up. So you are likely to be surprised at odd times when checking on your array, and expecting all of your drives to be spun down, and finding every one of them spun up, for no discernible reason. * So one of the questions to be faced is, how do you want your various write operations to be handled. Take a small scheduled backup of your phone at 4 in the morning. The backup tool determines there's a new picture to back up, so tries to write it to your unRAID server. If you are using the old method, the data drive and the parity drive have to spin up, then this small amount of data is written, possibly taking a couple more seconds than Turbo write would take. It's 4am, do you care? If you were using Turbo write, then all of the drives will spin up, which probably takes somewhat longer spinning them up than any time saved by using Turbo write to save that picture (but a couple of seconds faster in the save). Plus, all of the drives are now spinning, uselessly. * Another possible problem if you were in Turbo mode, and you are watching a movie streaming to your player, then a write kicks in to the server and starts spinning up ALL of the drives, causing that well-known pause and stuttering in your movie. Who wants to deal with the whining that starts then? Currently, you only have the option to use the old method or the new (currently the Auto option means the old method). But the plan is to add the true Auto option that will use the old method by default, *unless* all of the drives are currently spinning. If the drives are all spinning, then it slips into Turbo. This should be enough for many users. It would normally use the old method, but if you planned a large transfer or a bunch of writes, then you would spin up all of the drives - and enjoy faster writing. Tom talked about that Auto mode quite awhile ago, but I'm rather sure he backed off at that time, once he faced the problems of knowing when a drive is spinning, and being able to detect it without noticeably affecting write performance, ruining the very benefits we were trying to achieve. If on every write you have to query each drive for its status, then you will noticeably impact I/O performance. So to maintain good performance, you need another function working in the background keeping near-instantaneous track of spin status, and providing a single flag for the writer to check, whether they are all spun up or not, to know which method to use. So that provides 3 options, but many of us are going to want tighter and smarter control of when it is in either mode. Quite awhile ago, WeeboTech developed his own scheme of scheduling. If I remember right (and I could have it backwards), he was going to use cron to toggle it twice a day, so that it used one method during the day, and the other method at night. I think many users may find that scheduling it may satisfy their needs, Turbo when there's lots of writing, old style over night and when they are streaming movies. For awhile, I did think that other users, including myself, would be happiest with a Turbo button on the Main screen (and Dashboard). Then I realized that that's exactly what our Spin up button would be, if we used the new Auto mode. The server would normally be in the old mode (except for times when all drives were spinning). If we had a big update session, backing up or or downloading lots of stuff, we would click the Turbo / Spin up button and would have Turbo write, which would then automatically timeout when the drives started spinning down, after the backup session or transfers are complete. Edit: added what the setting is and where it's located (completely forgot this!)1 point
-
Ok I'll give it a try. Thx I stopped unmanic and monitoring to see if error is really cause by it.1 point
-
I had one of those running for 3 years with no issues. I just replaced it as part of my new server build. I am now using a Delkin B300 "Industrial" SLC flash drive:1 point
-
I'd be interested in similar support. I'd much rather pay for someone to help me that spend days trying to figure out something that might only take minutes for someone with knowledge.1 point
-
It has been almost 3 hours now since reboot with dockers set to ipvlan and unmanic set to not start automatically, I started it manually once docker service was up. Still no error message in log. I'll keep monitoring1 point
-
Thank you!! I will write back in a day or so to ensure my logs are not getting filled up anymore. root@mesawest:/lsi# ./sas2flash -list LSI Corporation SAS2 Flash Utility Version 20.00.00.00 (2014.09.18) Copyright (c) 2008-2014 LSI Corporation. All rights reserved Adapter Selected is a LSI SAS: SAS2008(B2) Controller Number : 0 Controller : SAS2008(B2) PCI Address : 00:04:00:00 SAS Address : 500605b-0-0650-1ae0 NVDATA Version (Default) : 14.01.00.08 NVDATA Version (Persistent) : 14.01.00.08 Firmware Product ID : 0x2213 (IT) Firmware Version : 20.00.07.00 NVDATA Vendor : LSI NVDATA Product ID : SAS9211-8i BIOS Version : 07.39.02.00 UEFI BSD Version : N/A FCODE Version : N/A Board Name : SAS9211-8i Board Assembly : H3-25250-02F Board Tracer Number : SP33006164 Finished Processing Commands Successfully. Exiting SAS2Flash.1 point
-
This is what matters, the firmware, it needs to be updated to 20.00.07.00, the utility version doesn't matter.1 point
-
Thanks Just did that and its working!1 point
-
In my recent (and ongoing) new home server build, I am focusing on reliability and uptime. One of my areas of improvement is the boot drive. I had been using a 32 gb Sandisk "Ultra Flair" for the last 3 years without issue. But for my new build, I wanted something a bit more... trustworthy. In my searching for a new boot drive, I found these Delkin USB sticks: Industrial USB Flash Drive | Delkin Devices- Rugged Controlled Storage https://www.delkin.com/products/industrial-usb-flash-drive/ https://www.delkin.com/wp-content/uploads/2021/01/401-0459-00-Rev-F-B300-Series-Industrial-USB-Drive-Engineering-Specification.pdf Highlights: - Industrial SLC - Controlled BOM (they won't change the parts inside or specs without notification) - Wide operating temperature range (-40 to 85 C) - Error correction, wear leveling, block management, redundant firmware, dynamic data refresh - Mine is stamped with Made in USA (I'm sure with some overseas parts) - Has a GUID for Unraid licensing Downsides: - They aren't fast, despite being USB 3.0 (75 MB/s read, 60 MB/s write, sequential, for the fastest 16/32 GB versions) - They are long and plastic. There is a "short" version that is still fairly long. No cap retention. - Expensive. Here are the prices on Digi-Key: 2 GB - $59 4 GB - $85 8 GB - $139 16 GB - $239 32 GB - $354 I settled on the 8 GB as a good balance between capacity, performance, and cost. While I winced at spending $139 on an 8 GB flash drive in 2023, it's easier to accept if you consider it an "industrial boot drive", and not something used occasionally to share Linux distros with friends. I'm sure there are consumer drives with similar features, but I like that these Delkin drives are documented and have a controlled BOM. Mine will live in my server in my 20 deg C basement for the foreseeable future. I'll report back if it ever has any issues.1 point
-
Thanks for the tutorial - it is clear. Problem solved1 point
-
"Something like this, assuming your user is photoprismuser, your password is photoprismpassword and the database is photoprismdb: photoprismuser:photoprismpassword@tcp(192.168.1.40:3307)/photoprismdb?parseTime=true " Thank you for the example! I learned, that after the IP:portnumber/ XXXX XXXX is the database name - I thought it was the container name In my case container name and database name is completely different... so the variable was wrongly set Now it works. But still it would be very interesting to learn how to run MariaDB Docker containers with multiple databases and users/passwords - see my last post. Many thanks, very helpful !1 point
-
Ok, I disabled autostart on unmanic. Downloaded a diagnostic file Rebooted the server When it is up, I will start unmanic and watch the log for the python error I'll keep you posted Thx again1 point
-
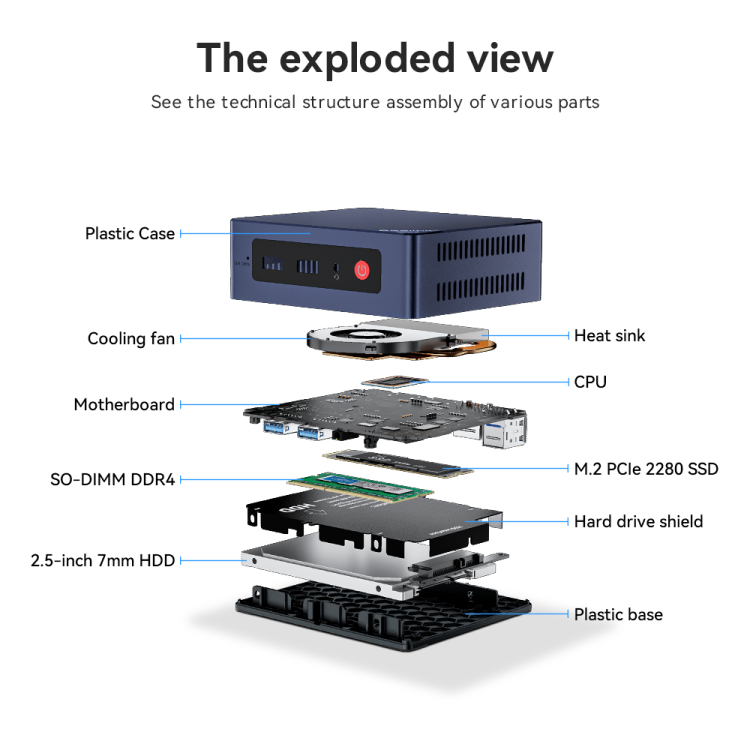
Looking to purchase one of these as energy rates and my aging hardware is causing concern. https://www.bee-link.net/products/u59-n5095?variant=40696376230068 I would be running: -Plex/Jellyfin (little to no transcoding) -PiHole (which I might push off to a proper Pi on the side) -Radarr -Possibly Wireguard for remote work The system only supports up to 2TB drives, which is fine for my usage. My library of media isn't that big where I'm needing 10-20TB of storage. I'm well aware that this system might be better off with a vanilla Ubuntu server or something of the sort, but I'm familiar with Unraid and it's layout and would prefer to keep using it if possible... Thoughts?1 point
-
Hi Beelink Mini S12 PRO Intel N100 (more powerfull, support AV1 Codec) PCI-E NVME + SATA (HHD OR SSD) More affordable than Morefine" Just buy one for: -Plex -Home Assitant -Pihole -Sophos Home Firewall https://pt.aliexpress.com/item/1005005200158913.html
 1 point
 -
Not AFAIK, only SAS2 models based on the SAS2008 and SAS2308 chips.1 point
-
Thanks. The procedure on the link page works great. I had to run it 4-5 times to get to the latest version. Along the way, if you found some errors or inadvertently say No to the occ upgrade, just re-run the "docker exec -it nextcloud updater.phar", it will resolve the problem by itself. The latest version as of now is 25.0.4.1 point
-
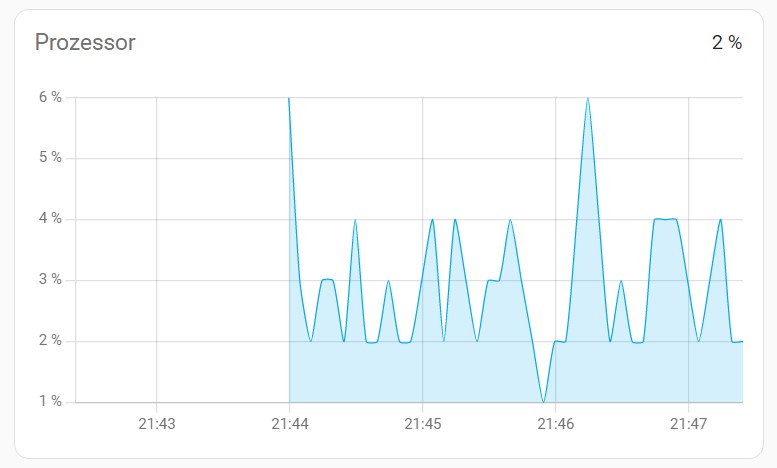
Yes, because your iGPU is 12th gen and not 13th gen (intel_gpu_top always displays the generation from the iGPU and not from the CPU and yes, the can be different ). For example my i5-10600 (10th gen CPU) has a 9th gen iGPU built in: intel-gpu-top: Intel Cometlake (Gen9) @ /dev/dri/card0 Is something transcoding on your iGPU or using your iGPU? If not nothing would be displayed because the GPU is basically in render standby (RC6) as you can see on top. IMC bus utilization is not supported by all CPUs, basically the same as if you have a Nvidia GPU, not all metrics are supported by all cards or better speaking by nvidia-smi.1 point
-
Yes if using the option built into Unraid. If instead you use the plugin options to handle the increments and also set the option to restart array operations in the plugins then it can continue from point previously reached. However you need to resolve this reason you are getting unclean shutdowns as for safety reasons the plugin will not restart array operations after an unclean shutdown. I might one day think about revisiting this decision but I at the moment am erring on the side of safety.1 point
-
Danke für die schnelle Antwort. Werde das mal heute abend checken1 point
-
I do yes. Beyond that I simply installed https://raw.githubusercontent.com/ich777/unraid-prometheus_smartctl_exporter/master/prometheus_smartctl_exporter.plg. If that's all it should take then I'll just try a reboot and see what happens. Thanks for the quick responses and your numerous contributions to Unraid, I use many and I love it 😁!1 point
-
Don't really understating what's going on here, there are two disabled disks but parity started syncing after array start: Mar 5 18:17:49 Tower kernel: md: recovery thread: recon P ... And according to the diags parity is valid, reboot, don't touch the array assignments and post new diags after array start.1 point
-
Vorschlag für die Unraid Notification: #unraid notification result=$(upsc $upshost ups.test.result) if [[ $result == "Done and passed" ]]; then /usr/local/emhttp/webGui/scripts/notify -i normal -s "USV test passed." -d "$result" else /usr/local/emhttp/webGui/scripts/notify -i alert -s "USV test failed!" -d "$result" exit 1 fi1 point
-
Oh man, sorry. Ich habe schon recht viel im Post gelesen, diesen Teil aber tatsächlich nicht. Ist jetzt durch gelaufen. Danke!1 point
-
Thanks, looks like somewhere along the way the invokeai folder permissions changed to root; Cloning into 'InvokeAI'... /home/invokeuser/InvokeAI/.git: Permission denied looks like it's loading properly after adjusting them1 point
-
I've had 3 Samsung bar plus fail. I see they are no longer available. I've had 2 Samsung Fit Plus fail. I see they are no longer available. Yes, this is on 5 different machines, so it is not a usb controller problem, unless all Intel mb's gen 6 to gen 12 have issues. USB is the lowest quality storage on the market, so it's no wonder users have so many issues with media that isn't designed to be plugged in 24hrs. I really don't mind buying ssd's and putting them in raid 1 even if all that space is wasted, if it means I don't have downtime. That's the biggest issue, especially when I'm not around.1 point
-
Le partage est techniquement illégal / interdit, cependant, tu peut télécharger Jacket sur ton unRAID il permet de généré les liens tornzab pour sonarr/radarr tu pourras y trouver beaucoup de site via se dernier1 point
-
You are likely to get better informed feedback if you attach your system’s diagnostics zip file to your next post in this thread.1 point
-
KVM wird unterschätzt. Ob Docker oder VM merke ich was die CPU angeht nicht viel davon. Der Speicherverbrauch ist bei der VM ca. 500-600MB und Unraid-Container 300-400MB, soweit man die Angaben trauen kann ^^ Kommt sicherlich auf die VM und auf die Anzahl der VM's an. Teste das am besten selbst 🙂

 1 point
 -
As far as I know that simply means an error - why I have no idea. It could be a spurious one or it could be genuine - no way to tell. It is not unusual to have a small number of errors if there has been an unclean shutdown, It surprises me that in the screen shot you posted the type of check is not shown since you have the plugin installed. That suggest to me that it was OK at that address - if by any chance the previous check had been correcting that is what one would expect. Not had a lot of feedback from people using the Assistant so not really sure how definitive it is in the real world although it seems fine in my testing (but there I had to simulate errors rather than having hardware that might be throwing genuine errors).1 point
-
Migration went smooth for me so far! I really like the new account page and having a direct link to the OTP Auth url, instead of having to decode the QR code manually, is really awesome, thanks! Just a minor remark (it's more of convenience thing): When generating the OTP Auth URL (and the respective QR code), IMO the label shouldn't include the Amazon Cognito user id, but rather the account name. So instead of: otpauth://totp/AWSCognito:UUID?secret=BLABLABLA&issuer=Unraid The URL with the (URL encoded) account name could look like this: otpauth://totp/jonpetersathan?secret=BLABLABLA&issuer=Unraid Or if you want to include the issuer prefix in the label: otpauth://totp/Unraid:jonpetersathan?secret=BLABLABLA&issuer=Unraid I think this Is a bit more convenient and user-friendly when importing into other apps/services. But that's just my humble opinion...1 point
-
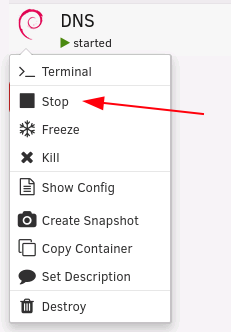
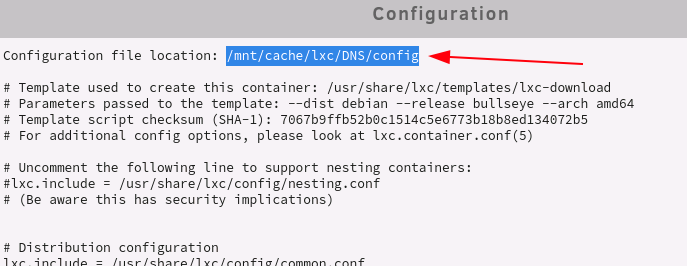
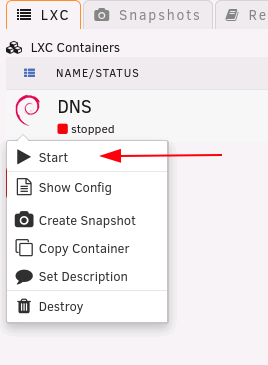
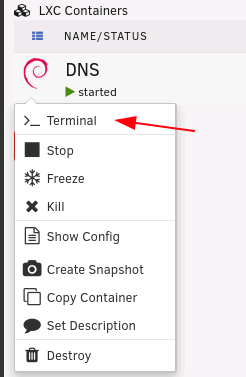
LANCache-Monolithic (optional): Ich empfehle euch wenn ihr LANCache verwendet eine dedizierte Festplatte zu verwenden die mittels UnassignedDevices beim Start von Unraid automatisch gemounted wird oder als separaten nicht gespiegelten Pool aus Performance Gründen zu verwenden. Der LANCache auf dem (Paritätsgeschütztem) Array macht keinen Sinn und ist aus Performance Gründen nicht zu empfehlen, wie schon oben geschrieben würde ich euch empfehlen bei 1Gbit/s LAN mindestens eine 7200rpm HDD und bei 2,5Gbit/s bzw. 10Gbit/s mindestens eine SATA SSD oder noch besser eine NVME zu verwenden. Im LXC Container legen wir uns als erstes einen leeren Ordner an in dem wir die Festplatte von Unassigned Devices oder von unserem Pool mounten können, Copy/Paste und Enter drücken: (bitte das Verzeichnis nicht ändern!) mkdir -p /mnt/lancache Danach müssen wir den LXC Container Stoppen und die Konfiguration auf Unraid direkt bearbeiten, dazu können wir das Terminal Fenster von unserem LXC Container schließen, klickt auf das Container Symbol und klickt "Stop": Um herauszufinden wo unsere Konfiguration gespeichert ist nochmal auf das Container Symbol klicken und "Show Config" auswählen: Im nun erscheinenden Pop-Up den Dateipfad der Konfigurationsdatei auswählen, in die Zwischenablage kopieren und auf "Done" klicken: In Unraid rechts oben auf das Terminal Symbol klicken: In diesem Terminal schreibt ihr jetzt: "nano /PFAD/ZU/EURER/config" und drückt danach Enter: (natürlich müsst ihr nach nano den kopierten Pfad zu der Konfiguration von Schritt 4 einfügen und Enter drücken - Leerzeichen zwischen nano und dem eingefügtem Pfad nicht vergessen😞 Ihr solltet nun die Konfiguration für diesen Container sehen die eigentlich für uns nicht wichtig ist, navigiert mit den Pfeiltasten ganz zum Schluss und fügt dort folgendes ein: lxc.mount.entry = /mnt/disks/misc/lancache mnt/lancache none bind 0 0 ACHTUNG: Bitte beachtet hierbei das "/mnt/disks/misc/lancache" der Pfad zu meinem Verzeichnis für LANCache den ich mittel Unassigned Devices gemounted habe ist, diesen müsst ihr vorher Anlegen und das Verzeichnis muss schon vorher existieren (sprich "/mnt/disks/misc" ist die disk und "/lancache" ist ein Verzeichnis auf dieser Platte). Der nächste Part "mnt/lancache" ist das Verzeichnis im Container das wir in Schritt 1 angelegt haben (der fehlende "/" von diesem Part ist kein Tippfehler!) Der letzte Part "none bind 0 0" sind Anweisungen wie das Verzeichnis in den LXC Container gemounted werden soll. Danach drückt ihr wieder "STRG + S" (zum Speichern) und danach "STRG + X" (zum Verlassen). Bitte das Terminal Fenster von Unraid das wir in Schritt 5 geöffnet haben jetzt wieder schließen. Anschließend starten wir unseren Container wieder: Hinweis: Wenn euer Container nicht starten und auf "stopped" bleiben sollte ist ein Pfad bzw. mit dem oben eingefügtem mount Eintrag etwas falsch, bitte kontrollieren und gegebenenfalls anpassen. Öffnet das Terminal von unserem LXC Container wieder: Jetzt kann der LANCache Container mit diesem Befehl installiert werden: ACHTUNG: Bitte passt die Werte nach dem "=" aus diesem Befehl an: CACHE_DISK_SIZE (Größe des Caches, Standard: 1GiB) CACHE_INDEX_SIZE (sollte pro zusätlichem 1GiB immer mindestens um 250MiB erhöht werden) CACHE_MAX_AGE (wie lange Dateien im Cache behalten werden sollen, Standard: 3650 Tage) TZ (hier eine Übersicht der TZ) docker run -d --name='LANCache' \ --net='bridge' \ -e CACHE_DISK_SIZE="1000000m" \ -e CACHE_INDEX_SIZE="250m" \ -e CACHE_MAX_AGE="3650d" \ -e TZ="Europe/Vienna" \ -v '/mnt/lancache/cache':'/data/cache':'rw' \ -v '/mnt/lancache/logs':'/data/logs':'rw' \ -p 80:80 -p 443:443 \ --no-healthcheck --restart=unless-stopped \ 'lancachenet/monolithic' Die Installation des LANCaches ist damit abgeschlossen bitte scrollt weiter nach unten um mit dem Tutorial weiter zu machen.


 1 point
 -
Hi, Do you have critical workloads and data on the unRAID or only non critical so far? 860 Evo 1TB sata3 - good for non critical media stuff such as running containers and VMs off of it, since it will probably not fail soon / in general I think this is better than the WD blue you mentioned (WDC_WDS100T2B0A) ., but haven't looked in depth. 960 PRO 512GB nvme - good for cache, vms and dockers if you feel like accelerating some things, will probably not fail soon. Keep an eye on smart and reduce writes if they become too much (maybe choose either burn it out for cache/ or for vms and dockers only) If you put them in current Desktop you can StorageSpaces and ReFS them together to get combined space and nvme speed without parity protection, to use for non critical fast storage such as Program Files and 'Media Scratch' if you are a creator ( I assume you use MS on the Desktop) Back that up to the unRAID in case something burst into flames (such as the filesystem versions with Windows OS different versions if you ever try to use older OS.) The second 1060 passthrough that could be used if ever need to have a guest use a PC for guest PC for example. A VM with a GPU can also be connected to a movie watching screen. The GPU also has digital audio output through the HDMI... Alternatively, the second GPU can reencode more streams if you share with friends, maybe with some TV stuff. It really depends how you really want to use your systems for your goals.1 point
-
This was frustrating. Didn't notice it in the newletter, didn't see any posts even on reddit... No warning that if you have capitals in your email address, (like I usually type it out) then logging in probably won't work. At least didn't for me. I changed to all lowercase letters with my email after a password reset, auto generated by chrome, and it finally let me in. Hopefully others find this useful. Or unRaid can add a "tolower" in their code. FYI, more prominent "Contact Us" would have been helpful, even just an email address.1 point
-
It is not controversial, it is wrong. You calculator is just that, a calculator that states how many combinations there are available. Unfortunately, by enforcing complexity you have just removed any password from the available pool that does not meet your complexity requirements and drastically reduced the amount of time needed. However, this is pretty moot now as brute force password cracking is only really available once the password DB has been obtained. Most online compromises are now performed by using password breach lists (Password spray attacks) so checking that passwords are not on a breach list is really important - you are not doing this. The password Mississippi1 complies to your complexity rules and can be set as a password but it exists in the top 100 most common passwords. Removing complexity makes passwords easier to remember and encouraging pass phrases makes passwords easier to remember and harder to crack. Users mostly do the same thing when they create a password with complexity, they add a number to the end, or a ! and the bad actors know this. https://auth0.com/blog/dont-pass-on-the-new-nist-password-guidelines/ What can you do to improve: Add federation to allow user of Google, Microsoft or Apple accounts to signin - one less password for a user to remember and these companies are very good at security. Enable passkeys - The next gen in internet security Add compromised password checking - use a service such as https://haveibeenpwned.com/API/v3#PwnedPasswords which will stop any compromised password being set and therefore drastically reducing the success of password spray attacks. Remove complexity to increase the available number of passwords and make them easier to remember. Side note, happy to sell you some consultancy on this1 point
-
My bad, just because URL have text n5095. New Intel CPU N100, N200 come out... and its product also release, they save more power but only single channel / slot memory and slightly less performance. You may also check MOREFINE M9, have two M2 by SATA (2242) and PCIe (2280).
 1 point
 -
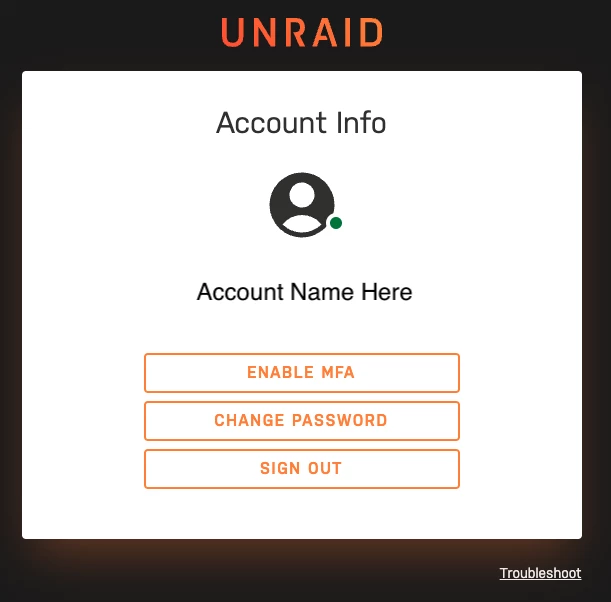
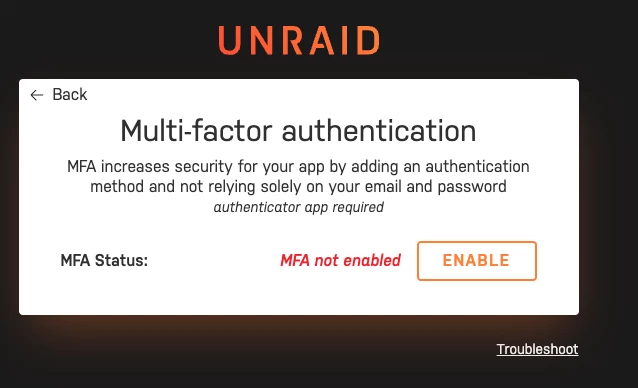
MFA Setup We highly recommend that you also set up Multi-Factor Authentication with this new identity provider. To enable MFA, click on your account name in the top right of the forums and click "Manage Unraid.net Account". The previous 2FA system you may have set up for the Unraid forums will no longer be used and will need to be reconfigured.
 1 point
 -
No - Thank you!1 point
-
I don't think that is the problem, though these controllers need some airflow around them, see how it goes with those disks using the SATA controller.1 point
-
Posted in the "feature requests" subforum to include these by default. I doubt it will get any traction though.1 point
-
Looking for a few testers with the following. 1.) Basic understanding of bash/shell (To install the files and change their permissions. chown, chmod etc...) 2.) That have mover tuning plug-in installed. (Preferrable have been using it for a while) (Required as the GUI update file is created based off this plug-in). 2b.) Have unRAID 6.11.3 or above installed. 3.) That can test moving files off cache shares to the array. 4.) That can test moving files TO cache pool FROM the array. 5.) Bonus - if you have multiple pools to test with.
 1 point
 -
There is currently an issue where if you have a momentary Internet problem the API will get disconnected but it won't realize it, so it doesn't try to reconnect on its own. There are two workarounds: First I would open a web terminal and run: unraid-api restart Wait 30 seconds, if you are still having issues then the second workaround is to sign out and sign back in. We should have this resolved in our next release. FYI - Remote Access is an optional feature and is not required for your server to show as online.1 point
-
I can do it but I don't wanna. I don't wanna write PHP.1 point
-
HI I am getting errors after installing the new version CA Backup: 25-12-2022 03:06 appData Backup Backup of appData complete - Errors occurred But how do i know what the error was ? I can see some error in log interface see here Line 39 to 46 show some issue but that path it says is not there is wrong its a shared backup path i have used for years for appdata You can see libvert no issue but appdata nothing from 11 Dec I removed the Flashdrive backup as i usethe UNraid.net plugin as suggested1 point
-
I've found a way to use the latest telegraf docker image while allowing installation of smartmontools and any other packages needed. This is using the "telegraf:alpine" image. This technique can probably be used with the "telegraf:latest" image but the package commands will be different. 1. Create your telegraf configuration file as /mnt/user/appdata/telegraf/telegraf.conf 2. Create the /mnt/user/appdata/telegraf/entrypoint.sh file: #!/bin/sh # Add packages apk update apk upgrade apk add smartmontools nvme-cli lm-sensors lm-sensors-detect perl curl ipmitool # Update smart database /usr/sbin/update-smart-drivedb --no-verify # Start telegraf telegraf --watch-config poll --config '/etc/telegraf/telegraf.conf' 3. Make the file executable: chmod 777 /mnt/user/appdata/telegraf/entrypoint.sh 4. Install atribe's official telegraf docker 5. Set Repository: telegraf:alpine 6. Set Extra Parameters: --user=root --entrypoint=/etc/telegraf/entrypoint.sh 7. Edit "Host Path 7" 7.a. Change "Container Path" to /etc/telegraf 7.b. change "Host Path" to /mnt/user/appdata/telegraf 7.c. change "Default Value" to /mnt/user/appdata/telegraf 7.d. Save the changes. 8. Click Apply to start the container.1 point
-
haveged is loaded through Unraid in "/etc/rc.d/rc.M": # Start the haveged entropy daemon: if [ -x /etc/rc.d/rc.haveged ]; then /etc/rc.d/rc.haveged start fi If I download a file haveged produces load: I stopped the service as follows: /etc/rc.d/rc.haveged stop Stopping haveged. I found no impact. The server runs as usual. So same question. Why is it needed? EDIT: Regarding this blog post haveged becomes active if the entropy of haveged is stronger than the one of /dev/random (linux default). So it adds a little bit more strength to the smb encryption while transfering the file. Conclusion: Produces load, I don't need it. Will be disabled by default through the Go File: # ------------------------------------------------- # disable haveged as we trust /dev/random # https://forums.unraid.net/topic/79616-haveged-daemon/?tab=comments#comment-903452 # ------------------------------------------------- /etc/rc.d/rc.haveged stop
 1 point
 -
CA GUI Links I must be bored. Rather than simply adding a bookmark to my browser, I created a plugin. Dirt simple (the necessary files required to make this a plugin are larger than the plugin itself) and simply turns the bottom of unRaid's footer from to instead be


 1 point
 -
Oh. Shit. So, in the Docker container, "/media" *IS* "/Media/TV Shows" on the server...?1 point


.thumb.png.20a8d1f02be118ce461d83dd5ddea553.png)