





Xardis
Members
-
Joined
-
They are clustered and the logs are showing them connecting, but we can't see the other servers when we go to the portal still. I've migrated the character saves from the world.db to account.db but that didn't help either.
-
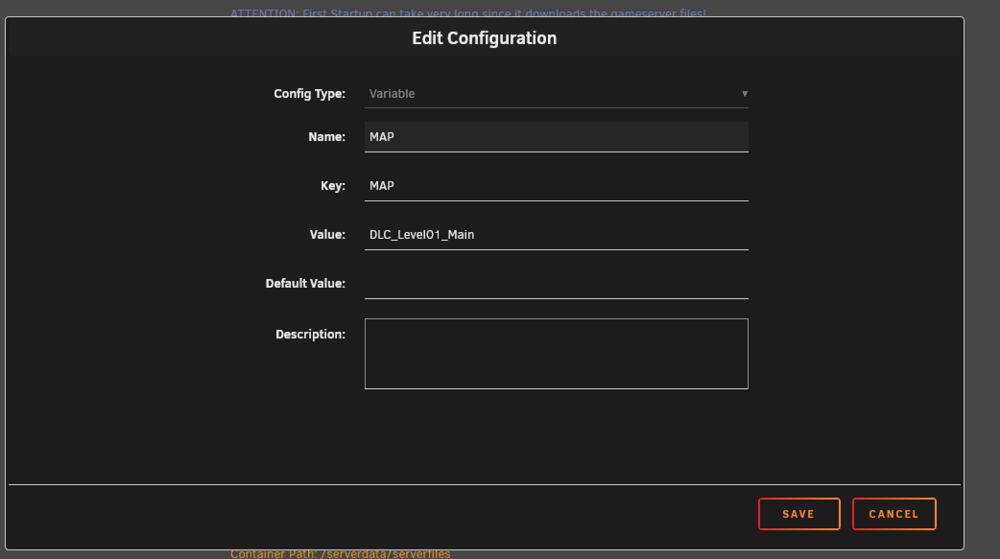
If you create a new variable can configure it for the new map there, it should work. Leave the Start Up Parameters without the map name. Here's a screenshot of what I did. Now, I still haven't been able to get characters to transfer between my clustered servers. We go to the portal on the island and don't see the other server in the cluster. The log files say they are connected, and I'm using the same ports (and even mapped the ports in the container config for the main server). I'll be interested in your experience once you get this to work.
-
Soulmask: has anyone gotten a clustered server config to work and let characters transfer between them? I can get both servers running, I can see in the logs that they are communicating, but when I take a character to the mysterious island portal, it doesn't show my clustered server in the list. I tried to add the MULTIHOME= variable for my IP thinking that might help, but that causes the container to start in a loop. Apparently this paramater is automatically included in the startup script, even though you don't see it in the GAME_PARAMS variable.
-
@ich777 I've been following the apps you create for the CA store for awhile and saw that you stopped making them. How much effort would it take or do you have a guide on how to build/create these apps so someone can continue your efforts? I have an IT background, but in infrastructure, less development. Anyways, just curious if this would be something you're interested in teaching someone that wants to learn -- even if you pointed to some guides on how to do it and would be ok if I asked questions. Appreciate your time!
-
Is there a parameter for creating backups of game files on a schedule, specifically Soulmask? Does it do it out of the box? I've looked over the github repo for Steamcmd but haven't seen anything. When I check the local appdata directory where the container files are store, I do not see anything.
-
I'm having the same issue. I've copied the files from Docker Star System to my Instance\<world>\Saves folder, but still not working. I have confirmed the INSTANCE_NAME and World names match as well. The instructions below are not very clear as to which folder to copy the Docker Star System files into though. Then continue: in the folder Saves you create a new folder with Docker Star System IMPORTANT: If you have changed the WorldName in the CFG before, enter the corresponding name. Then go into the folder and upload all the files that are stored in my GitHub account under Docker Star System." EDIT: Disregard - I made the post and tried something else. In the Saves folder, create another folder with the same name as your world and THEN copy the Docker Star System files. I think the wording of the instructions is a little funny that made me second guess myself that I needed to create another folder with the same name as my world name.
-
Yes, this is exactly the part I missed. I didn't pick the correct Config Type on this step. When I recreated with Port configured, it worked great! Thanks for your response - much appreciated!
-
I think I fixed this myself, root cause was user error. When I created the new port range, I didn't pick the right option in the drop-down menu - picked variable instead of port. Now the port redirection appears to be working properly.
-
I can concur - my server updated successfully on its own as well. Now if I could just get the second one running 😃
-
I have a question about this process. I'm trying to setup a second Valheim server. I installed a second copy of the Valheim container and set it up with different variables. I tried deleting the value from UDP - Game Port Range and added updated ports to the GAME_PORT section. However, when the container starts, it's not remapping any ports at all. It's still trying to use the default 2456 range. Next, I tried removing the UDP - Game Port Range section completely and added the ports in the GAME_PORT section. Now, no networking values are created. What is the proper way to add a second server with this container?
-
Edit - updating the repository worked like a charm! Thank you very much! Hey - thanks for the reply. I don't really know all of the different variables needed to help solve these issues yet - I'm very new to troubleshooting these contains. I'm using the repository - "influxdb:alpine". I'll review this post as well and try modifying my repository to this version as well. Everything is pointing to a permissions issue with logging in, but I know I've got the correct username/password combo configured.
-
Hi everyone -- new user here trying to perform initial setup. I've followed the guide and setup the telegraf.conf file per the documentation and the InfluxDB output settings. For some reason when I go to start up Telegraf, I get a 401 unauthorized error when telegraf attempts to create the telegraf db. I've tried to configure a token, but that variable isn't recognized. I tried setting up a username and password and updated those settings in the telegraf.conf file but no luck. output.influxdb config settings and error are below. outputs.influxdb config # Configuration for sending metrics to InfluxDB [[outputs.influxdb]] ## The full HTTP or UDP URL for your InfluxDB instance. ## ## Multiple URLs can be specified for a single cluster, only ONE of the ## urls will be written to each interval. # urls = ["unix:///var/run/influxdb.sock"] # urls = ["udp://127.0.0.1:8089"] urls = ["http://myprivateip:8086"] ## The target database for metrics; will be created as needed. ## For UDP url endpoint database needs to be configured on server side. # database = "telegraf" ## The value of this tag will be used to determine the database. If this ## tag is not set the 'database' option is used as the default. # database_tag = "" ## If true, the 'database_tag' will not be included in the written metric. # exclude_database_tag = false ## If true, no CREATE DATABASE queries will be sent. Set to true when using ## Telegraf with a user without permissions to create databases or when the ## database already exists. # skip_database_creation = false ## Name of existing retention policy to write to. Empty string writes to ## the default retention policy. Only takes effect when using HTTP. # retention_policy = "" ## The value of this tag will be used to determine the retention policy. If this ## tag is not set the 'retention_policy' option is used as the default. # retention_policy_tag = "" ## If true, the 'retention_policy_tag' will not be included in the written metric. # exclude_retention_policy_tag = false ## Write consistency (clusters only), can be: "any", "one", "quorum", "all". ## Only takes effect when using HTTP. # write_consistency = "any" ## Timeout for HTTP messages. # timeout = "5s" ## HTTP Basic Auth username = "telegraf" password = "mypassword" ## Token for authentication # token = "$INFLUX_TOKEN" ## HTTP User-Agent # user_agent = "telegraf" ## UDP payload size is the maximum packet size to send. # udp_payload = "512B" ## Optional TLS Config for use on HTTP connections. # tls_ca = "/etc/telegraf/ca.pem" # tls_cert = "/etc/telegraf/cert.pem" # tls_key = "/etc/telegraf/key.pem" ## Use TLS but skip chain & host verification # insecure_skip_verify = false ## HTTP Proxy override, if unset values the standard proxy environment ## variables are consulted to determine which proxy, if any, should be used. # http_proxy = "http://corporate.proxy:3128" ## Additional HTTP headers # http_headers = {"X-Special-Header" = "Special-Value"} ## HTTP Content-Encoding for write request body, can be set to "gzip" to ## compress body or "identity" to apply no encoding. # content_encoding = "gzip" ## When true, Telegraf will output unsigned integers as unsigned values, ## i.e.: "42u". You will need a version of InfluxDB supporting unsigned ## integer values. Enabling this option will result in field type errors if ## existing data has been written. # influx_uint_support = false Error from telegraf log 021-08-28T03:41:43Z W! [outputs.influxdb] When writing to [http://myprivateip:8086]: database "telegraf" creation failed: 401 Unauthorized 2021-08-28T03:41:53Z E! [outputs.influxdb] E! [outputs.influxdb] Failed to write metric (will be dropped: 401 Unauthorized):


