bcbgboy13
-
Posts
556 -
Joined
-
Last visited
-
Days Won
1
Content Type
Profiles
Forums
Downloads
Store
Gallery
Bug Reports
Documentation
Landing
Everything posted by bcbgboy13
-
I am not sure where are you located - but it is best to retire the old AMD platform and replace it with an Intel one (even if old). Check Ebay, your local Kijiji or Craigslist boards - there are a lot of people selling used server grade hardware where you could probably find an used Supermicro MB, XEON CPU(s) and 4-8GB ECC memory for $100 or so. Check it out to see if it is stable - run memtest for a day, even install some old windows and run some of the software for stress test and if stable then upgrade. This is the one thing that will speed up you parity test or rebuilds and even leave some horsepower for other stuff that you are not presently using but may consider doing in the future. Reason for that - the newer Unraids are using newer Linux kernels, which are using newer instruction sets (AVX2) which are not available in these older AMD CPUs - Semprons, Athlons x2, x4 or Phenoms. If you keep your present system even with a new CPU (raw CPU speed is better than more cores) you will have a very long parity checks, especially if you update to the dual parity. There is no way around that.... https://en.wikipedia.org/wiki/Advanced_Vector_Extensions I personally loved these old AMD CPUs for basic Unraid functionality. The AMD CPUs were always ECC capable and ECC and a UPS is a must for me. Some of the motherboard manufacturers at the time (Asus, Biostar, ) actually routed all 72 tracks to the RAM slots and kept (or did not disable) the ECC functionality in the BIOS - so by using the slightly more expensive unbuffered ECC memory one could end with an energy-efficient "server-grade" system at very low cost compared to the price of the Intel Xeon stuff. However I started out with a dual core 4850e (45W TDP), once I migrated to 6.6.6 I upgraded it to a 4-core 610e (still 45W TDP) but it was still not powerful enough. Doing a parity check I was afraid to use anything else, even preclearing a new HD on the side as it was maxed out. But for basic Unraid functionality they were OK. If you decide to stay with the current system and just change the CPU - raw CPU speed is better for the parity speed than the number of cores.
-
Your MB uses the earlier "F1" BIOS dated 11/25/2016 You should update to the latest one and try the controller again.
-
I am not sure if you can mix SATA and SAS drives on the same breakout cable. They use a different signaling scheme, which also allows for much longer cables for the SAS drives. I believe that if you mix them on the same cable this will force the controller to use the SATA signaling and this may not be liked by the SAS drives The cable you are using is already 1m long anyway which is the max for a SATA cable. It is better to use a shorter regular SATA cable attached to one of the MB ports for the SATA drive and keep the SAS drives separate.
-
You can have you wish here via user script from here:
-
6.6.6 Memory and CPU Spike - Can't Access Dockers
bcbgboy13 replied to shnax's topic in General Support
Most of your disks are also old and you are running them at very high temperature - above 50 and even 55 degC (and even higher in previous power cycles). Keep this in mind. -
(SOLVED) Crashing, or Freezing (Lock up) 6.6.7
bcbgboy13 replied to gravol's topic in General Support
Updating the BIOS should be your first resort. In fact every few weeks you should go to your board manufacturer site and check for new updates and pry to the computer gods that they keep releasing new updates.... Just RTFM first and then follow the procedures strictly - and make sure that if there is a jumper or switch to enable / disable the flashing you use it and then you disable it back, as the UEFI chip can be a desirable home for very nasty computer viruses/rootkits. -
Seagate has chosen to report some of the SMART attributes in a different way compared to the other HD manufacturers. In addition they report some attributes (with id# above 200) that no other manufacturer will report. So it is not direct apples to apples comparison and the RAW values that look crazy may and in your case are just normal. But if I was in your shoes I will also look at the max temperature a hard drive has run - it is usually way down in the SMART report. And in your case you have 5 HDs that were run at very high temperature at same time in the past - perhaps they shared 5in3 enclosure with a bad fan or a loose cable connection to the fan.... So here they are: sdq - 66 degC - ~69kh sdn - 65 - ~70.5kh sdc - 64 - ~59kh sdg - 59 - ~55.5kh sdk - 58 - ~50.5kh And when you replace a 2 or 3TB hard drive with 8TB one you will have spare 5-6 TB left - you can simply copy the content of 2 or 3 of these small aged drives, then zero them out and remove them from the array and you will end with more empty slots in your case (and perhaps save a tiny bit of electricity)
-
(SOLVED) UNRAID 6.6.6 crashes, can't seem to find the issue
bcbgboy13 replied to SomeRandomSod's topic in General Support
Another thing to keep in mind is quality of the power grid where you live. If you live in an area with dirty power you may experience a multiple power glitches - they could be very short in duration so you cannot observe them in any way, but may cause a memory corruption here and there - and since Unraid runs from the memory you will end up with unexpected problems as the time passes by. Adding a UPS (even a small one) usually will fix that! -
Can you try inserting the flash drive at one of the USB ports at the back panel - sometimes weird things do happen
-
I do not know if there is a Windows application to read the content of a XFS formatted drive, but you can simply download one of the many "live" Linux distros, bur it on a CD or USB drive, boot your windows computer from it, it will see the XFS partition and then you can copy the data to some place, even to your NTFS formatted disks if you have enough space there.... Your BIOS is 1.80, there is 1.90 which "improves the system performance"???? And regarding the high temperatures I am talking about your mechanical hard drives: For example - the 4TB Seagate (sdb) has the following: SCT Status Version: 3 SCT Version (vendor specific): 522 (0x020a) Device State: Active (0) Current Temperature: 24 Celsius Power Cycle Min/Max Temperature: 17/25 Celsius Lifetime Min/Max Temperature: 16/66 Celsius Seagate own specs calls for (just below in the SMART report) SCT Temperature History Version: 2 Temperature Sampling Period: 3 minutes Temperature Logging Interval: 59 minutes Min/Max recommended Temperature: 14/55 Celsius Min/Max Temperature Limit: 10/60 Celsius Temperature History Size (Index): 128 (50) The same with the other Seagate and three of the Toshibas (which BTW have 55 degC recommended/max temperature) For example the "new" disk Toshiba (sde - from your latest log) has Current Temperature: 28 Celsius Power Cycle Min/Max Temperature: 15/29 Celsius Lifetime Min/Max Temperature: 13/65 Celsius Under/Over Temperature Limit Count: 0/2348 Toshiba sampling/logging is 1 min and you have 2348 counts of over-temperature - this is at least 39 hours+ running at very high temperature in the past. Perhaps you had a bad fan or a disconnected cable for the fan....
-
2 things from me 1. There is a new BIOS (and a new BMC), released in 2018. 2. Some of your HDs have been subject to e very high temperatures in the past (above 60 degC and up to 66 degC ) - sdh, sdg, sde, sdb, sdc I am not sure when and how it happened ...
-
SOLVED: Big mess after ReiserFS to XFS conversion
bcbgboy13 replied to bcbgboy13's topic in General Support
OK then it is SOLVED. For a day I was young again remembering the glory days of manipulating manually the MBR, partitions, wiping the nasty viruses hiding in these unused 32kB... -
Perhaps you have "gremlins" in your hard disk which are manifesting now as we move to a newer kernels.... especially since you have this in your SMART report: ==> WARNING: A firmware update for this drive is available, see the following Seagate web pages: http://knowledge.seagate.com/articles/en_US/FAQ/207931en http://knowledge.seagate.com/articles/en_US/FAQ/223651en Plus this one: APM level is: 128 (minimum power consumption without standby) I still have a similar disk (mine is 3TB) with a very odd behavior - you can preclear that damn thing as many time as you wish and it will pass with nothing wrong in the SMART report but once added to the array and server reboots it gets kicked out as disabled. And I tried it recently with 6.6.6. - still the same!!! Here are the specs from Seagate: https://www.seagate.com/files/www-content/product-content/barracuda-fam/desktop-hdd/barracuda-7200-14/en-us/docs/100686584y.pdf
-
SOLVED: Big mess after ReiserFS to XFS conversion
bcbgboy13 replied to bcbgboy13's topic in General Support
Success!!!! After executing the command above with the proper disks "names": login as: root root@unraid's password: Linux 4.18.20-unRAID. root@unraid:~# dd if=/dev/zero of=/dev/sdi bs=1024 count=1 1+0 records in 1+0 records out 1024 bytes (1.0 kB, 1.0 KiB) copied, 0.000354388 s, 2.9 MB/s root@unraid:~# dd if=/dev/zero of=/dev/sdf bs=1024 count=1 1+0 records in 1+0 records out 1024 bytes (1.0 kB, 1.0 KiB) copied, 0.000304993 s, 3.4 MB/s root@unraid:~# dd if=/dev/zero of=/dev/sdc bs=1024 count=1 1+0 records in 1+0 records out 1024 bytes (1.0 kB, 1.0 KiB) copied, 0.000367164 s, 2.8 MB/s root@unraid:~# dd if=/dev/sdh of=/dev/sdi bs=512 count=1 1+0 records in 1+0 records out 512 bytes copied, 0.000388192 s, 1.3 MB/s root@unraid:~# dd if=/dev/sdh of=/dev/sdf bs=512 count=1 1+0 records in 1+0 records out 512 bytes copied, 0.000109879 s, 4.7 MB/s root@unraid:~# dd if=/dev/sdh of=/dev/sdc bs=512 count=1 1+0 records in 1+0 records out 512 bytes copied, 0.000107168 s, 4.8 MB/s root@unraid:~# this one was added at the very end of the syslog: Mar 12 10:06:13 unraid kernel: sdi: sdi1 Mar 12 10:07:50 unraid kernel: sdf: sdf1 Mar 12 10:08:43 unraid kernel: sdc: sdc1 After rebooting the server everything seems to be OK. The three disks are mounted with "MBR: 4K-aligned" and parity is valid!!!!! I will do a parity check just to be sure and will mark this "solved" in a day or two - waiting for someone to tell me that it is not a good idea to have four disks with identical volume identifiers... -
SOLVED: Big mess after ReiserFS to XFS conversion
bcbgboy13 replied to bcbgboy13's topic in General Support
Hmm, I was thinking more of using these: 1. Zeroing the first two sectors of the 3 unmountable drives: dd if=/dev/zero of=/dev/sdX bs=1024 count=1 2. Copying the first sector (MBR - the partition info) from the good 2 TB hard drive into the first sector of the other 3 drives: dd if=/dev/sdX of=/dev/sdY bs=512 count=1 , where the sdX is the source with good MBR 3. Reboot This should set me with 4 hard drives having the same volume ID (in the Microsoft sense - 4 bytes starting at location 0x1B8), but I am not sure if Linux (Unraid) uses it. If not advisable, then I will have to manually remove the drive, attach it to my Windows computer and manually change one bit of this volume IDs - which will result in three parity errors, but I can live with that - unless there is some HEX utility editor that I can use with Unraid to manually modify a bit I just need need some Linux guru to confirm that the the commands above are good -
No Device when switching to larger drives
bcbgboy13 replied to ruthlessone's topic in General Support
Since you have a hot-swappable bays their back-planes may be old and not compatible with the latest hard drives. Search the web for SATA 3.3V pin or 3.3V hard drive mod to see if this applies to you Good luck -
Something unexpected that you have to be prepared for but IMHO the modern external hard drives (at least the cheap ones) are not designed well in regard to thermal dissipation. They were horrible when they used USB2 interface. These days they are using USB3 interface which is much faster and perhaps adequate if you are going to dump a DVD or a BR disk, but if you are going to fill them at once and run the backup for 5-10 or even more hours I suspect you will overheat the drive inside. And after that I do not know how good your backup will be and how long this HD will last??? If you want to have a long lasting external hard drive I suggest a little bit DIY (but you will discard the potential warranty) Buy a new external HD and shuck it out (lots of guides on YT). Take the internal hard drive, attach it to the Unraid server and preclear it once or twice to be sure that the drive is good. Make sure to have some cooling if the drive is outside the case, so it does not run above 40-45 degC!!! Take a drill and drill multiple 5-10 mm holes in the plastic enclosure. Use a sandpaper on the inside, then wash the shells and let them dry. Buy a quiet 120 or even 140 mm fan (this one may be a bit larger than the enclosure itself but who cares if it will protrude 5-10 mm on the side or at the top...) Glue the fan to one side of the shell, then cut the wires and solder then carefully to the power jack on the small PCB (yellow cable is the 12V, the black one is the ground). Assemble everything back, using the already precleared drive and you will end up with a mean back-up drive that can handle everything and for as long as it is powered. If you use it only for occasional backup - it is good to have it powered every few months and do some reading/writing in order to move the heads and to lubricate the internals...!!! PS. I suggest you start with Seagate enclosure, as they are drive insensitive and will work with every hard drive there is it. The WD ones will work only with WD drives unless you do some other mods (cutting two pins from a small EEPROM chip) Good Luck
-
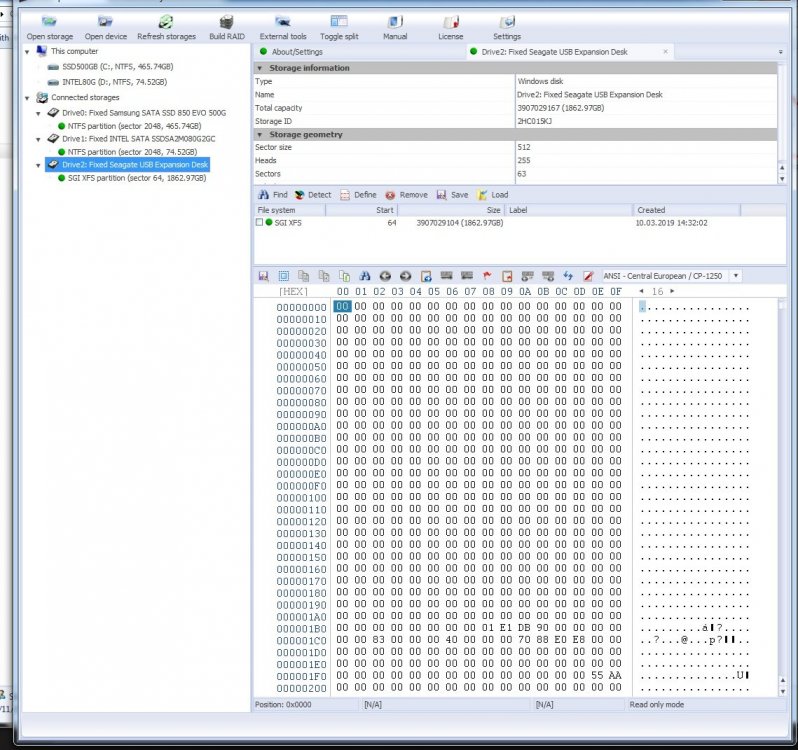
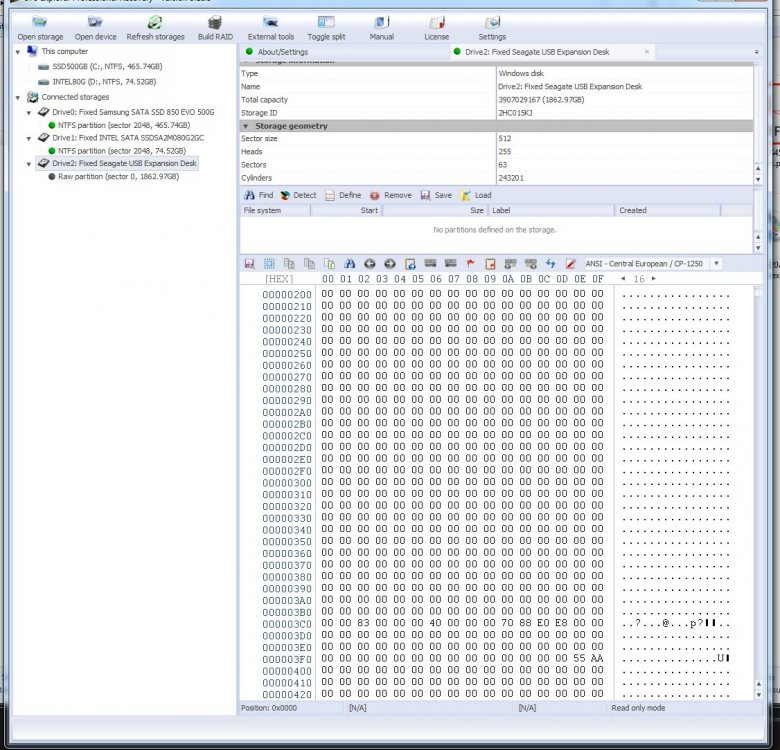
I decided to take the long path to convert all my drives from ReiserFS to XFS after reading multiple posts here and since I upgraded to 6.6.6 (but personally never experiencing any problem with the old file system) Everything ran fine or so I thought until the last weekend - I converted the drives one after another, then ran the system for a few days... We had strong winds here and I decided the shut the server overnight in a case we may have a power outage. I have a UPS but the dog really hates the alarm of it running on battery power!!! Upon powering up I was presented with the messages that 3 of my disks are "Unmountable: no file system" and the following message in the syslog Mar 11 08:22:26 unraid emhttpd: shcmd (209): mkdir -p /mnt/disk9 Mar 11 08:22:26 unraid emhttpd: shcmd (210): mount -t xfs -o noatime,nodiratime /dev/md9 /mnt/disk9 Mar 11 08:22:26 unraid kernel: XFS (md9): Invalid superblock magic number Mar 11 08:22:26 unraid root: mount: /mnt/disk9: wrong fs type, bad option, bad superblock on /dev/md9, missing codepage or helper program, or other error. Upon close inspection of the disks in question to see if they share a common breakout cable/power cable or for anything in common I see that all three were the very old WD green EARS models with jumper on pin1-2 (or7-8), but still running fine. I have another of these disks which was installed with no jumper a long time ago and this disk is running fine without problems after the conversion... I do remember here that during the conversion I did not like the option of having disks with "MBR:unaligned" options and I ended up overwriting the first sector of the drive with zeroes using the preclear tool, but I assumed that the formatting afterwards will recreate the MBR in its proper place in the first sector (the disks are less than 2.2GB to use the GPT) I stopped the array and then restarted in "maintenance mode" and tried to scan (-n) or repair (-v) the disk from the console but without success - after running for a few hours (and apr. 3,800,000 "reads") it exits with a message no secondary magic block found. After another shut-down I removed the jumpers and tried another "xfs_repair" while running in maintenance mode - this time it can find the magic block and repairs the disk very fast (under 15 seconds total running time). However when I start the array I am still presented with with "Unmountable disks" but this time the message is different: "Unmountable: unsupported partition layout" with the following in the syslog: Mar 11 08:22:26 unraid emhttpd: shcmd (206): mkdir -p /mnt/disk8 Mar 11 08:22:26 unraid emhttpd: /mnt/disk8 mount error: Unsupported partition layout Mar 11 08:22:26 unraid emhttpd: shcmd (207): umount /mnt/disk8 Mar 11 08:22:26 unraid root: umount: /mnt/disk8: not mounted. I powered down the server and removed one of the problems drive and the good drive to inspect their content - specifically the first 64 sectors. For my surprise it turned out that the MBR is in the second sector and not in the first one where it is supposed to be, The XFS partition in both cases starts at offset 64 sectors (hex address 8000) So I guess I will need some Linux gurus to help me with a command to copy the drive second sector (512 bytes) over the first sector and then zero the second sector, so I do not end with garbage polluting the first 64 sectors. This will be done in array running in maintenance mode to preserve the parity - surprisingly it still shows as a valid. Thank you After more reading on the MBR structure I realized I will need to copy the first sector from a good 2TB hard drive over the first sector on the three problematic hard drives. The zeroing of their second sector will be only the gravy. Attached is a picture of the good HD first sector and one of the bad ones second sectors - partition size is hex E8E08870 , corresponding to decimal 3,907,029,104 sectors of 512bytes each and starts at hex sector 00000040
-
Possible problems with "clear_array_drive" script and xfs formatted disks resulting in extremely low speed I initially ran the script on one "reiserFS" formatted disk and it worked beautifully. Then I decided to change my disks from "reiserFS to xfs using the "mirror" strategy and ended with one unused drive (the smallest one). By default my disks are set to use xfs and when I formatted it in the last step it did use the xfs. I saw that the disk was set as "MBR unaligned" and I zeroed the first 512 bytes. After another formatting it was all OK and I proceed to zero the disk using the script above. It started with over 200MB/s but quickly dropped to 1.2MB/s and later to 600-700kB/s. In a few hours it was zeroed only 1.5GB but it resulted in tens of millions of "writes" on the main page. Nothing wrong in the log file... I tried to kill the "dd" PID, then used Ctrl-C but was not successful and had to stop the array. It took maybe 10-20-30 minutes but finally it stopped and I could power down the server. I inspected the cables and the powered-up the server , formatted the disk again and then let it run overnight. In the morning it was barely zeroed 15GB, speed was around 500kB/s and again tens of millions of "writes " om the main page. Repeated the stopping/shut-down procedure again but this time after the power-up I formatted it with the older "reiserFS" and then gave it another go with the script. BINGO - it works as it should - in the 2 and half hours it did zeroed 700GB+ and the "writes" are around 1.65 million I believe someone should investigate it further reiserFS formatted disks - works fine xfs formatted disks - read elsewhere that the array should be in "maintenance mode" (not tested by me) btrfs formatted disks - no idea!!! Just for the kick I decided to format the drive with btrfs and surprisingly the script refused to run claiming that there is not a single empty hard drive !!! ============================================================================================== To summarize my tests for the "clear_array_drive" script: unRAID v 6.6.6 1TB WD green disk with no SMART problems. reiserFS format - 33.6MB used space - script runs as intended btrfs format - 17.2MB used space - script refused to run claiming no empty hard drive found xfs format - 1.03GB used space - script runs painfully slow with tens of millions of "writes" to the disk. The test was cancelled by me as the estimated time could be weeks or even month!!! Another post here claims OK but with array running in "maintenance mode" (this I did not test) =============================================================================================
-
Thank you for the quick reply. The data on the emulated disk 2 appears to be OK. I also found that when in "maintenance mode" you have the option to "Check Filesystem Status" I did this one and it finished surprisingly fast with following results: reiserfsck 3.6.27 Will read-only check consistency of the filesystem on /dev/md2 Will put log info to 'stdout' ########### reiserfsck --check started at Tue Feb 5 14:17:04 2019 ########### Replaying journal: Replaying journal: Done. Reiserfs journal '/dev/md2' in blocks [18..8211]: 0 transactions replayed Checking internal tree.. finished Comparing bitmaps..finished Checking Semantic tree: finished No corruptions found There are on the filesystem: Leaves 222023 Internal nodes 1554 Directories 640 Other files 5869 Data block pointers 223547164 (0 of them are zero) Safe links 0 ########### reiserfsck finished at Tue Feb 5 14:22:26 2019 ########### To me it looks like OK Now the question is how to do the next step - rebuilding into the same disk. My last parity check was done 57 days ago
-
I had to move physically my server this past weekend to do some small general repairs in the area were the server was located. The server was shut down properly, the cables disconnected and then the case moved carefully just a few mettres Upon powering up this morning I got the dreaded "disabled disk" #2. I powered down the server, opened the case and inspected the cables. Once powered up the array still shows the same disabled disk. The disk is question is connected to an LSI controller via break-out cable. The other three disks on this cable are fine. I ran the SMART short self-test - it was completed without problems : #Attribute NameFlagValueWorstThresholdTypeUpdatedFailedRaw Value 1Raw read error rate0x002f200200051Pre-failAlwaysNever0 3Spin up time0x0027160147021Pre-failAlwaysNever8975 4Start stop count0x0032099099000Old ageAlwaysNever1572 5Reallocated sector count0x0033200200140Pre-failAlwaysNever0 7Seek error rate0x002e100253000Old ageAlwaysNever0 9Power on hours0x0032085085000Old ageAlwaysNever11145 (1y, 3m, 7d, 9h) 10Spin retry count0x0032100100000Old ageAlwaysNever0 11Calibration retry count0x0032100100000Old ageAlwaysNever0 12Power cycle count0x0032100100000Old ageAlwaysNever685 192Power-off retract count0x0032200200000Old ageAlwaysNever446 193Load cycle count0x0032180180000Old ageAlwaysNever62780 194Temperature celsius0x0022118109000Old ageAlwaysNever34 196Reallocated event count0x0032200200000Old ageAlwaysNever0 197Current pending sector0x0032200200000Old ageAlwaysNever0 198Offline uncorrectable0x0030200200000Old ageOfflineNever0 199UDMA CRC error count0x0032200200000Old ageAlwaysNever0 200Multi zone error rate0x0008200200000Old ageOfflineNever0 What to do now and what are my options - the disk in questions is an old 2TB and I would like to avoid to purchase such small disk these days
-
Dell H700 for JBOD or a replacement suggestion
bcbgboy13 replied to Drabert's topic in Storage Devices and Controllers
H700 is a tough one. H200 is a better choice as it is SAS2008 based and can be cross-flashed to IT firmware. Or if your HDs are 2TB or smaller you can get the SAS 6i/R (not PERC) and cross-flash with the 1068e IT firmware -
Your motherboard BIOS is 4 revisions old: You use BIOS V1.7 01/13/2009 with the latest available being 1.B dated 2010-06-21 The two m1015 are with very old firmware (P10) with P15 available now: mpt2sas0: LSISAS2008: FWVersion(10.00.02.00).
-
Anyone running one, two or even three LSI controllers. Is this working for you?
-
The motherboard has newer BIOS available (from 2012.11.01). Try with this one.