





rpertusio
Members
-
Joined
-
Last visited
-
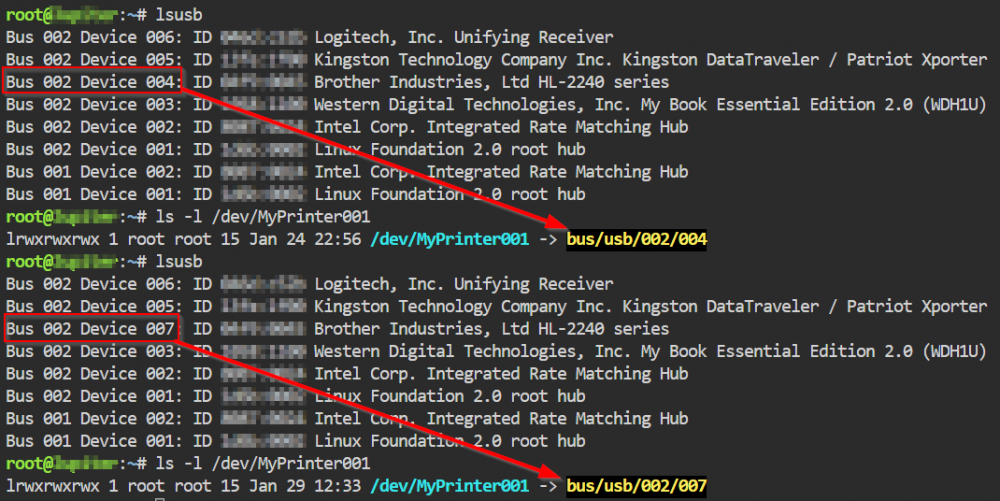
Can you confirm you followed all the steps? I powered OFF and ON my printer. The device number changed. And it picked up within seconds:
-
Please check 2 posts above and you'll see my post on how to make it work. See if my instructions work for you! Happy to take feedback, too.
-
Rick_Sanchez, cups Docker container -> Edit -> Change from 'Basic View' to 'Advanced View' (upper right toggle) Under "Extra Parameters" append this to the end: --device=$(readlink -f /dev/printer1) Make sure "Printer:" field is /dev/printer1 ========== Long Version (SymLink and docker config) ============ Pre-Req: * Install cups docker app * Plug your USB printer in In Unraid Terminal window: Run lsusb to find your USB printer: lsusb Find your device from the output. Example: Bus 002 Device 008: ID 04f9:0045 Brother Industries, Ltd HL-2240 series Remember the Bus(002), Device(008), and vendor/product ID(04f9:0045) for later: Run udevadm to find the serial number of your printer (replacing /002/008 with the Bus/Device number you collected above): udevadm info -a -n /dev/bus/usb/002/008 | grep '{serial}' | head -n1 Example: ATTR{serial}=="ABC123456" Create a file with the nano editor. (Rules are run in order. 99 would be run 'last', which is why the 99 is in the filename) nano /etc/udev/rules.d/99-usb-rules.rules In the editor, add the following lines. (First 2 lines are just comments, optional.) Replace the Vendor, Product, and Serial#. Use any name helpful to you for the Symlink. The result would be /dev/myprinter001 if you use my example: # This file maps a Brother Printer (Vendor:Product / Serial) to /dev/myprinter001 # Brother Printer / 04f9:0045 Brother Industries, Ltd HL-2240 series / Serial ABC123456 SUBSYSTEM=="usb", ATTRS{idVendor}=="04f9", ATTRS{idProduct}=="0045", ATTRS{serial}=="ABC123456", SYMLINK+="myprinter001" Close & save the file: [Ctrl+X] -> [y]es -> [enter] The file above gets wiped on boot, so we need to copy it every boot. Create a /boot/config/rules.d folder and copy the Rules file you made mkdir /boot/config/rules.d/ cp /etc/udev/rules.d/99-usb-rules.rules /boot/config/rules.d/99-usb-rules.rules Now, edit the /boot/config/go script, which: * Copies the rules file back out to /etc/udev/rules.d/ * Changes permissions (likely not necessary, but for completeness it's here) * Reload the rules & reset the USB subsystem (often because the rules sometimes don't load in time, so we have to trigger again) nano /boot/config/go And the file contents should be: # This sets the USB friendly name mapping rule to apply each boot cp /boot/config/rules.d/99-usb-rules.rules /etc/udev/rules.d/99-usb-rules.rules chmod 644 /etc/udev/rules.d/99-usb-rules.rules udevadm control --reload-rules udevadm trigger --attr-match=subsystem=usb Close & save the file: [Ctrl+X] -> [y]es -> [enter] Reboot the unraid system shutdown -r now On bootup, open a Terminal and check if your device is present: ls -l /dev/myprinter001 To get the cups Docker container working: cups container -> Edit -> Change from 'Basic View' to 'Advanced View' (upper right toggle) Under "Extra Parameters" append this to the end: --device=$(readlink -f /dev/myprinter001) Make sure "Printer:" field is /dev/myprinter001 (Re)Start the cups Docker container Within cups WebGUI, add the printer


