





irishjd
Members
-
Joined
-
Last visited
Everything posted by irishjd
-
So I tried this as my config is like this; however, every time I reboot, the config reverts.
-
Thanks for soing all that legwork! I will definitely look at it tomorrow.
-
When I get back in town, I’ll dig deeper into this.
-
I wrote an ugly script and scheduled it. It archives the existing log to a share I created, deletes the existing log, creates a new empty log and then restarts the snmpd service. If interested, I could post it hear?
-
Hello All, I am working on a user script, and I need to be able to restart a service (snmpd) from within the script. I have tried the usual commands "service" and "systemctl", but neither work in Unraid. Thanks, Jon
-
Its already back up to 25gb. Here are some of the entries: Received SNMP packet(s) from UDP: [172.17.0.2]:60467->[192.168.100.69]:161 Connection from UDP: [172.17.0.2]:60467->[192.168.100.69]:161 Connection from UDP: [172.17.0.2]:60467->[192.168.100.69]:161 Connection from UDP: [172.17.0.2]:60467->[192.168.100.69]:161 Connection from UDP: [172.17.0.2]:60467->[192.168.100.69]:161 Connection from UDP: [172.17.0.2]:60467->[192.168.100.69]:161
-
For me, it was full of actual snmp messages. I already deleted it. When it starts filling up again, I’ll put a snippet here.
-
Has anyone seen the issue where the /var/log/snmpd.log fills up the root volume? I can always delete it and restart the service. It would be nice if some logic was added to the plugging where this was done automatically when the volume capacity is less than 20%.
-
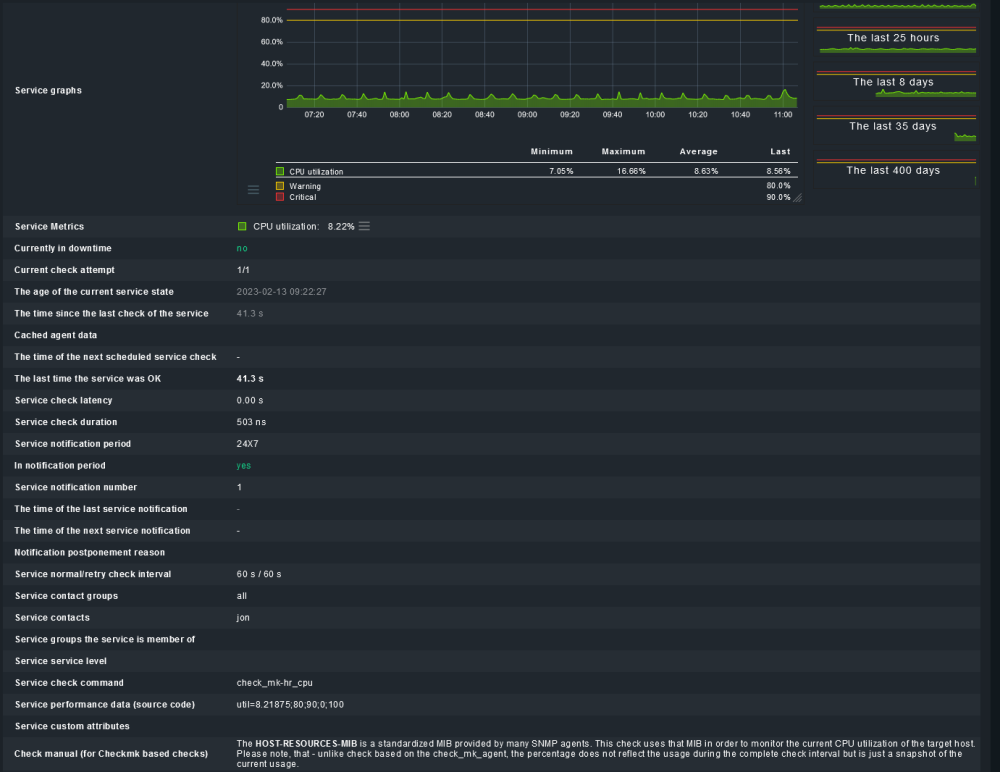
Updated the plugin with no issues. I've attached a couple of screen shots from checkmk that reference CPU info.

-
So this is an old Dell PowerEdge R820. That is why there are so many cores 😜
-
NP root@Unraid-1:~# lscpu Architecture: x86_64 CPU op-mode(s): 32-bit, 64-bit Address sizes: 46 bits physical, 48 bits virtual Byte Order: Little Endian CPU(s): 64 On-line CPU(s) list: 0-63 Vendor ID: GenuineIntel BIOS Vendor ID: Intel Model name: Intel(R) Xeon(R) CPU E5-4650 0 @ 2.70GHz BIOS Model name: Intel(R) Xeon(R) CPU E5-4650 0 @ 2.70GHz CPU @ 2.7GHz BIOS CPU family: 179 CPU family: 6 Model: 45 Thread(s) per core: 2 Core(s) per socket: 8 Socket(s): 4 Stepping: 7 CPU(s) scaling MHz: 36% CPU max MHz: 3300.0000 CPU min MHz: 1200.0000 BogoMIPS: 5399.67 Flags: fpu vme de pse tsc msr pae mce cx8 apic sep mtrr pge mca cmov pat pse36 clflush dts acpi mmx fxsr sse sse2 ss ht tm pbe syscall nx pdpe1gb rdtscp lm constant_tsc arch_perfmon pebs bts rep_good nopl xtopology nonstop_tsc cpuid aperfmperf pni pclmulqdq dtes64 monitor ds_cpl vmx smx est tm2 ssse3 cx16 xtpr pdcm pcid dca sse4_1 sse4_2 x2apic popcnt tsc_deadline_timer ae s xsave avx lahf_lm pti ssbd ibrs ibpb stibp tpr_shadow vnmi flexpriority ept vpid xsaveopt dtherm ida arat pln pts md_clear flush_l1d Virtualization features: Virtualization: VT-x Caches (sum of all): L1d: 1 MiB (32 instances) L1i: 1 MiB (32 instances) L2: 8 MiB (32 instances) L3: 80 MiB (4 instances) NUMA: NUMA node(s): 4 NUMA node0 CPU(s): 0,4,8,12,16,20,24,28,32,36,40,44,48,52,56,60 NUMA node1 CPU(s): 1,5,9,13,17,21,25,29,33,37,41,45,49,53,57,61 NUMA node2 CPU(s): 2,6,10,14,18,22,26,30,34,38,42,46,50,54,58,62 NUMA node3 CPU(s): 3,7,11,15,19,23,27,31,35,39,43,47,51,55,59,63 Vulnerabilities: Itlb multihit: KVM: Mitigation: Split huge pages L1tf: Mitigation; PTE Inversion; VMX conditional cache flushes, SMT vulnerable Mds: Mitigation; Clear CPU buffers; SMT vulnerable Meltdown: Mitigation; PTI Mmio stale data: Unknown: No mitigations Retbleed: Not affected Spec store bypass: Mitigation; Speculative Store Bypass disabled via prctl Spectre v1: Mitigation; usercopy/swapgs barriers and __user pointer sanitization Spectre v2: Mitigation; Retpolines, IBPB conditional, IBRS_FW, STIBP conditional, RSB filling, PBRSB-eIB RS Not affected Srbds: Not affected Tsx async abort: Not affected
-
@MVLPI am by no means an expert with SNMP, but my first guess would be MIB that you are using. If memory serves, for multi-core processors, there is a MIB for the overall processor and sub-mibs for their cores. Again, I am just guessing here.
-
@kubed_zero I just looked at the install script and wanted to thank you for taking the time to document so well! It refreshing to see well document code!
-
@kubed_zeroThanks for the update!
-
@iballHave you tried unistalling the plugin and then going to /boot/config/plugins on you unraid system and deleting everything that starts with "snmp"? I am showing a snmp.plg and a snmp directory. Unraid will use this info when reinstalling the plugin and it has caused me issues. After deleting that, try reinstalling agin, it worked for me. @kubed_zeroare there any plans to allow the snmp community to be changed from "public"? I would really like to see SNMPv3 support as well. Lastly, I hop[e this plugin is "read-only"?
-
I just ran "Fix Common Problems", and it states that I have a "Machine Check Events detected on your server". I did some research on what this is, and it was suggested that I create a new topic and include a diagnostics dump. Thus, here is the new topic and I have attached a current diagnostics dump. unraid-1-diagnostics-20230210-0909.zip
-
Hello, I had already manually installed the checkmk docker, before I install the docker.patch plugin. Now, Unraid continuously tells me that there is an update available for it. When I try to update it, I get this error: "Configuration not found. Was this container created using this plugin?". Is there any way to go back and create a configuration file for the plugin so I can upgrade it via Unraid?
-
All, the answer to my question is found in thread #48983
-
To do a 180, how would I shrink the size of the docker image file?
-
Me again... so, even though the warning is being displayed in the graylog log file, this is actually a elasticsearch issue. I believe I know how to fix it kind of. To get rid of this warning, I need to add a couple of lines to the elasticsearch.yml configuration file. The problem is, this file is not located in persistent storage (i.e. /appdata/), as it is located at: /usr/share/elasticsearch/config/elasticsearch.yml. Can anyone tell me how I can make persistent changes to this file? Specifically, I need to add these two lines: xpack.security.enabled: true discovery.type: single-node
-
Has anyone had any luck upgrading Elasticsearch using this template? I was able to get it updated to v7.17.8 by simply changing the Repository: field to: elasticsearch:7.17.8. Although this successfully updated the image, I am now being inundated with warnings in the logs. Specifically: 2022-12-29 08:17:33,366 WARN : org.graylog.shaded.elasticsearch7.org.elasticsearch.client.RestClient - request [GET http://192.168.100.69:9200/_cluster/health?master_timeout=60s&level=cluster&timeout=60s&local=true] returned 1 warnings: [299 Elasticsearch-7.17.8-120eabe1c8a0cb2ae87cffc109a5b65d213e9df1 "Elasticsearch built-in security features are not enabled. Without authentication, your cluster could be accessible to anyone. See https://www.elastic.co/guide/en/elasticsearch/reference/7.17/security-minimal-setup.html to enable security."] I am new to Docker, so I am not exactly sure how to correct this, but if I figure it out, I will post it back here.
-
I'm giving checkmk a look...
-
Have you had any luck getting WMI working with Observium?
-
@maybertsUnfortunatly, I did not. I gave up on LibreNMS and I am looking for something else.
-
@Mattaton instead of me trying and failing to provide you with decent instructions Take a look at this video: This is what I used to setup up my SearXNG https environment. If you happen to use CloudFlare as well, take a look at this too: This makes it super simple to enable https on any self-hosted app/site.





