


-
Reserved
-
Reserved
-
Flowise is an open-source generative AI development platform for building AI Agents and LLM workflows. Overview: Support for Docker image Flowise & Flowise-worker unraid templates made by ZippoX Application: All Hands/OpenHands - https://flowiseai.com/ Docker Hub: https://hub.docker.com/r/flowiseai/flowise / https://hub.docker.com/r/flowiseai/flowise-worker GitHub: https://github.com/FlowiseAI/Flowise Documentation: https://docs.flowiseai.com/ Important Info: you will find empty fields that will not be required to be filled unless you are going to use Postgres and Redis, otherwise feel free to ignore the fields. If you are not going to use Postgres as your DB then ignore any variable that starts with Postgres | If you are not going to use my Flowise-worker template and Redis, then ignore any variable that starts with Redis | For more Environmental Variables: https://github.com/FlowiseAI/Flowise/blob/main/docker/.env.example Want to use Postgres instead of SQLite? By default, the template should work as is, running on SQLite If you are planning to use Postgres (I am using Postgres version 12.5-alphine by Flight777): Change the database_type to postgres and configure the following variables. DATABASE_TYPE=postgres DATABASE_HOST= your Postgres IP / container name if you are planning to use the same Docker network for both containers DATABASE_PORT=5432 by default DATABASE_USER= your Postgres username DATABASE_PASSWORD= your Postgres password DATABASE_NAME= your wiseflow db name ( the container should create one with that name if it does not exist) DATABASE_SSL=false by default Additional Setup Step: Enable UUID Extension After launching Flowise with Postgres for the first time (which creates the database), you might need to enable the uuid-ossp extension: Access your Postgres Docker console Run the following command, replacing your_postgres_username and your_flowise_db_name With your actual values: psql -U your_postgres_username -d your_flowise_db_name -c "CREATE EXTENSION IF NOT EXISTS \"uuid-ossp\";" Restart Flowise The database must exist before running this command, so make sure you've launched Flowise with Postgres environment variables configured at least once before performing this step. Want to use Flowise-Worker with your FlowiseAI container? By default, Flowise runs in a NodeJS main thread. However, with a large number of predictions, this does not scale well. Therefore, there are 2 modes you can configure: main (default) and queue. Default mode: main (this mode will not require redis or worker and will do all predictions in the main FlowiseAI Container as a standalone) To use the second mode quque You must deploy a second container called Flowise-worker ( I have one deployed in CA, soon to be added) to use a flowise-worker ( you can run multiple) You need: Redis Container (I am running the Bitnami Redis version by A75G) Change the mode to queue in main FlowiseAI Container Configure the following env variable for both the main FlowiseAI template and the Flowise-worker template. They must match for it to work. MODE=queue QUEUE_NAME=flowise-queue REDIS_HOST=REDIS HOST REDIS_PORT=REDIS PORT (default port is 6379) REDIS_PASSWORD=YOUR REDIS PASSWORD REDIS_TLS=false Once all that is done, go ahead and deploy your flowise-worker container, and it should work with your main flowise container, given you have set up Redis and the main container correctly. For any issues with this template, please let me know below and I'll do my best to help you out!

-
ZippoX changed their profile photo
-
Reserved
-
Reserved
-
🙌 OpenHands (formerly OpenDevin), a platform for software development agents powered by AI. OpenHands agents can do anything a human developer can: modify code, run commands, browse the web, call APIs, and yes—even copy code snippets from StackOverflow. Overview: Support for Docker image OpenHands Application: All Hands/OpenHands - https://www.all-hands.dev/ Docker Hub: N/A They use their own registry | https://docker.all-hands.dev/all-hands-ai/openhands:0.47 GitHub: https://github.com/All-Hands-AI/OpenHands Documentation: https://docs.all-hands.dev/ Warning On a public network? See our Hardened Docker Installation Guide to secure your deployment by restricting network binding and implementing additional security measures. (I wouldn't expose it to the web) By default, OpenHands binds to all network interfaces (0.0.0.0), which can expose your instance to all networks the host is connected to. I would also suggest isolating it by using Docker network, which is built in Docker. Create an isolated network by going to Unraid Terminal and typing the following: docker network create [network-name] Example: docker network create openhands Once the network is created, you can select that network in the drop-down network type selection when configuring the template. For any issues with this template, please let me know below and I'll do my best to help you out! This is my very first Template going public and will hopefully publish more in time. I'll do my best to publish any docker images that I needed on my Unraid but couldn't find in the CA.
-
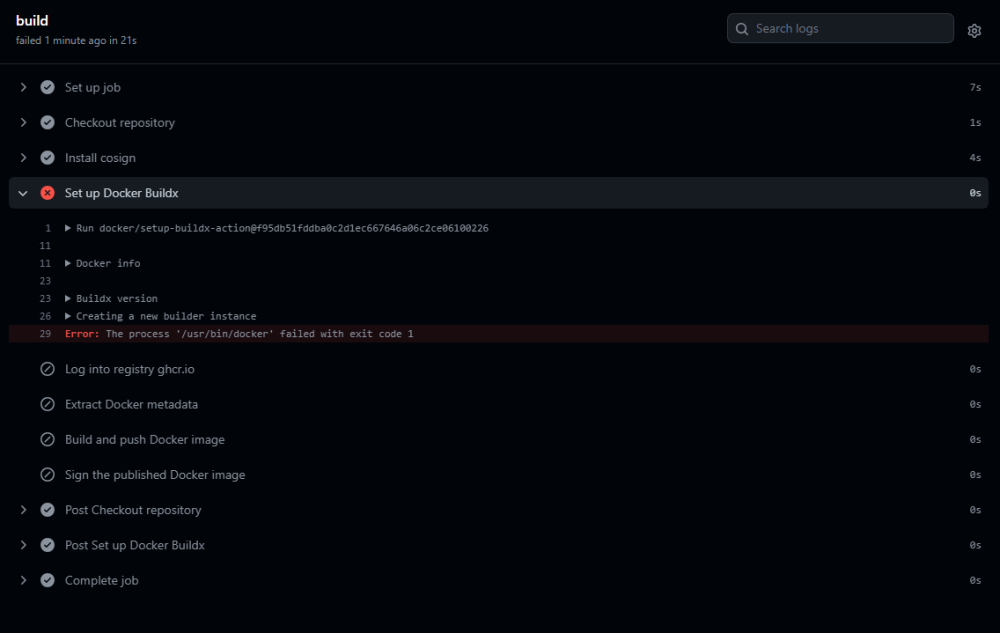
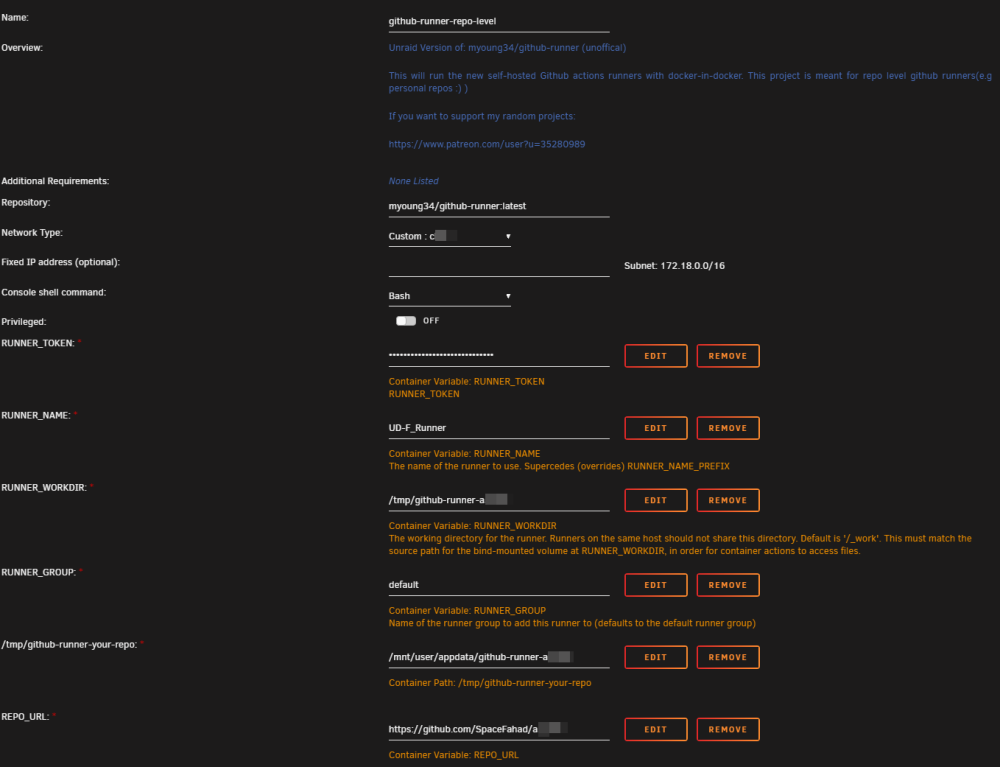
Was just looking for it! thanks for converting it to UD! I tried running it and it was running/idle. I changed the "runs-on" from "ubuntu-latest"to "self-hosted" on one of my workflows/actions, but I found an issue with the Docker Buildx set up. any idea how to resolve this issue? Issue: Log: Runner reusage is disabled Configuring -------------------------------------------------------------------------------- | ____ _ _ _ _ _ _ _ _ | | / ___(_) |_| | | |_ _| |__ / \ ___| |_(_) ___ _ __ ___ | | | | _| | __| |_| | | | | '_ \ / _ \ / __| __| |/ _ \| '_ \/ __| | | | |_| | | |_| _ | |_| | |_) | / ___ \ (__| |_| | (_) | | | \__ \ | | \____|_|\__|_| |_|\__,_|_.__/ /_/ \_\___|\__|_|\___/|_| |_|___/ | | | | Self-hosted runner registration | | | -------------------------------------------------------------------------------- # Authentication √ Connected to GitHub # Runner Registration √ Runner successfully added √ Runner connection is good # Runner settings √ Settings Saved. √ Connected to GitHub Current runner version: '2.309.0' 2023-09-26 19:33:32Z: Listening for Jobs 2023-09-26 19:35:14Z: Running job: build 2023-09-26 19:35:38Z: Job build completed with result: Failed UD Docker Template Config: Any help is appreciated! @QuentinM
-
Thank you for this information, will check once I receive the unit in 2-3 days.
-
Thank you again, just ordered both the Asus Hyper M.2 PCI-E and the Quadro GPU!
-
Thank you for confirming compatibility. Just so I understand, when I use the bifurcation setting, I am only affected the setting on that specific PCI-E slot and not the rest of the slots right?
-
Hello Members, I got a Dell 730xd with Dual Intel Xeon E5-2673 v3 CPU on the way and I am planning to order a PCI-E NVME card to add 2 M.2 drives for cache/appdata. I am planning to add a GPU (Nvidia Quadro RTX 4000) and I want to know if anyone tried a PCIE NVME with such server without compromise to the GPU. I checked few options below: 1- ASUS Hyper M.2 x16 PCIe 3.0 x4 Expansion Card V2 which requires bifurication support from the MB (will enabling this feature compromise GPU?) 2- Syba Dual M.2 M-Key NVMe Ports to PCIe 3.0 x16 Bifurcation Riser Controller - Support Non-Bifurcation Motherboard (SI-PEX40129) Now, I would prefer option 1 unless if it has any compromise to the GPU or it won't work with my server. and lastly, will those two work with the dell server and unraid anyway? Thanks!


