





.jpg.21ce45a89df32845cd74f97385b0873b.jpg)
Nemu
Members
-
Joined
-
Last visited
Everything posted by Nemu
-
perfect. still checking the euroofice stuff, but it´s not my priority at the moment. so might take a while.
-
It did not work for me as expected. Need to do some more testing
-
now it should work. https://github.com/Nemuritor01/Unraid-Templates/blob/main/scripts/opencloud_v75_migration.sh
-
Oh. Let me check this. I didn't see it. Sorry dude. Open cloud started for me, but I didn't implement this. Let me check what's missing an I get back to you. I meanwhile reinstalled my complete instance, as I needed to test the new Install Script. For me not a big deal, as I have not a huge amount of files in my instance,n which I backed up. I will check the script and send you an update later.
-
Migration Script for sxisting installations. The issue was, that Opencloud integrated the WOPI server into the opencloud containter. So the container "collaboraiton" is not necessary anymore. caused a lot of issues and couple of files needed to be edited. use this script in user scripts plugin. first check, if the folders match the installation. the script is set to dry run by default. run it and check if there are issues. if not. set dry run to "false" and run teh script. Collabora should work again. https://github.com/Nemuritor01/Unraid-Templates/blob/main/scripts/opencloud_v75_migration.sh the script should delete the collaboratin container. if not, do it manually. Also delete your proxy settings for wopi server. Ive also added a script to switch drom Collabora to EuroOffice, which is supported now. https://github.com/Nemuritor01/Unraid-Templates/blob/main/scripts/opencloud_switch_to_euro_office.sh let me know if it worked.
-
Testing a fix right now. If it works, I will update the scripts and send instructions.
-
Yes, same problem on my side. I've noticed, that Opencloud changed their compose sample files. I need to check the difference and hopefully find the issue. I will let you guys know.
-
Hey guys, the latest collabora update broke my implementation. Si just open cloud is working, but I was not able to get collabora to connect. Seems with the latest collabora doesn't support the bash entrypoint anymore. So until now, I did not find a solution to connect it successfully. Don't know, if I'm the only one. If I find a solution, I will let you know.
-
Hey guys, this seems partially correct. the only thing is, that from what I see, it´s not necessary to add the environmental variables. it´s just necessary to add the sharing block. I´ve created a script, which should do the work. update the container, then run the update script. thats it. https://github.com/Nemuritor01/Unraid-Templates/blob/main/scripts/opencloud_v7_upgrade.sh for new installations, no changes are necessary as the files get correctly created during first run.
-
Just to let you know. I'm working on a fix and will post an update soon.
-
Just checked my settings. I have already set "permit exclusive shares" to yes. I assume, that's why I did not see this problem. 😅
-
One issue I have with swag is -> swag finding the container names often doesn't work. But you can use your server IP instead of the container name. So instead of: set $upstream_app opencloud; set $upstream_port 9200; Use: set $upstream_app 192.168.178.10; set $upstream_port 9200; It's not as versatile as with container names, but I do not change my server IP, so I'm fine. I just did a change to the network. I'm using Swag on network Bro instead of bridge (or custom network). The reason is the DNS rewrites I'm using, when I access my container from my home network. With Bro network, swag gets a full external IP and listening on ports 443 and 80. That's necessary to create DNS rewrites. In adguard home (filters -> DNS rewrites) I've entered each of my containers sub-domains and route them to my swag IP. So when I'm at home, my traffic never leaves my home. This way, I also do not need to make collabora and wopi domains public (via cloudflare or pangolin). Swag is enough. Everything else in the swag guide you have posted should work and if you are using cloudflare as main DNS provider (as I do), the guide is straight forward. Once this works, setting up opencloud with the helper script should be easy. you can also test swag, if you e.g. test just the opencloud container as standalone without collabora etc. Delete everything. Don't use the script!Add container and template Opencloud. Remove everything under advanced view. Fill out, admin password and your url (OC_URL). what's in the main view.Then start the container. This is bare bones Opencloud. Then you can test, if your external domain works. If this is fine, proceed with opencloud+collabora. Remember, you have to copy and paste the full template again.
-
meanwhile I've also setup pangolin on a vps and in new builds, the traefik confs you've mentioned are default(!) values. So I got Opencloud running out of the box.
-
I'm not using tailscale for opencloud. I'm using three of my domains I own. Tough, for collabora and wopi server I've added a dns rewrite (to my swag container) in adguard home. So the internal communication of the stack never leaves my local network. Opencloud is very "sensitive" regading change of parameters in the the template, which often leads to a corrupt installation. This is due to security issues. Opencloud container e.g. syncs tokens with wopi server. I would highly recommend recreating the stack, when before applying changes. Remove the containers and also delete the folders (opencloud and collabora) and start from scratch. With the script, this is not difficult, as most of the data are saved in the script or in the template. I'm not using tailscale for opencloud. I'm using three of my domains I own. Tough, for collabora and wopi server I've added a dns rewrite (to my swag container) in adguard home. So the internal communication of the stack never leaves my local network. Opencloud is very "sensitive" regading change of parameters in the the template, which often leads to a corrupt installation. This is due to security issues. Opencloud container e.g. syncs tokens with wopi server. I would highly recommend recreating the stack, before applying changes. Remove the containers and also delete the folders (opencloud and collabora) and start from scratch. With the script, this is not difficult, as most of the data are saved in the script or in the template.
-
I've updated the opencloud template. Can you check, if it's working, now? I've updated the opencloud template. Can you check, if it's working, now?
-
There is already pocket-ID V2, now. ;) So far, I´ve tested it with desktop app, android, web. IOS will follow in the next days. So far. no issues. Getting collabora to work was a pain in the a... but now it´s fine. just uploaded: new pre_install_script https://github.com/Nemuritor01/Unraid-Templates/blob/main/scripts/opencloud_pre_install_script.sh Instructions you can get via script. set ENABLE_POCKET_ID="false" POCKET_ID_DRY_RUN="true" follow instructions to setup pocket-ID for opencloud. new pocket-ID template you can get here: https://github.com/Nemuritor01/Unraid-Templates/blob/main/templates/Pocket-ID.xml
-
If you guys want to make opencloud a bit safer, I have just integrated pocket-ID. Therefore I´ve created the pocket-ID template (CA store one is outdated and doesn´t work) and also integrated an option for pocket-ID into the script, which should make it straight forward. Pocket-ID is an OIDC provider, which lets you login into your apps via passkeys (exclusively). https://github.com/pocket-id/pocket-id As I do not want to confuse you guys, let me know, if something like this is useful, then I will upload the files.Otherwise I will keep it for my personal use.
-
Hello. No worries. I feel with you. Most of the code I did during my breaks on my mobile phone 😂. I wanted to check how I can get my templates to the CA store. Tough, seems just sending @Squid a message should be enough. But I need to clean up the templates, so they follow the CA store rules. However, stay healthy dude, that's most important and maybe there is some time working together in a new project in future.
-
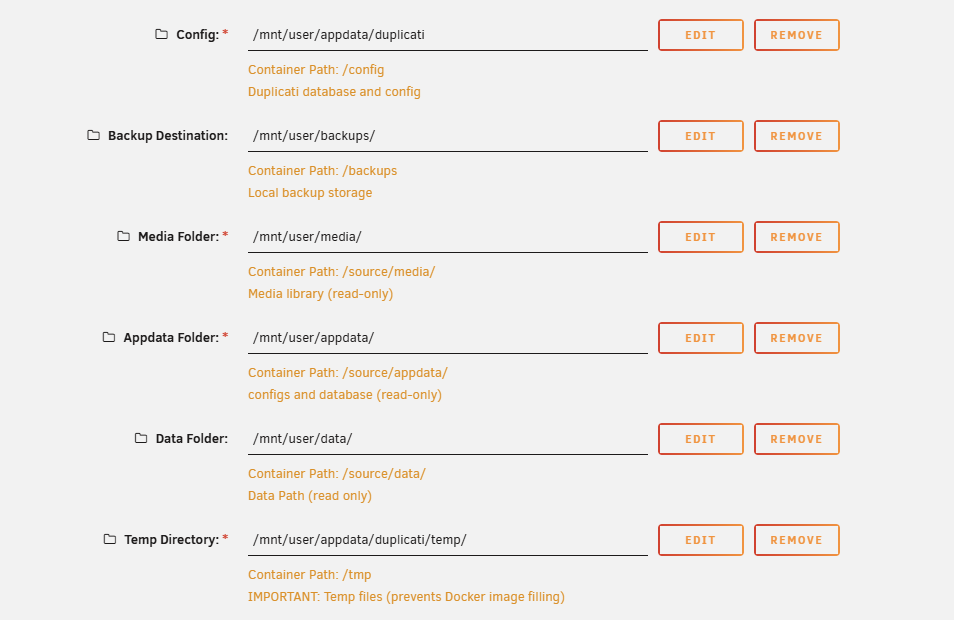
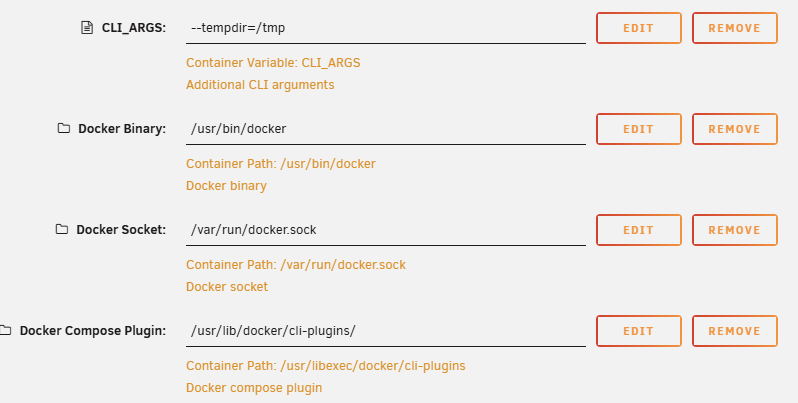
Hi guys, I finally managed to set up duplicati to backup my docker containers and also docker compose stacks. Mounting /mnt/user/ as source did not work for me. Seems this is a ZFS issue. I needed to mount the appdata and other forders directly via template. My main purpose for duplicati is to create backups of my immich stack +library, opencloud and also audiobookshelf. All of them are using a database. So creating a backup without stopping the containers is not a good idea. Therefore I´ve mounted docker and also the docker-compose plugin to the container. Now, Duplicati is able to talk to docker and also docker-compose. To start and stop containers, I´ve created a "script-generator". for each Duplicati Backup, it can generates a pre- and post-run script (two scripts) to stop and start defined containers (docker or docker-compose) The sequence of starting and stopping containers can be defined and also the wait time for each container. The generator saves the two scripts in the duplicati "script" folder with name pre-YourDefinedName.sh and post-YourDefinedName.sh It also makes the files executable. Here is the generator script, which can be used in plugin "user scripts" as well. Generator Script in Duplicati just create/edit a backup, go to options and under advanced options -> add "run-script-before" -> enter path "/scripts/pre-YourDefinedName.sh" -> add "run-script-after" -> enter path "/scripts/post-YourDefinedName.sh" Save and test your backup. I hope this helps some of you guys.

-
I finally found a working setup for my R8125. By now, if I enabled ASPM and the gigabit port on my Fritzbox, I always ended up with 30Mbit/s upload speed. If I switched the Fritzbox tob100Mbit Upload was 95 Mbit, so full speed. The issue was ASPM. Now here what I've done. Go to unraid page "main" Click on your flash drive "flash" Scroll down and you see Unraid OS Add following pcie_aspm=force pcie_aspm.policy=powersupersave pcie_port_pm=force Then open /boot/config/modprobe.d/ ( this is on your flash drive) and check if r8125.conf file is available. If not create it. Paste following: options r8125 aspm=1 options r8125 eee_enable=0 options r8125 s5wol=0 Now you have ASPM enabled, which allows your server c-states up to C10. BUT you won't get full network speed, as this enables also L1.1 and L1.2, which seem to prevent full speed. Use this command in shell to get your NIC PCIE Address. lspci | grep -i ethernetmine shows 04:00.0. now you need to create a script e.g. in plugin "user scripts" with the code below. Change the PCIE address to yours. # Enable only L1, disable L1.1 and L1.2 echo 1 > /sys/bus/pci/devices/0000:04:00.0/link/l1_aspm echo 0 > /sys/bus/pci/devices/0000:04:00.0/link/l1_1_aspm echo 0 > /sys/bus/pci/devices/0000:04:00.0/link/l1_2_aspmrun this script on array start. Restart your server. I have included this in my powertop autotune script, which I run on array start (Ive attached it). So far, everythings running great. Server reaches c10 with max network speed. powertop-autotune.txt
-
I have connected my swag proxy to tailscale. I route each subdomain (via cloudflare A record) to the swag tailscale IP and swag handles it. So I have all containers via tailscale available.
-
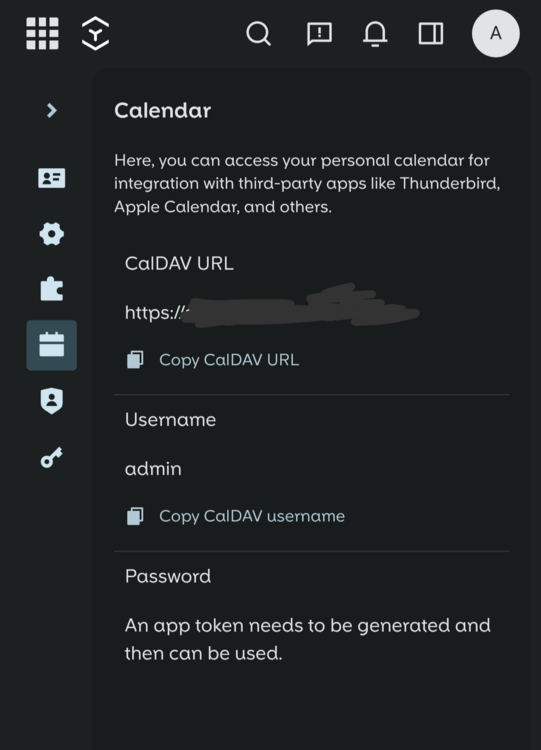
Added support for Radicale. New opencloud-radicale container in my GitHub templates folder. Also updated Opencloud template and installation script. The script creates the radicale folder and also the config files. https://github.com/Nemuritor01/Unraid-Templates The opencloud container just needs the path to radicale proxy.yaml. So you can add it manually to an existing container. Stop OpenCloud, edit template, add this path: Name: Radicale Proxy Config File Container Path: /etc/opencloud/proxy.yaml Host Path: /mnt/user/appdata/opencloud/config/proxy.yaml Access Mode: Read/Write
-
I've updated my swag opencloud container config. It fixes the issue with the desktop app not being able to login. GitHubUnraid-Templates/SWAG-conf/opencloud.conf at main · Nemur...Unraid templates to install Opencloud with additional services as Collabora - Nemuritor01/Unraid-Templates
-
Can you write some instructions, what you've changed in pangolin? I'm thinking about using it as well and I believe this could help a lot.
-
How it's used, is written in the GitHub description. But here some details: create your domains opencloud to container port 9200, collabora to container port 9980 and collaboration container port 9300. Copy the templates to /boot/config/plugins/dockerMan/templates-user --- boot is your flash drive and this folder is the one, all your community templates get stored to. use my script. Best is install "user script" plugin. Create a new script. copy and paste the content of my script (from my GitHub). Adjust the user section -> enter your domains and the where your open cloud folders will be. Then save and run the script. It creates folders and necessary files. Next check, if it has created the folders and the files - csp.yaml and banned-password-list.txt (files will just be created, if you set collabora=true Opencloud Container: Enter you password (IDM_ADMIN_PASSWORD), enter your opencloud domain with https in front: OC_URL https://opencloud.yourdomain.com then enter your collabora domain WITHOUT https in front: COLLABORA_DOMAIN collabora.yourdomain.com leave all other variables as is. collabora container: enter your wopi server domain (collaboration container) in aliasgroup1 with port: https://wopi.yourdomain.com:443 change your password. Under more settings extra_params you need to enter 2 times your opencloud domain ( opencloud.yourdomain.com) collaboration container (wopi server): Enter MICRO_REGISTRY_ADRESS: YourserverIP:9233 ; then under COLLABORATION_WOPI_SRC enter your wopi server domain with https in front: https://wopi.yourdomain.com, then under COLLABORATION_APP_ADDR enter your Collabora!!! domain with https in front: https://collabora.yourdomain.com ; under OC_URL enter your opencloud domain with https in front: https://opencloud.yourdomain.com ; under COLLABORATION_APP_ICON enter https://collabora.yourdomain.com/favicon.ico leave the rest as is. You can use e.g. swag as reverse proxy. The swag configs are also in my GitHub repo. I'm not using nginx proxy manager, but I've tested it. Tough, I couldn't get open cloud running with it, but I'm not that good in proxy stuff. I've just used cloudflare to create my open cloud domain. Collabora and Wopi domain I've used swag (my swag is running on Bro network). Then Unused adguard home DNS rewrite for collabora and wopi domain so that the communication never leaves my local network. You can watch this video to see, how he did it with a guard home. https://youtu.be/sWZsibkhIfs?si=3WnnWO8BKqABpgkY This should be it one more info. If you made a mistake and started the container. You can not just edit the container variable and restart the container, as the open cloud.yaml won't get overwritten. So you always need to delete the opencloud.yaml under opencloud/config manually! That's important and one of the issues I had. So I always removed the complete containers without removing the images, deleted the folders and started from scratch.
.thumb.jpg.3f025f872f067703c9c278f223c682a1.jpg)



