


SpaceInvaderOne
Community Developer
-
Joined
Everything posted by SpaceInvaderOne
-
When you see "Guest has not initialised the display yet". This is due to the nvram the vm is using. This can happen with any VM windows, Mac, linux. Easiest fix. Just delete the vm (but dont select select disks). Run macinbox again. It will see the disks already there and will not need to download again. It will recreate the nvram and xml template. then run the VM and you should be good
-
Check that netbios is set to disabled in smb settings on your server. This ciases an issue when enabled with samba over things like zerotier tailscale etc
-
I had a support session with @mauriceatkinson@btconnect. this evening to address this problem. Maurice and I tested a script I made which you can run using user-scripts which fixes the issue. I have posted the script and how to use it on my github https://github.com/SpaceinvaderOne/Unraid-ZeroTier-Server-Restart-fix
-
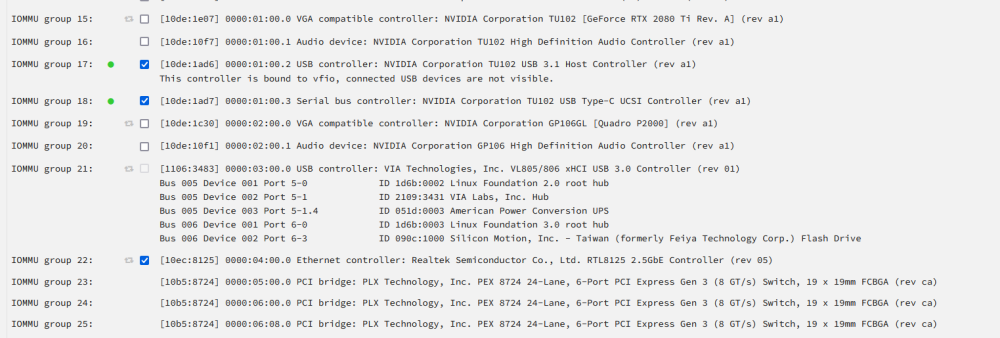
The xen-pciback.hide parameter is not necessary to "stub" PCI devices for passthrough. Instead, you can simply bind them to VFIO, which can be done directly from the GUI. To do this, navigate to Tools > System Devices, and select the devices you want to passthrough by ticking the box next to each. After rebooting your system, these devices will appear in the VM template, ready for use
-
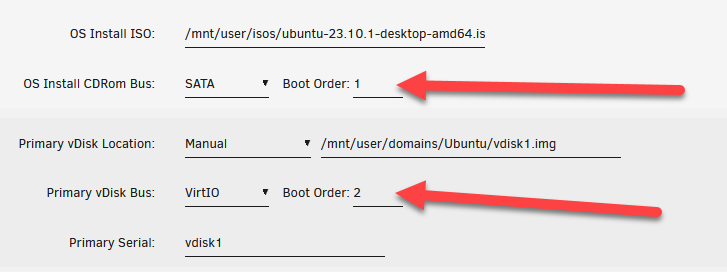
Hi, looking in your xml for the vm i see that your cdrom is set as the 2nd boot device <disk type='file' device='cdrom'> <driver name='qemu' type='raw'/> <source file='/mnt/user/isos/ubuntu-23.10.1-desktop-amd64.iso'/> <target dev='hda' bus='sata'/> <readonly/> <boot order='2'/> <address type='drive' controller='0' bus='0' target='0' unit='0'/> </disk> This should be the first device to install your OS. Goto the template and set the cd to boot order 1 and vdisk to boot order 2. Save the template and start it will boot from the cd and you can install
-
Would need to see your xml for the vm. There is no vm xml in your diagnostics. When using the vm are you passing through any devices?
-
The script has had a change that it can do the following 1. Snapshot and replicate either to a remote server or a local server. There can only be one destination in the script at present. 2. The script can snapshot and replicate a whole zfs pool. You can add exclusions for datasets which you dont want included. 3. It can replicate just one dataset specified 4. It can replicate with zfs replication or also to a location using rsync if the destination doesnt have zfs. (source location still must be zfs as for the rsync replication it mounts the newest snapshot the rsyncs that to destination) I will not add much more functionality to the script otherwise it just becomes to complicated to set up. I do plan on converting this (maybe) to a plugin at some point in the future when then i will add features
-
Hi, glad it's working. You won't see any difference in performance. You are not actually using a vdisk this way, you're directly passing the physical disk to the VM by its ID
-
Switching gpu and audio devices to use msi interrupts in your Windows vm can reduce audio stuttering by optimising how interrupts are managed. Download this https://www.dropbox.com/s/y8jjyvfvp1joksv/MSI_util.zip?e=2&dl=0 Then run the utility in the vm. It displays a list of devices and their current interrupt mode. Select all gpu and audio devices and set them to use msi interrupts. Save your changes and reboot the vm to apply these settings.
-
have you tried temporarily passing them to a different vm to see if its a windows issue or the host (Unraid)?
-
If a windows vm from a physical machine harddrive converted to vm i would use defaults but choose q35 chipset
-
Don’t bind the SATA controller; simply pass the SSD directly. Run this command in the terminal: ls /dev/disk/by-id/ This will display a list of all the disks on the server by their ID number. For example, here's what it shows on my server (though I've only included one SSD disk for clarity) root@BaseStar:~# ls /dev/disk/by-id/ ata-CT2000MX500SSD1_2117E5992883@ ata-CT2000MX500SSD1_2117E5992883-part1@ If you want to pass this SSD to the VM in the vdisk location in the vm template, instead of selecting "none", you should specify manual and put /dev/disk/by-id/ata-CT2000MX500SSD1_2117E5992883 (Note that I removed the '@'). Here, I am passing the entire disk, not just a partition (the second listing of my disk you see ends with -part1). I hope this helps!
-
I would probably use q35 chipset over i440fx
-
IMO you have too much pinned on the first core. Unraid OS uses this itself alot for its functions so can cause issues with your stuttering. 1. So isolate only the last 3 cores. Pin those to that to the vm. 2. Leave the first core unpinned (0,6) 3. Pin your containers to cores 2 and 3 (1,7 2,8) 4. I wouldnt bother using emulatorpin let Unraid handle that itself it will most likely use the first core anyway. Give that a try. It may help
-
Its difficult to know why your VM is freezing. More info would be needed. But as an example of troubleshooting this the OP probem we can see from the log. If we look at the log he posted it shows 2020-09-15T18:08:05.594959Z qemu-system-x86_64: vfio_err_notifier_handler(0000:03:00.0) Unrecoverable error detected. Please collect any data possible and then kill the guest 2020-09-15T18:08:05.599453Z qemu-system-x86_64: vfio_err_notifier_handler(0000:03:00.1) Unrecoverable error detected. Please collect any data possible and then kill the guest The message points to an unrecoverable error occurred with a passthrough device 0000:03:00.0 and 0000:03:00.1 which from the diagnostics show us its a 1050ti GPU 03:00.0 VGA compatible controller [0300]: NVIDIA Corporation GP107 [GeForce GTX 1050 Ti] [10de:1c82] (rev a1) Subsystem: eVga.com. Corp. GP107 [GeForce GTX 1050 Ti] [3842:6255] Kernel driver in use: vfio-pci Kernel modules: nvidia_drm, nvidia 03:00.1 Audio device [0403]: NVIDIA Corporation GP107GL High Definition Audio Controller [10de:0fb9] (rev a1) Subsystem: eVga.com. Corp. GP107GL High Definition Audio Controller [3842:6255] Kernel driver in use: vfio-pci So for the original person who made the post this was causing his freezes. Why he was having this error is hard to know but can be caused from different things. For example could be a hardware fault with the GPU or the motherboard. If i was advising the OP I would say to 1. update the bios in the motherboard to the latest. 2. making sure to also pass through a vbios for the GPU 3. Try putting the GPU in a different pcie slot. 4. Trying another GPU if possible and seeing if the problem continues. Now what i have said to do here is only specific to the OP and your problem could be totally different. But if you find your issue is from passthrough you could try this.
-
Yes its very straight forward. We can use the qemu-img tool to convert a virtual disk image to a physical disk. If the image is a raw image (by default in Unraid it is) then you would use this command qemu-img convert -f raw -O raw /mnt/user/domains/vm_name/vdisk1.img /dev/sdX If the image was a qcow2 image then the command would be qemu-img convert -f qcow2 -O raw /mnt/user/domains/vm_name/vdisk1.img /dev/sdX So the /dev/sdX refers to the disk you want to copy it to. Plug the disk that you want to use for the real machine into the server and it will get a letter. So for instance the /dev/sdg Be careful its the correct one as you dont want to write over an anraid array disk etc. Also just make sure the location of the vdisk for the vm is correct for this part /mnt/user/domains/vm_name/vdisk1.img
-
Please try a full reboot on the server. Also clear the cache on your browser.
-
I wonder if a windows update was responsible for this. The reason I think so is because of the restore point that you dont remember making. Significant Windows updates, like feature updates or semi-annual releases, Windows typically creates a restore point automatically. So i would guess this update caused an issue.
-
Also a possibility. As you are passing through both the sound of the GPU (which you should when passing through a GPU) and the motherboard sound device. So in windows there will be 2 devices for audio. I assume as you are passing through the motherboard audio is because that is your preference to use that. Probably Windows will put the default to be the HDMI sound from your 3070 and the secondary the onboard. So if the sound is going through the Nvidia sound and you dont have speakers in your monitor then that is why. Try switching the defauly audio out to the secondary audio. Just a possibility but maybe why.
-
I like keeping my vms on a ZFS Zpool. I have a dataset "domains" then a dataset for each individual vm. From there you can snapshot each directly from the zfs master plugin, or as i do automatically using sanoid. From here you can then use zfs replication to replicate the vms with snapshots to another Zpool. This is very efficient and a great solution in my opinion. To make this easier I have made some scripts to automatically do this. If you are interested in doing this check out these 2 videos.
-
Ha lol. Oh no Skynet knows about me, I must hide from the AI !! Thanks for your kind words and I am glad that you like the tutorials. Have a great day
-
Hi. Let me see if I understand the issue. You are passing through an Intel WiFi device to a macOS VM. I assume you are also passing through an AMD GPU as well. The AMD card is resetting correctly, but the Intel WiFi device is not. Is the Intel WiFi device built into the motherboard? I wonder why you want to pass through a WiFi device when you can use a virtual NIC for internet on the VM. Is it because the WiFi device is Bluetooth and WiFi combined? If so, I would recommend just not using the WiFi device. Use the virtual NIC and buy a cheap £10 USB Bluetooth adapter for Bluetooth. Hope this helps!
-
To anyone using EmbyServerBeta There was an update about 8 hours ago which for me broke my emby Cannot get required symbol ENGINE_by_id from libssl Aborted [s6-init] making user provided files available at /var/run/s6/etc...exited 0. [s6-init] ensuring user provided files have correct perms...exited 0. [fix-attrs.d] applying ownership & permissions fixes... [fix-attrs.d] done. [cont-init.d] executing container initialization scripts... [cont-init.d] done. [services.d] starting services [services.d] done. [cont-finish.d] executing container finish scripts... [cont-finish.d] done. [s6-finish] waiting for services. [s6-finish] sending all processes the TERM signal. [s6-finish] sending all processes the KILL signal and exiting. ** Press ANY KEY to close this window ** Temporary fix change repository from emby/embyserver:beta to emby/embyserver:4.9.0.5 Emby will then start and run. Just in a few days when after a new version is up and issue is fixed we can just go back and set tag back to beta.
-
sorry i think its included in Unraid now. Please see if you can see the log here /var/log/mcelog/ and post it here
-
Hi Yes we would need you to install the mcelog tool then post your diagnostics. The reason being is this is a Linux tool (which you can install from the nerdpack plugin on CA) is used for logging and interpreting mces ( stands for Machine Check Exceptions) These exceptions are hardware errors reported by the cpu. Modern cpus have built-in error detection which when they detect a problem, they generate an mce. These errors include things like problems with the cpu itself, memory errors, bus errors, cache errors etc etc. They can be - Temporary errors - these are often corrected by the system (os) Intermittent errors-- Occur every so often and not all the time. So these errors are harder to diagnose. Fatal errors -- Obviously more serious because they can cause server crashes or even data corruption. So when these errors are reported it is good to find out what they are as they can indicate potential hardware errors early before causing too much trouble. Howver not all erros mean something is bad. Some errors can be down to quirks of the cpu. If i remember correctly certain Amd cpus have been known to generate some mces that can be considered harmless because they are just part of the processor's normal way of working so they generate an mce under normal conditions. Also the way the cpus firmware or microcode is designed can lead to harmless mces being reported. Various mb bios settings also can especially those related to power management and overclocking etc. So you may want to see if there are bios updates for your mb. But yes without the mce log it will not be possible to know what the errors are as the tool makes them human readable. I hope this helps


