

kode54
-
Posts
246 -
Joined
-
Last visited
Content Type
Profiles
Forums
Downloads
Store
Gallery
Bug Reports
Documentation
Landing
Posts posted by kode54
-
-
Bumping this old topic to get it some more attention. Especially since a branch with Nexenta ZFS based TRIM support is waiting to be accepted into the main line.
I for one would love to see ZFS support replace BTRFS use. Create n-drive zpool based on the current cache drive setup, and create specialized and quota limited ZFS datasets for the Docker and libvirt configuration mount points. Yes, Docker supports ZFS.
Isn't there some licensing issue (CDDL vs GPL) that prevents ZFS from being distributed with the Linux kernel? I'd rather stay with BTRFS, myself.
And from what I've seen, one only wants to stick with BTRFS on a system they're ready to nuke at a moment's notice.
-
change this to VIRTIO. (this will most likely mean reinstalling windows).
There is a trick to switching over:
1) Add another hard drive, maybe 1MB or slightly larger, and make it VirtIO.
2) Boot the VM.
3) Install the viostor drivers for your OS to support the tiny image you mounted above.
4) Shut down the VM.
5) Delete the mini temporary VirtIO drive.
6) Change your boot image to VirtIO.
7) It should boot fine now.
-
-
To install the driver in unRAID, he'd need a version of ALSA built for the correct kernel.
-
I've dumped the ZFS stuff, probably too crazy to be using that bleeding edge code anyway. And now I'm down one SSD, it may have failed, or the cable or port may have failed. Now I've got one cache drive, the 256GB, formatted XFS.
Seems to be in working order now, though.
-
Updated CrystalDiskMark shots, with a new VM backed on an XFS cache drive.
First one's using cache='none' io='native':
Second one's using the defaults that always get overwritten by the template editor, cache='writeback', and no io parameter:
The io=native mode appears to reflect the actual drive performance, with the overhead of XFS and virtualization factored in.

-
Wtf?
Dec 12 18:23:50 unraid root: plugin: running: /boot/packages/python-2.7.5-x86_64-1.txz
Dec 12 18:23:50 unraid root:
Dec 12 18:23:50 unraid root: +==============================================================================
Dec 12 18:23:50 unraid root: | Upgrading python-2.7.9-x86_64-1 package using /boot/packages/python-2.7.5-x86_64-1.txz
Dec 12 18:23:50 unraid root: +==============================================================================
Dec 12 18:23:50 unraid root:
Dec 12 18:23:50 unraid root: Pre-installing package python-2.7.5-x86_64-1...
Dec 12 18:23:55 unraid root:
Dec 12 18:23:55 unraid root: Removing package /var/log/packages/python-2.7.9-x86_64-1-upgraded-2016-12-12,18:23:50...
Then after taking the array online and offline a few times:
Dec 12 18:25:20 unraid emhttp: unclean shutdown detected
Dec 12 18:35:19 unraid sudo: root : TTY=unknown ; PWD=/ ; USER=nobody ; COMMAND=/usr/bin/deluged -c /mnt/cache/deluge -l /mnt/cache/deluge/deluged.log -P /var/run/deluged/deluged.pid
I see you are using a very messy plugin-based Deluge setup that plonks conflicting versions of Python on the system, first 2.7.9, then 2.7.5 replaces 2.7.9 like it's a newer version. And lots of Python libraries. And ZIP and RAR and Par2 and yenc utilities. And then the last thing it does at the end is start deluged, which may or may not be hanging the httpd because it never returns.
Maybe try finding a Docker package that does everything you want?
E: I also see you've got a weird frankenstein mix of Reiser and XFS partitions, too. Yikes.
-
If this weren't a sticky topic, I'd have called that one hell of a bump. And then I noticed the bump occurred 11 days ago.
-
6.3.0-rc already knows about newer virtio iso downloads. Presumably, none of these were added to 6.2 newer releases because they were presumed to be incompatible with the older Qemu?
-
I only supplied it to get the user here going quickly. Naturally, it's not a trusted repository of packages. I assumed that dmacias would build it himself.
It has no dependencies, and building it merely requires basic build tools installation on Slackware 14.1, and the atop package from Slackbuilds, if you trust them.
I intend to contribute to a "trusted" repository for unRAID-ZFS, at least for alternative branches. My builds are intended to be tested and possibly trusted on SSD block devices, as they are based on spl:master and zfs:ntrim (from dweeezil repository). I have packages for my personal use built for 6.2.4 and 6.3.0-rc6, using the Slackbuilds scripts for spl-solaris and zfs-on-linux, with both modified to include a different version name, and the latter modified to pass --with-spl=/tmp/SBo/spl-<version>.
I'm not sure what to do to earn trust for packages, though.
E: Removed binary package from my bucket, as NerdPack makes it redundant.
-
Proposing the inclusion of the atop package from Slackbuilds, for moments where it may be useful to monitor which resources may be maxing out in a system. It will handily display color coded load percentages for memory and disks, and blink a status line red if it's being maxed out. May be useful in tracking down overburdening issues some people are experiencing.
-
Next time you prepare such activity, open an SSH terminal to your unRAID machine, and install atop and run it.
atop has been added to NerdPack. Use that to install it, and run it from ssh to look for bottlenecks.
-
It is possible if you use virt-manager to configure your VMs. But you won't be able to connect to them from the WebUI, since there is no web SPICE client in unRAID.
There are already performance issues with the stock noVNC client, so you may experience better performance if you use a native client.
-
Try deleting network.cfg, reboot, and reconfigure your network changes from scratch? Fixed my Docker issues from downgrading, may fix your Samba issues from upgrading.
Maybe also keep a backup copy, see how the two differ between your original and the recreated version.
-
No problem, and I'd try cleaning out that port, or replacing the switch altogether if you really find the need to use all of its ports.
-
Found the Dockerfile. Which imports from this base image.
Looks like you just mount anything you want to be accessible to the image. A simple start is to mount /mnt as /mnt, read-only.
Then you forward any port(s) you want to access to whatever public ports you want to access them on. The base image exposes an HTTPd with web RDP client on port 8080, and a direct RDP service on port 3389.
-
ERROR_UNEXP_NET_ERR
59 (0x3B)
An unexpected network error occurred.
Not sure what else to tell you about that.
You're probably also not going to be getting much access speed out of a 10Mbps link, especially if it keeps going up and down.
-
My results are also somewhat different. I've also taken to isolcpus and using only two cores / four threads for the virtual machine. I also have the two disk images hosted on an lz4 compressed ZFS pool on my SSDs.
<domain type='kvm' id='1'>
  <name>Windows 10</name>
  <uuid>xxxxxxxx-xxxx-xxxx-xxxx-xxxxxxxxxxxx</uuid>
  <metadata>
    <vmtemplate xmlns="unraid" name="Windows 10" icon="windows.png" os="windows10"/>
  </metadata>
  <memory unit='KiB'>8388608</memory>
  <currentMemory unit='KiB'>8388608</currentMemory>
  <memoryBacking>
    <nosharepages/>
    <locked/>
  </memoryBacking>
  <vcpu placement='static'>4</vcpu>
  <cputune>
    <vcpupin vcpu='0' cpuset='2'/>
    <vcpupin vcpu='1' cpuset='3'/>
    <vcpupin vcpu='2' cpuset='6'/>
    <vcpupin vcpu='3' cpuset='7'/>
  </cputune>
  <resource>
    <partition>/machine</partition>
  </resource>
  <os>
    <type arch='x86_64' machine='pc-i440fx-2.5'>hvm</type>
    <loader readonly='yes' type='pflash'>/usr/share/qemu/ovmf-x64/OVMF_CODE-pure-efi.fd</loader>
    <nvram>/etc/libvirt/qemu/nvram/xxxxxxxx-xxxx-xxxx-xxxx-xxxxxxxxxxxx_VARS-pure-efi.fd</nvram>
  </os>
  <features>
    <acpi/>
    <apic/>
  </features>
  <cpu mode='host-passthrough'>
    <topology sockets='1' cores='2' threads='2'/>
  </cpu>
  <clock offset='localtime'>
    <timer name='rtc' tickpolicy='catchup'/>
    <timer name='pit' tickpolicy='delay'/>
    <timer name='hpet' present='no'/>
  </clock>
  <on_poweroff>destroy</on_poweroff>
  <on_reboot>restart</on_reboot>
  <on_crash>restart</on_crash>
  <devices>
    <emulator>/usr/local/sbin/qemu</emulator>
    <disk type='file' device='disk'>
      <driver name='qemu' type='raw' cache='writeback'/>
      <source file='/mnt/zfs/domains/Windows 10/vdisk1.img'/>
      <backingStore/>
      <target dev='hdc' bus='virtio'/>
      <boot order='1'/>
      <alias name='virtio-disk2'/>
      <address type='pci' domain='0x0000' bus='0x00' slot='0x04' function='0x0'/>
    </disk>
    <disk type='file' device='disk'>
      <driver name='qemu' type='raw' cache='writeback'/>
      <source file='/mnt/zfs/domains/Windows 10/programming.img'/>
      <backingStore/>
      <target dev='hdd' bus='virtio'/>
      <alias name='virtio-disk3'/>
      <address type='pci' domain='0x0000' bus='0x00' slot='0x05' function='0x0'/>
    </disk>
    <disk type='file' device='cdrom'>
      <driver name='qemu' type='raw'/>
      <source file='/mnt/disk1/Purgatory/CD Images/vs2015.com_enu.iso'/>
      <backingStore/>
      <target dev='hda' bus='ide'/>
      <readonly/>
      <boot order='2'/>
      <alias name='ide0-0-0'/>
      <address type='drive' controller='0' bus='0' target='0' unit='0'/>
    </disk>
    <controller type='usb' index='0' model='nec-xhci'>
      <alias name='usb'/>
      <address type='pci' domain='0x0000' bus='0x00' slot='0x07' function='0x0'/>
    </controller>
    <controller type='pci' index='0' model='pci-root'>
      <alias name='pci.0'/>
    </controller>
    <controller type='ide' index='0'>
      <alias name='ide'/>
      <address type='pci' domain='0x0000' bus='0x00' slot='0x01' function='0x1'/>
    </controller>
    <controller type='virtio-serial' index='0'>
      <alias name='virtio-serial0'/>
      <address type='pci' domain='0x0000' bus='0x00' slot='0x03' function='0x0'/>
    </controller>
    <interface type='bridge'>
      <mac address='xx:xx:xx:xx:xx:xx'/>
      <source bridge='br0'/>
      <target dev='vnet0'/>
      <model type='virtio'/>
      <alias name='net0'/>
      <address type='pci' domain='0x0000' bus='0x00' slot='0x02' function='0x0'/>
    </interface>
    <serial type='pty'>
      <source path='/dev/pts/1'/>
      <target port='0'/>
      <alias name='serial0'/>
    </serial>
    <console type='pty' tty='/dev/pts/1'>
      <source path='/dev/pts/1'/>
      <target type='serial' port='0'/>
      <alias name='serial0'/>
    </console>
    <channel type='unix'>
      <source mode='bind' path='/var/lib/libvirt/qemu/channel/target/domain-Windows 10/org.qemu.guest_agent.0'/>
      <target type='virtio' name='org.qemu.guest_agent.0' state='connected'/>
      <alias name='channel0'/>
      <address type='virtio-serial' controller='0' bus='0' port='1'/>
    </channel>
    <hostdev mode='subsystem' type='pci' managed='yes'>
      <driver name='vfio'/>
      <source>
        <address domain='0x0000' bus='0x01' slot='0x00' function='0x0'/>
      </source>
      <alias name='hostdev0'/>
      <address type='pci' domain='0x0000' bus='0x00' slot='0x06' function='0x0'/>
    </hostdev>
    <hostdev mode='subsystem' type='pci' managed='yes'>
      <driver name='vfio'/>
      <source>
        <address domain='0x0000' bus='0x00' slot='0x1b' function='0x0'/>
      </source>
      <alias name='hostdev1'/>
      <address type='pci' domain='0x0000' bus='0x00' slot='0x08' function='0x0'/>
    </hostdev>
    <hostdev mode='subsystem' type='pci' managed='yes'>
      <driver name='vfio'/>
      <source>
        <address domain='0x0000' bus='0x01' slot='0x00' function='0x1'/>
      </source>
      <alias name='hostdev2'/>
      <address type='pci' domain='0x0000' bus='0x00' slot='0x09' function='0x0'/>
    </hostdev>
    <memballoon model='virtio'>
      <alias name='balloon0'/>
      <address type='pci' domain='0x0000' bus='0x00' slot='0x0a' function='0x0'/>
    </memballoon>
  </devices>
</domain>
-
Quick add on scrapping the optical drives: I tend to keep exactly one optical drive around after I'm fully installed, with no <source> line, implying empty drive. This way, I can use virsh or virt-manager to hot mount images if necessary. You can't hot attach or detach drives, though.
-
Check the mount point for the share inside the VM, and which user mounted it? I've found enough times that only the user that mounted it can write to it.
-
Note that only works for snapshots taken while the VM is powered off. Live snapshots will require the memory and system state data from the /var/lib/libvirt/images directory. Of course, if you're using passthrough of anything but USB devices, you're already prevented from taking live snapshots.
-
I never set it up in the first place, since it was just the auto detected defaults with DHCP everything.
-
Thanks for that tip. And I notice that network.cfg has not been recreated, and network-rules.cfg never existed. Did it matter that there was a bond named "bond0" and no named bridge in the old configuration?
-
Does this need fstrim to be run on it daily?
E: This may be relevant: https://github.com/zfsonlinux/zfs/pull/3656
E2: I have successfully built this using the vbatts/slackware container as a basis, with the following packages from Slackware64 14.1:
attr-2.4.46-x86_64-1.txz
autoconf-2.69-noarch-1.txz
automake-1.11.5-noarch-1.txz
bc-1.06.95-x86_64-2.txz
ca-certificates-20160104-noarch-1.txz
curl-7.31.0-x86_64-1.txz
cyrus-sasl-2.1.23-x86_64-5.txz
gcc-4.8.2-x86_64-1.txz
gcc-g++-4.8.2-x86_64-1.txz
git-1.8.4-x86_64-1.txz
glibc-2.17-x86_64-7.txz
kernel-headers-3.10.17-x86-3.txz
less-451-x86_64-1.txz
libmpc-0.8.2-x86_64-2.txz
libtool-2.4.2-x86_64-2.txz
m4-1.4.17-x86_64-1.txz
make-3.82-x86_64-4.txz
perl-5.18.1-x86_64-1.txz
zlib-1.2.8-x86_64-1.txz
And the following from Slackware64 14.2, due to a bug in how the Git package was built:
cyrus-sasl-2.1.26-x86_64-1.txz
Begin by preparing a kernel directory, which involves fetching a matching kernel's source package, applying all patches from unRAID's /usr/src, and copying any new files. Then make oldconfig and make to build it, and you'll have a tree for the Slackbuild packages for spl-solaris and zfs-on-linux.
You'll also need to follow the comment I posted at the bottom of the train at that pull request, since it outlines an spl commit that's not in master yet, to rebase the ntrim branch against. Otherwise, rebase the zfs tree against upstream/master, which is github.com/zfsonlinux/zfs.git.
Then:
LINUXROOT=/root/linux-whatever ./spl-solaris.SlackBuild
Then the zfs-on-linux.SlackBuild needs to be modified to pass a --with-spl=/tmp/SBo/spl-your-version.
E3: Now running spl:master and zfs:ntrim on unRAID 6.3.0-rc6. Fine so far, but benches slightly slower. Strange.
Alternative to echoing stuff to /sys config variables is to create a full zfs.conf of settings to apply, depending on which types of devices you'll be pooling, and copying that to /etc/modprobe.d before modprobe zfs.


Am I expecting too much from my Win10 VM?
in VM Templates
Posted
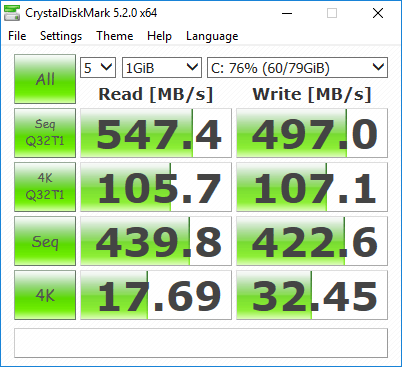
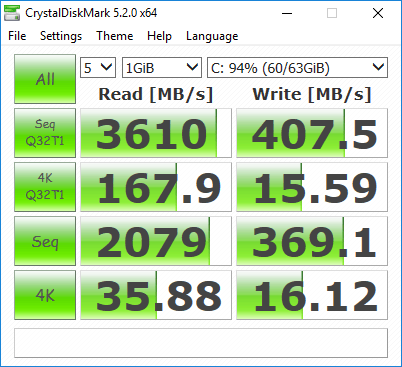
Bumping to prove that under certain conditions, great things could happen for no apparent reason, other than hopefully more optimal configuration settings.
Upon adding to my domain tag:
And adding the following override to the -cpu switch to the end, just before the end of the domain tag:
I was able to eke out some more performance, by turning on the hypervisor enlightenments, without tripping the Nvidia drivers. Doing it this way requires qemu version 2.5.0. It is possible to pass that vendor_id argument through the features->hyperv block, but only in libvirt 1.3.3 or newer, or possibly 2.1.0.
On the left, my first post here. On the right, my most recent benchmark of the same VM setup, only with the enlightenments enabled. Again, it's still possible to trick Nvidia's drivers, by faking the vendor_id of the hypervisor, which they specifically blacklist. I chose Microsoft for the lulz.