





wildwolf
Members
-
Joined
-
Last visited
Everything posted by wildwolf
-
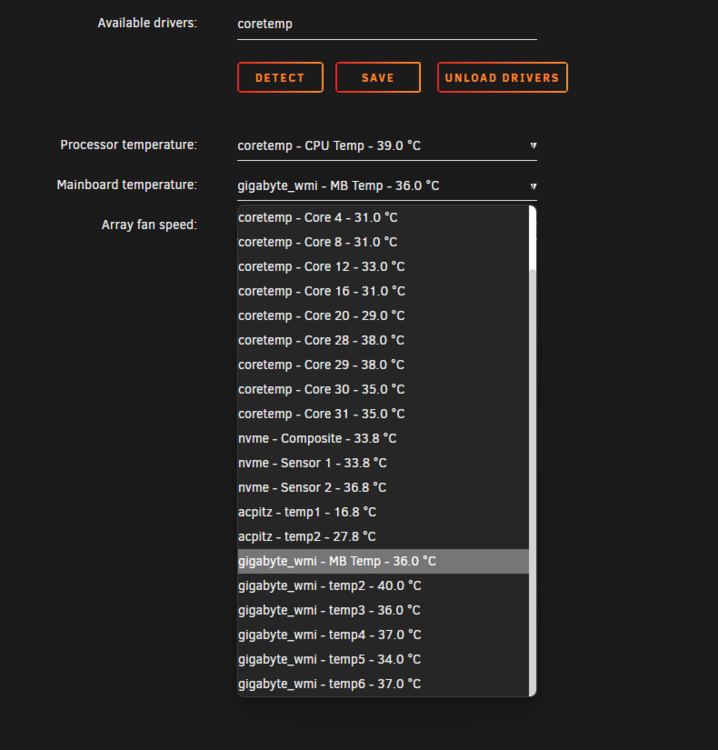
Happy to report that after I upgraded to unRAID 7 on 2 servers with a Gigabyte motherboard, I can now choose one of several temperature sensors on the motherboard and now have it showing on the dashboard. /me doing happy dance.
-
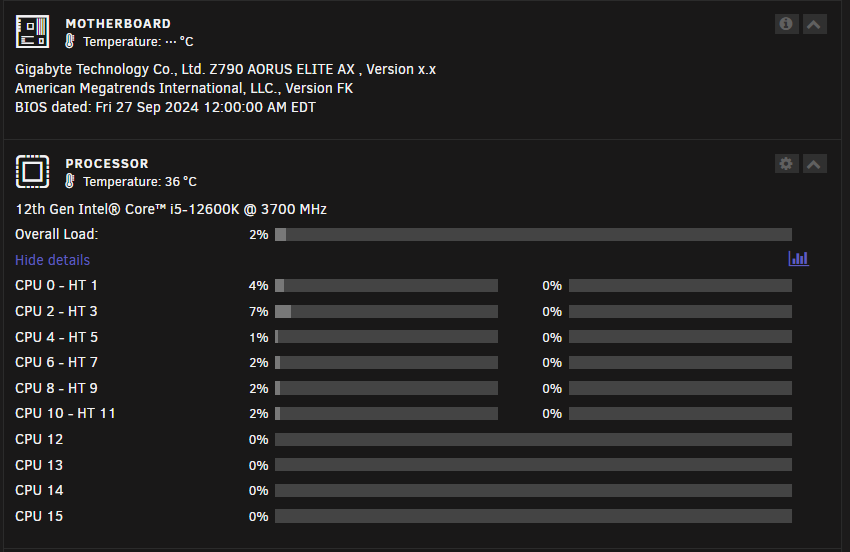
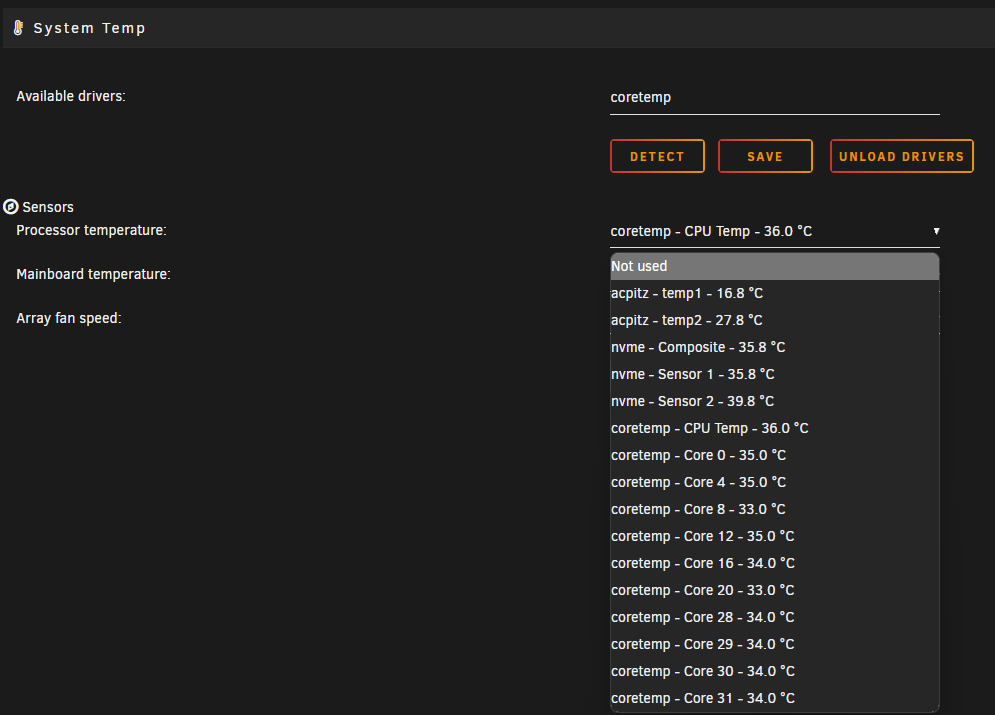
Again, coretemp is working/has always worked, as I'm assuming that's what shows me the CPU temp. What I don't get from it is a motherboard reading. # lsmod | grep coretemp coretemp 16384 0 # dmesg | grep coretemp # journalctl -xe | grep sensors bash: journalctl: command not found Motherboard is a Gigabyte Z790 AORUS ELITE AX. Manual shows temperature sensors near CPU, z790 chipset, by the battery, F_AUDIO connection, and under the PCIEX16 slot. My assumption is that coretemp doesn't have access/ability to read those 5 sensors, and it's annoying.
-
sensors-detect runs. It only suggests the modprobe coretemp. Now follows a summary of the probes I have just done. Just press ENTER to continue: Driver `coretemp': * Chip `Intel digital thermal sensor' (confidence: 9) Do you want to generate /etc/sysconfig/lm_sensors? (yes/NO): NO To load everything that is needed, add this to one of the system initialization scripts (e.g. /etc/rc.d/rc.local): #----cut here---- # Chip drivers modprobe coretemp /usr/bin/sensors -s #----cut here---- You really should try these commands right now to make sure everything is working properly. Monitoring programs won't work until the needed modules are loaded. Unloading i2c-dev... OK I've already put that in /boot/config/go: # cat /boot/config/go #!/bin/bash # Start the Management Utility /usr/local/sbin/emhttp & modprobe coretemp A couple days ago, I placed it in /boot/packages, and tried: installpkg /boot/packages/lm_sensors-3.6.0-x86_64-3.txz
-
# ls /lib/modules/$(uname -r)/kernel/drivers/hwmon abituguru.ko.xz corsair-psu.ko.xz lineage-pem.ko.xz max31790.ko.xz smsc47b397.ko.xz abituguru3.ko.xz dell-smm-hwmon.ko.xz lm63.ko.xz max6620.ko.xz smsc47m1.ko.xz acpi_power_meter.ko.xz dme1737.ko.xz lm73.ko.xz max6621.ko.xz smsc47m192.ko.xz ad7414.ko.xz drivetemp.ko.xz lm75.ko.xz max6639.ko.xz stts751.ko.xz ad7418.ko.xz ds1621.ko.xz lm77.ko.xz max6650.ko.xz tc654.ko.xz adc128d818.ko.xz ds620.ko.xz lm78.ko.xz max6697.ko.xz tc74.ko.xz adm1025.ko.xz emc1403.ko.xz lm80.ko.xz mcp3021.ko.xz thmc50.ko.xz adm1026.ko.xz emc2103.ko.xz lm83.ko.xz mr75203.ko.xz tmp102.ko.xz adm1029.ko.xz emc6w201.ko.xz lm85.ko.xz nct6683.ko.xz tmp103.ko.xz adm1031.ko.xz f71805f.ko.xz lm87.ko.xz nct6775-core.ko.xz tmp108.ko.xz adm1177.ko.xz f71882fg.ko.xz lm90.ko.xz nct6775.ko.xz tmp401.ko.xz adm9240.ko.xz f75375s.ko.xz lm92.ko.xz nct7802.ko.xz tmp421.ko.xz ads7828.ko.xz fam15h_power.ko.xz lm93.ko.xz nct7904.ko.xz tmp464.ko.xz adt7410.ko.xz fschmd.ko.xz lm95234.ko.xz npcm750-pwm-fan.ko.xz tmp513.ko.xz adt7411.ko.xz ftsteutates.ko.xz lm95241.ko.xz nzxt-kraken2.ko.xz tps23861.ko.xz adt7462.ko.xz g760a.ko.xz lm95245.ko.xz nzxt-smart2.ko.xz via-cputemp.ko.xz adt7470.ko.xz g762.ko.xz ltc2945.ko.xz pc87360.ko.xz via686a.ko.xz adt7475.ko.xz gl518sm.ko.xz ltc2947-core.ko.xz pc87427.ko.xz vt1211.ko.xz adt7x10.ko.xz gl520sm.ko.xz ltc2947-i2c.ko.xz pcf8591.ko.xz vt8231.ko.xz aht10.ko.xz hih6130.ko.xz ltc2990.ko.xz pmbus/ w83627ehf.ko.xz amc6821.ko.xz hwmon-vid.ko.xz ltc2992.ko.xz powr1220.ko.xz w83627hf.ko.xz applesmc.ko.xz i5500_temp.ko.xz ltc4151.ko.xz sbrmi.ko.xz w83773g.ko.xz aquacomputer_d5next.ko.xz i5k_amb.ko.xz ltc4215.ko.xz sbtsi_temp.ko.xz w83781d.ko.xz as370-hwmon.ko.xz ibmaem.ko.xz ltc4222.ko.xz sch5627.ko.xz w83791d.ko.xz asb100.ko.xz ibmpex.ko.xz ltc4245.ko.xz sch5636.ko.xz w83792d.ko.xz asc7621.ko.xz ina209.ko.xz ltc4260.ko.xz sch56xx-common.ko.xz w83793.ko.xz asus-ec-sensors.ko.xz ina238.ko.xz ltc4261.ko.xz sht15.ko.xz w83795.ko.xz asus_atk0110.ko.xz ina2xx.ko.xz max127.ko.xz sht21.ko.xz w83l785ts.ko.xz asus_wmi_sensors.ko.xz ina3221.ko.xz max16065.ko.xz sht3x.ko.xz w83l786ng.ko.xz atxp1.ko.xz it87.ko.xz max1619.ko.xz sht4x.ko.xz xgene-hwmon.ko.xz axi-fan-control.ko.xz jc42.ko.xz max1668.ko.xz shtc1.ko.xz coretemp.ko.xz k10temp.ko.xz max197.ko.xz sis5595.ko.xz corsair-cpro.ko.xz k8temp.ko.xz max31730.ko.xz smm665.ko.xz
-
Perl/nerd pack already installed. Followed command presented to download lm_sensors, /boot/extra didn't exist. Created it, placed file from wget command there. Ran sensors-detect, no change on output. Saw I could potentially try: installpkg/boot/packages/lm_sensors-3.6_0_x86_64_3.txz after placing into /boot/packages directory. Tried that, ran sensors-detect again. Output still the same. Tried to modprobe the lm_sensor or lm_sensors modprobe lm_sensor modprobe: FATAL: Module lm_sensor not found in directory /lib/modules/6.1.106-Unraid modprobe lm_sensors modprobe: FATAL: Module lm_sensors not found in directory /lib/modules/6.1.106-Unraid
-
Thanks all, latest/greatest release, BIOS updated to latest. It's an i5-12600K CPU on an Intel z790 chipset motherboard. sensor-detect only shows modprobe coretemp Guess I'll just need to be patient. Have checked BIOS a couple times for any enable/disable, will check again at next reboot. #----cut here---- # Chip drivers modprobe coretemp /usr/bin/sensors -s #----cut here---- # sensors acpitz-acpi-0 Adapter: ACPI interface temp1: +16.8°C (crit = +20.8°C) temp2: +27.8°C (crit = +105.0°C) nvme-pci-0200 Adapter: PCI adapter Composite: +34.9°C (low = -273.1°C, high = +84.8°C) (crit = +84.8°C) Sensor 1: +34.9°C (low = -273.1°C, high = +65261.8°C) Sensor 2: +37.9°C (low = -273.1°C, high = +65261.8°C) coretemp-isa-0000 Adapter: ISA adapter CPU Temp: +36.0°C (high = +80.0°C, crit = +100.0°C) Core 0: +32.0°C (high = +80.0°C, crit = +100.0°C) Core 4: +35.0°C (high = +80.0°C, crit = +100.0°C) Core 8: +31.0°C (high = +80.0°C, crit = +100.0°C) Core 12: +31.0°C (high = +80.0°C, crit = +100.0°C) Core 16: +35.0°C (high = +80.0°C, crit = +100.0°C) Core 20: +30.0°C (high = +80.0°C, crit = +100.0°C) Core 28: +34.0°C (high = +80.0°C, crit = +100.0°C) Core 29: +34.0°C (high = +80.0°C, crit = +100.0°C) Core 30: +34.0°C (high = +80.0°C, crit = +100.0°C) Core 31: +33.0°C (high = +80.0°C, crit = +100.0°C)
-
Version 6.12.13 2024-08-22 Had to swap some hardware recently. Went to a Gigabyte Z790 Aorus Elite AX - it was cheap and available next day when I needed it. The 1 annoying thing about it is it doesn't seem to have a motherboard temperature sensor that the Dynamix temp plugin can read/report. I miss seeing the motherboard temp in the dashboard. Or at the very least if it's not available, I'd like to disable it for the motherboard rather than seeing "Temperature: --- °C" displayed. Is this a gigabyte thing? I can't imagine a modern mobo maker not including sensor information and/or making it available to 3rd party app writers for non-Windows OS users.
-
I owe you a drink, sir. Accidentally killed my CPU & motherboard. Decided easiest solution was to migrate to new CPU, MOBO, RAM, and due to an MIA 2nd 4x4 CPU cable, had to get new PSU also. After a couple days of anxious waiting and finally being able to put it all together, everything booted - but not into unRAID. Found this thread, took me a bit to understand to put the unRAID boot USB drive into another PC and delete the trailing -, and sure enough, IT'S ALIVE! Thank you, thank you, thank you!
-
I was all set - had the parts for a nice z790 mobo & 14700K in the cart, then saw Arrow Lake coming out about a week later, so I waited. In 2021, I upgraded my current desktop to i7-12700 on z690 mobo, because I waited 2 days after launch of z790 to review things and by then, they were all sold out everywhere, so I had to get the z690 board. I tried to avoid that this time around, and forgot the fact that unRAID takes/needs time for new hardware to be supported. My mistake. My bad. So, I have a newly built server I can't use. Could reconfigure and use as desktop for family, swap with my z690/12700K, etc. Too much to decide on quickly. I am not concerned with the 4 SATA ports, I only used 2 in unRAID for SSD Cache drives. I have HBAs and yes, I saw you were avoiding those.
-
Went ahead and downloaded the installer utility, created boot media, and it just hangs after selecting initial option (unRAID, unRAID with GUI, etc.). Wondering how premature my purchase was. Maybe I'll delegate this to my desktop and use my motherboard/CPU as the new primary unRAID box (i7-12700K). Wonder how much of a wait I have?
-
I purchased and built Arrow Lake this last weekend. I haven’t tried anything yet as far as moving my drives/array and sounds like I need to wait until support is in the kernel anyways? I went with a gigabyte elite ice X and i7-265K. Current rig is only 8 years old (i7-6700K) and will have backup duties after a new license.
-
Currently running sickchill on a synology, but that presents a msg that it's no longer supported. I have an unRAID server, and found this thread. Is this a similar sickchill? Same sickchill? Running in a docker on unRAID seems desirable to me. I think I could then get rid of my synology. Is there a good howto/video for installing sickchill on unRAID docker from scratch? I'm assuming I can't easily port any thing over and would just need to start from scratch.
-
Okay, a little more searching and I think I've learned this is known/expected (unfortunately) behavior. It's unRAID server that can't keep up with Plex streaming when file transfers occur.
-
Hi, maybe I just have higher expectations than reality, so I need to ask how this should work or if I potentially have something wrong. I have a pretty decent system, albeit a few years old (64GB RAM, i7-6500K. I have a 2 port 10G card via unifi 48-port Enterprise POE switch, managed by a Unifi Dream Machine Pro. I have 1 line wired to 10G switch for my LAN network (192.168.1.1/24), and the 2nd line wired to my switch for my WiFi network (192.168.30.1/24). If I transfer a large amount of data (currently, 1TB) via the 192.168.1.1/24 network, it does the typical SMB thing - runs at about 38-50 MB/sec speeds (unRAID is encrypted, so I assume this slows things down), then eventually runs out of buffer? slows down and catches back up for a few more minutes. The windows file transfer icon tells me about 4 hours to finish the transfer. In the mean time, my daughter is trying to watch some kids shows on Plex. Almost immediately, it buffers like crazy and can't keep up - in short, it is unplayable. I was hoping by upgrading both lines to the switch to 10G that I would be able to transfer files at max speed on 1 line (wired) and plex would still be able to feed the wifi clients a decent amount of speed on the 2nd 10G line. Is it because they're still on the same switch, even though they're also on different lines and on different VLANs and the transfers over that switch are still the limiting factor? Is the limiting factor the CPU and the power encrypting 1TB of data to store on a share and not network throughput?
-
Found my problem. Didn't complete step 2 correctly. Disks are reordered, parity 2 is currently resyncing. Thanks, everybody, for the help & patience.
-
Something isn't right. After step 5, Start is not an option and it says Stopped. Invalid Expansion.
-
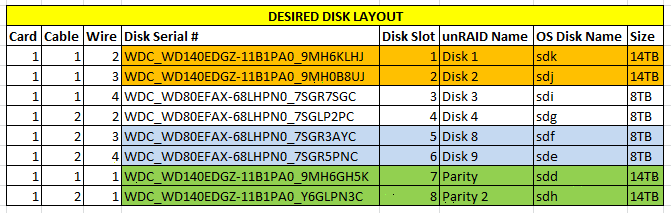
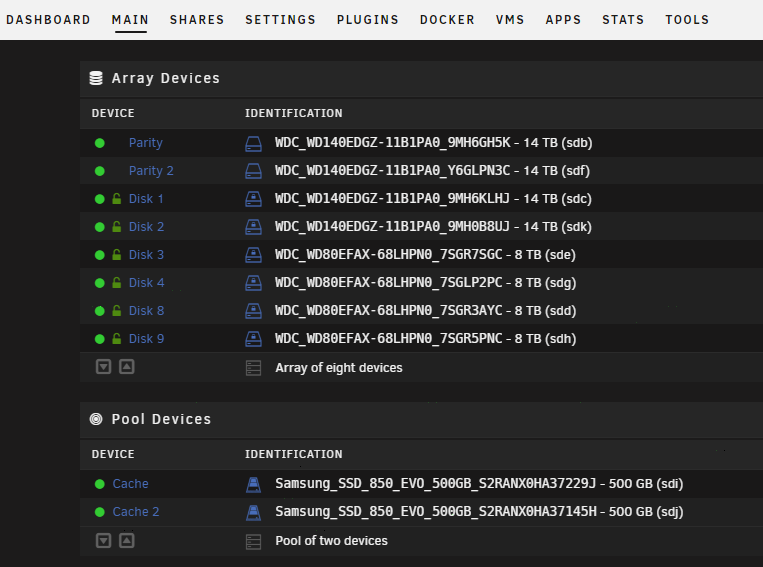
Okay, hopefully last question, to make sure I have the reorder work correct. Here is the current layout (see pic). I am trying to remove the gap in numbering on the GUI now. From my understanding, these are my steps: 1. Stop array. 2. Tools --> New Config 3. Click Preserve current configuration, click all, then click close. 4. Go to Main page. 5. Un-assign 3AYC as disk 8, assign it to disk 5. 6. Un-assign 5PNC as disk 9, assign it to disk 6. 7. Un-assign Parity 2. 8. Check box, Parity is valid. 9. Start array. 10. After it starts up, shut down again and reassign parity 2 drive to parity 2 spot/slot. 11. Start array - and rebuild parity 2 will commence. Is that accurate?
-
They're already labeled by manufacturer (WD drives are awesome for this!). Just wondering if there's any protection or performance benefit to separate the parity 1 per cable, or if not, I'll just slap them into a slot to match what the new config to be - labeled top to bottom 2 parity and 6 data.
-
Thanks for all the help guys. Card removed, down to 1 card, 2 breakout cables, and all is looking a little better to me. Now, off the wall question. My card (9211) has 2 connected cables with 2 drives connected each. Is there any benefit to having 1 parity drive on each connected breakout cable? Either performance or parity/data safety? Or no real world difference, just slap the drives where it's most convenient/easier to maintain/know where your drives are? When I originally built, I put 1 parity per cable, thinking it might be safer. However, I now realize that may not be true and wanted to ask if it matters. The system has 8 drives mounted vertically (Fractal Define R5), might be easier to know which drive is which if I put Parity at top, Parity 2 below that, Data 1 3rd, Data 2 4th, and on down the line. But is there any real detriment to doing that? Or would it be better to still separate parity drives per card's cable bundle?
-
Yes, corrected, thank you.
-
I think I finally understand. I can remove my other card, rearrange physical disks as I want. But my setup will still remain: P1 P2 D1 D2 D3 D4 D8 D9 until I do new config, which will then require rebuilding new parity 2 to 'close the gap' in the GUI to: P1 p2 D1 D2 D3 D4 D5 D6 Is that correct?
-
This is where I'm confused then. I want to accomplish both. I want to physically rearrange the 8 disks that remain, by swapping cables & such around so they are all on 1 controller card, instead of 2. Plus, I also hope to "close the gap" in the GUI layout. Or, will physically rearranging things (thus eliminating the 3 empty slots by eliminating all the extra slots from that 2nd card when it's removed and consolidating down to 1 card) automatically cause the drives to show up in all the right places, as long as I have parity & parity 2 identified as the correct 2 drives? Are you/others stating I/anybody could (in my view below) move disk 9 to the cable connector that is disk 5 (different controller card), and it'd still boot up with all the data intact, without having to run new config or do anything else?
-
Yes, it was checked, so I assume it was correcting parity errors, and not some other type of errors.
-
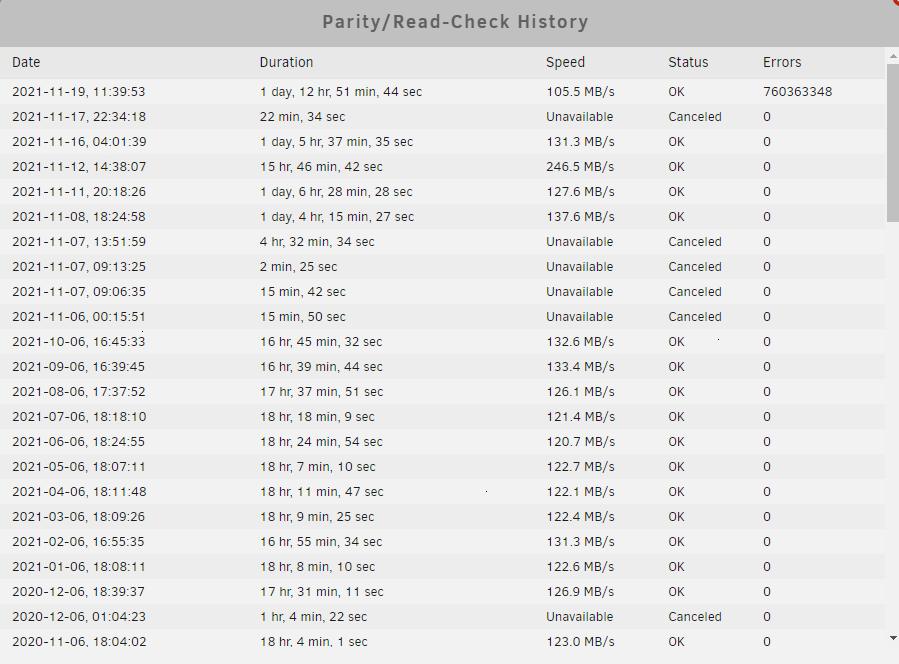
Yes, I'm pretty sure, but have no way to know? So, as long as I rearrange SAS cards, put drives back in the same order (1-2 parity in serial # order, 3-8 in serial # order) in new slots 1-8, I should be good? Added screenshot of parity checks - this is the only time I've ever received errors on a parity check, so my assumption is they are 'correcting parity check' errors.
-
Correct, and I want to reduce from using 2 SAS cards down to 1 SAS card. Also, when I 'cleared' the last 2 5TB drives, the script just stopped working - on both instances. (I ran and tried separately). I went ahead and removed the drives and changed configuration each time because I had already moved the data off each drive using unbalance. I assumed it failed, and that my parity, even though it said valid wasn't valid. After I got the 2nd one out, I ran another parity check to be sure. It just finished: Last check completed on Fri 19 Nov 2021 11:39:53 AM EST (today) Finding 760363348 errors Duration: 1 day, 12 hours, 51 minutes, 44 seconds. Average speed: 105.5 MB/se I assume because I was right, I removed and it didn't finish/update parity along the way when I tried to clear. However, I do appear to still have same size used array, all my larger drives in place, and I just finished the parity check so it all should be good now. I just need to consolidate the cards/cables down to 8 lines of a single SAS card now.



