





RifleJock
Members
-
Joined
-
Last visited
-
Can you add a check/notification to scrape VM's to see if VNC is enable and listening on 0.0.0.0 and a user is using public IP space? This would allow direct vnc access (and the security options for vnc if enabled also aren't very "secure") Working on my fifth plugin now, VNC Bind to also solve these problems, but figured it'd be good to have these as a check for fix common problems, Back in 2017, I had a user gain access to a DMZ'd unraid device (knowing it's a bad idea) and they bought a bunch of ram on someone elses random card, still to this day, don't know who's card... And I happened to see it because my vnc window was still up. Ever since then, I've been very careful with these things.. but even now to this day, every time you update a template there's a high chance that custom xml'd vnc limiting to certain ip's or ports defaults back to 0.0.0.0 and all interfaces. My plugin will work to secure this and notify users. Sorry, not trying to plug my plugin too hard, but it is a security risk and a very very common problem. <graphics type='vnc' port='-1' autoport='yes' websocket='-1' listen='0.0.0.0' sharePolicy='ignore'> <listen type='address' address='0.0.0.0'/> </graphics> Perhaps scrape all on-disk/ram vm templates for this to notify of the common problem? I'm pretty sure I've made a request to unraid before about these types of problems and made suggestions on fixes, but even today, they remain. PS. nobody probably cares, but yes, I am still using that ram in my system today that someone else bought for me on my amazon account that a hacker was using over my open vnc. And with these prices, I'm very glad I still have them!
-
Been lots of changes, let me know your latest findings!
-
Thanks for testing this stuff! The MTU issue was an oversight, I'll work to get that resolved. I had made some changes to the way MTU is restored for known past links as well as the way the configuration field is presented to the user on the tbnN tabs. I'll make sure that is saves correctly going forward, thus allowing MTU to set correct and survive reboots. EDIT: Should be resolved now in 8.24aa build. Though I haven't had a chance to test it myself.
-
Let me know when you get a chance to update and test again. Some drastic improvements have been made.
-
Awesome to hear your experiences! I'll look further into the issues you've brought up. I got a better thunderbolt cable in today, also getting a tablet with good Thunderbolt tomorrow. I'll do some further testing and see if I can resolve the needing to re-apply, as well as rolling MACs. Should be some updates from me soon! We can probably wait on your diagnostics for now. I'll let you know though! PS Oh, just seeing your responses as well over in the plugin support page as well.
-
This thread is the support topic for NBD ExportInstall the plugin, open Settings → Network Services → NBD, host a disk/partition over TCP with qemu-nbd, or pull a remote nbd:// target into qcow2 or raw on Unraid. For bugs or feedback, post here with Unraid version, plugin version, Host vs Pull, bind IP, read-only / Destructive mode settings, whether qemu-nbd and qemu-img are present, and what you expected vs what you saw. Screenshots of Network Services → NBD help a lot. NBD Export is for block-level export and imaging over a path you trust — not file sharing, not iSCSI. Basic NBD has no authentication; prefer a private LAN or Thunderbolt IP bind. Supported workflows when qemu tools are present: Host export — disk or partition as Network Block Device (read-only by default) Pull — remote nbd:// into qcow2 or raw under /mnt only Peer imaging between two Unraid boxes (or other qemu-nbd peers) One-slot / dock patterns — image a prepared volume onto a new NVMe in USB/TB enclosure Same plugin UI for Host, Pull, Status, and Settings. NBD is not SMB/NFS (files/folders). It is not iSCSI (different stack). This plugin uses qemu-nbd / qemu-img (usually already present if you use Unraid VMs). INSTALLATIONRecommended (Community Applications) Apps → Search NBD Export → Install Alternatively, Manual setup (same plugin) Plugins → Install Plugin, paste this URL: https://raw.githubusercontent.com/ibigsnet/NBDExport/main/nbd.plg After install: Settings → Network Services → NBD (tabs: Status · Host · Pull · Settings — next to NFS and SMB). Hard-refresh the browser after update if the UI looks stale. WHAT IT DOESHost a disk or partition over TCP with qemu-nbd Pull a remote nbd:// target into qcow2 or raw with qemu-img convert Read-only host export by default Bind to a specific IP (not 0.0.0.0 unless you explicitly allow it) Destructive mode = Off by default — blocks writable host and array/cache/pool/mounted/boot sources until you opt in Pull jobs write under /mnt only — never to /dev/… block devices Status, Host, Pull, and Settings tabs under Network Services → NBD Optional companion underlay: Thunderbolt Net for a fast private path (bind NBD to a TB IP) Default product path: read-only host, specific bind IP, Destructive off, pull to /mnt only. WHAT IT IS NOTNot SMB or NFS — no folders, shares, or file-level permissions; this is block protocol Not iSCSI — different stack and tooling Not a guarantee of security on untrusted networks — plain NBD has no auth; do not bind to the world Not “always write the array/boot device” — Destructive mode stays Off until you deliberately enable it Not a replacement for parity-aware Unraid array tools — imaging and block export are different jobs Never treat a live writable host export as a casual backup of a mounted filesystem without understanding consistency Prefer private or Thunderbolt binds. Details: security-and-bind.md · destructive-mode.md (links below). COMPATIBILITYPlugin allows Unraid 6.12.0+. Developed and tested on Unraid 7.x. Needs qemu-nbd and qemu-img on PATH (typical with VM support). Peer can be another Unraid with this plugin, or any host that speaks qemu-nbd / nbd. Optional: Thunderbolt Net for host-to-host underlay; Fabric Routing only if you need multi-hop IP — NBD itself is ordinary TCP. Reports welcome. LINKSDocs: https://github.com/ibigsnet/NBDExport/blob/main/DOCS.md How to use: https://github.com/ibigsnet/NBDExport/blob/main/docs/how-to-use.md When to use NBD: https://github.com/ibigsnet/NBDExport/blob/main/docs/when-to-use-nbd.md Security / bind: https://github.com/ibigsnet/NBDExport/blob/main/docs/security-and-bind.md Destructive mode: https://github.com/ibigsnet/NBDExport/blob/main/docs/destructive-mode.md GitHub: https://github.com/ibigsnet/NBDExport CA templates repo: https://github.com/ibigsnet/unraid-templates Raw plugin URL: https://raw.githubusercontent.com/ibigsnet/NBDExport/stable/nbd.plg Optional companions: • Thunderbolt Net (forum): https://forums.unraid.net/topic/200065-plugin-thunderbolt-net-host-to-host-networking-over-thunderbolt-345-and-usb44v2/ • Fabric Routing: https://github.com/ibigsnet/FabricRouting Support development: https://www.patreon.com/cw/IBIGSNet · https://www.paypal.com/paypalme/RifleJock License: GPLv3 — ibigs, LLC
-
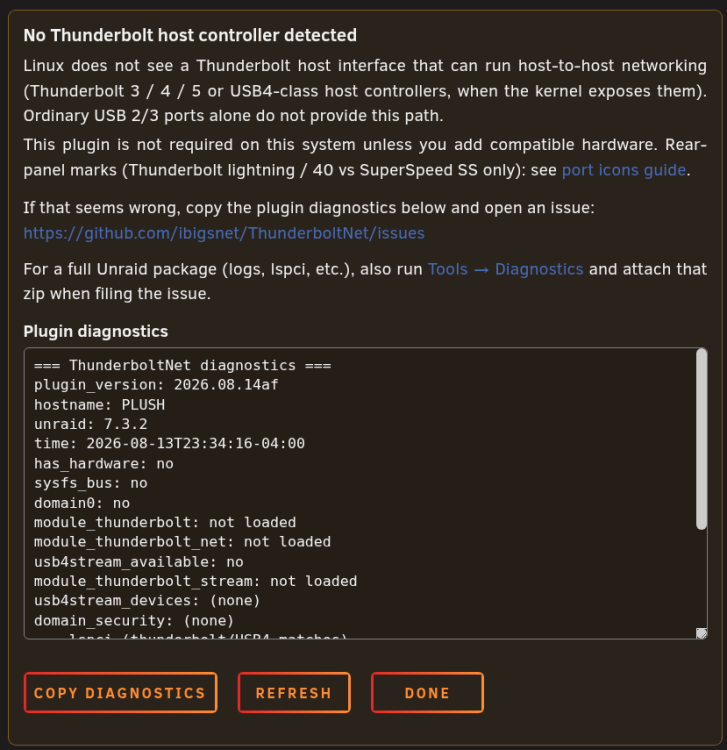
Thanks! - really glad it's useful! Stability / “production ready?” In my experience the thunderbolt_net path is stable enough for real work when the link trains cleanly, you use a simple static IP plan, and you don’t fight multi-cable domain weirdness. I’ve already used it with my NBD Export plugin (not on CA yet) for a 4TB NVMe whole-disk Host/Pull over Thunderbolt networking — not “copy a folder over SMB” — so I’m dogfooding it hard. I'm also working on a plugin as well for doing FabricRouting and extending the support for that as well through thunderbolt networking. (also not yet up on CA) What “production-ready” means here is a bit split: • Kernel: Unraid already ships the Thunderbolt / thunderbolt_net stack (not an out-of-tree driver you install from CA). • Product: Unraid doesn’t fully surface that path in the stock UI the way some other distros experiment with. This plugin is management UX on top of that kernel path — still early, but aimed at feeling natural on Unraid. • Your pair: NUC Pro 15 <--> MacBook Pro is reasonable if both ends expose host networking on a real TB/USB4 cable (not a dock Ethernet path) and you set static IPs both ends. I haven’t lived on that exact pair day-to-day; Linux <-> Linux is where I’ve pushed hardest. If you’re already running Unraid on the NUC, diagnostic dumps from the plugin help a lot when something’s quirky. See: peer-scenarios) Limits that matter if you’re thinking production-ish: • Safe Mode / no-plugins won’t load the UI — have Ethernet/manual fallback (see safe-mode recovery notes). • Prefer one known-good TB4/USB4 cable; unplug other host TB cables when debugging. Lots of cables market themselves as TB-class and aren’t. • Keep default route = No on the TB side so WAN/mgmt stays on eth/Wi-Fi. NUC Pro 15 → MacBook Pro I’d expect the dual TB4/USB4 ports to behave like other USB4 hosts that expose the controller to Linux. Direct host-to-host (not through a dock as the “network”), static IPs both ends, start simple. OT — storage / 10G AQC Different stacks from host-to-host thunderbolt_net. OWC ThunderBay etc. are DAS (Direct Attached Storage) stability questions; AQC 10G is normal Ethernet and often fine long-term. This plugin doesn’t manage those. And of course, my end goals do align to bringing stability everywhere, when/where possible. But mainly, to leverage faster inter connectivity between devices, why settle for 10gig LAN when I can have 20gb/s or 40gb/s. And at the expense of just a TB standard cable for hardware already owned? If unraid lacks detection of thunderbolt_net driver usage, my plugin flags it:
-
Working on a plugin for this. Will put it up on CA store soon. I'm looking to leverage my dual 40gb/s links between two unraid hosts... It's WIP, but users can follow the development here: https://github.com/ibigsnet/ThunderboltNet https://forums.unraid.net/topic/200065-plugin-thunderbolt-net-host-to-host-networking-over-thunderbolt-345-and-usb44v2/
-
This thread is the support topic for Thunderbolt Net + Fabric Routing (FRR resides here, for now)Install the plugin, plug one Thunderbolt/USB4-class cable to a peer host, set a static IP on the tbn tab, and use it like a simple eth path. For bugs or feedback, post here with Unraid version, controller generation if you know it (TB3 / TB4 / TB5 / USB4 / USB4 v2), peer OS (Linux/macOS/Windows), cable notes, and what you expected vs what you saw. Screenshots of Settings → Network Settings → Thunderbolt help a lot. Thunderbolt Net is for reliable single-link host-to-host networking wherever Linux exposes the Thunderbolt fabric and thunderbolt_net — not locked to one sticker speed. Supported when the kernel sees a host controller and a thunderboltN interface, including: Thunderbolt 3 Thunderbolt 4 Thunderbolt 5 USB4 (20G and 40G product tiers, when the platform implements host networking) USB4 Version 2.0 (e.g. 80 Gb/s class) when controllers and cable train that path Same plugin UI for all of those. We report trained rate and lanes honestly. Port stickers (40 Gb/s, 80 Gb/s, etc.) are capability class — not a promise of full dual-lane TCP on every host-to-host pair. One cable, one peer, eth-like UX. Not dual-cable bonding for 2× bandwidth. Plain USB 2/3 SuperSpeed-only ports (SS only, no Thunderbolt/USB4 host router) are out of scope — those never get thunderbolt_net. INSTALLATIONRecommended (Community Applications) Apps → Search Thunderbolt Net → Install Alternatively, Manual setup (same plugin) Plugins → Install Plugin, paste this URL: https://raw.githubusercontent.com/ibigsnet/ThunderboltNet/stable/thunderboltnet.plg After install: Settings → Network Settings → Thunderbolt (and the tbn0 / tbn1 tabs when interfaces appear). Hard-refresh the browser after update if the UI looks stale. WHAT IT DOESWorks across TB3 / TB4 / TB5 / USB4 / USB4 v2 hosts when Linux exposes them Shows fabric: security, modules, peers, trained RX/TX and lanes (whatever rate the path actually trained) Per-link settings like eth: enable, static IPv4/IPv6, MTU, optional bridge/VLAN notes Unraid services listening on TB IPs (network-extra include), per-peer preferences, harden-all Known peers memory (settings return when a peer reconnects) Activity hints on live links Honest link quality: trained first; single-lane on dual-capable hosts is common under Linux host-to-host Default product path: one cable, one peer, static IP, MTU 1500 both ends for bulk (peer must match). WHAT IT IS NOTNot limited to “Thunderbolt 4 only” or “40G only” — same stack for older and newer generations Linux supports Not dual-cable bonding to the same peer for 2× bandwidth (usually one netdev; bonding is experimental and often fails on thunderbolt_net) Not a guarantee of dual-lane or full sticker TCP (e.g. 40G/80G class ports can still train 20 Gb/s · 1-lane; ~10–15 Gbit/s TCP is normal on that path) Not a dock RJ45 “TB switch” — dock Ethernet is usually a USB/PCIe NIC; configure it like eth Never unbind the Thunderbolt NHI “to reset” networking — that can wedge the controller until reboot If dual-cable experiments wedged the fabric: unplug all TB/USB4 host cables from both ends on both machines, wait, plug exactly one cable, then reconfigure. COMPATIBILITYPlugin allows Unraid 6.12.0+. Developed and tested on Unraid 7.x (including 7.3.x). Needs a Thunderbolt-family or USB4 host controller that Linux exposes (not USB2/3-only SuperSpeed ports). Peer can be Linux (including another Unraid), macOS Thunderbolt Bridge, or Windows where host networking is available. Reports from TB3 through TB5 / USB4 v2 welcome. LINKSDocs: https://github.com/ibigsnet/ThunderboltNet/blob/main/DOCS.md Standards / generations: https://github.com/ibigsnet/ThunderboltNet/blob/main/docs/standards-and-speeds.md GitHub: https://github.com/ibigsnet/ThunderboltNet CA templates repo: https://github.com/ibigsnet/unraid-templates Raw plugin URL: https://raw.githubusercontent.com/ibigsnet/ThunderboltNet/stable/thunderboltnet.plg
-
Working on a plugin for this. Will put it up on CA store soon. I'm looking to leverage my dual 40gb/s links between two unraid hosts... It's WIP, but users can follow the development here: https://github.com/ibigsnet/ThunderboltNet https://forums.unraid.net/topic/200065-plugin-thunderbolt-net-host-to-host-networking-over-thunderbolt-345-and-usb44v2/
-
This thread is the support topic for Storage Guard.Install the plugin, set your free-space thresholds, and use 'Main' page as usual. For bugs or feedback, post here with Unraid version, a quick note on array/pool layout, and what you expected vs what you saw. Screenshots of Settings and 'Main' help. Drive prices make replacing a failed disk the same day expensive. Storage Guard is a first-glance check on Main: set free-space thresholds for the array and each pool so you can see whether you still have room to move data after a disk fails. When free space falls to or below a threshold, the free space bar on Main is colored yellow (warning) or red (critical). Optional Unraid notifications use the same thresholds. INSTALLATIONRecommended (Community Applications) Apps -> Search Storage Guard -> Install Alternatively, Manual setup (same plugin) Plugins → Install Plugin, paste this URL: https://raw.githubusercontent.com/ibigsnet/StorageGuard/stable/storageguard.plg After install: Settings → User Utilities → Storage Guard WHAT IT DOESFree-space Warning and Critical thresholds for the array and each pool Thresholds from real disk sizes, or custom values (1.5T, 500G, 7.5T, etc.) Colors the Main free space bar (solid or outline, per array/pool) Optional Unraid notifications (independent of coloring) COMPATIBILITYTested on Unraid 7.1.3 through 7.3.2. Plugin allows Unraid 6.12.0+. Main free-bar coloring is built around Unraid 7 layout. Reports from other 7.x builds welcome. LINKSDocs: https://github.com/ibigsnet/StorageGuard/blob/main/DOCS.md GitHub: https://github.com/ibigsnet/StorageGuard CA templates: https://github.com/ibigsnet/unraid-templates Raw plugin URL: https://raw.githubusercontent.com/ibigsnet/StorageGuard/stable/storageguard.plg Support development: https://www.patreon.com/cw/IBIGSNet · https://www.paypal.com/paypalme/RifleJock
-
Was CTOP removed?
-
I can confirm, that I run into a lot of these problems as well. I had originally built the 7950x on Asus X670E Extreme. I ended up doing RMA's and other things that left my build in a messy state. While buying and swapping hardware around, I ultimately ended up building a secondary system. The other system, the 7950x3D and x670e Gene, seems to be a lot more stable. I will say that I went away from unraid due to the instability with it. Now both of those systems are on 7950x3D, and I notice, that there are lots of limitations with unraid and the x3D processors as well, having to send data through a specific core, and crashes after reserving specific cores for vm's. I'll be playing around with all the builds again on unraid soon, I'm sure I'll still run into the same issues, but seing as there as been a lot of BIOS updates and Kernel updates with unraid, perhaps there is some stability now? We will see.
-
How necessary is this process? (using ich777/minecraftbasicserver) --env 'UID=99' \ --env 'GID=100' \ The issue that I'm facing, is that my Minecraft (MC Eternal) server reboots will take literally forever to reboot due to this process. I've got hundreds of gigs of Dynmap and World data, and everytime the container reboots, this process will struggle to go through each of the directories created, mainly Dynmap and World folders will cause this to take forever as there are millions of folders/subdirectories. Can I set the necessary permissions one time, and disable this process from the bootup process?
-
Same boat here, AX1500i. Unraid 6.10.0-rc3 root@CRYZEN:~# lsusb Bus 008 Device 001: ID 1d6b:0003 Linux Foundation 3.0 root hub Bus 007 Device 001: ID 1d6b:0002 Linux Foundation 2.0 root hub Bus 006 Device 001: ID 1d6b:0003 Linux Foundation 3.0 root hub Bus 005 Device 003: ID 0b05:1984 ASUSTek Computer, Inc. USB Audio Bus 005 Device 002: ID 05e3:0608 Genesys Logic, Inc. Hub Bus 005 Device 001: ID 1d6b:0002 Linux Foundation 2.0 root hub Bus 004 Device 001: ID 1d6b:0003 Linux Foundation 3.0 root hub Bus 003 Device 003: ID 1b1c:1c02 Corsair Corsair Link TM USB Dongle Bus 003 Device 002: ID 05e3:0608 Genesys Logic, Inc. Hub Bus 003 Device 001: ID 1d6b:0002 Linux Foundation 2.0 root hub Bus 002 Device 001: ID 1d6b:0003 Linux Foundation 3.0 root hub Bus 001 Device 001: ID 1d6b:0002 Linux Foundation 2.0 root hub Bus 009 Device 001: ID 1d6b:0002 Linux Foundation 2.0 root hub Bus 010 Device 002: ID 090c:1000 Silicon Motion, Inc. - Taiwan (formerly Feiya Technology Corp.) Flash Drive Bus 010 Device 001: ID 1d6b:0003 Linux Foundation 3.0 root hub root@CRYZEN:~# root@CRYZEN:/sys/bus/usb/drivers# ls -al total 0 drwxr-xr-x 8 root root 0 Mar 19 04:13 ./ drwxr-xr-x 4 root root 0 Mar 19 04:13 ../ drwxr-xr-x 2 root root 0 Mar 19 04:13 hub/ drwxr-xr-x 2 root root 0 Mar 19 04:13 synaptics_usb/ drwxr-xr-x 2 root root 0 Mar 19 04:13 usb/ drwxr-xr-x 2 root root 0 Mar 19 04:13 usb-storage/ drwxr-xr-x 2 root root 0 Mar 19 04:13 usbfs/ drwxr-xr-x 2 root root 0 Mar 19 04:13 usbhid/ root@CRYZEN:/sys/bus/usb/drivers# cd hub/ root@CRYZEN:/sys/bus/usb/drivers/hub# ls -al total 0 drwxr-xr-x 2 root root 0 Mar 19 04:13 ./ drwxr-xr-x 8 root root 0 Mar 19 04:13 ../ lrwxrwxrwx 1 root root 0 Mar 19 09:08 1-0:1.0 -> ../../../../devices/pci0000:20/0000:20:01.1/0000:21:00.0/0000:22:01.0/0000:23:00.0/usb1/1-0:1.0/ lrwxrwxrwx 1 root root 0 Mar 19 09:08 10-0:1.0 -> ../../../../devices/pci0000:00/0000:00:08.1/0000:03:00.3/usb10/10-0:1.0/ lrwxrwxrwx 1 root root 0 Mar 19 09:08 2-0:1.0 -> ../../../../devices/pci0000:20/0000:20:01.1/0000:21:00.0/0000:22:01.0/0000:23:00.0/usb2/2-0:1.0/ lrwxrwxrwx 1 root root 0 Mar 19 09:08 3-0:1.0 -> ../../../../devices/pci0000:20/0000:20:01.1/0000:21:00.0/0000:22:08.0/0000:2a:00.1/usb3/3-0:1.0/ lrwxrwxrwx 1 root root 0 Mar 19 09:08 3-5:1.0 -> ../../../../devices/pci0000:20/0000:20:01.1/0000:21:00.0/0000:22:08.0/0000:2a:00.1/usb3/3-5/3-5:1.0/ lrwxrwxrwx 1 root root 0 Mar 19 09:08 4-0:1.0 -> ../../../../devices/pci0000:20/0000:20:01.1/0000:21:00.0/0000:22:08.0/0000:2a:00.1/usb4/4-0:1.0/ lrwxrwxrwx 1 root root 0 Mar 19 09:08 5-0:1.0 -> ../../../../devices/pci0000:20/0000:20:01.1/0000:21:00.0/0000:22:08.0/0000:2a:00.3/usb5/5-0:1.0/ lrwxrwxrwx 1 root root 0 Mar 19 09:08 5-1:1.0 -> ../../../../devices/pci0000:20/0000:20:01.1/0000:21:00.0/0000:22:08.0/0000:2a:00.3/usb5/5-1/5-1:1.0/ lrwxrwxrwx 1 root root 0 Mar 19 09:08 6-0:1.0 -> ../../../../devices/pci0000:20/0000:20:01.1/0000:21:00.0/0000:22:08.0/0000:2a:00.3/usb6/6-0:1.0/ lrwxrwxrwx 1 root root 0 Mar 19 09:08 7-0:1.0 -> ../../../../devices/pci0000:20/0000:20:08.1/0000:33:00.3/usb7/7-0:1.0/ lrwxrwxrwx 1 root root 0 Mar 19 09:08 8-0:1.0 -> ../../../../devices/pci0000:20/0000:20:08.1/0000:33:00.3/usb8/8-0:1.0/ lrwxrwxrwx 1 root root 0 Mar 19 09:08 9-0:1.0 -> ../../../../devices/pci0000:00/0000:00:08.1/0000:03:00.3/usb9/9-0:1.0/ --w------- 1 root root 4096 Mar 19 09:08 bind lrwxrwxrwx 1 root root 0 Mar 19 09:08 module -> ../../../../module/usbcore/ -rw-r--r-- 1 root root 4096 Mar 19 09:08 new_id -rw-r--r-- 1 root root 4096 Mar 19 09:08 remove_id --w------- 1 root root 4096 Mar 19 04:13 uevent --w------- 1 root root 4096 Mar 19 09:08 unbind root@CRYZEN:/sys/bus/usb/drivers/hub# cd ../synaptics_usb/ root@CRYZEN:/sys/bus/usb/drivers/synaptics_usb# ls -al total 0 drwxr-xr-x 2 root root 0 Mar 19 04:13 ./ drwxr-xr-x 8 root root 0 Mar 19 04:13 ../ --w------- 1 root root 4096 Mar 19 09:11 bind -rw-r--r-- 1 root root 4096 Mar 19 09:11 new_id -rw-r--r-- 1 root root 4096 Mar 19 09:11 remove_id --w------- 1 root root 4096 Mar 19 04:13 uevent --w------- 1 root root 4096 Mar 19 09:11 unbind root@CRYZEN:/sys/bus/usb/drivers/synaptics_usb# cd ../usb root@CRYZEN:/sys/bus/usb/drivers/usb# ls -al total 0 drwxr-xr-x 2 root root 0 Mar 19 04:13 ./ drwxr-xr-x 8 root root 0 Mar 19 04:13 ../ lrwxrwxrwx 1 root root 0 Mar 19 09:11 10-1 -> ../../../../devices/pci0000:00/0000:00:08.1/0000:03:00.3/usb10/10-1/ lrwxrwxrwx 1 root root 0 Mar 19 09:11 3-5 -> ../../../../devices/pci0000:20/0000:20:01.1/0000:21:00.0/0000:22:08.0/0000:2a:00.1/usb3/3-5/ lrwxrwxrwx 1 root root 0 Mar 19 09:11 3-5.1 -> ../../../../devices/pci0000:20/0000:20:01.1/0000:21:00.0/0000:22:08.0/0000:2a:00.1/usb3/3-5/3-5.1/ lrwxrwxrwx 1 root root 0 Mar 19 09:11 5-1 -> ../../../../devices/pci0000:20/0000:20:01.1/0000:21:00.0/0000:22:08.0/0000:2a:00.3/usb5/5-1/ lrwxrwxrwx 1 root root 0 Mar 19 09:11 5-6 -> ../../../../devices/pci0000:20/0000:20:01.1/0000:21:00.0/0000:22:08.0/0000:2a:00.3/usb5/5-6/ --w------- 1 root root 4096 Mar 19 09:11 bind --w------- 1 root root 4096 Mar 19 04:13 uevent --w------- 1 root root 4096 Mar 19 09:11 unbind lrwxrwxrwx 1 root root 0 Mar 19 09:11 usb1 -> ../../../../devices/pci0000:20/0000:20:01.1/0000:21:00.0/0000:22:01.0/0000:23:00.0/usb1/ lrwxrwxrwx 1 root root 0 Mar 19 09:11 usb10 -> ../../../../devices/pci0000:00/0000:00:08.1/0000:03:00.3/usb10/ lrwxrwxrwx 1 root root 0 Mar 19 09:11 usb2 -> ../../../../devices/pci0000:20/0000:20:01.1/0000:21:00.0/0000:22:01.0/0000:23:00.0/usb2/ lrwxrwxrwx 1 root root 0 Mar 19 09:11 usb3 -> ../../../../devices/pci0000:20/0000:20:01.1/0000:21:00.0/0000:22:08.0/0000:2a:00.1/usb3/ lrwxrwxrwx 1 root root 0 Mar 19 09:11 usb4 -> ../../../../devices/pci0000:20/0000:20:01.1/0000:21:00.0/0000:22:08.0/0000:2a:00.1/usb4/ lrwxrwxrwx 1 root root 0 Mar 19 09:11 usb5 -> ../../../../devices/pci0000:20/0000:20:01.1/0000:21:00.0/0000:22:08.0/0000:2a:00.3/usb5/ lrwxrwxrwx 1 root root 0 Mar 19 09:11 usb6 -> ../../../../devices/pci0000:20/0000:20:01.1/0000:21:00.0/0000:22:08.0/0000:2a:00.3/usb6/ lrwxrwxrwx 1 root root 0 Mar 19 09:11 usb7 -> ../../../../devices/pci0000:20/0000:20:08.1/0000:33:00.3/usb7/ lrwxrwxrwx 1 root root 0 Mar 19 09:11 usb8 -> ../../../../devices/pci0000:20/0000:20:08.1/0000:33:00.3/usb8/ lrwxrwxrwx 1 root root 0 Mar 19 09:11 usb9 -> ../../../../devices/pci0000:00/0000:00:08.1/0000:03:00.3/usb9/ root@CRYZEN:/sys/bus/usb/drivers/usb# cd ../usb-storage/ root@CRYZEN:/sys/bus/usb/drivers/usb-storage# ls -al total 0 drwxr-xr-x 2 root root 0 Mar 19 04:13 ./ drwxr-xr-x 8 root root 0 Mar 19 04:13 ../ lrwxrwxrwx 1 root root 0 Mar 19 09:12 10-1:1.0 -> ../../../../devices/pci0000:00/0000:00:08.1/0000:03:00.3/usb10/10-1/10-1:1.0/ --w------- 1 root root 4096 Mar 19 09:12 bind lrwxrwxrwx 1 root root 0 Mar 19 09:12 module -> ../../../../module/usb_storage/ -rw-r--r-- 1 root root 4096 Mar 19 09:12 new_id -rw-r--r-- 1 root root 4096 Mar 19 09:12 remove_id --w------- 1 root root 4096 Mar 19 04:13 uevent --w------- 1 root root 4096 Mar 19 09:12 unbind root@CRYZEN:/sys/bus/usb/drivers/usb-storage# cd ../usbfs/ root@CRYZEN:/sys/bus/usb/drivers/usbfs# ls -al total 0 drwxr-xr-x 2 root root 0 Mar 19 04:13 ./ drwxr-xr-x 8 root root 0 Mar 19 04:13 ../ --w------- 1 root root 4096 Mar 19 09:13 bind lrwxrwxrwx 1 root root 0 Mar 19 09:13 module -> ../../../../module/usbcore/ -rw-r--r-- 1 root root 4096 Mar 19 09:13 new_id -rw-r--r-- 1 root root 4096 Mar 19 09:13 remove_id --w------- 1 root root 4096 Mar 19 04:13 uevent --w------- 1 root root 4096 Mar 19 09:13 unbind root@CRYZEN:/sys/bus/usb/drivers/usbfs# cd ../usbhid/ root@CRYZEN:/sys/bus/usb/drivers/usbhid# ls -al total 0 drwxr-xr-x 2 root root 0 Mar 19 04:13 ./ drwxr-xr-x 8 root root 0 Mar 19 04:13 ../ lrwxrwxrwx 1 root root 0 Mar 19 09:13 5-6:1.7 -> ../../../../devices/pci0000:20/0000:20:01.1/0000:21:00.0/0000:22:08.0/0000:2a:00.3/usb5/5-6/5-6:1.7/ --w------- 1 root root 4096 Mar 19 09:13 bind lrwxrwxrwx 1 root root 0 Mar 19 09:13 module -> ../../../../module/usbhid/ -rw-r--r-- 1 root root 4096 Mar 19 09:13 new_id -rw-r--r-- 1 root root 4096 Mar 19 09:13 remove_id --w------- 1 root root 4096 Mar 19 04:13 uevent --w------- 1 root root 4096 Mar 19 09:13 unbind root@CRYZEN:/sys/bus/usb/drivers/usbhid# ^C root@CRYZEN:/sys/bus/usb/drivers/usbhid#


