-
Posts
112 -
Joined
-
Last visited
-
Days Won
2
Content Type
Profiles
Forums
Downloads
Store
Gallery
Bug Reports
Documentation
Landing
Everything posted by lotetreemedia
-
 Updated the post! However there is a server version avaiable are you aware of any limits there? I can't seem to find any
 -
This is a great idea! I don't have the extra horsepower on my machine to keep a windows VM up all the time though But never the less good shout!
-
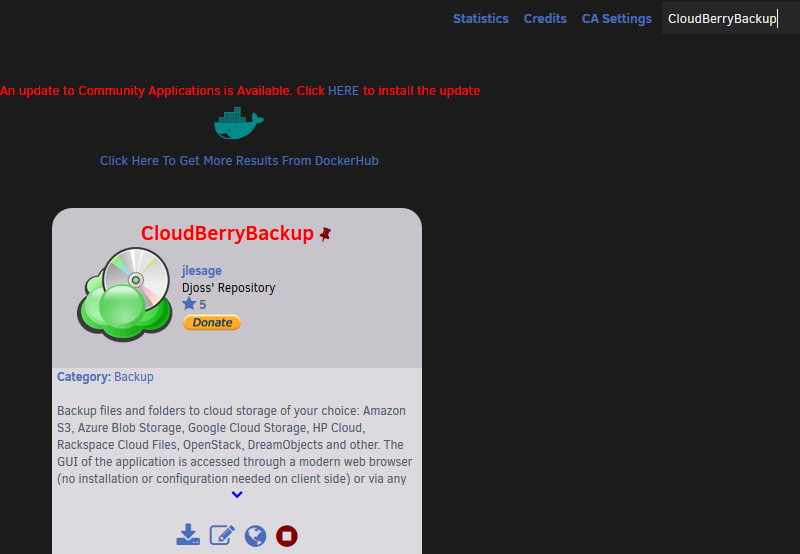
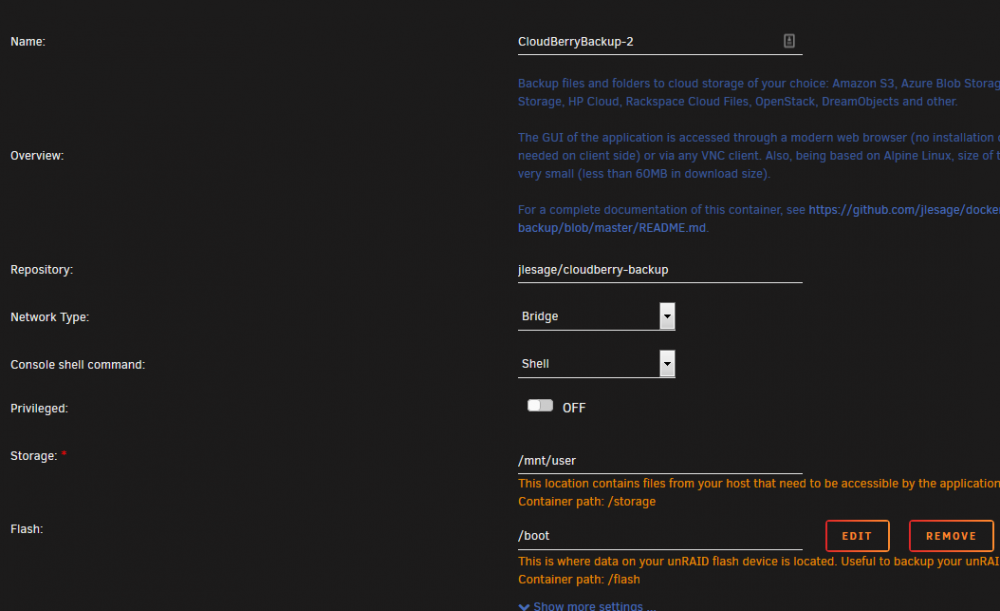
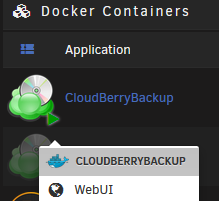
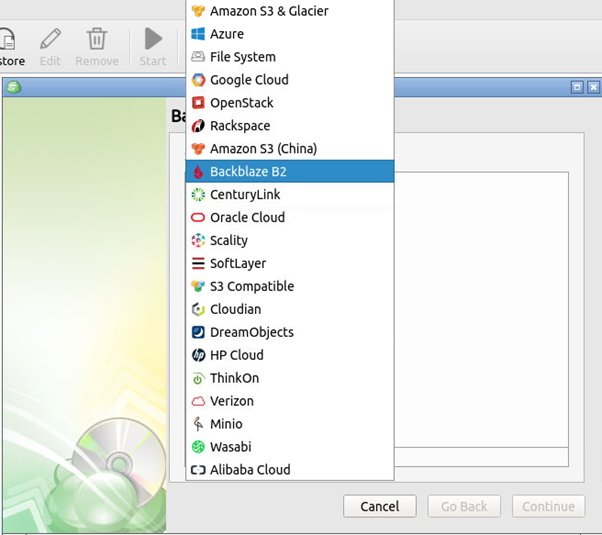
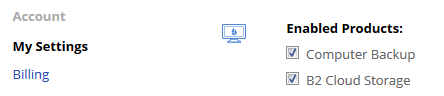
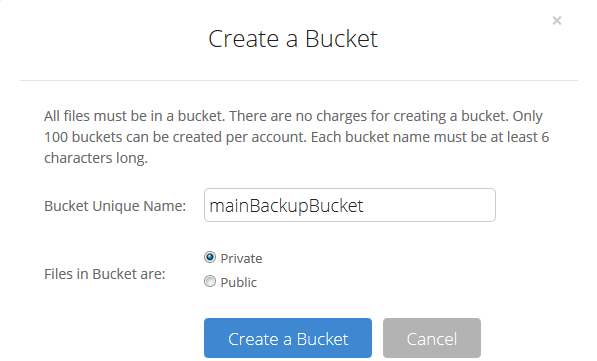
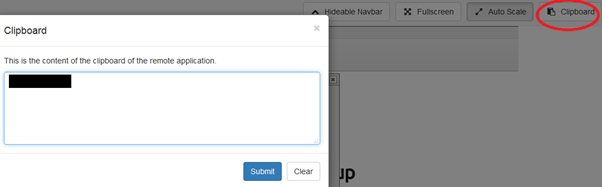
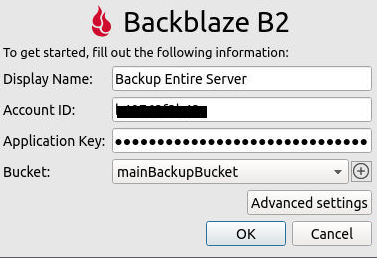
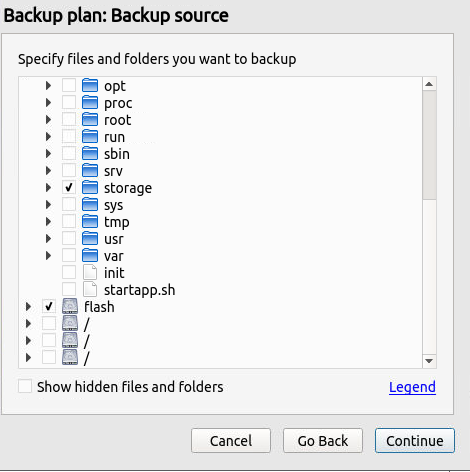
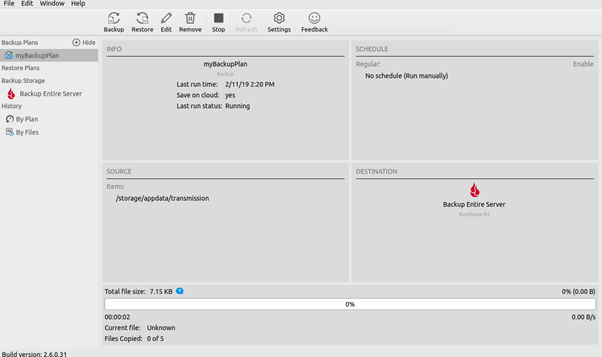
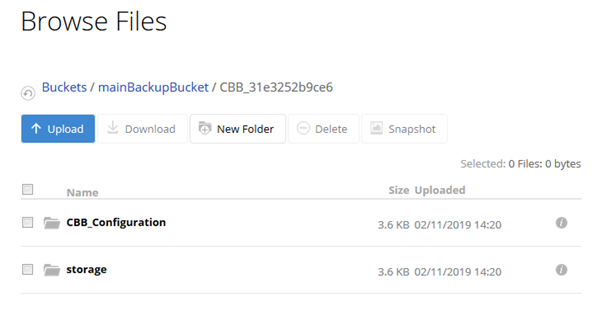
This tutorial is for a simple Backup solution for your entire unRAID box, flash drive and all. Please note, it will involve paying money for things. I'm aware this can be accomplished with tools like rclone and @SpaceInvaderOne has done a brilliant tutorial on how to do that. However, my requirements were as follows: I just wanted a GUI solution that will offer the same fine grained control with minimum setup. I wanted something reliable as my data in invaluable. I didn't want to risk losing anything because I cheaped out on something. Both the application I chose and the storage provider offer trial / free tier options so you can try this tutorial out. If it's not for you, no harm no foul. Some of you will also be averse to "Handing your data over to the corporations". I respect that, but I can't risk losing a lifetime of family photos so i'm willing to pay for a little piece of mind. The Cost 1. CloudBerry Backup This is the application that will be used to initiate, schedule, monitor, and track the backup. It's a $29.99 one off cost and in my mind was well worth it. They are reputable and have a great suite of products. If you don't want to use BackBlaze as I have, you can also connect CloudBerry to a host of other storage providers. It also caters for encryption and in the event of a disaster it has restore functionality as well. CloudBerry offer a 15 Day trail so you can test out the functionality and see if it fits your use case. EDIT: After some great sleuth work by @charlescc1000 , looks like the personal edition of CloudBerry is limited to 5TB worth of data. so this guide will work well if you're under that limit. Looks like if you're above that limit you will need to buy the Linux Ultimate Version which is $149.99. Please bear this in mind. Might be extortionate for some, but personally I think it's okay as a one off cost. You're able to upgrade and pay the difference once you hit the limit as well. 2. BackBlaze Another reputable company in the backup business, BackBlaze was my provider of choice. It will cost you $0.005/GB/month so $5/TB/month. It is much faster compared to offerings from CrashPlan and is cheaper than S3 (non-glacier), Azure, and Google Cloud. There is no fee for getting your data into BackBlaze but there is a 0.01/GB cost for download. They also integrate with many other vendors such so if you decide to switch to another NAS solution you can get your data onto there as well. It's pay for what you use so I won't be capped / paying for anything I'm not using. BackBlaze give you the first 10GB Free for you to test. The Solution 1. Buy CloudBerry The variant you need to buy is CloudBerry Desktop Backup for Linux. After you've purchased it they will email you an activation code. We'll keep this handy for the next step. 2. Install CloudBerry container. Head over to the APPS tab in unRAID. If you can't see it you need to install the Community Applications plugin. Search for CloudBerry and click the install button under it. You can keep all the default values and click apply. Head to the Docker tab in unRAID, click the play icon on CloudBerryBackup followed by WebUI. Choose Activate (If you've purchased) or Trial Enter your details and click finish. Congratulations you've installed CloudBerry! Click the Backup / Backup Files Button which will open the Cloud Storage window. Click on the little plus icon followed by BackBlaze B2. We can leave this window as is and come back to it after we've setup BackBlaze. 3. Create BackBlaze account You can sign up to BackBlaze free of charge and You can use a google account to sign in if that makes it easier. In your account click on Settings on the left and scroll down to Enabled Products. Next to B2 Cloud Storage, Click on the Link to Verify your Mobile Number. Once your number is verified enable B2 Cloud Storage. 4. Create a Bucket and Get the Keys A bucket is just a container for keeping files or like a top level folder. Why would you want more than 1 bucket? In the case that you wanted a different set of rules for backup schedules and wanted to keep your data separate this is how you'd do it. Also if you wanted to backup more than one device to it's own bucket you could create multiple buckets to do so. For me I just wanted all my data stored in a single bucket (your folder structure will remain in the bucket so not to worry). Click on create Bucket. Chose a unique name (this will need to be globally unique, meaning no one else in the world can have this bucket name) Click Create. Now that we've created the bucket that will hold all the data we need the keys to it. For this we click on Show Account ID and Application Key. Here again you have quite fine grained control over your bucket via multiple Application Keys. So if you had one of your friends backup up to your bucket. you'd create an application key for them and not give them the master one. In the event you'd like to revoke access / change certain permissions without affecting other keys you could do that. For me, I've just got a single device backing up so I'm going to use the Master Application Key. Please note that Master Keys are only displayed once. So once you click Create New Master Application Key keep the window open we're going to use it immediately. Copy your application ID to your clipboard for bonus efficiency points. 5. Create The Backup Schedule Head back to our CloudBerry Container WebUI and choose a display name for this Backup plan. You can create multiple backup Plans if you wish but we're just creating a single one for now to backup the entire server. The thing to note here is that we're VNCd into the containers WebUI so your computers clipboard isn't shared with it. The way we use the containers clipboard is with the clipboard button on the top right in the Navbar. Click on the Clipboard button, paste your application ID into the box and click submit. You can now paste your Application ID into the CloudBerry dialog box. Now Do the same for the Master Application Key. Click the drop down box next to Bucket. After 1 or 2 seconds you will see the Bucket name that we created in the previous step. Hoorah! Under Advanced Settings you can choose a prefix that this backup plan will use in the bucket. This is useful if you have more than one backup plan. So in the BackBlaze you will see the structure: Bucket > Prefix name > Folders-that-are-backed-up Select Okay and click on the Plan we've just created and click Continue. Choose a Backup Plan Name and click Continue. The next window shows a few drives. The one's you're interested in are the first two. The first one of which will just show up as "/". If you'd like to backup the contents of your flash drive click the tick box next to it. Expand the first drive and scroll down to the folder labeled "storage" This should immediately look familiar to you. Yes! They are your shares. Select the folders you want to backup or choose "storage" if you want to backup everything followed by Continue. Now the next settings namely: Advanced Filters Encryption Retention Policies Schedule Notifications Are best answered by you alone. I personally Backup all the files in the storage folder, with encryption on, retain all the files, and backup daily at midnight. The backup is an incremental backup so only files that have been added or changed will make their way up to BackBlaze. That being said your options may vary. To manually start your backup click on your backup plan in CloudBerry (myBackupPlan) and click Start. Your backup should immediately begin. To see the fruits of your work head back to BackBlaze, Under B2 Cloud Storage click on Browse Files. You should see your bucket there and all your files under it. Don't forget to set your container to AutoStart and you should be golden


-
Hi there. Here's the edited dump file for the MSi GTX 1070 Aero - Mini-ITX MSI-1070-Aero-iTX.dump Tested and working fine. Keep up the good work @SpaceInvaderOne
-
Secure your unRAID SSH Access and Tunnel using PuTTY
lotetreemedia replied to lotetreemedia's topic in General Support
Yes that's actually the way I'm using now Going to update the guide to reflect that. Works fantastic for any sites that use the browser. Still might need the other method if you're wanting to use things like RDP. Thanks @Crilith ! -
Secure your unRAID SSH Access and Tunnel using PuTTY
lotetreemedia posted a topic in General Support
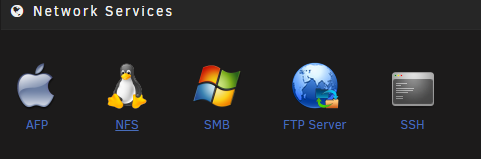
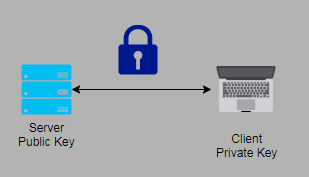
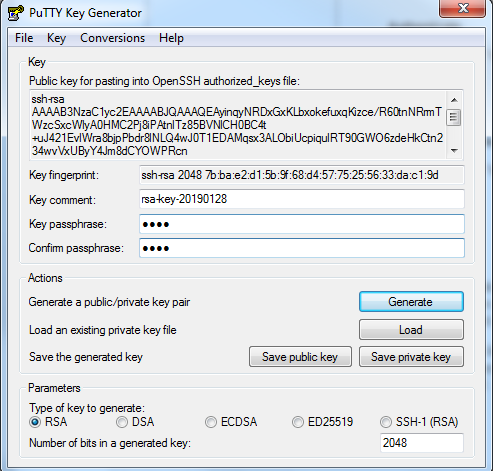
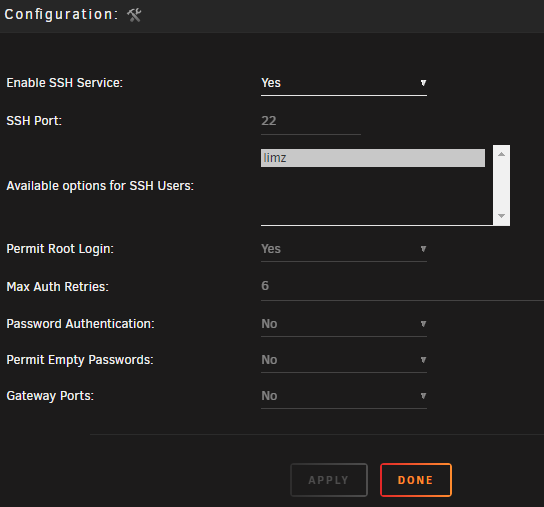
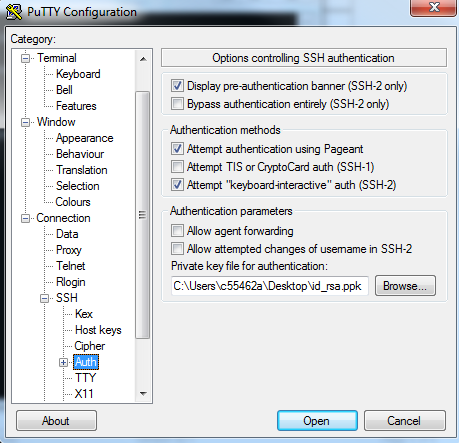
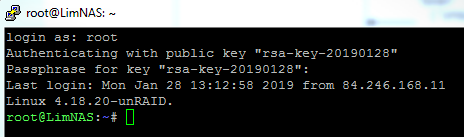
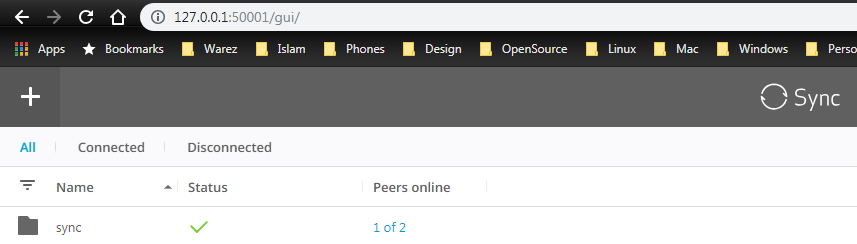
I've seen bits of this covered in other posts but haven't found one PuTTY specific. (Or maye I should get my eyes checked). Never the less there are many reasons you want to use a Key Pair to access your unRAID server via SSH compared to using just a username and password. This is especially true if you'd like to access your server via the internet. Another benefit to doing this is the use of Tunnels. Using SSH you can tunnel into just about anything. Take this example below. If you wanted to Access unRAID via SSH, the Windows Desktop, or any of your containers you would need to go into your router and forward all their ports, for each of the services you wanted to access. So not only will SSH give you get secure access to your unRAID server, but you will also be able to tunnel into any of the containers on your unRAID box, or any machine on your home network for that matter. All traffic sent over this connection will also be encrypted given you another layer of security! Be warned, that leaving port 22 opened on your router without disabling password authentication is not a good idea. Many hackers scan WAN IP addresses and if they find famously opened ports they will continuously try accessing SSH via root and a bunch of different passwords. First things first you will need to Forward Port 22 on your router to your unRAID server. All this does is, if you would like to access your unRAID box over the internet. You will send a request to your Router's WAN IP Address or Dynamic DNS address (Out of scope of this article but covered here). When the SSH Request hits your router, your router will forward that request onto your unRAID server. 1. Get DocGyver's SSH Config Tool This will make starting and stopping the SSH Daemon as well as tweaking your SSH Settings a breeze. When you're ready head over to Community Apps and search for "SSH Config Tool". Once installed you can Access the Config Tool under Settings > Network Services > SSH 2. Get PuTTYGen and Generate your Keys A key pair is made up of a Private Key and a Public Key. The public key pretty much be given to anyone as its well, public. However make sure that your private key is safe and do not distribute it. This is admittedly an over simplification, but basically your Public Key will be put onto your unRAID box and the Private Key will be kept on your machine. When you try to access your server over SSH, your Server will match the Public Key against the Private Key. If it's a match it will let you in. If you need to access more than one server, all you need to do is put your Public Key on said server and you can use the same Machine / Private Key to access it. After you Donwload PuTTY and PuTTYGen launch PuTTYGen and click on Generate. You will be requested to move your mouse cursor over the window to generate some randomness Enter a Key Passphrase and Confirm Passphrase (This protects your Private Key in case someone gets their hands on it) Click Save Private Key, and choose a destination (Name it id_rsa.ppk for extra points) [optional] Click Save Public Key, and choose a destination (Name it id_rsa.pub for extra points) Here's where the first problem comes in. For some reason PuTTY doesn't save the Public Key in the correct format so just taking it from the saved file and putting it on the server won't work. Leave this window open for now we'll come back to it. 3. Put your Public Key onto unRAID and Persist it SSH into your unRAID box using PuTTY as normal and type the following: nano /root/.ssh/authorized_keys Now go back to your PuTTYGen window and select all the text in the Public key for pasting into Open SSH authorized_keys file Section. Press Ctrl + C to copy the key to your clipboard Go back to your PuTTY window and right click into the window (this will paste the key into the correct file which is in the Nano editor) Press Ctrl +X to exit Press Y to save the file Give the file and directory the correct permissions by typing: chmod 600 /root/.ssh/authorized_keys chmod 700 /root/.ssh If you have more than one machine that you'd like to grant access you can put their Public Keys in the same file. However, Make sure each one is on the next line! One problem here is that on reboot this file will be lost so we must persist it! To do that let's first copy the authorized key file somewhere where it can be retrieved. cp /root/.ssh/authorized_keys /boot/config/ssh/ Now open your Go file (which runs on boot by typing) nano /boot/config/go This file runs whenever your unRAID server boots up after we make these changes it will ensure that your authorized_keys file is restored even after you restart your server. Paste the following in the end of the file mkdir /root/.ssh chmod 700 /root/.ssh cp /boot/config/ssh/authorized_keys /root/.ssh/ chmod 600 /root/.ssh/authorized_keys 4. Turn off SSH Password Authentication Open your unRAID UI and head over to the SSH Config Tool we downloaded above. If you need to make a change you must first Set Enable SSH Service to No. Once disabled make the following changes: Password Authentication = No Click Apply and Re-Enable your SSH Service. If you try to access your unRAID server using username and password now your unRAID server should refuse. Good! Let's fix that. 5. Add your Private Key to PuTTY. Open PuTTY, type your Host Name, choose a Save Sessions name and click save. A seved session will ensure that we don't have to keep typing your IP Address, as well as save the location of your private key file. In the tree on the left navigate to Connection > SSH > Auth. Click on Browse and find the Private Key file we generated earlier. In the tree on the left navigate to Session Click Save And that's pretty much it. Now try to login via SSH. unRAID will ask you which user you'd like to login as, you should type root. unRAID will ask you for the passphrase for your Private Key File (which we created earlier) It will let you in! 6. Tunnel like a champ So you've accessed your unRAID box via the internet. And you'd like to access the web UI on one of your containers. Or maybe you'd like to access another device on your network. Well using a simple Tunnel, you can do just that. In our example diagram above we see we have a Resilio Sync Docker Container with the WebUI port of 8888. To Create a Tunnel to that container and access its UI via the internet: Open PuTTY and Load your Session that we saved above. Navigate to Connection > SSH > Tunnels Choose an arbitrary Source Port (I like to start at 50001 to avoid conflict) Choose a destination (in our case IP_ADDRESS_OF_UNRAID:PORT) In the tree on the left navigate to Session Click Save At this point you may have to close your SSH Session and reopen it again. Once that's done, open your favourite browser (Which should be anything other than Edge or Internet Explorer) and in the web address type: http://127.0.0.1:50001 What's basically happening here is that we're sending a request to our Local machine, on por 50001. Which is the port we have open for our SSH Tunnel. PuTTY then redirects that request via the SSH connection to the destination we specified above which is our Resilio Sync Docker Container. And just like that. You've got yourself a Tunnel. No fancy port forwarding needed. Nice and secure over an encrypted line. Give yourself a cookie. So give it a shot. Many companies use this approach to accessing services in their network and is sometimes referred to as a Bastion Host or Jump Box. I've covered it a little more in depth on one my articles here. Thanks to everyone on this post for all the guidance in getting this setup. Happy Secure Shelling!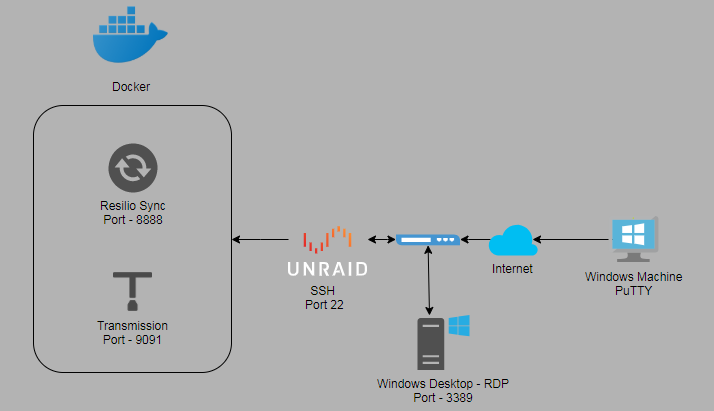
-
New UI Looks absolutely brilliant. So happy about the TimeMachine support over SMB :)