

Cliff
-
Posts
147 -
Joined
-
Last visited
Content Type
Profiles
Forums
Downloads
Store
Gallery
Bug Reports
Documentation
Landing
Posts posted by Cliff
-
-
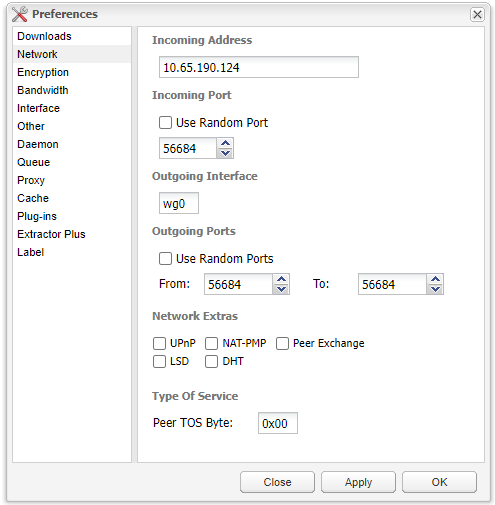
I just tried to switch from rtorrent-vpn to deluge-vpn and am trying to use wireguard as I did with rtorrent-vpn.
But I can't get it to work correctly, I can add a torrent and in the beginning it starts to download at around 30MiB/s (I am have a 1000/1000MB/s connection). But after a few seconds it goes down to a few KiB/s for a couple of minutes then again up to around 30MiB/s for a few seconds.
So I can only download at a decent speed at a few seconds at a time.
I did not have this problem with rtorrent, what can cause this problem ?
I am using Wireguard and in rtorrent I had to add the opened wireguard port to the settingsfile in rtorrent under "listening ports"Where is the correct place to add this port in deluge ?
-
Nothing happens when I powercycle. I am using 3x AOC 1440p monitors, and they work fine when I connect the same cables using my work computer or when I start an ubuntu VM.
-
I am using 3 monitors connected to my GTX 1060 GPU and in all VM's I have tried the monitors works correctly. But only in my Windows 11 VM I have the problem that one of my monitors change the colorformat from RGB to YCbCr422 8-bit SDR which looks really bad. I have tried creating new windows 11 templates and sometimes all monitors use the correct colorformat. But after a little while when I have ulocked the vm it is back to YCbCr422 8-bit again. If I use the nvidia controlpanel and change the colorformat the monitor just blacks out then reverts again.
I am using a dock for my work computer connected to the same monitors and that one uses the same cables and also works fine. Does anyone have any idea of what can cause this ? -
I have a strange problem. I am using 3 monitors for my vm setup and it has worked without problems before. But I don't know if it started when I updated unraid to the rc-builds or if it is after a windows 11 update. But now when I reboot my windows vm I only get one monitor to turn on. After windows have booted I can open windows display settings and I see that the other two monitors are not in use. I can then click on one of them and select "Extend desktop to this display" and it will start working. When doing the same with the last one nothing happens. Unplugging/replugging the monitor does also not work.
The only way to fix this is to reinstall the drivers and then select the "Extend desktop to this display" option again. This works but it kind of suck to have to do this every time I restart my vm. Does anyone know how to fix this.
I am using a stubbed gtx 1060 6gb in the vm.
-
I just noticed a really annoying problem. After starting a 3D game like satisfactory in my Windows 11 VM my GPU ramps up the fans to 100% and and after that the gpu fans stay att 100% even after playing. Does anyone have any idea of how to fix this ?
I am running the Windows 11 VM with a Ryzen 5950x and a GTX 1060 6Gb
-
I have a strange issue. I am using code server to run a react-app at port 3000 and when I add the port to the container I can access it from an browser. But when trying to also run json-server at port 3001 I can access it from inside the container by using curl. But when I try to access the server from an react-app also running in the same container I get "ERR_CONNECTION_REFUSED"
I have also tried adding the port 3001 to the container but I still can't access it internally or externaly. Does anyone have any idea of how to solve this ?
-
I had my Unraid server running fine until I added a AMD GPU to be used in an macOS VM. I then noticed that I got some problems where I could not reboot my VM. I then downloaded the AMD Reset plugin but it was not able to restart my VM anyway. I then read on this forum that I might need to switch from UEFI to legacy for the AMD reset plugin to work.
I then unselected the UEFI settings in the flash settings in unraid and tried changing my usb settings in the bios but I never got it to boot in legacy mode. At some time I managed to boot my windows os directly from hdd and a disk-repair started before I managed to realize it. It did "repair" my unraid usb and now whatever I do I can't boot unraid again. Can anyone give me any advice of how to restore my usb-drive again so that I can boot unraid ?
-
But I realized that I have a new problem now as I am out of connections in my triple monitors. So my first option is to get a 2x3 hdmi kvm switch but they are pretty expensive.
So I was thinking of maybe selling my 1060 and RX 560 and only use one gpu for all vm's. But what amd gpu would be comparable with at least my old 1060 in performance and also supported by macOS ?
-
I have been running a windows 11 vm as my daily os for a while and just recently added a second gpu to be used with Ubuntu/MacOS. But I now realized that I am out of connections on my triple monitors as I also connect my dock for my work laptop to the same monitors.
I would like to be able to switch between my vm's without unplugging any cables. Does anyone have any tips of any 2 computer -> triple monitor HDMI/DP kvm switches that is not super expensive ?
-
Sorry, I probably should have searched the forum some more before asking for help. But I think it got solved by itself somehow. I still get the error but now my mac vm starts. And it looks like everything works as expected. But I have only tried some web-browsing and youtube and not any games or other gpu intensive stuff.
-
I have managed to get Monterey installed and I can boot the vm using vnc. But when I try to add my Radeon RX 560 with bios it crashes directly when starting up with this message:
2022-03-03T15:54:08.334916Z qemu-system-x86_64: vfio_err_notifier_handler(0000:0c:00.1) Unrecoverable error detected. Please collect any data possible and then kill the guest
2022-03-03T15:54:08.334987Z qemu-system-x86_64: vfio_err_notifier_handler(0000:0c:00.0) Unrecoverable error detected. Please collect any data possible and then kill the guest
Dos anyone know how to solve this ?
-
No matter what I try I only get three options when starting my vm, macOS Base system, uefi shell and reset nvram. And every time I select the first options I get a logo and progressbar for a couple of seconds then it just reboots back to the first screen with the three options again. Does any one know how to solve this ?
-
I tried installing both Monterey and big sur with the same result where the userscript completes directly after running and the vm is unable to install.
But I checked the log from the macinabox app when running and noticed that it says it has only downloaded ~2500bytes
and I am guessing that this is the problem ?
continuing
I am going to download the BigSur recovery media. Please be patient!
.
.
1. High Sierra (10.13)
2. Mojave (10.14)
3. Catalina (10.15)
4. Big Sur (11.6) - RECOMMENDED
5. Monterey (latest)
Big Sur (11.6) - RECOMMENDED
Downloading 694-35959...
Saving http://oscdn.apple.com/content/downloads/41/28/071-71279/5djpevqmc2w0ti2c4n1m8mkz7fm791t1ic/RecoveryImage/BaseSystem.dmg to BaseSystem.dmg...
Note: The total download size is 637.20 MB
Saving http://oscdn.apple.com/content/downloads/41/28/071-71279/5djpevqmc2w0ti2c4n1m8mkz7fm791t1ic/RecoveryImage/BaseSystem.chunklist to BaseSystem.chunklist...
Note: The total download size is 2596 bytes
.
.
mkdir: created directory '/domains/Macinabox BigSur'
I have created the Macinabox directories
.
.
Formatting '/domains/Macinabox BigSur/macos_disk.img', fmt=raw size=107374182400
.
Created vdisk
.
.
Putting stock open core in the vm share
Archive: /Macinabox/bootloader/OpenCore-v16.img.zip
Putting stock open core in the vm share
Archive: /Macinabox/bootloader/OpenCore-v16.img.zip
inflating: /config/OpenCore-v16.img
Going with the default nic type for the macOS vm
macOS VM template generated and moved to server (You need to run macinabox_helper userscript)
.
.
A copy of macinabox helper and notify script has been put in appdata

Summary of what has been done

.
.
The reference /domains below refers to where you mapped that folder in the docker template on your server
(normally to /mnt/user/domains)
.
.
MacOS install media was put in your Unraid isos share named BigSur-install.img
.
.
A Vdisk of 100G was created in /domains/Macinabox BigSur
.
.
OpenCore bootloader image named BigSur-opencore.img was put in your Unraid vm share in the folder named BigSur
.
.
Custom ovmf files are in /mnt/user/system/custom_ovmf
.
.
XML template file for the vm is ready for install with macinabox helper user script.
Note This file assumes your vm share is the default location /mnt/user/domains
If it isnt you will need to change the locations accordingly after in unraid vm manager before running vm
A copy of the macinabox helper user script was placed in /mnt/user/appdata/macinabox
.
.
OK process is now complete
-
I have been trying to install monterey three times now but it never works, btw should the part where you run the userscripts complete in a few seconds ?. After I start the vm I can only chose from base system, uefi.., reset nvram and after selection the first option the vm just rebots back to the same menu
-
I am running an unraid server where I also am running my dayly windows vm. My vm is running from an nvme drive used for cache but I am getting annoyed hearing constant read/writes to my mechanical hdd array.
I firstly thought that it was plex/rutorrent that was constantly using my disks but even after shutting down those dockers I still see that the disks are being used.
I have 3x12TB drives in an array where one of them is used for parity. If I look under "main" I can see that the read/write speed constantly fluctuates between ~30KB/s and 15MB/s. I tried installing netdata and can see that something is accessing the disk frequently but can't understand what it is.
How can I reveal what kind of process is using the disk ?

-
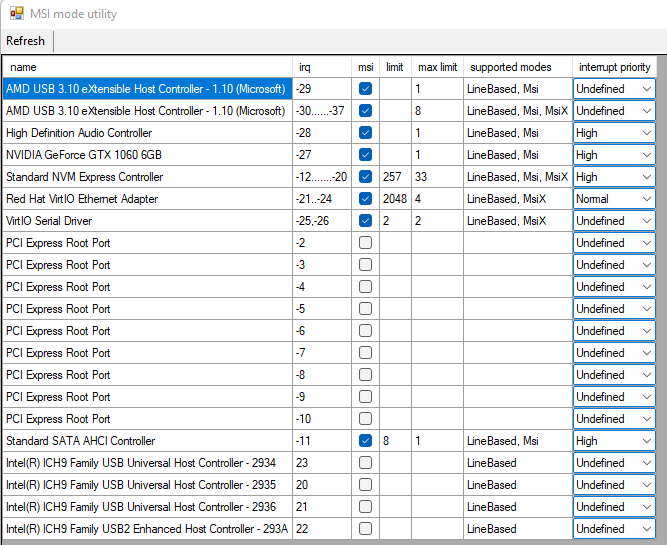
Ok tried disabeling all msi, rebooted and now it is unusable again it took 5 minutes to boot, only one monitor works (I have three) and I did the mistake of trying to open chrome and now all cpu cores are at 100% and the VM does not respond. I will try to force shutdown and only open the msi-app. But what devices would be the best bet to enable again to get the VM to work again ?
-
Ok, thanks for the information. I have always created the VMs unsing the passed through nvme as hdd so I always use the same windows install if even if I create a new Win11 . I am passing through the entire usb controller as I am using a usb kvm switch to switch between my work-computer and my private (The windows 11 vm). And If I did not pass through the entire controller the vm would hang when switching between the computers and it lost all usb input devices. And yes this VM spikes 15-20% when moving the mouse. Ok so I should disable all msi checkboxes for now ?
-
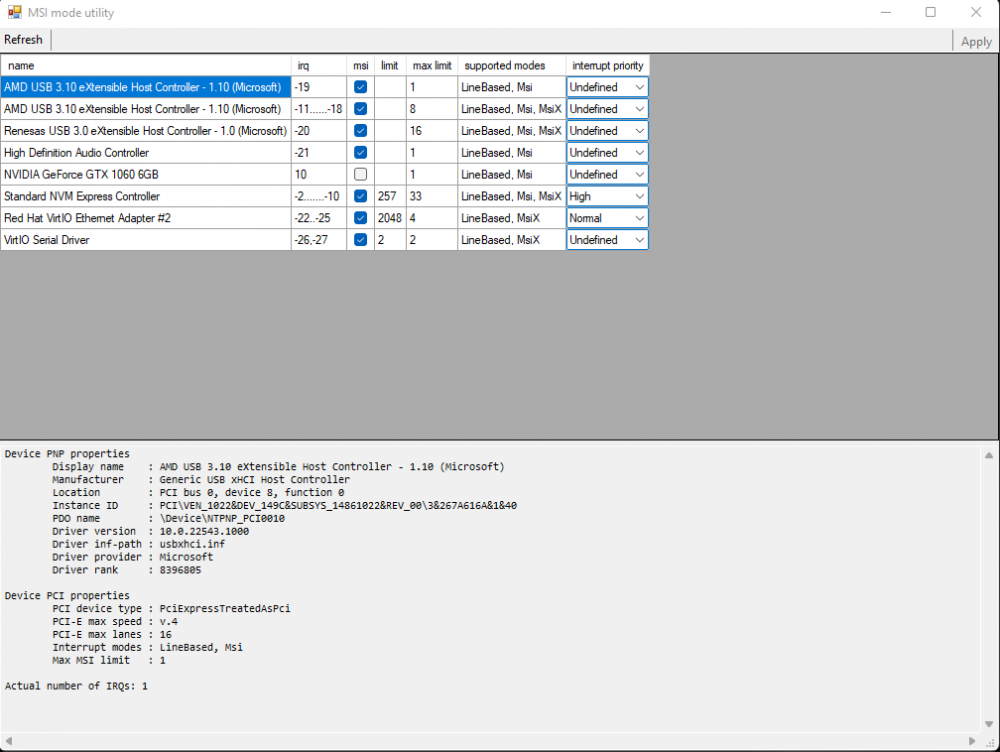
This is how it looks now, I have not enabled anything myself in this vm but I do not know if any of my previous msi settings is still applied from my previous vm.
-
On 2/10/2022 at 5:18 PM, ghost82 said:
It should not..but who knows..from your screenshot only the 4 intel emulated controllers are using irq, all the other devices are using msi, so it's not an issue with irq.
However msi for some devices can be problematic.
Not much to say unfortunately, but if I were you I:
1. disable all msi fixes and see if it changes something
2. if it doesn't change, remove all the passthroughs, except for the nvme (you have the os on it), so remove gpu and usb, and see if it changes something
3. if it's ok add again one at a time the other passthrough, first gpu, then usb, and see if it works
4. only if you have issues in the vm for specific devices (usually gpu and audio, sometimes with network), enable msi, you don't need to enable msi for all devices, having shared irq can be perfectly fine, as it is also in several bare metal builds
Thanks for the tips, I tried your steps and removed all passthroughs but the nvme and created a new Win11 VM. I had some strange issues where I could not create any VM using Q35 for some reason but after changing to i440fx I was able to create the new VM. So this time I have only stubbed the nvme and the usb-controller and my VM is usable again. My CPU dpes not spike to 100% any longer as it did before but I still have the issue that when I move the mouse rapidly all cores increase with ~15-20%.
Should I try to stub the gpu again or do I need to enable msi on the usb-controller or is there some other steps I could try to eliminate the cpu load when using the mouse? -
I don't really know what happend but after running fine since I created my Unraid server my windows 11 VM suddenly is really slow and unresponsive and CPU is ideling at around 70% on all cores and is hitting 100% as soon as I open a browser o similar.
I am passing through gpu, nvme-drive and a usb controller.
I have tried recreating the vm with both i440fx and q35 but there is no difference in performance. And also tried deleting the VM image in the Unraid VM settings. One thing I noticed is that if I try to specify the biosfile for the gpu I have to enter it manually I can not browse the folders and navigate to the file as I could before in the VM template settings.
I have also tried running the MSI utility and selected the GPU.
I have also noticed that when I use the mouse the cpu also increases with 20-30% on all cores. So I am guessing thare is something wrong with the usb settings too. Is this also related to MSI ? and does anyone have any idé af how to solve this. The CPU govenor is already set to "on demand" and I do not have any windows hyper-v or other vm features enabled.
<?xml version='1.0' encoding='UTF-8'?>
<domain type='kvm' id='3'>
  <name>Windows 11</name>
  <uuid>25cede08-af6a-ae6d-fbfa-5907e210b2c6</uuid>
  <metadata>
    <vmtemplate xmlns="unraid" name="Windows 11" icon="windows11.png" os="windowstpm"/>
  </metadata>
  <memory unit='KiB'>17301504</memory>
  <currentMemory unit='KiB'>17301504</currentMemory>
  <memoryBacking>
    <nosharepages/>
  </memoryBacking>
  <vcpu placement='static'>8</vcpu>
  <cputune>
    <vcpupin vcpu='0' cpuset='1'/>
    <vcpupin vcpu='1' cpuset='7'/>
    <vcpupin vcpu='2' cpuset='3'/>
    <vcpupin vcpu='3' cpuset='9'/>
    <vcpupin vcpu='4' cpuset='4'/>
    <vcpupin vcpu='5' cpuset='10'/>
    <vcpupin vcpu='6' cpuset='5'/>
    <vcpupin vcpu='7' cpuset='11'/>
  </cputune>
  <resource>
    <partition>/machine</partition>
  </resource>
  <os>
    <type arch='x86_64' machine='pc-q35-6.1'>hvm</type>
    <loader readonly='yes' type='pflash'>/usr/share/qemu/ovmf-x64/OVMF_CODE-pure-efi-tpm.fd</loader>
    <nvram>/etc/libvirt/qemu/nvram/25cede08-af6a-ae6d-fbfa-5907e210b2c6_VARS-pure-efi-tpm.fd</nvram>
    <boot dev='hd'/>
  </os>
  <features>
    <acpi/>
    <apic/>
  </features>
  <cpu mode='host-passthrough' check='none' migratable='on'>
    <topology sockets='1' dies='1' cores='4' threads='2'/>
    <cache mode='passthrough'/>
    <feature policy='require' name='topoext'/>
  </cpu>
  <clock offset='localtime'>
    <timer name='rtc' tickpolicy='catchup'/>
    <timer name='pit' tickpolicy='delay'/>
    <timer name='hpet' present='no'/>
  </clock>
  <on_poweroff>destroy</on_poweroff>
  <on_reboot>restart</on_reboot>
  <on_crash>restart</on_crash>
  <devices>
    <emulator>/usr/local/sbin/qemu</emulator>
    <disk type='file' device='cdrom'>
      <driver name='qemu' type='raw'/>
      <source file='/mnt/user/isos/virtio-win-0.1.208-1.iso' index='1'/>
      <backingStore/>
      <target dev='hdb' bus='sata'/>
      <readonly/>
      <alias name='sata0-0-1'/>
      <address type='drive' controller='0' bus='0' target='0' unit='1'/>
    </disk>
    <controller type='pci' index='0' model='pcie-root'>
      <alias name='pcie.0'/>
    </controller>
    <controller type='pci' index='1' model='pcie-root-port'>
      <model name='pcie-root-port'/>
      <target chassis='1' port='0x8'/>
      <alias name='pci.1'/>
      <address type='pci' domain='0x0000' bus='0x00' slot='0x01' function='0x0' multifunction='on'/>
    </controller>
    <controller type='pci' index='2' model='pcie-root-port'>
      <model name='pcie-root-port'/>
      <target chassis='2' port='0x9'/>
      <alias name='pci.2'/>
      <address type='pci' domain='0x0000' bus='0x00' slot='0x01' function='0x1'/>
    </controller>
    <controller type='pci' index='3' model='pcie-root-port'>
      <model name='pcie-root-port'/>
      <target chassis='3' port='0xa'/>
      <alias name='pci.3'/>
      <address type='pci' domain='0x0000' bus='0x00' slot='0x01' function='0x2'/>
    </controller>
    <controller type='pci' index='4' model='pcie-root-port'>
      <model name='pcie-root-port'/>
      <target chassis='4' port='0xb'/>
      <alias name='pci.4'/>
      <address type='pci' domain='0x0000' bus='0x00' slot='0x01' function='0x3'/>
    </controller>
    <controller type='pci' index='5' model='pcie-root-port'>
      <model name='pcie-root-port'/>
      <target chassis='5' port='0xc'/>
      <alias name='pci.5'/>
      <address type='pci' domain='0x0000' bus='0x00' slot='0x01' function='0x4'/>
    </controller>
    <controller type='pci' index='6' model='pcie-root-port'>
      <model name='pcie-root-port'/>
      <target chassis='6' port='0xd'/>
      <alias name='pci.6'/>
      <address type='pci' domain='0x0000' bus='0x00' slot='0x01' function='0x5'/>
    </controller>
    <controller type='pci' index='7' model='pcie-root-port'>
      <model name='pcie-root-port'/>
      <target chassis='7' port='0xe'/>
      <alias name='pci.7'/>
      <address type='pci' domain='0x0000' bus='0x00' slot='0x01' function='0x6'/>
    </controller>
    <controller type='pci' index='8' model='pcie-root-port'>
      <model name='pcie-root-port'/>
      <target chassis='8' port='0xf'/>
      <alias name='pci.8'/>
      <address type='pci' domain='0x0000' bus='0x00' slot='0x01' function='0x7'/>
    </controller>
    <controller type='pci' index='9' model='pcie-root-port'>
      <model name='pcie-root-port'/>
      <target chassis='9' port='0x10'/>
      <alias name='pci.9'/>
      <address type='pci' domain='0x0000' bus='0x00' slot='0x02' function='0x0'/>
    </controller>
    <controller type='virtio-serial' index='0'>
      <alias name='virtio-serial0'/>
      <address type='pci' domain='0x0000' bus='0x02' slot='0x00' function='0x0'/>
    </controller>
    <controller type='sata' index='0'>
      <alias name='ide'/>
      <address type='pci' domain='0x0000' bus='0x00' slot='0x1f' function='0x2'/>
    </controller>
    <controller type='usb' index='0' model='ich9-ehci1'>
      <alias name='usb'/>
      <address type='pci' domain='0x0000' bus='0x00' slot='0x07' function='0x7'/>
    </controller>
    <controller type='usb' index='0' model='ich9-uhci1'>
      <alias name='usb'/>
      <master startport='0'/>
      <address type='pci' domain='0x0000' bus='0x00' slot='0x07' function='0x0' multifunction='on'/>
    </controller>
    <controller type='usb' index='0' model='ich9-uhci2'>
      <alias name='usb'/>
      <master startport='2'/>
      <address type='pci' domain='0x0000' bus='0x00' slot='0x07' function='0x1'/>
    </controller>
    <controller type='usb' index='0' model='ich9-uhci3'>
      <alias name='usb'/>
      <master startport='4'/>
      <address type='pci' domain='0x0000' bus='0x00' slot='0x07' function='0x2'/>
    </controller>
    <interface type='bridge'>
      <mac address='52:54:00:d6:9a:aa'/>
      <source bridge='br0'/>
      <target dev='vnet2'/>
      <model type='virtio-net'/>
      <alias name='net0'/>
      <address type='pci' domain='0x0000' bus='0x01' slot='0x00' function='0x0'/>
    </interface>
    <serial type='pty'>
      <source path='/dev/pts/0'/>
      <target type='isa-serial' port='0'>
        <model name='isa-serial'/>
      </target>
      <alias name='serial0'/>
    </serial>
    <console type='pty' tty='/dev/pts/0'>
      <source path='/dev/pts/0'/>
      <target type='serial' port='0'/>
      <alias name='serial0'/>
    </console>
    <channel type='unix'>
      <source mode='bind' path='/var/lib/libvirt/qemu/channel/target/domain-3-Windows 11/org.qemu.guest_agent.0'/>
      <target type='virtio' name='org.qemu.guest_agent.0' state='connected'/>
      <alias name='channel0'/>
      <address type='virtio-serial' controller='0' bus='0' port='1'/>
    </channel>
    <input type='mouse' bus='ps2'>
      <alias name='input0'/>
    </input>
    <input type='keyboard' bus='ps2'>
      <alias name='input1'/>
    </input>
    <tpm model='tpm-tis'>
      <backend type='emulator' version='2.0' persistent_state='yes'/>
      <alias name='tpm0'/>
    </tpm>
    <audio id='1' type='none'/>
    <hostdev mode='subsystem' type='pci' managed='yes'>
      <driver name='vfio'/>
      <source>
        <address domain='0x0000' bus='0x01' slot='0x00' function='0x0'/>
      </source>
      <alias name='hostdev0'/>
      <rom file='/mnt/user/isos/vbios/gpu_1060_vbios.rom'/>
      <address type='pci' domain='0x0000' bus='0x03' slot='0x00' function='0x0'/>
    </hostdev>
    <hostdev mode='subsystem' type='pci' managed='yes'>
      <driver name='vfio'/>
      <source>
        <address domain='0x0000' bus='0x01' slot='0x00' function='0x1'/>
      </source>
      <alias name='hostdev1'/>
      <address type='pci' domain='0x0000' bus='0x04' slot='0x00' function='0x0'/>
    </hostdev>
    <hostdev mode='subsystem' type='pci' managed='yes'>
      <driver name='vfio'/>
      <source>
        <address domain='0x0000' bus='0x08' slot='0x00' function='0x1'/>
      </source>
      <alias name='hostdev2'/>
      <address type='pci' domain='0x0000' bus='0x05' slot='0x00' function='0x0'/>
    </hostdev>
    <hostdev mode='subsystem' type='pci' managed='yes'>
      <driver name='vfio'/>
      <source>
        <address domain='0x0000' bus='0x08' slot='0x00' function='0x3'/>
      </source>
      <alias name='hostdev3'/>
      <address type='pci' domain='0x0000' bus='0x06' slot='0x00' function='0x0'/>
    </hostdev>
    <hostdev mode='subsystem' type='pci' managed='yes'>
      <driver name='vfio'/>
      <source>
        <address domain='0x0000' bus='0x0c' slot='0x00' function='0x0'/>
      </source>
      <alias name='hostdev4'/>
      <address type='pci' domain='0x0000' bus='0x07' slot='0x00' function='0x0'/>
    </hostdev>
    <memballoon model='none'/>
  </devices>
  <seclabel type='dynamic' model='dac' relabel='yes'>
    <label>+0:+100</label>
    <imagelabel>+0:+100</imagelabel>
  </seclabel>
</domain>
-
I have been trying to get traffic routing through vpn-containers to work for several months now and have followed numerous guides and used many different vpn-containers. I can get the routed container to get the correct ip most of the times but I have never been able to access the webui of any routed container.
Is there any special instructions when using a vpn-container that uses wireguard ? I suspect that I need to modify the PostUp/PreDown settings in the wireguard conf.
-
After changing the USB, PSU, motherboard and switching out the RAM I finally found what caused the instabillity, it was the Ryzen 3900x CPU. I just replaced it with a 5600G while the 3900x is beeing replaced.
So now everything is almost back as it was before. Only problem is that I now have really poor performance in my windows 11 VM even tho I have assigned it the same amount of cores.
-
I had alot of problems where my server was constantly rebooting for months and the troubleshhoting driving me crazy I finally found the problem that was the CPU (after replacing both PSU and motherboard).
I replaced my Ryzen 3900x with a Ryzen 5600G until I get a new one back from the RMA process. The Ryzen 3900x had 12 cores and the 5600G has only 6 cores but I have assigned the same amount of cores to my Windows 11 VM (4 cores). I also upgraded to Unraid 6.10 after changing the CPU, but I notice that my performance is really bad. I am passing through a raw nvme disk to my windows VM and also a 1060 GPU with bios but even when I play really old games like Grim Dawn it stutters/lagging like crazy.
I tried running Cinebench anf I got a score of 5400 points with four cores instead of six but when looking in the database a stock 5600G should get around 11200 points so from my calculations I should get around 7400 points if it was scaling properly. The only thing I can remember configuring differently this time was that I used OVMF TPM bios and selecting Q35-6.1 instead of 5.1, everythin gelse is the same (raw nvme ssd disk, 16GB RAM and passing the GPU with bios)
Does anyone know what can cause the performance degration ? When using the 3900x I could not notice any differnence at all from when I just booted Windows 11 directly from the nvme. -
On 8/12/2021 at 4:49 AM, hackersarchangel said:
Good evening
")
I have the container installed and so far the logs say everything is working as expected. However I’m attempting to access other containers, and I believe I have followed your guide properly, but it’s not working.
Edit: I forgot to mention…
I added a network using the following:
docker network create container:passthroughvpn
Which then made it a selectable option in the drop down menu.
I added a port using the “Add another path,port,variable,device” and here is where my possible confusion is coming in. Your guide says the container port is the exposed port but that I need to access it using the host port you specified in the directions on GitHub. Want to confirm I have that correct in setting the port the service is expecting to be reached at as the Container port, and whatever port I want to use as the Host port.
That said, I like using the default ports of each service, so is that a possibility for me to do so?
Also, I know the container itself is working as it was working with the other VPN container I was using until I decided to switch.Edit: I resolved the issue. I am accessing the web interfaces from my Wireguard VPN to the network, which reports me as being 172.x.x.x and in setting the LAN_NETWORK to match that resolved my issue. However, I did try setting it to 0.0.0.0/0 and that did not work, also doing “172.x.x.x/24, 192.x.x.x./24” did not work as well. I was still able to access via 172.x.x.x, but not 192.x.x.x. If that could be fixed somehow to allow access from multiple IP ranges that would be fantastic.
That said, great work! Glad to have found a “generic” VPN container, and if there is anything I can do to help out, let me know.Could you explain this some more ? If I have another docker container which uses port 5555 for webui i select the container:passthroughvpn network in the docker container and also remove the webui port ? And then I add the webui as a port in passthroughvpn ?


[Support] binhex - DelugeVPN
in Docker Containers
Posted
Thanks, so it does not matter what value I use for the outgoing ports ? I can just add a random range ?