





ghost82
Members
-
Joined
-
Last visited
Everything posted by ghost82
-
1) May 11 13:11:30 Tower kernel: pci 0000:01:00.0: BAR 3: assigned to efifb I think the kernel arguments you are using in your syslinux conf are wrong**; this: video=efifb:off,vesafb:off should be: video=efifb:off video=vesafb:off But I don't think you need to kill vesafb (as far as I know efifb is used or vesafb, depending on the kernel version), so just replace with: video=efifb:off 2) May 11 13:11:30 Tower kernel: pci 0000:01:00.0: vgaarb: setting as boot VGA device This vga is flagged as boot vga, so vbios is a must, try to use the one attached. 3) general advices: - do not use both novnc and gpu passthrough - always set the gpu in the target as a multifunction device - if i440fx doesn't work try q35 with better pcie passthrough compatibility **As far as syslinux try this: default menu.c32 menu title Lime Technology, Inc. prompt 0 timeout 50 label Unraid OS menu default kernel /bzimage append pcie_acs_override=downstream,multifunction vfio_iommu_type1.allow_unsafe_interrupts=1 video=efifb:off initrd=/bzroot label Unraid OS GUI Mode kernel /bzimage append initrd=/bzroot,/bzroot-gui label Unraid OS Safe Mode (no plugins, no GUI) kernel /bzimage append initrd=/bzroot unraidsafemode label Unraid OS GUI Safe Mode (no plugins) kernel /bzimage append initrd=/bzroot,/bzroot-gui unraidsafemode label Memtest86+ kernel /memtest No need to touch the unraid os gui mode, if you want to boot with gui why you disable efifb?Instead modifiy unraid os and boot unraid os label if you want to passthrough the primary gpu; no need to use vfio-pci.ids with ids, unraid has its own mechanism to attach devices to vfio at boot and you already configured them. 236582.rom
-
Tesla p4 has no video outputs, it's a gpu to make calculations and/or to get video acceleration. You can't connect a monitor to it, but you can pass it through and access the vm with a vnc server installed inside the vm, insted of using "unraid novnc".
-
May 8 16:11:37 Tower kernel: pci 0000:03:00.0: vgaarb: setting as boot VGA device You need to pass a vbios for that quadro otherwise it wont work.
-
Try vfio-pci.disable_idle_d3=1 instead of disable_idle_d3=1 However this may well be a motherboard bios issue. change also from this: <hostdev mode='subsystem' type='pci' managed='yes'> <driver name='vfio'/> <source> <address domain='0x0000' bus='0x01' slot='0x00' function='0x0'/> </source> <rom file='/mnt/user/isos/vbios/3090.rom'/> <address type='pci' domain='0x0000' bus='0x00' slot='0x05' function='0x0'/> </hostdev> <hostdev mode='subsystem' type='pci' managed='yes'> <driver name='vfio'/> <source> <address domain='0x0000' bus='0x01' slot='0x00' function='0x1'/> </source> <address type='pci' domain='0x0000' bus='0x00' slot='0x06' function='0x0'/> </hostdev> to this: <hostdev mode='subsystem' type='pci' managed='yes'> <driver name='vfio'/> <source> <address domain='0x0000' bus='0x01' slot='0x00' function='0x0'/> </source> <rom file='/mnt/user/isos/vbios/3090.rom'/> <address type='pci' domain='0x0000' bus='0x00' slot='0x05' function='0x0' multifunction='on'/> </hostdev> <hostdev mode='subsystem' type='pci' managed='yes'> <driver name='vfio'/> <source> <address domain='0x0000' bus='0x01' slot='0x00' function='0x1'/> </source> <address type='pci' domain='0x0000' bus='0x00' slot='0x05' function='0x1'/> </hostdev>
-
gpu drivers cannot be in the virtio iso...use and install nvidia drivers: https://www.nvidia.it/Download/driverResults.aspx/203214/en-us
-
1. Binded devices have wrong addresses, probably you changed the physical slot of the gpu; do again the "bind to vfio at startup setup" Loading config from /boot/config/vfio-pci.cfg BIND=0000:09:00.0|10de:128b 0000:09:00.1|10de:0e0f --- Processing 0000:09:00.0 10de:128b Error: Vendor:Device 10de:128b not found at 0000:09:00.0, unable to bind device --- Processing 0000:09:00.1 10de:0e0f Error: Device 0000:09:00.1 does not exist, unable to bind device (2. Enable unsafe interrupts in unraid: (may not be required) --> Settings -> VM -> change "VFIO allow unsafe interrupts" to Yes) 3. Use the attached vbios if you are not able to dump one 200079.rom 4. reboot
-
Where are diagnostics?
-
Change to this: <hostdev mode='subsystem' type='pci' managed='yes'> <driver name='vfio'/> <source> <address domain='0x0000' bus='0x0a' slot='0x00' function='0x0'/> </source> <alias name='hostdev0'/> <rom file='/mnt/user/isos/vbios/GT710_new.rom'/> <address type='pci' domain='0x0000' bus='0x00' slot='0x05' function='0x0' multifunction='on'/> </hostdev> <hostdev mode='subsystem' type='pci' managed='yes'> <driver name='vfio'/> <source> <address domain='0x0000' bus='0x0a' slot='0x00' function='0x1'/> </source> <alias name='hostdev1'/> <address type='pci' domain='0x0000' bus='0x00' slot='0x05' function='0x1'/> </hostdev> Then install nvidia drivers.
-
Check the windows vm logs after a crash and hopefully you will find what makes the vm to crash, because in the log of the host there are no issues.
-
This should do the trick for q35 machine type; you have 2 options: a) specify global speed and width values for all pcie-root-ports: at the bottom of the xml you write: </devices> <qemu:commandline> <qemu:arg value='-global'/> <qemu:arg value='pcie-root-port.x-speed=8'/> <qemu:arg value='-global'/> <qemu:arg value='pcie-root-port.x-width=16'/> </qemu:commandline> </domain> This will give you a x16 "physical" slot at x8 speed (Gen 3). b) specify speed and width values for a specific pcie-root-port 1) Identify the pcie-root-port in which the passed thorugh device is plugged in, for example: ... ... <controller type='pci' index='1' model='pcie-root-port'> <model name='pcie-root-port'/> <target chassis='1' port='0x8'/> <address type='pci' domain='0x0000' bus='0x00' slot='0x01' function='0x0' multifunction='on'/> </controller> ... ... <hostdev mode='subsystem' type='pci' managed='yes'> <driver name='vfio'/> <source> <address domain='0x0000' bus='0x0a' slot='0x00' function='0x0'/> </source> <address type='pci' domain='0x0000' bus='0x01' slot='0x00' function='0x0'/> </hostdev> ... ... Passed through device with source address 0a:00.0 is attached in the guest at address 01:00.0, meaning that it's a ttached to pcie-root-port with index='1'. 2) Set an alias for the identified pcie-root-port; the alias must start with ua- then add specific qemu custom args at the bottom of the xml; the code becomes (for latest versions of libvirt): ... ... <controller type='pci' index='1' model='pcie-root-port'> <model name='pcie-root-port'/> <target chassis='1' port='0x8'/> <alias name='ua-mydev0'/> <address type='pci' domain='0x0000' bus='0x00' slot='0x01' function='0x0' multifunction='on'/> </controller> ... ... <hostdev mode='subsystem' type='pci' managed='yes'> <driver name='vfio'/> <source> <address domain='0x0000' bus='0x0a' slot='0x00' function='0x0'/> </source> <address type='pci' domain='0x0000' bus='0x01' slot='0x00' function='0x0'/> </hostdev> ... ... </devices> <qemu:override> <qemu:device alias='ua-mydev0'> <qemu:frontend> <qemu:property name='x-speed' type='unsigned' value='8'/> <qemu:property name='x-width' type='unsigned' value='16'/> </qemu:frontend> </qemu:device> </qemu:override> </domain> -- In your case to have Gen 2 x4 I think values could be: x-speed: 5 (5GT/s, Gen2) x-width: 4 (x4 "physical" slot) ----- However, from the latest source code of qemu, it defaults to pcie gen 4 x32 lanes: DEFINE_PROP_PCIE_LINK_SPEED("x-speed", PCIESlot, speed, PCIE_LINK_SPEED_16), DEFINE_PROP_PCIE_LINK_WIDTH("x-width", PCIESlot, width, PCIE_LINK_WIDTH_32), In fact in my case, without adding the extra lines, my 6900 xt gpu is detected in a windows 11 vm as pcie 4.0 even if my motherboard supports only pcie 3.0....This is only cosmetic. ----- This to say that changes should not be required, since the emulated hardware is superior (it's the latest) compared to the pcie speed/width you want to set.
-
I may be wrong but I think that migratable=off is not directly responsible for performance increase, but invtsc, in fact in my mac os vm I had to disable migratable to actually have invtsc active in the guest (with cpu host passtrough); it is well known that invtsc increases performance in windows vm, especially while gaming.
-
When you compare things to bare metal, so without taking consideration the cache, the best thing is to have the vm behaving as closed as possible to bare metal, because everything you emulate adds some overhead, that you may notice, or not, depending on how you use your vm. In your case you are using an emulated (virtio or sata) controller, to attach an emulated vdisk. Better could be an emulated controller (virtio or sata) with a physical disk passed through. Best is to passthrough the controller (with the disk attached), sata or nvme.
-
Could be related to layout in the guest, you added multifunction for gpu but you forgot to update the target bus for the audio aprt, replace with this and test: <hostdev mode='subsystem' type='pci' managed='yes'> <driver name='vfio'/> <source> <address domain='0x0000' bus='0x02' slot='0x00' function='0x0'/> </source> <rom file='/mnt/user/isos/vbios/2023/GeForce GTX 970.rom'/> <address type='pci' domain='0x0000' bus='0x04' slot='0x00' function='0x0' multifunction='on'/> </hostdev> <hostdev mode='subsystem' type='pci' managed='yes'> <driver name='vfio'/> <source> <address domain='0x0000' bus='0x02' slot='0x00' function='0x1'/> </source> <address type='pci' domain='0x0000' bus='0x04' slot='0x00' function='0x1'/> </hostdev> And make sure to use nvidia latest drivers, not windows ones.
-
Your issue is with irq conflicts: Apr 24 08:34:35 LZYDiskStation kernel: genirq: Flags mismatch irq 16. 00000000 (vfio-intx(0000:01:00.0)) vs. 00000080 (i801_smbus) where 01:00.0 (mellanox) conflicts with the SMBus. 1. update the bios (if any is available) and see if the irq conflict disappears 2. change the phisical slot of the mellanox and see if the irq conflict disappears 3. check in your bios if you can manually assign irqs to devices (I don't think you have this option..) If you aren't able to solve with these suggestions I think there's nothing more you can do..
-
why bonding is enabled if the only interface you have is eth0?
-
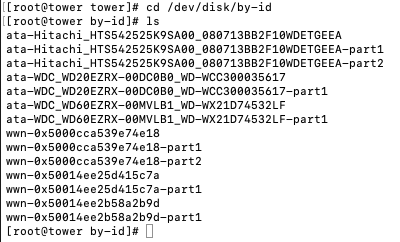
In unassigned device set the 'Pass Through' switch to on for that drive. Navigate with the terminal to /dev/disk/by-id/ List the content with ls command and identify the drive: You can see I have 3 disks starting with ata-; first disk has 2 partitions, the other 2 have one partition. The id of interest is that without -partX suffix, for example: ata-Hitachi_HTS542525K9SA00_080713BB2F10WDETGEEA ata-WDC_WD20EZRX-00DC0B0_WD-WCC300035617 ata-WDC_WD60EZRX-00MVLB1_WD-WX21D74532LF It could be that when you list the content the ids could have '@' at the end of the file name, ignore it. Go to your linux vm xml and add a new block for the drive, inside <devices></devices> for example: <disk type='block' device='disk'> <driver name='qemu' type='raw' cache='writeback'/> <source dev='/dev/disk/by-id/XXXXXXXXXXX'/> <backingStore/> <target dev='hdd' bus='sata'/> <address type='drive' controller='0' bus='0' target='0' unit='3'/> </disk> Replace XXXXXXXX with the correct id, i.e. ata-Hitachi_HTS542525K9SA00_080713BB2F10WDETGEEA This will attach the disk to the default emulated sata controller of the linux vm.
-
There are several things that are wrong: 1. vfio configuration: it seems you changed the slot of the gpu, but vfio config is old and your gpu (multifunction) is not attached to vfio at boot 2. Your gpu is still in use by the host because BAR3 is assigned to efifb; just add 'video=efifb:off' to syslinux configuration 3. Your gpu is flagged as boot vga by the host: you need to pass a vbios in the vm configuration, otherwise it wont work, either dump it from your gpu (recommended) or download one from techpowerup and hex edit it (remove the nvidia nvflash header) 4. I would advice to make a new vm q35 type (not i440fx) + ovmf: q35 has better support for pcie passed through devices 5. I suggest to passthrough all the components of the gpu in the vm and not only the video part, i.e.: 02:00.0 VGA compatible controller [0300]: NVIDIA Corporation TU106 [GeForce RTX 2070 Rev. A] [10de:1f07] (rev a1) Subsystem: Micro-Star International Co., Ltd. [MSI] TU106 [GeForce RTX 2070 Rev. A] [1462:3734] Kernel driver in use: vfio-pci Kernel modules: nvidia_drm, nvidia 02:00.1 Audio device [0403]: NVIDIA Corporation TU106 High Definition Audio Controller [10de:10f9] (rev a1) Subsystem: Micro-Star International Co., Ltd. [MSI] TU106 High Definition Audio Controller [1462:3734] 02:00.2 USB controller [0c03]: NVIDIA Corporation TU106 USB 3.1 Host Controller [10de:1ada] (rev a1) Subsystem: Micro-Star International Co., Ltd. [MSI] TU106 USB 3.1 Host Controller [1462:3734] Kernel driver in use: xhci_hcd 02:00.3 Serial bus controller [0c80]: NVIDIA Corporation TU106 USB Type-C UCSI Controller [10de:1adb] (rev a1) Subsystem: Micro-Star International Co., Ltd. [MSI] TU106 USB Type-C UCSI Controller [1462:3734] After you set the vm you need to switch to the xml view and set the gpu as a multifunction device for the target. All of this is covered in the VM Engine (KVM) subforum.
-
I would suggest to not do things directly on that hd, because you can do things wrong and damage it more as far as data recovery. I would suggest to clone 1:1 that disk to an img file, then use that img to do what you want. In real I would backup also the img file, so to be able to start over again if something goes wrong with the original img. You can use 'dd' command for cloning; obviously if you are cloning a 2TB hd you need at least 2TB of free space in the target disk. -- Look also at this: https://serverfault.com/questions/383362/mount-unknown-filesystem-type-linux-raid-member and see if with the solution you are able to directly mount the hd on md0 without any need of a vm.
-
I just tested this again and the issue is recent changes in qemu 8.0.0 DSDT. By injecting with qemu 8.0.0 the DSDT dumped from qemu 7.2.1, I'm able to boot the vm again. An issue was opened in qemu bugtracker. https://gitlab.com/qemu-project/qemu/-/issues/1630
-
Hi, your goal is to isolate the controllers from unraid to be used in a vm or somewhere else? Because now the 2 controllers use the r8169 driver in unraid. To be able to use them in a vm (for exampl) you need to attach them to vfio driver. Go to tools --> system devices, put a checkmark for iommu groups 18 and 24. Reboot unraid. After reboot the controllers will be isolated and they could be used for a vm. Note that for this to work, you need to configure unraid network with other controller(s) than that devices otherwise the two boxes will be greyed out because the 2 devices are in use by the host.
-
For future purposes I just tested qemu 8.0 without any luck. My monterey vm is not able to boot (apple screen with prohibition symbol). keyboard (attached to emulated usb controller) doesn't seem to work too, to boot into opencanopy. Changing machine type to older versions seems to have no effect. There are several changes in qemu 8, including acpi-index for hotplug and vfio upgraded to v2. Opencore log doesn't contain any useful info I'm passing through a sata controller and it seems mac os is not able to boot from the hd, because it outputs "still waiting for root device"; opencore is able to detect the disk. My question is if someone has successfully tested qemu 8 with devices passed through, possibly with at least a multifunction device (gpu for example). @pavo@ofawx@Leoyzen
-
Apr 13 17:40:10 Tower kernel: Kernel command line: BOOT_IMAGE=/bzimage initrd=/bzroot pci=noaer iommu=pt amd_iommu=on nofb nomodeset initcall_blacklist=sysfb_init isolcpus=10-15,26-31 nofb parameter is no more valid in the syslinux configuration, replace it with: video=efifb:off
-
I don't have any igpu so I can't suggest anything more apart asking in that thread to other users that have the same igpu. I can say that you probably wont be able to dump the vbios from the igpu, you need to extract it from the bios of your motherboard (the discussion I linked has instructions about how to do it) or download one.
-
Apr 10 13:54:15 Storage kernel: vfio_iommu_type1_attach_group: No interrupt remapping support. Use the module param "allow_unsafe_interrupts" to enable VFIO IOMMU support on this platform Settings -> VM -> change "VFIO allow unsafe interrupts" to Yes. Apply, reboot and try
-
Replace this: <hostdev mode='subsystem' type='pci' managed='yes'> <driver name='vfio'/> <source> <address domain='0x0000' bus='0x10' slot='0x00' function='0x0'/> </source> <alias name='hostdev0'/> <address type='pci' domain='0x0000' bus='0x03' slot='0x00' function='0x0'/> </hostdev> with this: <hostdev mode='subsystem' type='pci' managed='yes'> <driver name='vfio'/> <source> <address domain='0x0000' bus='0x10' slot='0x00' function='0x0'/> </source> <address type='pci' domain='0x0000' bus='0x03' slot='0x00' function='0x0' multifunction='on'/> </hostdev> <hostdev mode='subsystem' type='pci' managed='yes'> <driver name='vfio'/> <source> <address domain='0x0000' bus='0x10' slot='0x00' function='0x1'/> </source> <address type='pci' domain='0x0000' bus='0x03' slot='0x00' function='0x1'/> </hostdev> <hostdev mode='subsystem' type='pci' managed='yes'> <driver name='vfio'/> <source> <address domain='0x0000' bus='0x10' slot='0x00' function='0x2'/> </source> <address type='pci' domain='0x0000' bus='0x03' slot='0x00' function='0x2'/> </hostdev> <hostdev mode='subsystem' type='pci' managed='yes'> <driver name='vfio'/> <source> <address domain='0x0000' bus='0x10' slot='0x00' function='0x3'/> </source> <address type='pci' domain='0x0000' bus='0x03' slot='0x00' function='0x3'/> </hostdev>



