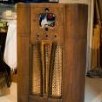
ChuckTSI Posted July 27, 2014 Share Posted July 27, 2014 Time to upgrade the case on my UnRaid setup. I was going to go with Norco case, but decided I wanted something unique. I love old floor radios so I thought it was time for Project ** Logo improvements pending ** So I picked up this radio for 40$. (after a 4.5 hour drive to get to it and 4.5 hours to get it back home). 1937 Rogers Majestic 12-75 Shortwave Radio (I would have preffered FM / AM Radio as I wanted to keep the radio working, but the body of this radio was worth more customizing. I really would like to keep this display somehow. When I was moving it to the garage to remove the insides, I kept hearing rattling. Found the culprits! Damn Bert and Random Toupee Guy. Spent an hour or so cleaning it out, little bit of polishing up and it's not looking too bad. I will spend more time cleaning up the traces of dust and debris. Also, the top must have had a vase sitting on it. water damaged veneer. Will look at replacing top with either veneer or hardwood top. Now.. how to add all the computer components to this thing? I need to come up with multiple plans. Spent a couple hours measuring the unit and creating a drawing in Sketchup. It's been a long day, so it's all I have accomplished. Keep an eye on this thread. I will post updates when possible. Also, I hope my pictures get better [PAGE 3 Updates] Starting finally. There is going to be a redesign of the way the racks open. They will pivot back from the bottom. Here is the damaged top again: Removed the top damaged layer of veneer. Going to go veneer hunting (saved large piece for grain matching) Cutting the shelf brackets. Rough idea of height / clearance requirements (mock up using pine. too soft and not quite cut to spec. Slight bends in the brackets). Solid though. Most wood parts for each rack will be made using hardwood. Got some parts. Wood is Poplar. Ready to start tomorrow hopefully. try and finish the front plate (with fans), sides and bottom supports along with the two racks. Will examine a pivot style when complete. overkill but would love soft open / close racks. Cut out the rack tops: Mounted: Assemble Fan / Rack Box Cut out and install fans into front plate Fans Installed: Front and Read View (still needs cutout for fan power wires to leave the fan box) This not making new holes in the original radio is becoming a pain. Tried to remove the mid shelf, but they glued the front. This has caused more headaches. The space between the front curves and that plate allows for 1 finger. I now need to create custom power cables and distribution block. For now I built a baseplate to cover the midshelf and accept mounting hardware. The bolts holding down the baseplate are a little high for my liking. I'll be getting some of those ikea style furniture bolts. I also need to buy new baseplate material as the old piece I used was warped. Going to try and use clamps to see if I can get it to hold flat shape. (highly doubt it) Tossed in all the drives I have. Worried that parity and cache are so close to the top. Maybe the design will only hold 20 drives instead of 22. We'll see how temps are. and here is the mess of wires I need to deal with. <grumble grumble> I forgot about getting a power button. Reset button, etc etc. lots of forgots. so now unraid is offline and my regular drives will have to bear the brunt of media for now. [PAGE 4 Updates] Tonight was taking care of some little things that were driving me crazy. Changed the adapter plate bolts to low profile. Had to custom cut. Change out the warped board for a straight one. Better motherboard clearance now. Added cage/tray lock bolts. Didn't want my production drives falling on the floor. Cleaned up some wiring for now. Bought the hardboard for the back. Until I know exactly where everything is going, can't cut it. IT'S ALIVE!!! (I feel like Henry Frankenstein running around the house saying it) [PAGE 5 Updates] The server is running great. Temps are stable. Added a 3/4 inch plate to the bottom with felts underneath. Slides nicely on the hardwood floor. (Nearly too heavy to lift alone) Items to tackle: NEW Vibration from 1 or 2 older drives is resonating withing the case. (1 of them is VERY loud) EXISTING - Veneer the top - Find front cover material (perforated aluminum sheet) or maybe wood veneer for matching? - Complete the back panel - Find Radio Component that will work in radio and make custom knobs (was missing 1 when I bought it, want all to match) - Work out glass display functionality (worries me, I can't remember where I put it >.<) - Power Button. Screwdriver is annoying. This server lives in a basement room with the door closed. Room temp is held at 23.6 degrees C. Rest of House is 20. I cut a piece of oak veneer and fastened to front plate. Made to fit. Stained Test Mounted I then attached some fancy aluminum sheet to the front. Drilled out the holes for the mounting of the trim piece and voila. Total Spent so far: $40 - $40 Radio $90 - Fans and Controller $53 - 3/4 Inch Poplar $30 - Closet Rails 6$ - PC Screws $20 - Aluminum Sheet ------------------------------- $249 Quote Link to comment
gfjardim Posted July 27, 2014 Share Posted July 27, 2014 If I can make a suggestion, in the place of that dial you could put a "gauge" showing drive temperature or total used space. https://www.tindie.com/products/TheRengineer/analog-gauge-stepper-breakout-board/ Quote Link to comment
ChuckTSI Posted July 27, 2014 Author Share Posted July 27, 2014 If I can make a suggestion, in the place of that dial you could put a "gauge" showing drive temperature or total used space. https://www.tindie.com/products/TheRengineer/analog-gauge-stepper-breakout-board/ Nice find! The glass actually separates from the radio portion. So this is possible. And yes. All suggestion welcome! Quote Link to comment
unevent Posted July 27, 2014 Share Posted July 27, 2014 Put it back together, have it restored and sell it to a collector. Quote Link to comment
gfjardim Posted July 27, 2014 Share Posted July 27, 2014 Do you have any ideas no how do you will store your hdd into it? May I suggest http://www.newegg.com/Product/Product.aspx?Item=N82E16816111045 Quote Link to comment
ChuckTSI Posted July 27, 2014 Author Share Posted July 27, 2014 "No Vintage Pre WWII Radios will be harmed in the making of this server." Download: Sketchup File of the Radio Case: http://www.chucklavoie.ca/_projects/unraidio/unraidio.skp ** for those that may want to try some ideas out as well ** The drives will be suspended from and resting on the original wooden supports inside. I will build custom brackets / adapters to ensure no new holes will be drilled into the radio. If I want to restore it, it will be simple to undo changes. Other ideas that I am considering: FM Tuner (https://www.sparkfun.com/products/11083) or Online Radio Streams w/ Raspeberry Pi (http://www.bobrathbone.com/raspberrypi/Raspberry%20PI%20Radio.pdf) 2.1 PC Speakers (Inside) 7" LCD Touchscreen Monitor (In Window area)? Or Fan Controller? Battery Backup built in (larger battery for hours of up time) I am very indecisive lately, so this may take awhile. Rough draft #1. (2x 200mm Cooling Fans for HDD) Side cylinders provide upper unit with cooler air from bottom. Will be closed in at back. (slit at top to allow hot air to escape). Fan in cylinders to push air up Quote Link to comment
garycase Posted July 28, 2014 Share Posted July 28, 2014 Very nifty project ... I'd keep the radio dial -- adds a lot of character, and there's really not much you'd need to show r.e. the server itself. Lots of internal room for excellent ventilation, so this can be a really nice, high-capacity server that nobody would ever guess was a computer Quote Link to comment
gfjardim Posted July 28, 2014 Share Posted July 28, 2014 Take a look at that link I posted. It could save you a lot of time/trouble. Quote Link to comment
ChuckTSI Posted July 28, 2014 Author Share Posted July 28, 2014 Take a look at that link I posted. It could save you a lot of time/trouble. Definitely won't save me money! time I have a lot of. But I will keep it in mind. You know how loud those fans are on those? Quote Link to comment
kizer Posted July 28, 2014 Share Posted July 28, 2014 Personally I'd leave the outside Totally stockish so its more of a server in hiding. That Radio is the showcase if anything. Heck if I could hide my server in the addict or in the basement even better since its just for storage, but an old Radio like that is so awesome to look at. As for fan noise I have 3 120mm running and I just did a 7volt mod to mine and you can barely hear them even on. Sure stick your head next to them and you can, but from a short distance nada. Quote Link to comment
ChuckTSI Posted July 28, 2014 Author Share Posted July 28, 2014 Agreed. The radio will remain as stock looking as possible and it has to be almost dead silent cooling wise. Looked up 7 volt mod, I may try it as long as it can still move enough air to cool all the drives during parity checks. Magic Eye (Top Hole) http://en.wikipedia.org/wiki/Magic_eye_tube I am trying to get the magic eye to stay (show disk access) but with the fact that this 6x6 tube burns out with time and those tubes are $$$ and rare, I am looking for alternative. (maybe EM83, etc) Window (Display Hole) Thinking I will build a casing for it and add a 20% tinted piece of glass behind it with about 1" space in between. I will light up the area between the panes of glass. When the radio is on, the radio dial will show nicely, but when off, the light between the panes will allow the minimal red led lighting from the upper part of the inside to barely be visible. Worst case, will just keep it simple with black felt instead of tint. But I can't see how this will be used yet. none of the numbers on the display I can work with. (maybe the 1.7 to 5.5 could be temp? 17 to 55?) 1" Hole below display will either be Radio control knob or USB port. Three button holes I was going to put power, reset and some other type of switch there, but realized that I don't want people (AKA kids) pushing the buttons (ooh look shiny) Still unsure. Guess keep it to radio functions Drive arrangement has almost been decided. Gonna hammer out the details in Sketchup this week. Gonna retain much of the wood look. Quote Link to comment
dlandon Posted July 28, 2014 Share Posted July 28, 2014 Put it back together, have it restored and sell it to a collector. +1 I restore vintage tube radios. What a waste of a really nice radio. Quote Link to comment
ChuckTSI Posted July 28, 2014 Author Share Posted July 28, 2014 Again.. for the vintage radio lovers, there will be NO harm to this Radio. All original parts are in a box ready to be reinserted. No extra holes or damage will be done to the radio. Side note: This radio was missing the speaker and cable, output tube 6F6M, has it's power cord cut and missing one knob. I simply don't understand though. You are both unraid lovers (you are part of the forum) and you are vintage radio lovers. Why would you not support this?! Especially with no damage to the radio? Temporary home until I find a cooler case. (just WAIT!.. the vintage coca cola fridge guys are gonna be pissed next). lol. Ok. I digress. I will restore the radio guts by slowly replacing caps and resistors. Then I will restore the radio. But in the meantime until I find another radio case I love, this is it's home. Find me a post WWII radio that has character and will fit 24+ drives and has AM / FM Tube Radio. For 40$ or less. Delivered to my door. Quote Link to comment
garycase Posted July 29, 2014 Share Posted July 29, 2014 I think you've got a GREAT project going here. I agree (as I noted earlier) with leaving the external appearance unaltered, so it LOOKS like an original radio. There should be plenty of interior space to hosue your server with no mods to the physical case, so it could always be returned to its original function as a radio. Can't wait to see how your server looks housed in a vintage Coca Cola dispenser Quote Link to comment
unevent Posted July 29, 2014 Share Posted July 29, 2014 -- Magic Eye (Top Hole) http://en.wikipedia.org/wiki/Magic_eye_tube I am trying to get the magic eye to stay (show disk access) but with the fact that this 6x6 tube burns out with time and those tubes are $$$ and rare, I am looking for alternative. (maybe EM83, etc) -- Simulate it like what this guy did: http://www.hpfriedrichs.com/radioroom/magiceye/rr-magiceye.htm. What this guy does is a simple method, though can get more stable and more precise control with a microcontroller such as PIC, Arduino, etc. Curious as to how you want it to display disk access? Simply oscillate on access or variable based on drive access LED duty cycle? Quote Link to comment
ChuckTSI Posted July 29, 2014 Author Share Posted July 29, 2014 Simulate it like what this guy did: http://www.hpfriedrichs.com/radioroom/magiceye/rr-magiceye.htm. What this guy does is a simple method, though can get more stable and more precise control with a microcontroller such as PIC, Arduino, etc. Curious as to how you want it to display disk access? Simply oscillate on access or variable based on drive access LED duty cycle? I saw this on YouTube but didn't see the page. I find it might be close enough. And yes, was just going to use the led output and use a solid state relay to pass off the signal / voltage needed to operate the eye. It would be off on. No in between. This LED version would be the best modern / power saving method to match but wondering about noise or a motor spinning the disk?? Also, the power contacts must wear out at some point? The eye will the the "piece de resistance" of this unRAIDIO. Just worried about meeting everyone's expectations of this thing. Quote Link to comment
ChuckTSI Posted July 29, 2014 Author Share Posted July 29, 2014 Thinking along these lines. The radio part of this won't be a big space issue so I'm not going to bother drawing it out. 140mm fans. Shielded separator (drives and speakers) Some nice vintage speaker cloth to cover the fans and speakers (worried about enough air movement after the fabric is added). Can't use the original cloth as it is glued to the original panel and something splashed on it (looks like bleach). Now need to figure out the drive bracketing. Buy existing or make my own. I like this idea. Quote Link to comment
Ashe Posted July 29, 2014 Share Posted July 29, 2014 Where are those drive cages from? Sent from my Q5 using Tapatalk Quote Link to comment
ChuckTSI Posted July 29, 2014 Author Share Posted July 29, 2014 Where are those drive cages from? Sent from my Q5 using Tapatalk Here you go sir. http://www.caselabs-store.com/drive-cages/ Quote Link to comment
Ashe Posted July 29, 2014 Share Posted July 29, 2014 Thanks. Will come in useful for some custom builds Sent from my Q5 using Tapatalk Quote Link to comment
garycase Posted July 29, 2014 Share Posted July 29, 2014 Case-labs is a nice find -- they've got some very nice choices for customizations. Thanks for the link. Quote Link to comment
unevent Posted July 30, 2014 Share Posted July 30, 2014 Simulate it like what this guy did: http://www.hpfriedrichs.com/radioroom/magiceye/rr-magiceye.htm. What this guy does is a simple method, though can get more stable and more precise control with a microcontroller such as PIC, Arduino, etc. Curious as to how you want it to display disk access? Simply oscillate on access or variable based on drive access LED duty cycle? I saw this on YouTube but didn't see the page. I find it might be close enough. And yes, was just going to use the led output and use a solid state relay to pass off the signal / voltage needed to operate the eye. It would be off on. No in between. This LED version would be the best modern / power saving method to match but wondering about noise or a motor spinning the disk?? Also, the power contacts must wear out at some point? The eye will the the "piece de resistance" of this unRAIDIO. Just worried about meeting everyone's expectations of this thing. I would suggest removing the mechanical switches and contacts from the design. Depending on the final design power requirements, power can be transferred in simplest form by adding a coin cell to the rotating element, solar cell, a second hobby DC brush motor with a shaft on both ends to make a generator, slip ring, etc. Google POV displays or spinning clock for ideas. Quote Link to comment
Recommended Posts
Join the conversation
You can post now and register later. If you have an account, sign in now to post with your account.
Note: Your post will require moderator approval before it will be visible.