

HectorG
-
Posts
19 -
Joined
-
Last visited
Content Type
Profiles
Forums
Downloads
Store
Gallery
Bug Reports
Documentation
Landing
Posts posted by HectorG
-
-
probably not of much help but usb controllers seem to be hit and miss for many (espeically amd ryzen owbers) and even then it feels usb controllers even when in seperate groups appear to still be sharing from the other usb controllers on the mobo causing other issues and instability.
I see why space invader vid he just bought a usb controller card and passed that through so reduced the headache, gonna do same shortly.
-
On 5/31/2020 at 4:37 PM, djglenn said:
With mine it boots fine now (following the above), just cannot pass any drive through by doing it which defeats the purpose of doing it in the first place 😂
Ok I fixed the issue (I have same issue as yourself) Rachid told me to use a special bootloader modded bios (clover) iso file as the primary vdisk instead of it being set to none(space invader made it in his video and shows same thing), then you can tick the nvme drive in other pci devices as normal and also click the + sign under primary disk to add 2nd vidsk such as unassigned disk or other drives as normal.
This forces windows 10 template to boot off the nvme drive using the modded clover iso, startup.nsh is gone now. Here is the link to info:
Hopefully this fixes the issue for the rest of the unraid users having startup.nsh or boot issues with nvme pass through.
-
 1
1
-
-
1 hour ago, rachid596 said:
OK tell me if it's work.
I use this clover IMG with my samsung 970 evo and works perfectly.
Envoyé de mon HD1913 en utilisant Tapatalk
Thank you very much rachid596 ! (and to space invader) it worked with that modded clover bios bootloader iso file.
Instead of adding primary vdisk location = none, I chose manual and selected the clover bootloader.iso (download link in space invaders vid above)
then I clicked + sign to add my 2nd vdisk location and selected my unassigned disk as normal (or add any other hdd or device)
Booted it up several times to make sure but no more startup.nsh error. Unraid does save the bios savings what I found was setting primary vdisk to none (to pass through the nvme drive) and then adding a 2nd vdisk (assigned device hdd) the unraid vm template was then assuming since there was no primary hard drive (was set to none) it was defaulting to the 2nd vdisk causing the startup.nsh boot loop error.
Using the clover bootloader bios.iso file in primary vdisk gives the vm windows template a location to boot as well as being a better modded bootloader to allow nvme to correctly pass through.
I wish space invader would do a small video of an up to dated nvme pass through video with vfi plugin + using the clover bios bootloader iso, otherwise its gonna be hell when others try to do vfi without the clover bios or vice versa, I will link this post to the other thread where the other unraid users are having same or similar issues hopefully should fix it for them too.
-
10 hours ago, rachid596 said:
Hello, i use the file from this vidéo to boot from my ssd nvme
Envoyé de mon HD1913 en utilisant Tapatalk
thanks I did see this video a while back but noticed maybe this is relevant to older unraid builds, the ytube comments suggested using a clover bios was not required anymore since the ovmf bios can support uefi and nvme boots (although I think its buggy since it wont save after a reboot).
Still I will give it a try since this issue still exist as noted also over here these guys modded the xml to tell it to boot directly off the nvme
drive but some had issues with passing through other unassigned devices.
https://forums.unraid.net/topic/83515-forcing-boot-order-w-nvme-pass-through/
I will have to try all of them and see what works.
-
On 5/31/2020 at 4:37 PM, djglenn said:
With mine it boots fine now (following the above), just cannot pass any drive through by doing it which defeats the purpose of doing it in the first place 😂
Hi did you have any joy with this issue ?
I still have this issue sadly to me it feels like the bios is not saving the boot order, when you get startup.nsh shell error and type exit and change boot order and save it, it 100% saves since if you click resume/continue it boots to your nvme drive but..... if you shut down and restart it defaults the original incorrect bios.
To me it almost feels like a bug in the vm virtual bios regardless of q35 or i440 etc
I posted here also:
Some suggested using a clover modded bios, never heard of this but will also try this soon.
I believe there maybe a temp solution to forcing the VMs q35 or i440x bios to directly boot off your nvme device but my xml/linux command work is not that good but it involves editing the startup.nsh file:
I did add these lines into my startup.nsh file:
fs0:
cd efi/boot
bootx64.efi
but it claims it cannot find the files, even though I can manually go through each folder and file and run it and boot fine.
unraid wiki mentions OVMF has this boot issue with VMs but also says like many its a 'one time' boot, this is not the case
with myself and many others. Almost feels like a bug within unraid with the bios settings not being saved or the VM template needs a boot order option to tell the VM which devices to boot off first?
-
These may not work since I am new to unraid but I did have the error 43 myself, try these:
I had to disable Legacy bios or CSM in the motherboard bios then the error 43 went away and my Nvidia card worked fine.
GPU pass through does not work with those it has to be UEFI bios only, also when creating your VM template in unraid do not use seabios since its legacy/csm mode (so wont pass through gpus) it has to be set to OVMF only since that supports UEFI bios and GPU pass through.
You should also use your correct gpu bios of your gpu card and make sure it's been edited correctly, otherwise if it's not been edited it won't work either for pass through. Ytube space invader has the vids for that and shows you how to edit the rom file.
also this may not help but I did all the above and had a blank screen when my VM started I followed jt rippers instructions here:
and applied a script fix, this allowed my gpu to display and work also.
Again not sure if it helps but maybe worth a look.
-
I have a strange issue with VM windows 10, I am running VM directly off an internal nvme ssd (with windows 10 already) Nvidia gpu pass through all works well but I get the startup.nsh bios message each time I start the vm.
I can type exit, select boot manager and select my uefi nvme intel ssd and it boots fine to windows and runs well but obviously it's not nice to do this every single time I switch on Windows 10vm.
I have already tried to delete the boot order entries and leave just my uefi nvme intel ssd as the only boot device or like the first or only boot device to exist, saved changes to bios and clicked resumed this works but its temporary, soon as I restart back I get startup.nsh screen its like the bios does not remember the boot order or changes I made. Tried also changing boot order to point to only uefi intel nvme drive, same effect.
Tried win 8.1 and 7 templates, intel 44x machine bios and q35s, I have to use ovmf since I require gpu pass through so seabios is not a solution for me but from the other threads that was mentioned as a fix.
Anyone seen this error or have any idea ? feels like I need force & save the bios to point to my intel nvme drive since it's not being saved.
-
Had this exact error and then figured since the nvme drive is enabled and checked within the vm template to just go back to that busted or bad VM template and then uncheck NVME drive in the other pci devices section or just uncheck any usb or pci express devices and hit apply. Now you should be able to simply delete the vm without any error message.
Unraid is so logical that if you try to 'Windows' it, it won't forgive you for being stupid and it will just tell you off, but if you think like spock unraid just works.
-
2
-
-
Well was just about to post my cure to the deadful nvidia code 43 error but Dangerous above posted it. I too have an 3800x AMD system and Nvidia card, I had switched to CSM to fix unraid gui getting a blank screen but when I ran the VM win10 it came up with code 43 and a giant screen.
Luckerly I recalled I changed that bios setting since it was working last week fine so knew switching CSM in my bios to OFF was perhaps going to fix it and it did.
Something to note however is not all bios of mainboards call it UEFI mode or Legacy mode anymore, my motherboard calls it CSM which I believe is legacy mode.
Looking back on the last 4 pages id bet the whole UEFI, Legacy, CSM mode is causing the code 43 error so give it a try I believe its due to Windows 10 and gpus being installed via UEFI mode and not legacy/CSM.
-
1
-
-
1 hour ago, Froberg said:
I really fear this is causing a hindrance for some people who are new to UnRaid.
It 100% is for myself, I have watched probably 20 space invader vids and read many pages on the forum (probably overkill in terms of newbie) and just feel I have spent more time trying to get the flash stick set up correctly then using unraid itself.
Even with the above hackery to rename to UNRAID it did not work for me, but then I noticed it is my fault or the unraid wiki is not fully clear, the Manual method of creating the unraid stick (copying over the zip etc) only works if you are in legacy bios mode, my bios does not have any legacy mode written anywhere but then I found its also known as CSM. So I disabeled CSM and the stick boots fine. The only issue is I can't have CSM enabled since when I pass through my GPU on my VM I discovered I get the dreaded Code 43 gpu fault but switching off CSM in bios my gpu can pass through the nvidia card fully without error (I will update the code43 thread with my findings may help others)
So I still remembered others on here used a old pc, tried it on a 10 year pc and unraid creator created it perfectly on a sandisk usb stick and the corsair!
So only took 3-4 weeks to fully get a usb stick running. I also read usb2.0 flash are more reliable but I used a magazine freebie one and while it passed multi write read/write test, I think its a dodgy stick maybe the cheap or free ones are a reason ! so ill digress and say cough up get a good quality flash drive.
Its perhaps a bit of old guides getting out of date, seems UEFI, Legacy/CSM and usb3.0 flash are also problematic, maybe its better to flash on an stick on an usb 2.0 port on a 10 year old computer.
Really at this point I just want to see if unraid is stable enough to move full time, which I believe it is.
-
ran into this issue also but sure enough as it hangs on sync I went back to windows explorer renamed pen drive to UNRAID and it began copying correctly. I ran the unraid usb creator as admin also but still had to do the above.
-
On 6/1/2020 at 12:39 AM, Skitals said:
What temp readings are you referring to? There are no issues with unraid and hot cpu temps on these boards.
Oh thanks I must be mistaken, thought I heard of hotter temps with AMD cpus and unraid good to hear this is not the case.
-
pretty good video here:
I currently am having usb controller issues (its possible but bit tricky to isolate and pass through-needs some work) since I am new to unraid I may actually just get a usb 3.0 pciexpress card there cheap and since it's an separate device should be more headache free, I too have issues with my usb soundcard dac/amp sometimes does not get detected even despite being listed in device manager or no power.
I recommend getting one with additional power to help drive powerful usb devices.
-
Hello I am new to unraid and just read this excellent post, I own a AMD 3800x and Asrock 570x mobo so think I have spotted some of these issues (mainly trying to vfi onboard sound to win10 vm crashing it and crashing unraid), I think I can avoid the onboard audio (I use an usb external soundcard) and can get a usb controller seperate card to solve any usb pass through issues.
Is there a problem with unraid and AMD cpus/X570 with hot cpu temps or is this false temp readings ?
-
Hi probably not the best person to give advice since I too have issues with usb controller pass through, I think you own a AMD ryzen and maybe X470/570 board?
I think were having the same issue I did some extra reading/googling and it pointed to these threads here:
https://forums.unraid.net/topic/87557-guide-asrock-x570-taichi-vm-w-hardware-passthrough/?_fromLogin=1
https://forums.unraid.net/topic/86026-kernel-680-rc5-w-navi-reset-v2-vega-reset-k10temp-ryzen-patches-x570-onboard-audio-fix/page/2/
https://forums.unraid.net/topic/82625-kernelcustom-kernel-build-with-treaks-20200307-v683558419108naviveganfsv4r8125zen2/
I have a Ryzen 3800x/Asrock X570 mobo and after latest bios updates (which helped and enabling Iommu and usb to 'enable' in bios) and adjusting ACS override= both, I rebooted and found what was perfection, a separate usb controller (usb 3.1 port and C port on group 35 with id:1022:149c- so I used vfi plugin to enable that one and it works on win10 vm but its slightly iffy and can hang and also crash unraid server forcing parity checks (lots of hours of fun) so it's not something anyone wants.
Anyhow that group 35 and 1022:149c maybe a trap and is still being used by the other 2 usb controllers (check first link with endy) so there are 3 usb controllers I think X570 boards have.
I think I may just buy a usb 3 card for a tenner, also I have just read AMD Ryzen and 470/570 mobos have issues (hot cpu temps? and the onboard sound card won't work on VMs-I tried with onboard sound and it crashed also) so check the other 2 links, I am still new to unraid so could be wrong but it sounds like a separate usb controller card and usb sound card is the way forward with Ryzen cpus and X570+ mobos for now especially with running VMs headache free.
-
On 1/19/2020 at 9:54 PM, Endy said:
I’ve seen a lot of people asking questions and having problems getting graphics cards and onboard usb controllers passed through on Ryzen X570 systems. I had some issues myself that thanks to a couple of people here on the forums I was able to get resolved. This guide is about setting up a Windows 10 vm using a single graphics card with onboard usb passed through.
Because I have managed to get it working, I thought it might be a good idea to write a little guide based on my setup in case it can help some other people.
While this was specific to my motherboard and hardware, there are parts that should be applicable for other hardware combinations.
Let’s start with my hardware. I’m using a Ryzen 7 3800X with the AsRock X570 Taichi. The graphics card is a Geforce GTX 1070.
BIOS
First step is to make sure the bios is up to date. At the time I am writing this the newest bios for my motherboard is 2.70 dated 12-9-2019. This is the AGESA version:
Update AMD AGESA Combo-AM4 1.0.0.4 Patch B
Once updated, boot into the bios once then restore default settings, save, reboot and go back into the bios.
To enable IOMMU I found this at level1techs:
https://forum.level1techs.com/t/x570-taichi-iommu-groups/145762/2
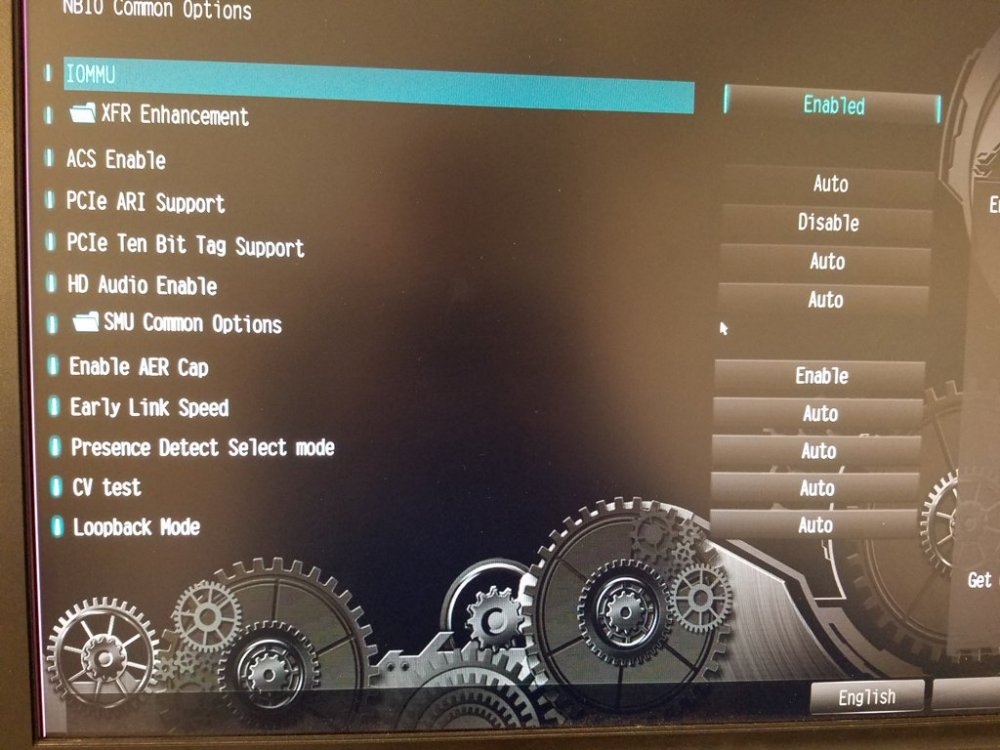
After some trial and error, I found that in order to passthrough the motherboard usb controllers, I had to change some usb options from Auto to Enabled. Because there is one controller that can’t be passed through, not all of these probably need to be changed, but I’m not sure which ones are for which controllers. Doesn’t seem to be causing me any issues at the moment.
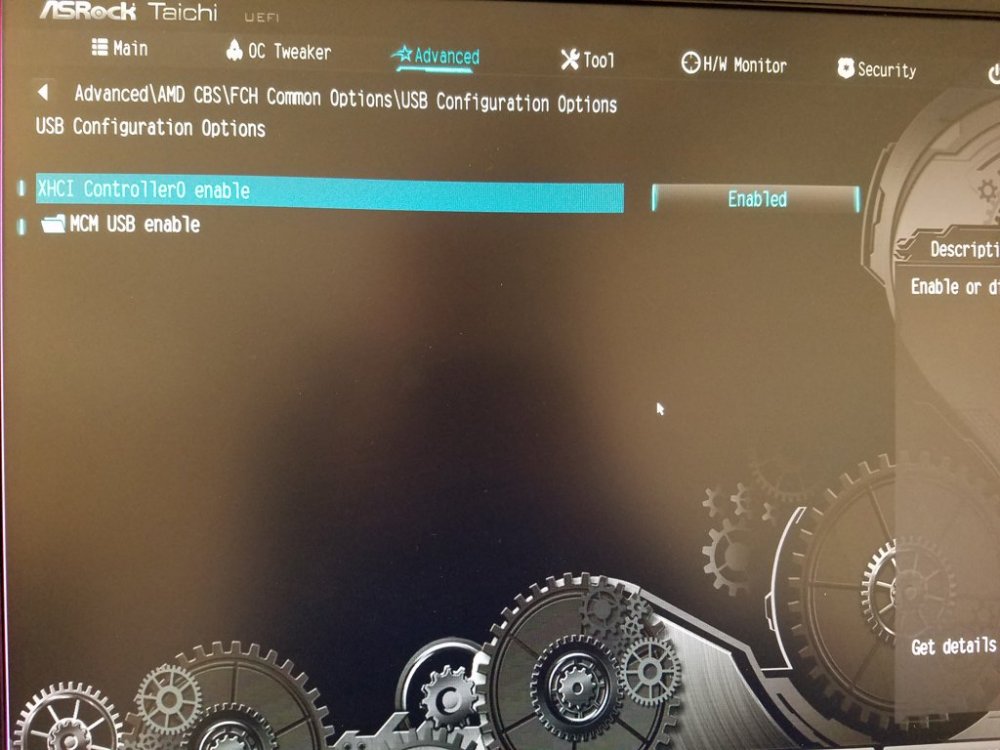
Go to Advanced>AMD CBS>FCH Common Options>USB Configuration Options and change XHCI Controller to Enabled.
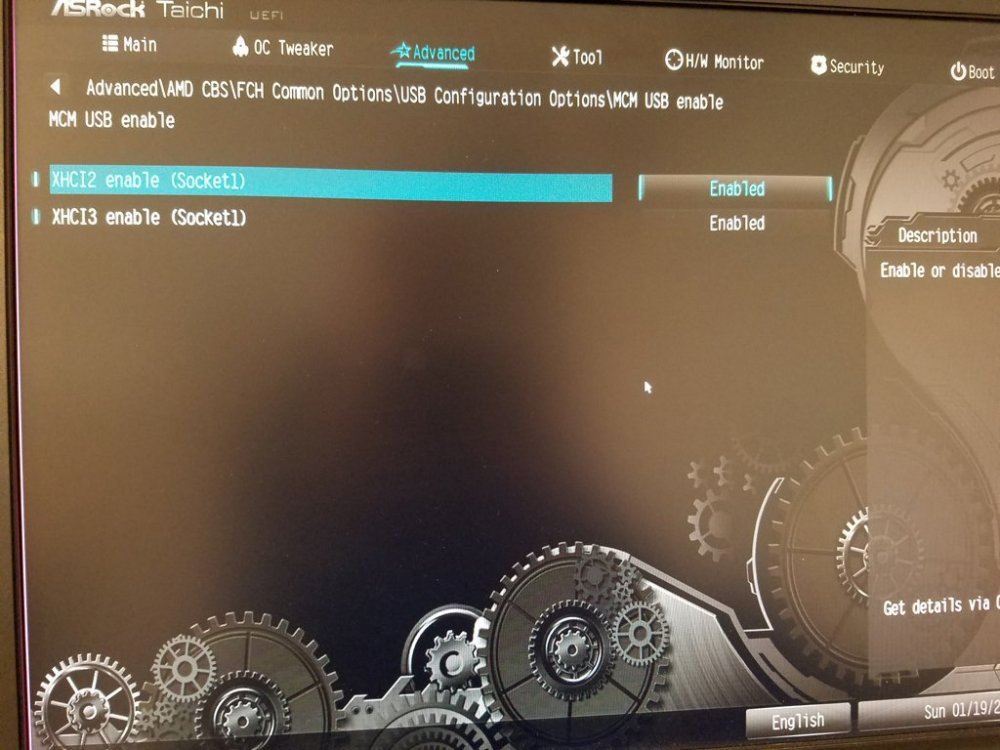
While there go to MCM USB enable and set XHCI2 enable and XHCI3 enable to Enabled.
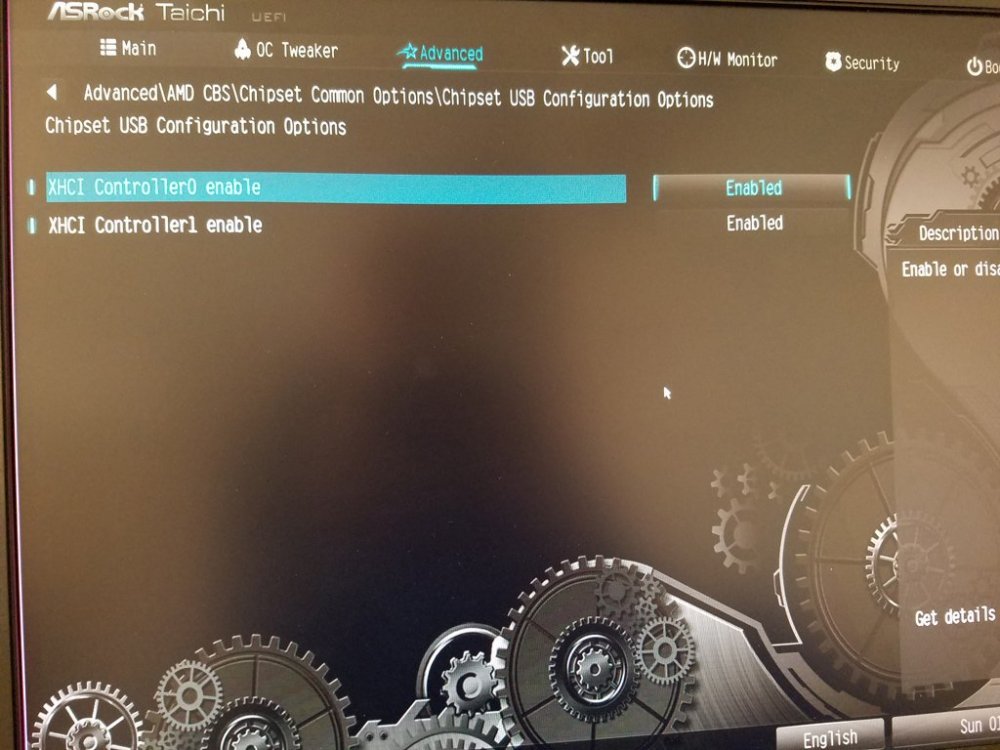
Next is Advanced>AMD CBS>Chipset Common Options>Chipset USB Configuration Options. Change XHCI Controller0 enable and XHCI Controller1 enable to Enabled.
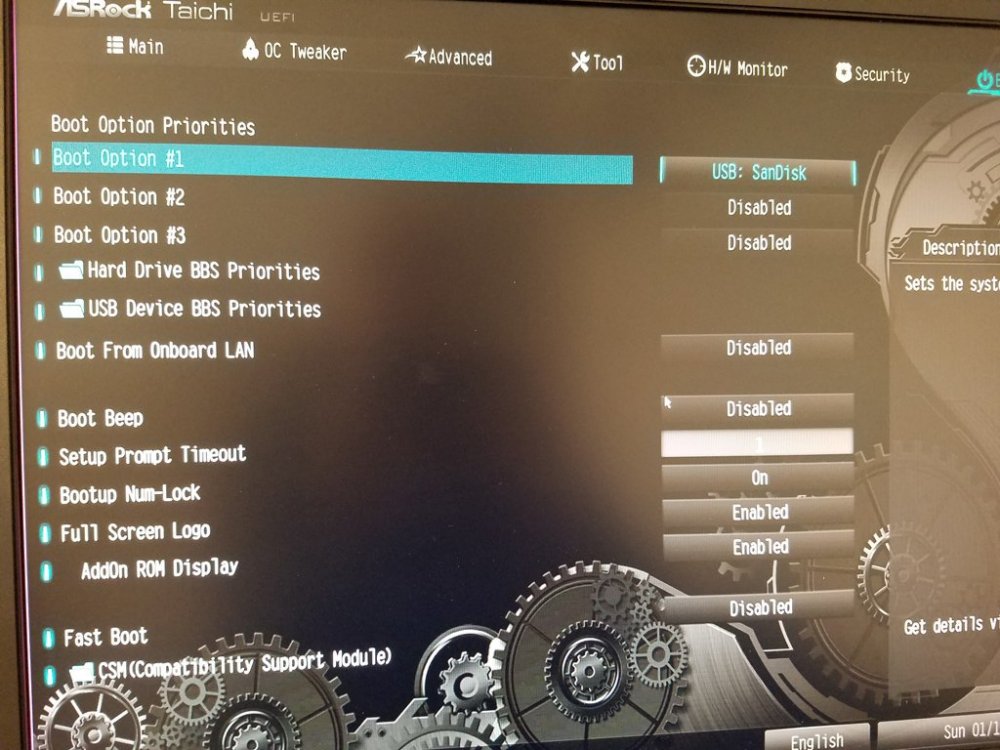
The last thing is to set the boot device to the Unraid usb non uefi. (Supposedly booting the usb using uefi can cause problems, but I have not experienced those myself so I can’t comment on that. This is the better safe than sorry approach.)
Save settings and reboot.
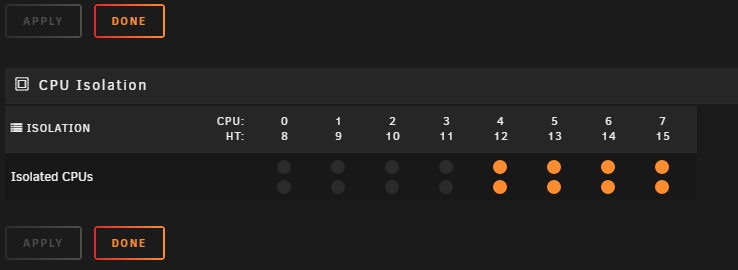
Isolating Cores
This next step may be considered optional, but it’s about making sure the vm has the best chance of performing as best it can. In Unraid go to Settings>CPU Pinning. At the bottom you can choose which CPU cores you would like to isolate. Unraid like to use core 0, so I stay away from that one and usually start at the other end. Keep in mind to match the hyperthreads together. In my case I went with cores 4-7 and the matching hyperthreads 12-15.
Syslinux
Next, in Unraid, go to the Main tab and click on Flash then scroll down to Syslinux Configuration. To edit these click on Menu View and it will change to Raw View.
I like to have a separate menu option for hardware passthrough so I just copy everything for ‘label Unraid OS’, delete ‘menu default’ under ‘label Unraid OS’, then paste in the new menu item with the other menu items. Make sure to rename it and that it says ‘menu default’ so that’s the one that Unraid will boot into automatically.
The only other change is to add ‘video=efifb:off’ after ‘ initrd=/bzroot’. I admit that I am not sure on the details of why this is necessary, but I believe it has to do with passing through the only graphics card in the system.
label Unraid OS HWPT
menu default
kernel /bzimage
append isolcpus=4-7,12-15 initrd=/bzroot video=efifb:off
vfio-pci.cfg
To stub the graphics card and usb controller I highly recommend using the VFIO-PCI CFG plugin. So far it works really well and makes things much easier. Plus, it gives useful information like if your device can be reset and also which devices are attached to which usb controllers (very useful for figuring out which usb ports belong to which usb controllers). The plugin can be found in Community Apps.
Once installed you can find it in the Settings tab. Go there and it’s a good time to double check that the IOMMU groups are looking like they should. Then it’s as easy as selecting which devices you want to stub.
Check the graphics card and it’s audio controller.
For the onboard usb controllers, it’s tempting to try using the one that is off on in it’s own group. In my case that was this one:
Group 33 10:00.3 [RESET] 1022:149c USB controller: Advanced Micro Devices, Inc. [AMD] Matisse USB 3.0 Host Controller
However, that one will not work and was one of the problems I ran into, but thanks to an explanation by @Skitals it makes sense why that one would not work. The address is Bus:Device:Function. Notice that the Function for that usb controller is 3. That means that despite being in it’s own IOMMU group, it belongs to another device and therefore, can’t be passed through.
Good thing there are two other usb controllers on this motherboard in this group:
Group 20 03:08.0 [RESET] 1022:57a4 PCI bridge: Advanced Micro Devices, Inc. [AMD] Device 57a4
         0a:00.0 [RESET] 1022:1485 Non-Essential Instrumentation [1300]: Advanced Micro Devices, Inc. [AMD] Starship/Matisse Reserved SPP
         0a:00.1 1022:149c USB controller: Advanced Micro Devices, Inc. [AMD] Matisse USB 3.0 Host Controller
         0a:00.3 [RESET] 1022:149c USB controller: Advanced Micro Devices, Inc. [AMD] Matisse USB 3.0 Host Controller
Select the three Oa:00 devices.
Make sure the usb drive that Unraid uses is not in one of the usb ports for those two controllers and then reboot.
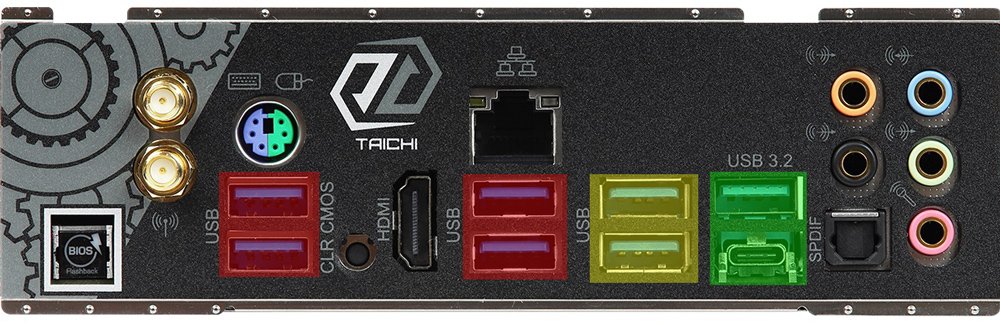
For reference, here’s a picture that shows the back panel of the X570 Taichi. The ports colored in red belong to the usb controller that’s off in it’s own group. The yellow and green colored ports belong to the two other usb controllers. I have not yet tried to figure out which controllers the mother usb headers belong to.
vm xml – graphics card
Before creating the vm, we’ll need a dump of the vbios. While it is possible to download from techpowerup, that may or may not be the right vbios for your exact card. I found it was easiest to put Hiren’s BootCD on a usb drive and swap that with the unraid usb drive, boot into that, dump the vbios with GPUZ and save that to the usb drive. Take that usb drive to another computer and edit the vbios with a hex editor to remove the header as seen in this Spaceinvader One video:
https://www.youtube.com/watch?v=1IP-h9IKof0&t=438s
Put the Unraid usb drive back in the server and start it up. (Now is a good time to make sure it’s still booting into Legacy mode and not uefi as I noticed mine had switched at this point.) Put the vbios file somewhere on your Unraid server so that the vm will be able to access it. (Maybe a vbios folder in with your ISO folders.)
Time to create a Windows 10 vm. Go to the VMS tab, Add VM, Windows 10. I’ll just mention the things that I actually change and the rest of the settings will stay at defaults.
Logical CPUs - change this to match the the cores you isolated earlier
Initial and Max Memory – change these to the desired amount of RAM for the vm, I’m using 8192 MB for both
Machine – Q35
OS Install ISO – point this to your Windows 10 install ISO
VirtIO Drivers ISO – might want to make sure you have the latest version (virtio-win-0.1.171.iso as of the time I am writing this) They can be found here under Direct downloads virtio-win iso:
Note: You can set your default virtio iso in Settings>VM Manager.
Graphics Card – set to your graphics card
Graphics ROM BIOS – point this to the vbios file you got from your graphics card earlier
Sound Card – set to the graphics card audio controller
Other PCI Devices – I had some issues with this but so far I have found two ways that seem to work. The first is to just select the usb controller that ends in .3. (In the reference photo above, I believe it’s the usb ports colored in yellow.) The other way is to select the 2 usb controllers and the non-essential instrumentation. Then the xml also needs to be edited which will be explained below.
Uncheck Start VM after creation
Click Create
Now the xml of the vm needs to be edited, so go in to edit it and click on Form View to change it to XML View.
Now we need to follow this video by Spaceinvader One. There is one thing I noticed that was different for my setup and that was that it was the Bus that was different and not the Slot, so I went ahead and changed the Bus to match.
https://www.youtube.com/watch?v=QlTVANDndpM&t=601s
Usb Controller
If both usb controllers were selected, then the xml needs to be edited in a similar fashion as to the way the graphics card xml was edited.
Here’s mine for an example:
<hostdev mode='subsystem' type='pci' managed='yes'>
 <driver name='vfio'/>
  <source>
   <address domain='0x0000' bus='0x0a' slot='0x00' function='0x0'/>
  </source>
 <address type='pci' domain='0x0000' bus='0x05' slot='0x00' function='0x0' multifunction='on'/>
</hostdev>
<hostdev mode='subsystem' type='pci' managed='yes'>
 <driver name='vfio'/>
  <source>
   <address domain='0x0000' bus='0x0a' slot='0x00' function='0x1'/>
  </source>
 <address type='pci' domain='0x0000' bus='0x05' slot='0x00' function='0x1'/>
</hostdev>
<hostdev mode='subsystem' type='pci' managed='yes'>
 <driver name='vfio'/>
  <source>
   <address domain='0x0000' bus='0x0a' slot='0x00' function='0x3'/>
  </source>
 <address type='pci' domain='0x0000' bus='0x05' slot='0x00' function='0x2'/>
</hostdev>
I should also mention that I changed the Bus since before it was audio was 5, non-essentials device was 6, usb controller was 7 and usb controller was 8. With the audio moved to Bus 4 with the graphics card, I changed the other 3 devices to the now vacated Bus 5.
That should about cover it.
If you are trying to use a previous vm and it doesn’t start and no error comes up and it’s just nothing on the screen, try removing the vm and recreating it. (Thanks to @testdasi for that one.)
big thank you to Endy, I have a AsRock X570 mobo and these settings will be handy since am very new to unraid.
I, too, noticed after doing further bios updates the iommu grouping was better asrock are doing a good job of releasing newer bios so far. But I think I still ran into sam usb controller issue you mentiioned and had tried all 3 but the other 2 did not work (just hanged the vm and crashed unraid) the separate one works better but has been a bit iffy sometimes does not detect my usb soundcard rarely (creative X3), and since the other 2 usb controllers hanged vm when I used the vci plugin I think I may just get a usb 3 separate card instead to reduce headache.
I noticed you used machine Q35 and also a non uefi unraid pen flash, does this give better stability ?
Either way I will re-read your guide, I currently have a VM running Win10 successfully but think once I got the seperate usb controller sorted
and I use a usb sound card I should be more solid.
Also, worth mentioning it's a good idea to enable "VFIO allow unsafe interrupts" under VM advanced tab settings, this solves the usb issue if you are hot swopping devices and won't hang the vm and crash the unraid server.
-
Query for CS380 owners : did owners consider trying to use 140mm > 120mm fan adaptor converters on the inside of the hdd cage (2 fans)and even maybe on the outside of it (bottom (intake) and one on back(external) you could mount the fan on the outside maybe.
140mm fans have better air flow and the improved silence, so this maybe worth a mod.
-
thank you to unraid team, I have been enjoying my experience with it and have already decided to purchase it.
-
2
-


Win 10 VM drops into UEFI shell upon startup
in VM Engine (KVM)
Posted
Bit more insight into this issue and a fix for startup.nsh uefi shell appearing constantly :