

mjorud
-
Posts
54 -
Joined
-
Last visited
Content Type
Profiles
Forums
Downloads
Store
Gallery
Bug Reports
Documentation
Landing
Posts posted by mjorud
-
-
I have see the same thing.
GPU-Z shows that Resizable BAR is enabled, even though "Resizable BAR enabled in BIOS" shows Unsupported GPU.
Nvidia shows that Resizable BAR is enabled with 8192 MB GDDR6 dedicated video memory and 24572 MB total available graphics memory.
Does ReBAR work? Not sure, and I'm not sure how to confirm it in-game.
-
I updated from 6.12.3 to 6.12.4-rc19 today and now I have the resource1_resize folder. Ran the script, but I still have "Unsupported GPU" in GPU-Z.
A bonus is that I have seen a 13% increase for both 2D and 3D when running PassMark PerformanceTest after the update.-
 1
1
-
-
I'm trying the patch but for some reason I'm missing the "resource1_resize" under "/sys/bus/pci/devices/0000\:01\:00.0/".
"cat resource1_resize" only gives me "cat: resource1_resize: No such file or directory".
I assume that my problem lies there?
But if i run "lspci -vvvs 01:00.0 | grep "BAR"" I get:
Capabilities: [bb0 v1] Physical Resizable BAR
BAR 0: current size: 16MB, supported: 16MB
BAR 1: current size: 8GB, supported: 64MB 128MB 256MB 512MB 1GB 2GB 4GB 8GB
BAR 3: current size: 32MB, supported: 32MBSo by the look of that, everything looks OK.
-
Hi,
I have been tinkering with ReBAR and general performance in a W11 Gaming VM.
Hardware is i7-12700K, Asus PRIME Z690M-PLUS D4 and Asus RTX 3060 Ti Dual Mini v2. The GPU does support ReBAR.
The VM has 12 CPUs and 32 GB RAM allocated. Samsung 990 Pro is passed through as the only disk.
The VM is working fine. Not great, but fine. I say fine because it's a hugh step down from bare metal in regard of benchmarks. A little overhead is expected though.
I have followed this and other threads and I think I have done everything correctly.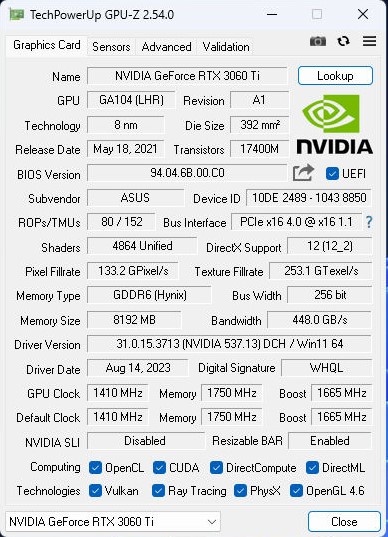

GPU-Z shows that ReBAR is enabled... but that the GPU is unsupported. The VM in installed on a NVMe so when booting bare metal the all is good; the GPU is supported.
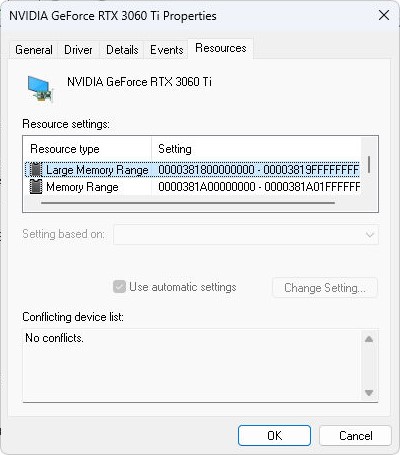
Looking in the Device Manager, Large Memory Range is there. I have to admit that I have not yet tried the user script...
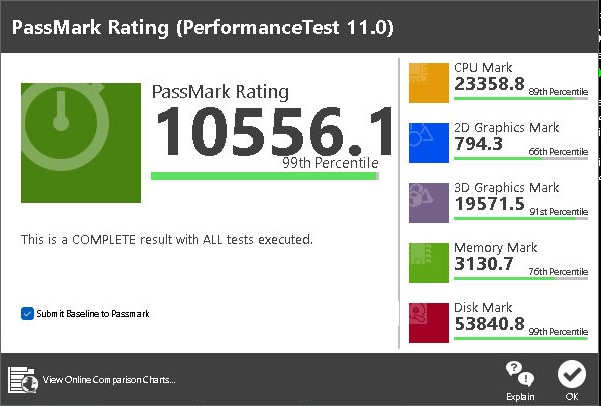
This is my results from PerformanceTest.
Best regards
J-
1
-
-
It works as expected and no longer backups volume mappings other than \appdata\.
")
The old version of the backup plugin required the CA Auto Update Applications plugin to be installed (if I remember correctly). Do this new version also require that plugin?
-
Do Appdata Backup also backup all Docker volume mappings?
My appdata\binhex-delugevpn is 73 MB but I had to stop the backup process when the backed up archive grew over 200 GB. This also happened to several other Dockers.
Please find the debug attached.
-
WARNING: some attributes cannot be read from corsair-cpro kernel driver
WARNING: some attributes cannot be read from corsair-cpro kernel driver
Corsair Commander Pro
├── Temperature probe 1     No
├── Temperature probe 2     No
├── Temperature probe 3     No
├── Temperature probe 4     No
├── Fan 1 control mode     PWM
├── Fan 2 control mode     PWM
├── Fan 3 control mode      DC
├── Fan 4 control mode     PWM
├── Fan 5 control mode      DC
└── Fan 6 control mode      DC

ASUS Aura LED Controller (experimental)
└── Firmware version    AULA3-AR32-0207
This is what the log file outputs now. Please note that the ASUS Aura LED Controller is popping up because I have just upgraded the motherboard.
I just found out (and I have been using Unraid for 10 years or so) that Unraid has native support for the Corsair Commander Pro. Atleast all fans are visible in the Dashboard.
-
The Docker is up to date, and my config.yaml only contains
controller:
    type: 'commander'
    fan_sync_speed: '100'
I do not have the Kraken.
-
This is the config.yaml
controller:
    type: 'commander'
    fan_sync_speed: '100'
And after the latest update this is what the log says
WARNING: some attributes cannot be read from corsair-cpro kernel driver
Usage:
  liquidctl [options] list
  liquidctl [options] initialize [all]
  liquidctl [options] status
  liquidctl [options] set <channel> speed (<temperature> <percentage>) ...
  liquidctl [options] set <channel> speed <percentage>
  liquidctl [options] set <channel> color <mode> [<color>] ...
  liquidctl [options] set <channel> screen <mode> [<value>]
  liquidctl --help
  liquidctl --version
Corsair Commander Pro
├── Temperature probe 1     No
├── Temperature probe 2     No
├── Temperature probe 3     No
├── Temperature probe 4     No
├── Fan 1 control mode     PWM
├── Fan 2 control mode     PWM
├── Fan 3 control mode      DC
├── Fan 4 control mode     PWM
├── Fan 5 control mode      DC
└── Fan 6 control mode      DC
If I open console and write liquidctl status
# liquidctl status
Corsair Commander Pro
├── Fan 1 speed     1369  rpm
├── Fan 2 speed     1380  rpm
├── Fan 3 speed     1197  rpm
├── Fan 4 speed     1351  rpm
├── Fan 5 speed     1224  rpm
├── Fan 6 speed     1211  rpm
├── +12V rail      12.01  V
├── +5V rail        4.97  V
└── +3.3V rail      3.36  V

#
it seems to work just fine though.
-
That was quick.
This is my config.yaml
controller:
    type: 'commander'
    fan_speed: '100'
And this is what the log file shows:
WARNING: some attributes cannot be read from corsair-cpro kernel driver
Usage:
  liquidctl [options] list
  liquidctl [options] initialize [all]
  liquidctl [options] status
  liquidctl [options] set <channel> speed (<temperature> <percentage>) ...
  liquidctl [options] set <channel> speed <percentage>
  liquidctl [options] set <channel> color <mode> [<color>] ...
  liquidctl [options] set <channel> screen <mode> [<value>]
  liquidctl --help
  liquidctl --version
Usage:
  liquidctl [options] list
  liquidctl [options] initialize [all]
  liquidctl [options] status
  liquidctl [options] set <channel> speed (<temperature> <percentage>) ...
  liquidctl [options] set <channel> speed <percentage>
  liquidctl [options] set <channel> color <mode> [<color>] ...
  liquidctl [options] set <channel> screen <mode> [<value>]
  liquidctl --help
  liquidctl --version
Corsair Commander Pro
├── Temperature probe 1     No
├── Temperature probe 2     No
├── Temperature probe 3     No
├── Temperature probe 4     No
├── Fan 1 control mode     PWM
├── Fan 2 control mode     PWM
├── Fan 3 control mode      DC
├── Fan 4 control mode     PWM
├── Fan 5 control mode      DC
└── Fan 6 control mode      DC
I would assume the log should show something like this:
Corsair Commander Pro
├── Fan 1 speed     1357  rpm
├── Fan 2 speed     1372  rpm
├── Fan 3 speed     1193  rpm
├── Fan 4 speed     1325  rpm
├── Fan 5 speed     1227  rpm
├── Fan 6 speed     1210  rpm
├── +12V rail      12.01  V
├── +5V rail        4.97  V
└── +3.3V rail      3.36  V
Best regards
-
I have been looking for a liquidctl Docker that supports Corsair Commander Pro.
The LaaC-folder created under \appdata is created by root:root instead of nobody:users. This makes it hard to create config.yaml using the share.
Adding PUID 99 and PGID 100 helped.
I can't wrap my head around the yaml-file. All I want is to run
liquidctl set sync speed 100to make all six fans run at maximum. The server is located in the outhouse so noise is of no consern.
Thank you for the Docker.
-
I did some more testing.
Assigning all CPU/Threads to the VM I get a Passmark CPU score of 10200. That's a bump from 7300.
3DMark average score goes from 7900 to 8800. CPU score from 3460 to 4820. No change in GPU score.
Not sure what kind of impact this does on the host. I assume that the host need some horsepower to run VM services and other services...
-
Hi ghost82,
True, the bare metal benchmarks I compare my results with are full 12 threads while I only use 8. Because of this I do expect a reduced results, but not as low as I get.
I ran latencymon and my "system appears to be suitable for handling real-time audio and other tasks without dropouts". I also ran WhySoSlow and all seems good except for "The highest measured SM BIOS interrupt or other stall was 156 microseconds. This is considered poor behaviour". Not sure if this really is a problem.
-
Hi,
I'm struggeling getting good performance out of my Windows 10 Gaming VM. I have read all posts regarding Gaming VM performance on this forum and on reddit... and tried most, if not all, tips and hints.
This is my hardware:
MB: ASUSTeK COMPUTER INC. WS C246M PRO
CPU: Intel® Core™ i7-8700 CPU @ 3.20GHz
RAM: 32 GiB DDR4
GPU: GeForce RTX 3060 TiI basically using this VM as a SteamLink host, streaming to my TV (Apple TV). This works fine and I can play a lot of games without any big issues, but I would think I would get more performance out of it.
3DMark Time Spy gives me
Average Score: 7900
GPU Score: 10300
CPU Score: 3460Looking at the average results on the 3DMark site the average is 11200, 13000 on GPU and 7700 on CPU.
Passmark CPU Mark results in 7300 wheras the average is 13400. It seems that I get half of the CPU performance compared to bare metal. I do understand there is a bit of overhead, but half?So this is what I have done. I have pinned and isolated
2/8
3/9
4/10
5/11
to the VM. 0/6 and 1/7 are reserved to unRAID.I have tried different combination of pinning, memory, machine and BIOS.
This is what the syslinux.cfg file looks like
label Unraid OS
  menu default
  kernel /bzimage
  append isolcpus=2-5,8-11 initrd=/bzroot
I have been playing with Tips & Tweaks and disabled NIC Flow Control and NIC Offload. CPU Scaling set to Performance.
vm.dirty_background is set to 5% while vm.dirty_ratio is set to 10%. Updated from 6.9 to 6.10 RC5 without any change in benchmark results.This the the VM XML:
<?xml version='1.0' encoding='UTF-8'?>
<domain type='kvm' id='4'>
  <name>SteamLink VM</name>
  <uuid>e416468d-a356-9244-1a24-796b26a8d360</uuid>
  <metadata>
    <vmtemplate xmlns="unraid" name="Windows 10" icon="windows.png" os="windows10"/>
  </metadata>
  <memory unit='KiB'>12582912</memory>
  <currentMemory unit='KiB'>12582912</currentMemory>
  <memoryBacking>
    <nosharepages/>
  </memoryBacking>
  <vcpu placement='static'>8</vcpu>
  <cputune>
    <vcpupin vcpu='0' cpuset='2'/>
    <vcpupin vcpu='1' cpuset='8'/>
    <vcpupin vcpu='2' cpuset='3'/>
    <vcpupin vcpu='3' cpuset='9'/>
    <vcpupin vcpu='4' cpuset='4'/>
    <vcpupin vcpu='5' cpuset='10'/>
    <vcpupin vcpu='6' cpuset='5'/>
    <vcpupin vcpu='7' cpuset='11'/>
    <emulatorpin cpuset='0,6'/>
  </cputune>
  <resource>
    <partition>/machine</partition>
  </resource>
  <os>
    <type arch='x86_64' machine='pc-i440fx-6.2'>hvm</type>
    <loader readonly='yes' type='pflash'>/usr/share/qemu/ovmf-x64/OVMF_CODE-pure-efi.fd</loader>
    <nvram>/etc/libvirt/qemu/nvram/e416468d-a356-9244-1a24-796b26a8d360_VARS-pure-efi.fd</nvram>
  </os>
  <features>
    <acpi/>
    <apic/>
    <hyperv>
      <relaxed state='on'/>
      <vapic state='on'/>
      <spinlocks state='on' retries='8191'/>
      <vendor_id state='on' value='none'/>
    </hyperv>
  </features>
  <cpu mode='host-passthrough' check='none' migratable='on'>
    <topology sockets='1' dies='1' cores='4' threads='2'/>
    <cache mode='passthrough'/>
  </cpu>
  <clock offset='localtime'>
    <timer name='hypervclock' present='yes'/>
    <timer name='hpet' present='no'/>
  </clock>
  <on_poweroff>destroy</on_poweroff>
  <on_reboot>restart</on_reboot>
  <on_crash>restart</on_crash>
  <devices>
    <emulator>/usr/local/sbin/qemu</emulator>
    <disk type='file' device='disk'>
      <driver name='qemu' type='raw' cache='writeback'/>
      <source file='/mnt/user/appdata/vm-images/steamlink-vdisk1.img' index='3'/>
      <backingStore/>
      <target dev='hdc' bus='virtio'/>
      <boot order='1'/>
      <alias name='virtio-disk2'/>
      <address type='pci' domain='0x0000' bus='0x00' slot='0x08' function='0x0'/>
    </disk>
    <disk type='file' device='disk'>
      <driver name='qemu' type='raw' cache='writeback'/>
      <source file='/mnt/user/vm-images/steamlink-vdisk2.img' index='2'/>
      <backingStore/>
      <target dev='hdd' bus='virtio'/>
      <alias name='virtio-disk3'/>
      <address type='pci' domain='0x0000' bus='0x00' slot='0x09' function='0x0'/>
    </disk>
    <disk type='file' device='cdrom'>
      <driver name='qemu' type='raw'/>
      <source file='/mnt/user/appdata/vm-images/virtio-win-0.1.217-1.iso' index='1'/>
      <backingStore/>
      <target dev='hdb' bus='ide'/>
      <readonly/>
      <alias name='ide0-0-1'/>
      <address type='drive' controller='0' bus='0' target='0' unit='1'/>
    </disk>
    <controller type='usb' index='0' model='ich9-ehci1'>
      <alias name='usb'/>
      <address type='pci' domain='0x0000' bus='0x00' slot='0x07' function='0x7'/>
    </controller>
    <controller type='usb' index='0' model='ich9-uhci1'>
      <alias name='usb'/>
      <master startport='0'/>
      <address type='pci' domain='0x0000' bus='0x00' slot='0x07' function='0x0' multifunction='on'/>
    </controller>
    <controller type='usb' index='0' model='ich9-uhci2'>
      <alias name='usb'/>
      <master startport='2'/>
      <address type='pci' domain='0x0000' bus='0x00' slot='0x07' function='0x1'/>
    </controller>
    <controller type='usb' index='0' model='ich9-uhci3'>
      <alias name='usb'/>
      <master startport='4'/>
      <address type='pci' domain='0x0000' bus='0x00' slot='0x07' function='0x2'/>
    </controller>
    <controller type='pci' index='0' model='pci-root'>
      <alias name='pci.0'/>
    </controller>
    <controller type='pci' index='1' model='pci-bridge'>
      <model name='pci-bridge'/>
      <target chassisNr='1'/>
      <alias name='pci.1'/>
      <address type='pci' domain='0x0000' bus='0x00' slot='0x02' function='0x0'/>
    </controller>
    <controller type='pci' index='2' model='pci-bridge'>
      <model name='pci-bridge'/>
      <target chassisNr='2'/>
      <alias name='pci.2'/>
      <address type='pci' domain='0x0000' bus='0x00' slot='0x04' function='0x0'/>
    </controller>
    <controller type='pci' index='3' model='pci-bridge'>
      <model name='pci-bridge'/>
      <target chassisNr='3'/>
      <alias name='pci.3'/>
      <address type='pci' domain='0x0000' bus='0x00' slot='0x05' function='0x0'/>
    </controller>
    <controller type='pci' index='4' model='pci-bridge'>
      <model name='pci-bridge'/>
      <target chassisNr='4'/>
      <alias name='pci.4'/>
      <address type='pci' domain='0x0000' bus='0x00' slot='0x0a' function='0x0'/>
    </controller>
    <controller type='pci' index='5' model='pci-bridge'>
      <model name='pci-bridge'/>
      <target chassisNr='5'/>
      <alias name='pci.5'/>
      <address type='pci' domain='0x0000' bus='0x00' slot='0x0b' function='0x0'/>
    </controller>
    <controller type='pci' index='6' model='pci-bridge'>
      <model name='pci-bridge'/>
      <target chassisNr='6'/>
      <alias name='pci.6'/>
      <address type='pci' domain='0x0000' bus='0x00' slot='0x0c' function='0x0'/>
    </controller>
    <controller type='ide' index='0'>
      <alias name='ide'/>
      <address type='pci' domain='0x0000' bus='0x00' slot='0x01' function='0x1'/>
    </controller>
    <controller type='virtio-serial' index='0'>
      <alias name='virtio-serial0'/>
      <address type='pci' domain='0x0000' bus='0x00' slot='0x03' function='0x0'/>
    </controller>
    <interface type='bridge'>
      <mac address='52:54:00:b5:f1:81'/>
      <source bridge='br0'/>
      <target dev='vnet3'/>
      <model type='virtio'/>
      <alias name='net0'/>
      <address type='pci' domain='0x0000' bus='0x00' slot='0x06' function='0x0'/>
    </interface>
    <serial type='pty'>
      <source path='/dev/pts/2'/>
      <target type='isa-serial' port='0'>
        <model name='isa-serial'/>
      </target>
      <alias name='serial0'/>
    </serial>
    <console type='pty' tty='/dev/pts/2'>
      <source path='/dev/pts/2'/>
      <target type='serial' port='0'/>
      <alias name='serial0'/>
    </console>
    <channel type='unix'>
      <source mode='bind' path='/var/lib/libvirt/qemu/channel/target/domain-4-SteamLink VM/org.qemu.guest_agent.0'/>
      <target type='virtio' name='org.qemu.guest_agent.0' state='connected'/>
      <alias name='channel0'/>
      <address type='virtio-serial' controller='0' bus='0' port='1'/>
    </channel>
    <input type='mouse' bus='ps2'>
      <alias name='input0'/>
    </input>
    <input type='keyboard' bus='ps2'>
      <alias name='input1'/>
    </input>
    <audio id='1' type='none'/>
    <hostdev mode='subsystem' type='pci' managed='yes'>
      <driver name='vfio'/>
      <source>
        <address domain='0x0000' bus='0x01' slot='0x00' function='0x0'/>
      </source>
      <alias name='hostdev0'/>
      <address type='pci' domain='0x0000' bus='0x06' slot='0x01' function='0x0' multifunction='on'/>
    </hostdev>
    <hostdev mode='subsystem' type='pci' managed='yes'>
      <driver name='vfio'/>
      <source>
        <address domain='0x0000' bus='0x01' slot='0x00' function='0x1'/>
      </source>
      <alias name='hostdev1'/>
      <address type='pci' domain='0x0000' bus='0x06' slot='0x01' function='0x1'/>
    </hostdev>
    <hostdev mode='subsystem' type='usb' managed='no'>
      <source>
        <vendor id='0x1b1c'/>
        <product id='0x0c10'/>
        <address bus='1' device='3'/>
      </source>
      <alias name='hostdev2'/>
      <address type='usb' bus='0' port='1'/>
    </hostdev>
    <memballoon model='none'/>
  </devices>
  <seclabel type='dynamic' model='dac' relabel='yes'>
    <label>+0:+100</label>
    <imagelabel>+0:+100</imagelabel>
  </seclabel>
</domain>
I have also tried a fresh install of both W10 and W11 and both gives me a result of 7300 on Passmark CPU Mark both with and without a GPU passed through. The same as my W10 Gaming VM with GPU passed through.
Looking at the unRAID Dashboard the pinned CPUs are getting a 100% load when running benchmarks.
Is this the maximum performance I can expect to get out of my VM, or is it possible to squeeze more out of it?
I'm thankfull for all tips and pointers.
Best regards
-
Hi,
Has anyone been able to dockerify liquidctl or compile it for unRAID? I have to use an Ubuntu VM to be able to use liquidctl...
-
On 18.7.2016 at 0:15 PM, dartworth said:
Just a few requests here.
Mayan EDMS - https://gitlab.com/mayan-edms/mayan-edms-docker
Free Open Source DMS (document management system).
Paperless - https://github.com/danielquinn/paperless/
Scan, index, and archive all of your paper documents
Read the Docs - https://github.com/rtfd/readthedocs.org
Thanks
A Paperless docker would be awesome. It's on Docker Hub, but I have not been able to make any sense of that.
-
 1
1
-
-
Hi,
I have been running unRAID several years on an ESXi box (Tyan S5512, Xeon E3-1240, 32 GB ECC RAM, 2x IBM M1015 in a Norco 4020) with great success. Now I want to move unRAID away from ESXi to a standalone solution for several reason.
1. I backup VMs to unRAID (which is not THAT smooth because unRAID is a VM itself)
2. I'm running a Windows 8 VM with an AMD R9 x280 GPU passed through for Steam Home Streaming (works great by the way), with the GPU laying on top of the Norco 4020 attached to a 20 cm riser. Not very smooth. This is because there is no more room for the GPU thanks to the M1015s.
3. I would like to have another rack server in my rack.

There is a jungle out there when it comes to motherboards.
1. Low power. AMD or Intel does not matter.
2. Needs 2x PCIe x3 for the M1015. Preferably 3x if I need more drives.
3. Preferably an Intel integrated NIC, but an expansion card will do if not possible.
4. On-board GPU.
This unRAID server will only serve media and will not run any add-ons. Any recommendations will be most welcome.
Best regards
-
I'm running pfSense VM on my ESXi box and it has never failed me. It HAS to work as I'm away from home quite often and my gf is not very tolerant when it comes to my "hobby" not working (the same box is also serving Live-TV and media).
-
I'm boring as hell.
Unraid VM is unraid
Ubuntu Server VM is ubuntu
pfSense VM is pfsense
TVHeadEnd VM is tvheadend
SBS 2011VM is sbs2011
-
No, not yet.Has anyone been contacted by the OP?
I guess summer is to blame.
-
I'm currently rsync'ing files from an external harddrive to the array.
How?
I mount the external drive (or non-array SATA drive in my case).
mount -t reiserfs /dev/disk/by-id/scsi-SATA_SAMSUNG_HD103UJS13PJDWS152308-part1 /mnt/temp
I have this in my go file as I use this hard drive as my temporary download disk outside the array (don't use cache drive). How I figured out the disk/by-id I can't remember but it's here on the forum somwhere.
-
I have been running my ESXi server (I named him Nansen) for almost six months and it has been running flawlessly.
I also built an off-site baremetal unRAID server (which I named Amundsen
) for backup. VPN tunnel between them and using rsync for transfer.I have replaced the stock fans of my Norco with Noctua fans (a bit more pleasant) and also upped the RAM from 16 MB to 32 MB.
I'm running unRAID with only VMTools and Powerdown script. Sabnzdb, Deluge, APCUPSd and PMS is running on a Ubuntu Server guest. pfSense guest is acting as my router. MySQL for XBMC is running on the second Ubuntu Server. Tvheadend is running on the third Ubuntu Server. As for now this is connected to a DM and XBMC, but I'm looking into getting a cable DVB-tuner (USB) but not sure which. I also have a WinXP guest for file management.
Recently I have been playing with a SBS 2011 guest trying to set up Exchange but I don't understand a thing of that. And I thought SBS was intuitive and easy to set up. I was wrong.
Now my biggest problem is that I really don't have anything to play around with anymore because everything just works.
Anyone have an idea for what to do next?
-
I'm running P11 on both of my cards. Are there any benefits for upgrading to P15? I got my cards preflashed with P11 from eBay and after reading threads and threads with different procedures, troubles and so forth I'm a bit reluctant to upgrade. If it ain't broke, don't fix.

-
The plug-in works great.
It automatically connects my offsite backup server to my onsite LAN, and I can rsync from onsite unRAID server to offsite backup server.
What I cannot do, is accessing the offsite backup server from a computer that is on the offsite LAN. Is that possible?


Gaming VM, CPU selection and 1% low FPS
in VM Engine (KVM)
Posted · Edited by mjorud
Hi folks,
I used to be a gamer until my mid twenties. Work and family, life as you might call it, "took over". A year or so ago Ron Gilbert released Return to Monkey Island, and man... it took me back to the good old times with adventure games, Lucas Arts, Sierra, Larry, Roger Wilco, Sam'n'Max and so forth. Memory lane...
Anyway. Return to Monkey Island woke up the dorment gamer in me and I have played Fallen Order, Survivor, The Last of Us and I'm currently working my way through Alan Wake 2 (scary or what?)... and I'm really looking forward to Outlaws!
Not sure why I'm sharing my life story... anyway... to make a long story a bit longer.
My current setup is
- Intel i7-12700K
- 64 GB DDR4
- RTX 4070 Super
- Samsung 990 Pro 2 TB (NVMe (passed))
I have pinned 5 P-cores to the Gaming VM (W11) and 32 GB RAM. Pinning 6 cores does not give me any notable performance gain in-game. To play I'm using Sunshine and Moonlight on Apple TV with Xbox 360 controller. Works great, and would work even better if Nvidia fixed the HAGS issue.
With RTSS running I see that the GPU is running at ~70% in most games. Will upgrading the CPU to i9-14900K (or even i7-14700K) increase performance? An increase in 1% low FPS would be great.
From my limited knowledge about bottlenecking it seems that the CPU is "to blame".
I still have the same showstoppers (and a dog) that put the gamer in me to sleep, so when I actually have the time to disembowl some Imperial bastards, find the secret of Monkey Island or shit my pants reading Alan's manuscripts I want to do it with all graphical settings set to HIGH.
To summarise... will upgrading from i7-12700K to i9-14900K give me a boost in 1% low FPS?
Best regards...