





Everything posted by drmit
-
After disabling both onboard LAN ports, I was able to reboot and see that the 'Interface Rules' link was gone from the Network Settings page, with only 'Interface eth0', 'Interface eth3', 'Interface Extra' and 'Routing Table' as options. Everything seemed to work OK but eth3 was showing in red as not configured. I couldn't figure out how to reassign the MAC at eth3 to be eth0; eventually I clicked a 'Reset' button on either the eth0 or eth3 page (a bit unsure which) that nuked my connection to the server entirely, after which I couldn't log back in from a browser on my Windows PC. I restarted the server, logged in via GUI mode and noticed 'Interface eth3' was now gone. I now only have 'Interface eth0', 'Interface Extra' and 'Routing Table' as options on the Network Settings page. Bonding and Bridging were now turned on by default in eth0 - those were off in the previous configuration, so I switched them off and all seems to be running well. So I don't know if it was switching off the 2 onboard LAN ports that allowed me to use that 'Reset' button (don't recall that being there previously?), or if that Reset button was there all along and all I needed to do was click it. Still can't test for the higher speeds yet, need to wait till my new switch arrives next week. Keen to see if this was all worth it! I love Unraid but I've gotta say re-configuring anything can be quite the challenge sometimes! You would think installing a new nic would be a bit more straightforward.
-
The motherboard UG has this to say about the two ethernet ports: - PCIE x1 Gigabit LAN 10/100/1000 Mb/s - Realtek RTL8111E - Supports Wake-On-LAN - Supports LAN Cable Detection - Supports Energy Efficient Ethernet 802.3az - Supports Dual LAN with Teaming function - Supports PXE It's an ASRock Z68 Professional Gen3 (Fatal1ty) board...my understanding is the two ports are generally intended for link aggregation, i.e. 'dual LAN Teaming function' with a special Windows driver, but they can also be used to connect to separate networks. Back when this board was in a Windows box I could use either ethernet port to connect to my switch/router; I've never had a switch or router that supported link aggregation so never tried to use it that way. It's always been used with only one of the ports connected at a time, and I can confirm they both work independently of one another (I usually just connect the LAN cable to the first port I see on the back; I don't keep track of which one I'm using, if that makes sense). Ideally I'd rather not shut them both off in the BIOS in case I decide to repurpose this 2.5 GbE nic later down the track, and then can't work out why the onboard ports don't work...
-
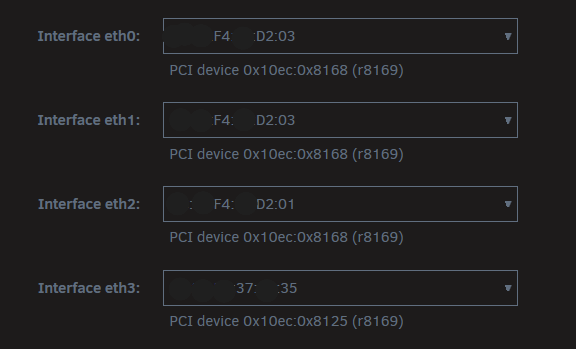
Thanks for the response MAM. I can't seem to find a way to do that. The confusing bit is that when I navigate to the Interface Rules page there are four interfaces listed: eth0, eth1, eth2 and eth3; eth0 and eth1 have the same MAC address, while eth2 is slightly different, and eth3 is the one I'm pretty sure is the new card (the PCI device name ends with 0x8125, while all the others end in 0x168): The options in the drop-down menu also contain the duplicate MAC ending in D2:03. Any idea how you would change the above so there's no duplicate MACs?
-
I have a basic use case for my Unraid server as a general NAS and as my Plex media server. No VMs etc. I've been using my onboard ethernet connection for years, but finally made the decision to upgrade my network infrastructure to allow a 2.5 GbE connection between my Windows PC and my Unraid server. The existing motherboard on my Unraid server has two 1 GbE ports (only one of which I use), so I've added a TP Link TX201 PCIe NIC to the server, which I understand utilises the Realtek RTL8125 chipset. From what I've read on other posts I need to set the new card to be eth0 for it to work properly, via Settings -> Interface Rules. I've seen conflicting advice on how to go about installing and configuring the new NIC, so in the end I just physically installed it, then rebooted with the ethernet cable connected to the old port, tried to identify which MAC address is for the new card, then used Settings -> Interface Rules to select it as eth0. However, when I select the new card to be eth0, I get the error 'MAC address mismatch: Rules contain duplicate MAC address assignments'. I tried rebooting again with both the new and old ethernet ports connected, and with only the new port connected. With the ethernet cable connected only to the new port, I can still login to the web GUI, but I still can't change the new NIC to be eth0. I can't find any information on if I need to re-configure anything else, like the Plex or DuckDNS dockers either. All seems to be working normal now though - Plex works and I can access my files via SMB. Unfortunately, I haven't installed the new 2.5 GbE switch yet, so I can't yet test for higher speeds, but file transfers are still working fine at my previous max speed of around 115 MB/s i.e. ~1 Gbps. Am I overthinking this/missing something here?? There's so much conflicting information on these forums sometimes, many times I imagine due to improvements to the OS. Any suggestions or clarifications appreciated! sirpleximus-diagnostics-20251220-1309.zip
-
SATA power and data cables to the problem drive now checked and all seem to have good continuity on all of the pins. Resistance varies but no one pin seemed much worse than another. I was finally able to figure out how to 'detach' the drive from the Settings menu in Unassigned Devices. I then re-attached, after which I was able to add it back into the array as a parity drive (it auto-populated the first parity drive slot once I re-attached it). I then rebuilt parity overnight and the check completed with no errors. After 're-attaching' the drive and starting the array I was able to download the SMART log (attached) which states that the CRC error count is now 2 (it was 1 after the last failed parity check). It also says (for both 'errors'): When the command that caused the error occurred, the device was doing SMART Offline or Self-test. Why would it say that when the error occurred during a parity check, not a SMART test? Another extended SMART test is now underway. I'm a bit unsure what to do next. Should I RMA the drive? Replace the cables with new ones and hope parity continues to remain valid? My data is all backed up, but ironically my backup server (TrueNAS) seems to be having hardware issues right now, so I'd prefer to not take any chances. What is anyone's experience in RMAing a drive with a few CRC errors? Will WD just replace with new, or would they reject it if one of their tests seems to indicate the drive is fine? WDC_WD101EFBX-68B0AN0_VCJW6NVP-20230904-0806.txt
-
No power splitters, and only using 3 max of the 4 SATA power connectors on any one branch from the PSU (which is new as well, Seasonic Prime PX-650). Will attempt to check the cables with a multimeter, though those pins are quite narrow. Any idea on expected resistance?
-
Thanks for the tip trurl, diagnostics attached. sirpleximus-diagnostics-20230903-1425.zip
-
Hi all, First off thanks to everyone who contributes to this community. I started with Unraid less than two years ago after never having used a Linux-based system before, and while I haven't contributed to these forums much, I've found them immensely helpful. My unraid server is currently running 6.12.3 with an array of 3 x 10TB WD Red Plus drives with single parity (i.e. 2 x 10TB array disks and one 10TB parity drive). All drives are attached directly to the motherboard, so no controllers in use. I run parity checks once per month on the first of the month, and last month my Parity drive ended up disabled, and a SMART check of the drive found one CRC error. I assumed at the time it may be a one-off, so I checked my cabling, which all looked fine, and rebuilt parity onto the same drive. A SMART extended test completed fine, apart from CRC error count = 1. All seemed fine until this month's parity check. This time, the parity drive became disabled, but I can't seem to read the SMART data on it (possibly because I can't figure out how to get it to spin up??). When I try to run smartctl -a /dev/sdg from terminal, I get the response: Short INQUIRY response, skip product id A mandatory SMART command failed: exiting. To continue, add one or more '-T permissive' options. I tried to stop the array, remove the disk from the array, restart in maintenance mode, stop the array, and re-add the disk to the array as a Parity drive. While it appears in the drop-down list initially (sdg), after selecting it the UI refreshes and the option for sdg is then gone from the list. The drive is listed under unassigned devices (so I was able to copy out the disk log information), but I can't seem to do anything with it. Could anyone provide a suggestion on what my next step should be? The drives are only about 1.5 yrs old so should still be under warranty, but if there is something simple I'm missing here I'd like to get to the bottom of it rather than leave my array unprotected while the RMA runs its course (I'm in New Zealand and bought the drives from Amazon, so who knows how long the RMA will take). Could a SATA/power cable or SATA port on the motherboard be at fault here (they appear fine visually)? I've attached the syslog and disk log but if any other data would be useful I can add that too. Thanks for your help! syslog.txt disk log information sdg.txt
