


NeoMod
Members
-
Joined
-
Last visited
-
I stumbled upon this thread after quite a bit of research while setting up a general instance of Redis on my UNRAID server with persistence enabled. I know I'm quoting some very old answers, but since this thread is one of the first results on google I thought It may be helpful for others to leave a response. (or quite frankly also for my future self, sleep-deprived, searching for this same issue again ) So, first thing first: it is possible to change this setting on UNRAID and it should not pose any issue but I can't exactly be sure this is the case for every system/setup out there. Also, no this is not a leftover: it is a requirement for Redis, and you can read more in the official documentation. Explaining "why" it's needed is a little out of my league, so I can point you to one (of the many) explanations that might make it easier to understand. Yes, you can run the following command in UNRAID terminal to temporarily enable the memory overcommit function: sysctl "vm.overcommit_memory=1" To my (little) knowledge, this should also be the ideal first step to check if something goes AWOL with your system after enabling this function: since it is only temporarily enabled, a reboot would restore the previous value (= 0) avoiding any further issue. This is just my opinion based on my current understanding of things, so pick it up with a grain of salt: according to Redis Documentation this option should always be favoured when using persistence and should be beneficial in all instances where the Redis DB size is an overall medium/small size (1GB to 5GB seems to be the popular consensus). But... As far as I understand there could be a case when the system (due to design limitations -ie. low RAM - or due to functional status -ie. high resource utilization with big DB) can enter a state of insufficient memory and this could potentially lead to data loss if Redis is unable to recover. This is just a summary of what I have found out reading various resources on the topic, so please don't roast me if it's not 100% accurate. 😛 Regarding the persistence of the vm.overcommit option in UNRAID, I have found two possible routes: Access the UNRAID terminal and edit the following file: /etc/sysctl.conf adding the following lines at the end: # Redis Fix to use overcommit memory vm.overcommit_memory = 1 Leverage the "go" file in UNRAID, as mentioned by another user on the forum, and edit the following file: /boot/config/go adding the following line at the end: sysctl vm.overcommit_memory=1 I have no idea which one is the "right choice" regarding UNRAID, but under any other Linux machine, I would leverage the sysctl.conf creating a custom rule in the /etc/sysctl.d folder, so here is what I did: I created the file 98-redis-overcommit.conf and added the line memory vm.overcommit_memory = 1 inside it. (I use tailscale plugin which uses rule 99, so I figured I'd give this rule the previous order of execution but if don't use tailscale you can use number 99. it is not advised to use three-digit numbers. ) touch /etc/sysctl.d/98-redis-overcommit.conf nano /etc/sysctl.d/98-redis-overcommit.conf # Redis Fix to use overcommit memory vm.overcommit_memory = 1 chmod 644 /etc/sysctl.d/98-redis-overcommit.conf Hope this might help someone else.
-
Unfortunately, after much research, I'm sorry to say that it is "simply impossible". To make a long story short: HP has a very peculiar approach to kernel development for the motherboards used in their pro-sumer server line. Even though HPE is targeting this server to the SOHO/SMB group, which would put it in the middle of the Plex clientele, they decided to use the Intel SPS firmware which doesn't allow the Intel Quick Sync (aka hardware acceleration on CPU). (The pseudo-official statement is that "SPS firmware is required for the server features of the microserver Gen10 Plus" but I couldn't find any more than that). There are only two roads ahead: You could insert a low-power graphic card (nVidia Quadro p400 is the go-to choice due to low power requirements) and use it for hardware transcoding, even though this means sacrificing the use of a PCIE-to-nVME adapter board. Or you could rely on CPU "brute-forcing" for Plex transcoding: I tested it with an i9-9900T up to two concurrent streams being transcoded and while it worked the core use was - predictably - crazy high, meaning that other apps (docker, VM) would be negatively affected. I didn't want to sacrifice the nVME SSD and I wasn't too keen on using all my cores for the transcoding, since it was something I use a lot while travelling, so I decided to move Plex on a dedicated mini-host: I'm using and HP EliteDesk G2 equipped with an i5-9500T where the Intel QuickSync is available for Plex to take advantage while keeping the power requirement as low as possible. Honestly, I wish I had known this before upgrading to the Gen 10 Plus and before investing into it: coming from a Gen 8 I was stupid enough to assume that Quick Sync would be supported also on Gen 10 Plus.
-
NeoMod changed their profile photo
-
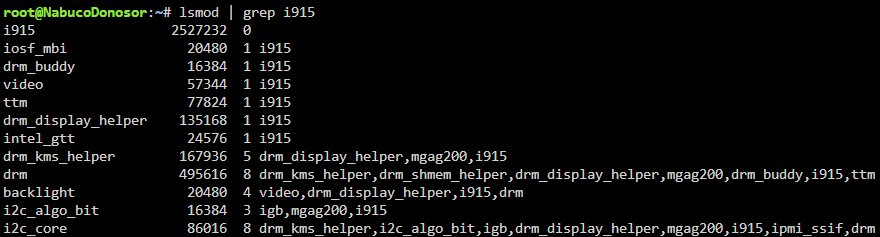
Hi everyone, I know the topic is “old and complex” and many answers have been provided – with many guides here on the forum – but I’m at a total loss and I can’t figure out what else to do. My System: HPE Proliant Microserver GEN 10 Plus UNRAID 6.12.2 RAM: 32 GB EEC CPU: Intel i9-9900T (I’ve done my due-diligence: Quick Sync is supported by this CPU. Intel Ark sheet) 4 HDD – 3 Drives and 1 Parity Disk 1 NVME SSD mounted on a PCIe SSD M2 Expansion Card as Cache 1 USB SSD, not assigned to the array. Used as external extra storage for docker config files. What I have tried so far: I’ve read most – if not all – the guides here on the forum, from oldest to newest including: guide-plex-hardware-acceleration-using-intel-quick-sync add-intel-igpu-qsv-quick-sync-encoding-to-official-plex-media-server-the-easy-way guide-plex-hardware-acceleration-using-intel-quick-sync devdri-is-missing solved-692-transcoding-with-intel-gpu-missing-devdri unable-to-get-intel-integrated-gpu-usable-in-unraid-containers Then I did “the usual”: Install “Intel-GPU-TO” Install “GPU Statistics” – for a quick glance after each try Executed intel_gpu_top in console, which reported the following: Tried executing modprobe i915 and lsmod | grep i915 which reported the following: Checked for the existence of the /dev/dri folder which contained the following: (in my understanding there should be something else except for card0 when things works out as intended) I tried searching the BIOS, and I ended up trying Disabling (and then Enabling) the “Embedded Video Connection” option is System Utilities --> System Configuration --> BIOS/Platform Configuration --> Advanced Options I made sure my Server has all the firmware modules updated: I have installed the SPP Service Pack “SPP2023030000.2023_0323.27” and the Patch Bundle “P64601_001_2023.03.00.02.17”. I even tried removing the HPE ILO Card because I’ve read somewhere (I can’t find it anymore) about it being the cause of the problem. Same results as above. “That’s all folks” point of arrival: Then I came along a bit of troubling news here: microserver-gen10-plus-and-intel-quick-sync If I’m not reading this wrong – and I sure hope so! – this would indicate and inherent problem with the “Plus” version of the HPE Microserver GEN 10. But there seem to be mixed feedback from “the internet” about this, and I’m not sure what to think. Is there anything else which I could try to enable Quick Sync / iGPU / Transcoding on this server, according to your knowledge? [ Thank you for your time just reading all this…]


-
Thank you very much @itimpi for the quick and reassuring answer! I will proceed with the step procedure and complete the upgrade.
-
Hello everyone, I have been using UNRAID for some months now, and I am happy with it, and today I have some questions on how to properly proceed with an HD change for both a Parity Drive and a Data Drive. I have read all the documents (here and here ) but before doing anything stupid I would like to receive confirmation since I would hate myself for losing data over such a “simple” procedure. I am currently running UNRAID on an HP Microserver Gen8 with the following configuration: - 1 SSD Cache Drive - 4 WD RED “2TB” Data Drives organized as: ------ 1 "2TB" Parity Drive ------ 3 "2TB" Data Drive What I would like to achieve is: - Upgrade the Parity Drive with a 4TB WD RED - Upgrade the Data Drive with a 4TB WD RED In brief, I would like to upgrade one of my Data Drive with a larger one (from 2TB to 4TB) but in order to do I first need to upgrade the Parity Drive to the corresponding maximum size (again, from 2TB to 4TB). I have read about the “Parity Swap” procedure, and I was preparing to do so but then I also read that: Hence, my question is: can I “split” the initial operation into two different, smaller and more secure procedures? In particular: First step -- upgrade the Parity Drive, swapping the old 2TB for the new 4TB. This of course would require time to Rebuild and Check the Parity. Second step -- once the New Parity Drive (4TB) is up and the Array (with the same old 3 Drives, 2TB each) is running fine, I would proceed with the “Replacing a Data Drive” procedure. Once again, this would require time to do all the operations and the Array won’t be available. I know, and I’m fine with planning some downtime in advance. So, is this “2-steps 2-procedures” technically correct, or I’m completely wrong? (and if so, I would like to ask for directions in the right way). Thanks in advance.


