propaganda_710
Members
-
Joined
-
Last visited
-
Did you ever figure this out? I am running into a similar situation.
-
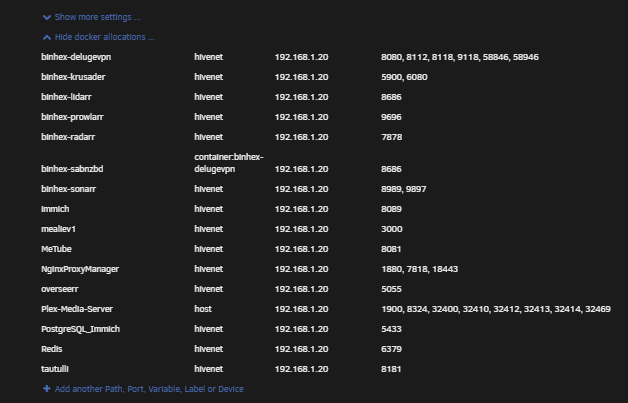
@MowMdown Thank you for your reply. I am not on Unraid 7.0 just yet ( I am on 6.12.15 ) so the 'Container' option as the network in the container template is not available. Although, I did figure it out... Annoyingly enough, I don't think I was waiting long enough for Deluge to make those container connections? I am not sure. I cleared my cache after making the configuration changes to Lidarr and waited about 5 ish minutes. After waiting, I noticed that my docker network changed from 'container:???' to 'container:deluge-vpn.' After I noticed this change, webgui wasn't working but manually typing in the ip address and port did! After this showed successful, I mirrored that configuration with Radarr, Sonarr, and Prowlarr. Waited about 5 minutes, and all three showed container:deluge-vpn under the docker network column. Curl ifconfig.io was showing Deluge's IP for all containers. All seem to be working. Woohoo! Apparently I wasn't being patient enough. This sparks another question though. Whenever I decide to upgrade to Unraid 7.0. Is the way I have this configured going to break anything? Being that the new 'container' option in the network portion of the template is now available in 7.0... will the route I went in 6.12.15 be rendered ineffective? I am now afraid to upgrade to 7.0 in fear of breaking everything I just worked out. Thank you for your continued support!
-
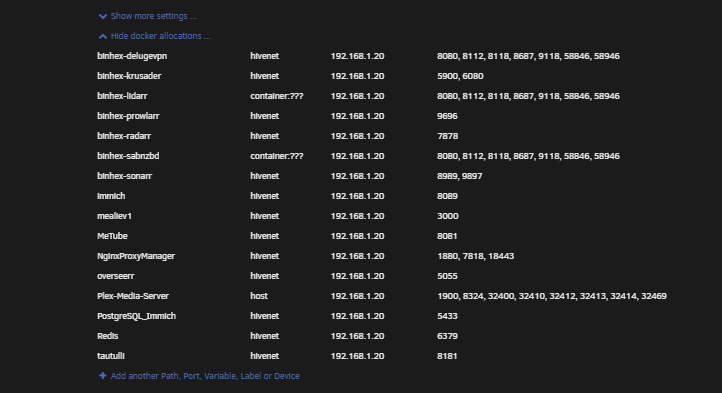
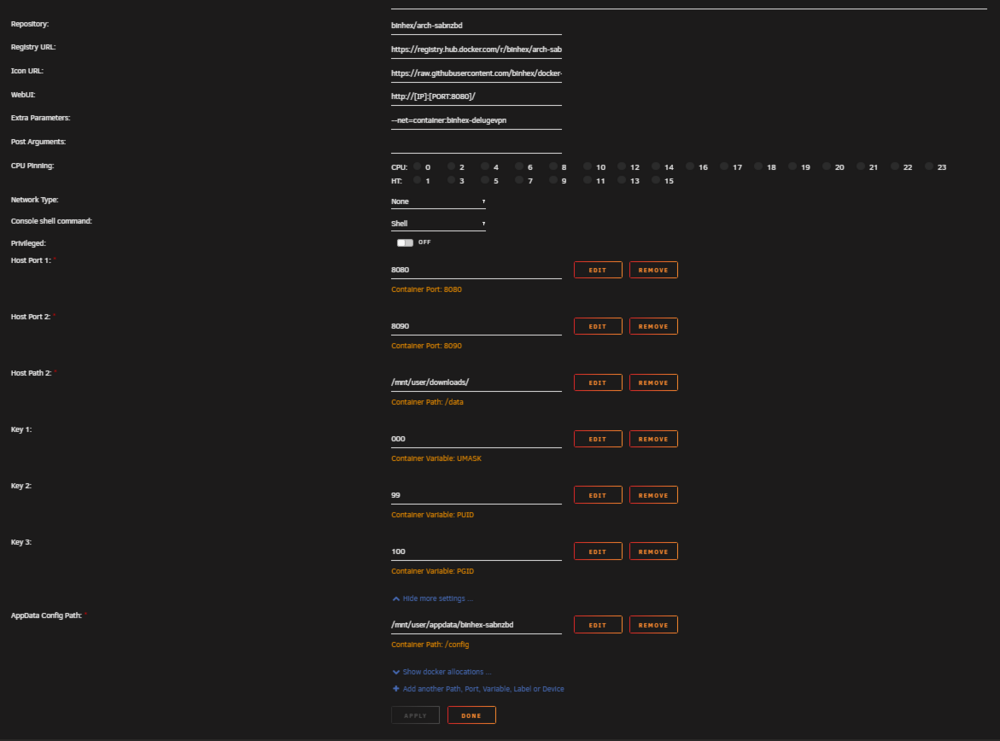
This is a picture of my docker allocations when I have configured Lidarr to run through the VPN container (same steps taken when I successfully routed SAB through Deluge). The questions marks next to the container network (container:???) is probably my issue. Any ideas?
-
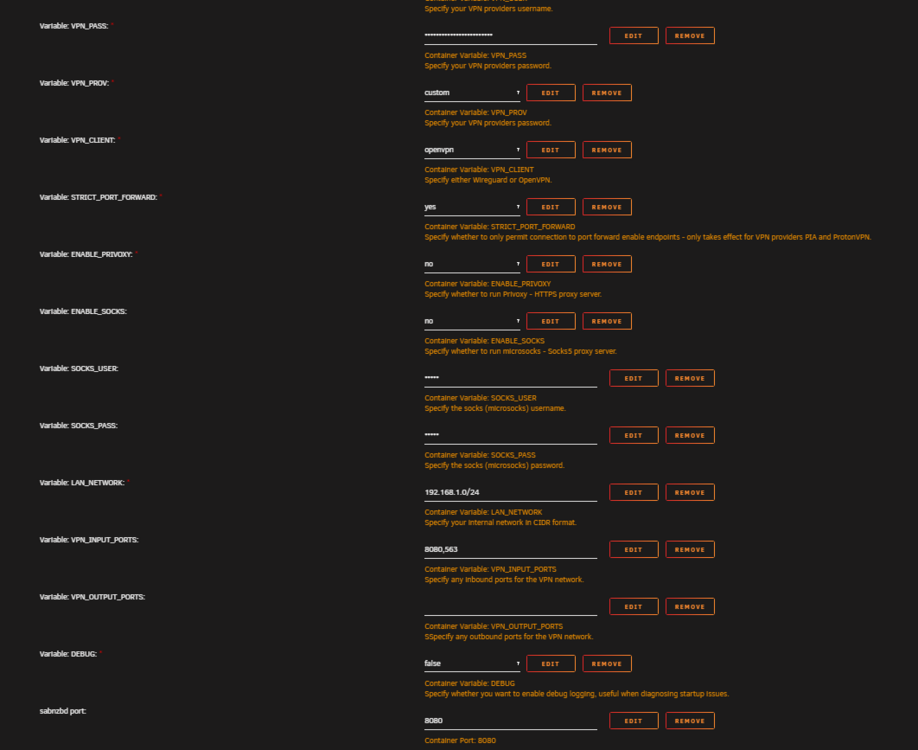
Hello community, I have been trying to wrap my head around this one for a while and am at my wits end. To start: I have successfully routed my SABNZBD container through my Deluge (VPN) container by following the SpaceInvaderOne videos, as well as some tips and trick I have picked up through researching different articles online. This was done a little over a year ago. What I believe I did for this outcome: Downloaded Sab, configured it to work properly without being run through a VPN. Downloaded Deluge, configured it to work properly without any containers running through it. Then on Sab: Left click icon and 'Edit' container and toggle advanced view (top right). In 'Extra Parameters' enter --net=container:binhex-delugevpn Go to 'Network Type' and select 'none'. Click on 'Apply'. Then in Deluge: Left click icon and 'Edit' container and toggle advanced view (top right). Click on 'Add another Path, Port, Variable, Label or Device' and add in a 'config type' of 'port'. Enter in the applications Web UI port for 'Container port' from your list taken earlier in step 4. Edit 'VPN_INPUT_PORTS' env var and put applications Web UI port numbers for the 'Container Port' in the 'value', if multiple ports required then use a comma to separate. Click on 'Apply'. I didn't have to remove the SAB port from the SAB template, I just added the SAB port to the Deluge VPN_INPUT_PORTS and added another Port variable pointing to Sab, and it worked. After applying these configurations, checking 'curl ifconfig.io' in Sab's terminal (displayed Deluge's IP). WebUI wasn't working, but I could access it by navigating to the host's IP and Sab's configured port. Great. (a weird occurrence, was that Sab would not start directly after these configuration changes. It seems as if Sab needed to wait almost a couple minutes for Deluge to do something in order for Sab to start.) Oh well. after rebooting the server both Deluge and Sab came up within a normal amount of startup time. Both are operational, and Sab traffic is run through Deluge. I'm happy. This is where my confusion starts. After trying to go through these same EXACT steps to route another container (binhex-lidarr) through Deluge.. neither SAB or Lidarr will start. Deluge starts no issue with normal operation. But when trying to start either lidarr or sab I get a "no such container" error. I thought to myself, okay wait a few minutes to let Deluge do what it needs to do to allow these containers to start (similar with what I experienced just with Sab after configuring Sab to run through Deluge.) Well after about 10 minutes, the container still would not start. What am I missing here? My end goal is to get my entire ARR setup run through Deluge. Is this even possible? It seems that when I add another container to my Deluge VPN container, everything by Deluge stops working. I will link configs and templates below (these will be pictures of how Sab is configured with Deluge, I removed the Lidarr configs to get things working again). Any help would be much appreciated. Side-Note **Notice on docker allocations that my Sab port is the same as my Lidarr port. This may be the cause? I went ahead and tried changing my Lidarr port to 8687, but that in turn changed my Sab port to 8687. Is this by design? Or why is my Sab port changing to the port I configure my Lidarr port to?**
-
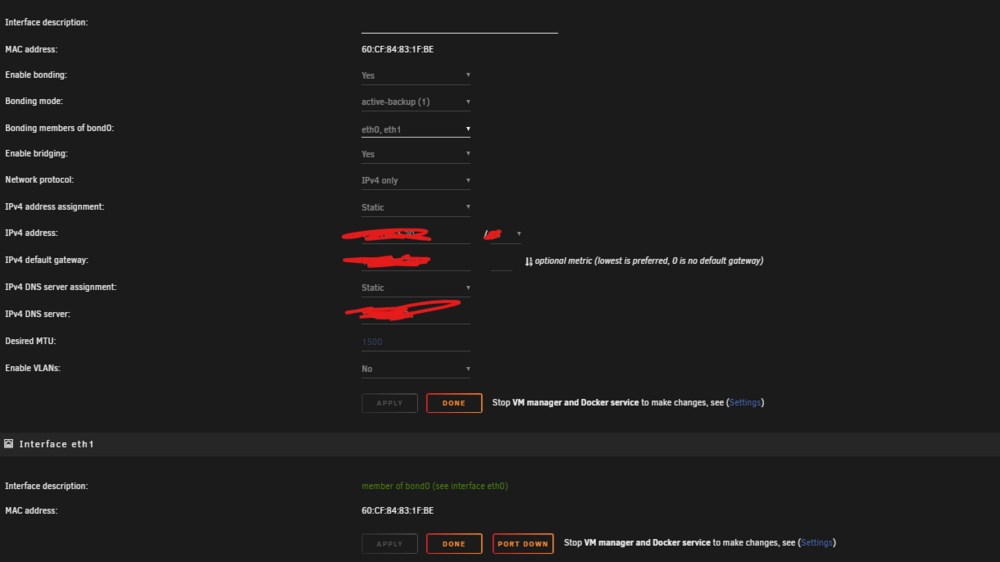
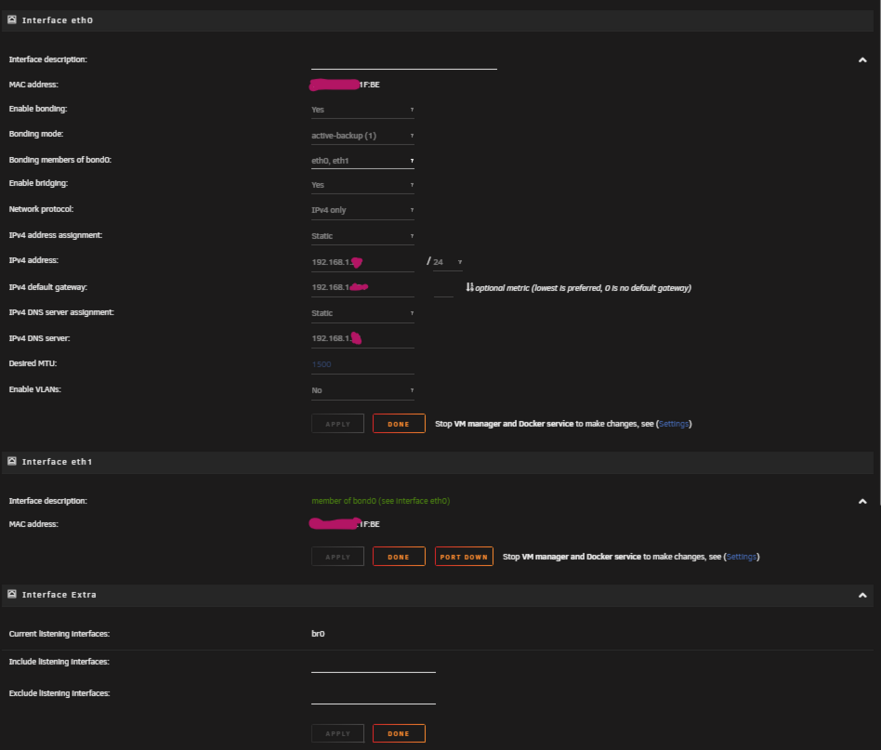
Alright. So here's the update. I went ahead and followed these steps and made these discoveries: I disabled bonding on br0, which in turn removed eth1 from br0. After this I tried a few things. First, I tried configuring the eth1 interface with a valid IP configuration within the 192.168.1.x subnet in Network Settings (in the Unraid OS). After doing so, I was unable to bind the NIC (eth1) to vfio in Tools>System Devices for my VM. I assume after I had configured the IP address, gateway, etc.. Unraid essentially owned the interface. With this I was unable to pass the NIC to the VM. So... I back tracked. I then went ahead and removed the IP configuration from eth1. Afterwards, I was able to bind the NIC in Tools>System Devices to vfio. After the interface was bound to vfio, I rebooted the server. I then proceeded to go into the VM config (gui version) after boot and checked the checkbox next to the NIC I just passed through (this checkbox is located under 'Other PCI Devices.') Booted the VM and still using the previous network interface to RDP into the server. When remoted into the server I installed the Intel Ethernet Controller drivers found on Intel's website. I now have two active ethernet adapters within my VM. I configured the Intel Ethernet Adapter I just passed through, with a valid IP configuration within the 192.168.1.x subnet. Then I proceeded to disable the previous ethernet adapter I was using prior to passing through this Intel Ethernet Controller. After the previous Network Adapter was disabled, I was booted out of RDP. I then RDP'd into the VM using the new IP config I just assigned to the newly passed through NIC. I was able to connect successfully. I ran a few speed tests and have convinced myself I have successfully passed through my 2.5GB NIC to my gaming VM. My VM now has a NVME, GPU, and NIC passed through for near bare metal performance. Although, I had one setback I wasn't expecting. After I had set all of this up, a few hours later I noticed that my Plex was no longer accessible outside my network. It was locally, but was not accessible via the internet. I went ahead and undid all of the changes I had made, and Plex was still not accessible outside my network. With an elevated heart rate, I set my VM back up with the passed through NIC to get that fully functional again.. then I focused on Plex. To make this long story shorter.... I basically had to undo all remote access configurations (within plex settings, and port forwarding within my firewall) to get Plex accessible outside the internet again. Why this happened.... no clue.. Happy it's working again though. Hopefully it stays that way. Any idea @bmartino1 @SimonF on why my Plex crapped out? And why it took me un applying the remote access settings, and basically re applying the SAME settings (literally no configuration changes but unapplied and reapplied). Two Final Questions before I Mark this as resolved: Any idea why I experienced the issue with Plex? From your perspectives, is this a valid way in settings up this passed through NIC? Thank you for your time.
-
@bmartino1 @SimonF Beautiful. Will be trying this when I get home from work this evening or tomorrow afternoon. I really appreciate both you guys with this endeavor. By Friday, a solution should be marked regarding the completion of my Gaming VM Project. Thank you again.
-
@SimonF Okay. Going off of that. My overall plan is: Disable bonding in Unraid's Network Settings. Which from what I am gathering will split both eth0 and eth1 into their own IP configuration templates. I will then configure eth1 with a different IP address but within the same subnet as eth0 (192.168.1.x). Eth0's IP configuration I am leaving the same an not reconfiguring. So essentially both NICs will have a 192.168.1.x IP address. Both being able to communicate with my default gateway in the 192.168.1.x subnet as well. After this is done and bonding of both eth0 and eth1 are now separate, and they both have valid IP configurations within the 192.168.1.x subnet. I would then go ahead and navigate to Tools>System Devices to bind eth1 to vfio. Which in turn would make it appear under the VM configuration template category 'other PCI devices.' After checking the checkbox for the newly vfio bound NIC (2.5GB interface) under 'Other PCI Devices,' in the VM configuration. Boot the VM and I am good? Am I following that correctly?
-
@SimonF Right. Which is what you are saying 'isn't normally advised'. I am wondering what the normally advised method is since that isn't it. Thank you for the quick responses sir. This community is freaking awesome!
-
@SimonF I am unable to bind the 2.5 GB NIC (eth1) to vfio without doing so to my knowledge. Both NICs are currently in use by Unraid being that they are both bonded. Which in turn wouldn't allow me to passthrough the NIC to the VM in the VM configuration. Unless I am missing something from the previous research/explanations. Apologies if this is frustrating with the back and forth, I really appreciate everyone's help here.
-
@SimonF thank you for chiming in sir. Understood on your second point. But on the first, what would be the more recommended setup for what I am trying to do? Or what is normally advised? If you need any further information from me to give you more insight, please let me know. I am really trying to go by the book here on this project. I appreciate you in advance Simon.
-
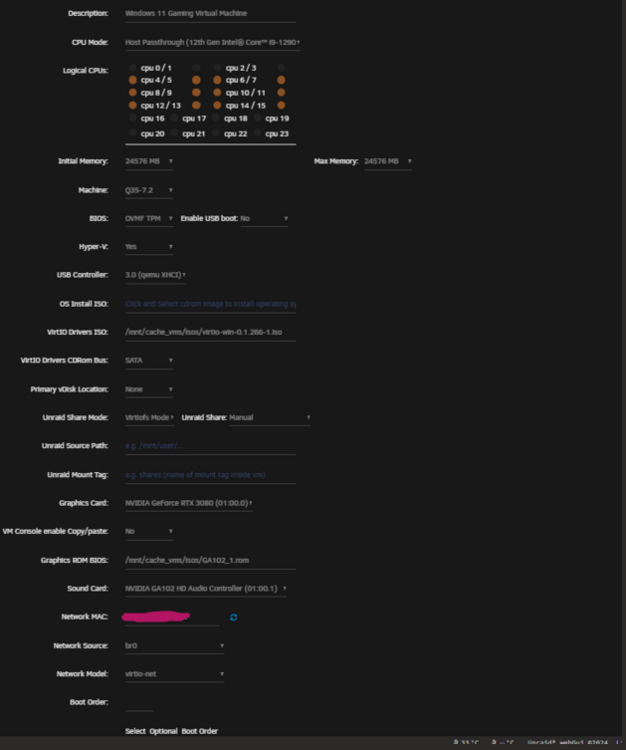
Here is my XML, I hope this helps (I have bolded and underlined the network part of the XML): <?xml version='1.0' encoding='UTF-8'?> <domain type='kvm' id='1'> <name>VM-Win11-Gaming</name> <uuid>bd4fa862-79f7-25c9-88b0-07838f087536</uuid> <description>Windows 11 Gaming Virtual Machine</description> <metadata> <vmtemplate xmlns="unraid" name="Windows 11" icon="windows11.png" os="windowstpm"/> </metadata> <memory unit='KiB'>25165824</memory> <currentMemory unit='KiB'>25165824</currentMemory> <memoryBacking> <nosharepages/> </memoryBacking> <vcpu placement='static'>12</vcpu> <cputune> <vcpupin vcpu='0' cpuset='4'/> <vcpupin vcpu='1' cpuset='5'/> <vcpupin vcpu='2' cpuset='6'/> <vcpupin vcpu='3' cpuset='7'/> <vcpupin vcpu='4' cpuset='8'/> <vcpupin vcpu='5' cpuset='9'/> <vcpupin vcpu='6' cpuset='10'/> <vcpupin vcpu='7' cpuset='11'/> <vcpupin vcpu='8' cpuset='12'/> <vcpupin vcpu='9' cpuset='13'/> <vcpupin vcpu='10' cpuset='14'/> <vcpupin vcpu='11' cpuset='15'/> </cputune> <resource> <partition>/machine</partition> </resource> <os> <type arch='x86_64' machine='pc-q35-7.2'>hvm</type> <loader readonly='yes' type='pflash'>/usr/share/qemu/ovmf-x64/OVMF_CODE-pure-efi-tpm.fd</loader> <nvram>/etc/libvirt/qemu/nvram/bd4fa862-79f7-25c9-88b0-07838f087536_VARS-pure-efi-tpm.fd</nvram> <smbios mode='host'/> </os> <features> <acpi/> <apic/> <hyperv mode='custom'> <relaxed state='on'/> <vapic state='on'/> <spinlocks state='on' retries='8191'/> <vendor_id state='on' value='none'/> </hyperv> </features> <cpu mode='host-passthrough' check='none' migratable='on'> <topology sockets='1' dies='1' cores='6' threads='2'/> <cache mode='passthrough'/> </cpu> <clock offset='localtime'> <timer name='hypervclock' present='yes'/> <timer name='hpet' present='no'/> </clock> <on_poweroff>destroy</on_poweroff> <on_reboot>restart</on_reboot> <on_crash>restart</on_crash> <devices> <emulator>/usr/local/sbin/qemu</emulator> <disk type='file' device='cdrom'> <driver name='qemu' type='raw'/> <source file='/mnt/cache_vms/isos/virtio-win-0.1.266-1.iso' index='1'/> <backingStore/> <target dev='hdb' bus='sata'/> <readonly/> <alias name='sata0-0-1'/> <address type='drive' controller='0' bus='0' target='0' unit='1'/> </disk> <controller type='usb' index='0' model='qemu-xhci' ports='15'> <alias name='usb'/> <address type='pci' domain='0x0000' bus='0x00' slot='0x07' function='0x0'/> </controller> <controller type='pci' index='0' model='pcie-root'> <alias name='pcie.0'/> </controller> <controller type='pci' index='1' model='pcie-root-port'> <model name='pcie-root-port'/> <target chassis='1' port='0x8'/> <alias name='pci.1'/> <address type='pci' domain='0x0000' bus='0x00' slot='0x01' function='0x0' multifunction='on'/> </controller> <controller type='pci' index='2' model='pcie-root-port'> <model name='pcie-root-port'/> <target chassis='2' port='0x9'/> <alias name='pci.2'/> <address type='pci' domain='0x0000' bus='0x00' slot='0x01' function='0x1'/> </controller> <controller type='pci' index='3' model='pcie-root-port'> <model name='pcie-root-port'/> <target chassis='3' port='0xa'/> <alias name='pci.3'/> <address type='pci' domain='0x0000' bus='0x00' slot='0x01' function='0x2'/> </controller> <controller type='pci' index='4' model='pcie-root-port'> <model name='pcie-root-port'/> <target chassis='4' port='0xb'/> <alias name='pci.4'/> <address type='pci' domain='0x0000' bus='0x00' slot='0x01' function='0x3'/> </controller> <controller type='pci' index='5' model='pcie-root-port'> <model name='pcie-root-port'/> <target chassis='5' port='0xc'/> <alias name='pci.5'/> <address type='pci' domain='0x0000' bus='0x00' slot='0x01' function='0x4'/> </controller> <controller type='virtio-serial' index='0'> <alias name='virtio-serial0'/> <address type='pci' domain='0x0000' bus='0x02' slot='0x00' function='0x0'/> </controller> <controller type='sata' index='0'> <alias name='ide'/> <address type='pci' domain='0x0000' bus='0x00' slot='0x1f' function='0x2'/> </controller> <interface type='bridge'> <mac address='52:54:00:dd:eb:2d'/> <source bridge='br0'/> <target dev='vnet0'/> <model type='virtio-net'/> <alias name='net0'/> <address type='pci' domain='0x0000' bus='0x01' slot='0x00' function='0x0'/> </interface> <serial type='pty'> <source path='/dev/pts/0'/> <target type='isa-serial' port='0'> <model name='isa-serial'/> </target> <alias name='serial0'/> </serial> <console type='pty' tty='/dev/pts/0'> <source path='/dev/pts/0'/> <target type='serial' port='0'/> <alias name='serial0'/> </console> <channel type='unix'> <source mode='bind' path='/var/lib/libvirt/qemu/channel/target/domain-1-VM-Win11-Gaming/org.qemu.guest_agent.0'/> <target type='virtio' name='org.qemu.guest_agent.0' state='disconnected'/> <alias name='channel0'/> <address type='virtio-serial' controller='0' bus='0' port='1'/> </channel> <input type='tablet' bus='usb'> <alias name='input0'/> <address type='usb' bus='0' port='1'/> </input> <input type='mouse' bus='ps2'> <alias name='input1'/> </input> <input type='keyboard' bus='ps2'> <alias name='input2'/> </input> <tpm model='tpm-tis'> <backend type='emulator' version='2.0' persistent_state='yes'/> <alias name='tpm0'/> </tpm> <audio id='1' type='none'/> <hostdev mode='subsystem' type='pci' managed='yes'> <driver name='vfio'/> <source> <address domain='0x0000' bus='0x01' slot='0x00' function='0x0'/> </source> <alias name='hostdev0'/> <rom file='/mnt/cache_vms/isos/GA102_1.rom'/> <address type='pci' domain='0x0000' bus='0x03' slot='0x00' function='0x0'/> </hostdev> <hostdev mode='subsystem' type='pci' managed='yes'> <driver name='vfio'/> <source> <address domain='0x0000' bus='0x01' slot='0x00' function='0x1'/> </source> <alias name='hostdev1'/> <address type='pci' domain='0x0000' bus='0x04' slot='0x00' function='0x0'/> </hostdev> <hostdev mode='subsystem' type='pci' managed='yes'> <driver name='vfio'/> <source> <address domain='0x0000' bus='0x73' slot='0x00' function='0x0'/> </source> <boot order='1'/> <alias name='hostdev2'/> <address type='pci' domain='0x0000' bus='0x05' slot='0x00' function='0x0'/> </hostdev> <memballoon model='none'/> </devices> <seclabel type='dynamic' model='dac' relabel='yes'> <label>+0:+100</label> <imagelabel>+0:+100</imagelabel> </seclabel> </domain>
-
@bmartino1 I finally have all of the pieces to tackle my gaming VM project. This is what I have done so far: I went ahead and created a VM by first only passing through my NVME to use as the Windows 11 VM's primary disk for the OS. This is a 4TB drive so I plan on also using this for my primary game storage. Install went great, drive is recognizable in Windows / Steam / etc. Simply bound the NVME to vfio in Tools>System Devices. Rebooted the computer. Built the VM by setting the primary vdisk location to 'None' and selecting the NVME drive at the bottom under, 'Other PCI Devices.' After that I went ahead and booted into Windows via VNC, setup remote desktop. Shutdown. Proceeded to then bind to vfio my Asus TUF 3080 via Tools>System devices. Rebooted the computer. Edited the vm (GUI method) by switching Graphics Card to my 3080, added the VBIOS ROM file I extracted earlier via GPUZ on another Windows machine, and then added the correlated GPU sound card. Booted the VM, downloaded the drivers and BOOM. Success. So now that I have my GPU and NVME handled. It is time to handle passing through my 2.5 GB NIC to the VM to separate traffic from Unraid containers and Gaming VM. I am going to post my network settings below, as I still need some clarification. Going off the information above. I have now added an ethernet cable in my 2.5 GB NIC. So full picture, I have a 10GB NIC (eth0) and 2.5 GB NIC (eth1) currently hooked up to the same unmanaged switch. My question is: If I break the bond by changing 'bonding mode' to disabled.. will the 2.5 GB NIC be put on the same subnet as my 10GB NIC? Or different subnets? My concern is that if my 2.5 GB NIC is put on a different subnet, it won't be able to communicate with my gateway which is under the 192.168.1.x subnet. My end goal is to get my VM on the same subnet as everything else on my network (as I don't want to battle VLANs, especially since I am currently using an unmanaged switch which doesn't support VLAN configurations). Will the change to the bonding mode, put my 2.5 GB NIC (eth1) on a different subnet than my current 10GB NIC (eth0)? I am afraid to make changes to this without asking as I am reading online that people were unable to access the WebGUI after making these changes. My next question is would passing this through to my VM be as easy as binding the NIC (which is in a separate IOMMU group than my 10GB NIC) to vfio... and then editing the GUI form of the VM configuration to choose eth1 (2.5GB NIC) instead of br0? You had mentioned to use br0 instead of vmbri. But I guess I am not following on how eth1 (2.5 GB NIC) is tied to br0. Or I guess whatever br0 even is... Overall two questions: If I break the bond by changing 'bonding mode' to disabled.. will the 2.5 GB NIC be put on the same subnet as my 10GB NIC? Or different subnets? Would passing this through to my VM be as easy as binding the NIC (which is in a separate IOMMU group than my 10GB NIC) to vfio... and then editing the GUI form of the VM configuration to choose eth1 (2.5GB NIC) instead of br0?
-
You're amazing, thank you.
-
@bmartino1 This is all great information and I will for sure need sometime to unpack it. Thank you for providing insight on how I can accomplish this task. Whenever I have all my parts come in for my gaming VM (the next few weeks), I will attempt the XML configuration route first, without touching any bond settings. If that doesn't work, I will attempt the steps you have laid out for me regarding separating the NICs in the bond settings. Going off your latest comment: I am currently using Unraid 6.12.13 (haven't moved to Unraid7 just yet). I am noting to NOT select virbr0 for Network Bridge settings.. select br0. The reconfiguring of the XML file will point to the 2.5 GB NIC for this gaming VM.. so unbonding the NICs to allow the 2.5 GB NIC for passthrough wouldn't be necessary.. is this correct? if this is not correct, please correct me if this is correct, when you mention to change the source dev. from vhost0 to my 2.5GB NIC interface in the XML file, what exactly am I putting in as a replacement (the MAC address, interface id)? Making this change, will it effect already in place network settings for already existing containers? Or being that this NIC is not currently in use, I should see no change in network performance for other containers/services? Regarding the passed through GPU. I am going to passthrough an Asus TUF 3080 to this soon to be gaming VM. Going off of that information, what settings do you recommend changing to reflect the best performance from this GPU to the gaming VM? I really appreciate all the help I can get here, so again... thank you.
-
Hello Unraid Community, This is my first post to the community, so apologies ahead of time if this seems disorganized or amateur-ish. I have an Unraid server that has a motherboard with two NICs. One 10GB NIC and one 2.5GB NIC. I only have an ethernet cable plugged into my 10GB NIC, so the 2.5GB NIC is not in use. My end goal with the information provided here is to passthrough one of these NICs (the 2.5 GB to start) to a soon to be gaming VM, so I can separate traffic from my container and media services from my gaming VM's traffic. I noticed while doing some research for this endeavor I am about to take on, that my two NICs are bonded, so passthrough is currently not attainable. After further research I see that this is a default setting with Unraid. So here come the questions.. 1) Being that this is a default setting in Unraid... Will unbonding the NICs (the 10GB and 2.5GB NIC) effect any throughput I am currently receiving and providing? My thought is no, being that the 10GB NIC is the only NIC physically in use, so therefore there should be no change unless I decide to utilize the 2.5GB NIC for the container services I am currently inquiring about. 2) Am I able to passthrough a NIC on my motherboard that is unbonded, therefore not in use by Unraid, to a VM of my choosing, or will I need a NIC controller using a PCIe slot? 3) If this is all possible, can someone provide some instructions on how to do so? I am seeing online to do this: Plug Monitor, Keyboard into server and access GUI after a reboot instead of accessing over network Stop Docker and VM service (which also stops any running VM's / containers) Stop Array Remove 2.5GB NIC from bond (which should keep my management IP the same on the already in use 10GB NIC, therefore not losing connectivity for other services after applying these settings) Add an IP config to the 2.5GB NIC, after plugging in an ethernet cable to an active port of course Save settings Reboot and boom? Passthrough should now be achievable? Or am I missing a few steps? Please advise with any information at all, I am a sponge. I think I saw a few things about swapping MAC addresses to reflect the change? I don't know if this reflects my situation or not. Thank you for reading, and thank you for any help you can provide.