


Walkersway
Members
-
Joined
-
Last visited
-
Thanks, I will backup what I can before I fit the new disk as a precaution
-
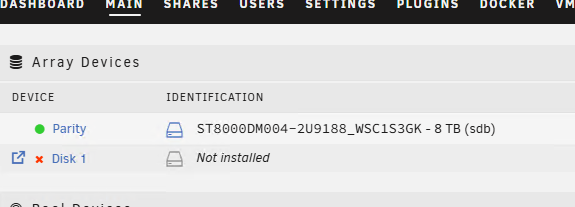
In 30 years i have never had a disk failure. Came back into my office after lunch to hear a disk clicking. Unraid was showing everything online. With Disk 1 available and parity ok. Managed to powerdown and power on and its now showing the disk has failed. Is this a simple case of just replacing the disk or is there more work to be done? What are the risks of data loss if i just replace the disk? Its not critical if i loose data. Mainly my media library, anything else i can copy off to an old NAS.
-
I have seen this discussed a few times, but they tend not to clarify the requires properly and end up with no answer so hopefully someone can help. I have an unpaid host setup with a 4 port network card. So before it's suggest I pass through the network card that's not possible in this case and I'm out of PCI slots. I'm trying to replicate my firewall configuration that runs on a mini pc. The reasons for this is the mini pc sometimes has issues booting so doing firewall firmware updates can be troublesome and leave me without internet. Ideally I want to replicate the exact setup as I do have an option of adding the virtual firwall as a HA standby so it needs the same setup. Currently my firewall is 1 wan connection, and 1 connection used for the LAN, the LAN connection then has multiple vlans. The issue with the virtual one is that I can create multiple virtual nic adapters bound to each direct vlans, and while it works it's not the same as the current firwall so the ha will not be possible. So for example unpaid now has br0, br0.100, br0.110, br0.120 etc configured. Is there anyway I can have one virtual nic that will provide all the vlans and let the virtual firewall determine what vlans they are on using the Vlan tagging? I suspect it's going to be a case or a dedicated network card password though to the VM but trying to avoid this. Thanks
-
No Joy with that. I'm giving up, tried otehr things like a ESXi host in Unraid or a windows Vm with VMware workstation and still the same. Shame this would be really useful to have working.
-
Hi. Im trying to get the Aruba CX simulator running. This is in OVA format. I have extracted this file and converted the disk and it boots fine. Where im having issues is the network interface does not work. I have tried several options for the adapter. vmxnet3 e1000 virtio virtio-net and none of them work. From the below OVF you can see it needs multiple adapters. Does anyone have any recomendations? <?xml version="1.0" encoding="UTF-8"?> <Envelope vmw:buildId="build-3018522" xmlns="http://schemas.dmtf.org/ovf/envelope/1" xmlns:cim="http://schemas.dmtf.org/wbem/wscim/1/common" xmlns:ovf="http://schemas.dmtf.org/ovf/envelope/1" xmlns:rasd="http://schemas.dmtf.org/wbem/wscim/1/cim-schema/2/CIM_ResourceAllocationSettingData" xmlns:vmw="http://www.vmware.com/schema/ovf" xmlns:vssd="http://schemas.dmtf.org/wbem/wscim/1/cim-schema/2/CIM_VirtualSystemSettingData" xmlns:xsi="http://www.w3.org/2001/XMLSchema-instance" xmlns:vbox="http://www.virtualbox.org/ovf/machine"> <References> <File ovf:href="arubaoscx-disk-image-genericx86-p4-20210610000730.vmdk" ovf:id="file1"/> </References> <DiskSection> <Info>List of the virtual disks used in the package</Info> <Disk ovf:capacity="11193129984" ovf:diskId="vmdisk1" ovf:fileRef="file1" ovf:format="http://www.vmware.com/interfaces/specifications/vmdk.html#streamOptimized"/> </DiskSection> <NetworkSection> <Info>Logical networks used in the package</Info> <Network ovf:name="Null"> <Description>Logical network used by this appliance.</Description> </Network> </NetworkSection> <VirtualSystem ovf:id="ArubaOS-CX_Virtual"> <Info>A virtual machine</Info> <OperatingSystemSection ovf:id="101" vmw:osType="otherLinux64Guest"> <Info>The kind of installed guest operating system</Info> <Description>ArubaOS-CX_Virtual</Description> <vbox:OSType ovf:required="false">Linux_64</vbox:OSType> </OperatingSystemSection> <VirtualHardwareSection> <Info>Virtual hardware requirements for a virtual machine</Info> <System> <vssd:ElementName>Virtual Hardware Family</vssd:ElementName> <vssd:InstanceID>0</vssd:InstanceID> <vssd:VirtualSystemIdentifier>ArubaOS-CX_Virtual</vssd:VirtualSystemIdentifier> <vssd:VirtualSystemType>vmx-10 virtualbox-2.2</vssd:VirtualSystemType> </System> <Item> <rasd:Caption>2 virtual CPU</rasd:Caption> <rasd:Description>Number of virtual CPUs</rasd:Description> <rasd:ElementName>2 virtual CPU</rasd:ElementName> <rasd:InstanceID>1</rasd:InstanceID> <rasd:ResourceType>3</rasd:ResourceType> <rasd:VirtualQuantity>2</rasd:VirtualQuantity> </Item> <Item> <rasd:AllocationUnits>MegaBytes</rasd:AllocationUnits> <rasd:Caption>4096 MB of memory</rasd:Caption> <rasd:Description>Memory Size</rasd:Description> <rasd:ElementName>4096 MB of memory</rasd:ElementName> <rasd:InstanceID>2</rasd:InstanceID> <rasd:ResourceType>4</rasd:ResourceType> <rasd:VirtualQuantity>4096</rasd:VirtualQuantity> </Item> <Item> <rasd:Address>0</rasd:Address> <rasd:Caption>ideController0</rasd:Caption> <rasd:Description>IDE Controller</rasd:Description> <rasd:ElementName>ideController0</rasd:ElementName> <rasd:InstanceID>3</rasd:InstanceID> <rasd:ResourceType>5</rasd:ResourceType> </Item> <Item> <rasd:Address>0</rasd:Address> <rasd:Caption>usb</rasd:Caption> <rasd:Description>USB Controller</rasd:Description> <rasd:ElementName>usb</rasd:ElementName> <rasd:InstanceID>4</rasd:InstanceID> <rasd:ResourceType>23</rasd:ResourceType> </Item> <Item> <rasd:AddressOnParent>0</rasd:AddressOnParent> <rasd:Caption>disk1</rasd:Caption> <rasd:Description>Disk Image</rasd:Description> <rasd:ElementName>disk1</rasd:ElementName> <rasd:HostResource>ovf:/disk/vmdisk1</rasd:HostResource> <rasd:InstanceID>5</rasd:InstanceID> <rasd:Parent>3</rasd:Parent> <rasd:ResourceType>17</rasd:ResourceType> </Item> <Item> <rasd:AutomaticAllocation>true</rasd:AutomaticAllocation> <rasd:Caption>Ethernet adapter on 'Null'</rasd:Caption> <rasd:Connection>Null</rasd:Connection> <rasd:ElementName>Ethernet adapter on 'Null'</rasd:ElementName> <rasd:InstanceID>6</rasd:InstanceID> <rasd:ResourceSubType>PCNet32</rasd:ResourceSubType> <rasd:ResourceType>10</rasd:ResourceType> </Item> <Item> <rasd:AutomaticAllocation>true</rasd:AutomaticAllocation> <rasd:Caption>Ethernet adapter on 'Null'</rasd:Caption> <rasd:Connection>Null</rasd:Connection> <rasd:ElementName>Ethernet adapter on 'Null'</rasd:ElementName> <rasd:InstanceID>7</rasd:InstanceID> <rasd:ResourceSubType>PCNet32</rasd:ResourceSubType> <rasd:ResourceType>10</rasd:ResourceType> </Item> <Item> <rasd:AutomaticAllocation>true</rasd:AutomaticAllocation> <rasd:Caption>Ethernet adapter on 'Null'</rasd:Caption> <rasd:Connection>Null</rasd:Connection> <rasd:ElementName>Ethernet adapter on 'Null'</rasd:ElementName> <rasd:InstanceID>8</rasd:InstanceID> <rasd:ResourceSubType>PCNet32</rasd:ResourceSubType> <rasd:ResourceType>10</rasd:ResourceType> </Item> <Item> <rasd:AutomaticAllocation>true</rasd:AutomaticAllocation> <rasd:Caption>Ethernet adapter on 'Null'</rasd:Caption> <rasd:Connection>Null</rasd:Connection> <rasd:ElementName>Ethernet adapter on 'Null'</rasd:ElementName> <rasd:InstanceID>9</rasd:InstanceID> <rasd:ResourceSubType>PCNet32</rasd:ResourceSubType> <rasd:ResourceType>10</rasd:ResourceType> </Item> <Item> <rasd:AutomaticAllocation>true</rasd:AutomaticAllocation> <rasd:Caption>Ethernet adapter on 'Null'</rasd:Caption> <rasd:Connection>Null</rasd:Connection> <rasd:ElementName>Ethernet adapter on 'Null'</rasd:ElementName> <rasd:InstanceID>10</rasd:InstanceID> <rasd:ResourceSubType>PCNet32</rasd:ResourceSubType> <rasd:ResourceType>10</rasd:ResourceType> </Item> <Item> <rasd:AutomaticAllocation>true</rasd:AutomaticAllocation> <rasd:Caption>Ethernet adapter on 'Null'</rasd:Caption> <rasd:Connection>Null</rasd:Connection> <rasd:ElementName>Ethernet adapter on 'Null'</rasd:ElementName> <rasd:InstanceID>11</rasd:InstanceID> <rasd:ResourceSubType>PCNet32</rasd:ResourceSubType> <rasd:ResourceType>10</rasd:ResourceType> </Item> <Item> <rasd:AutomaticAllocation>true</rasd:AutomaticAllocation> <rasd:Caption>Ethernet adapter on 'Null'</rasd:Caption> <rasd:Connection>Null</rasd:Connection> <rasd:ElementName>Ethernet adapter on 'Null'</rasd:ElementName> <rasd:InstanceID>12</rasd:InstanceID> <rasd:ResourceSubType>PCNet32</rasd:ResourceSubType> <rasd:ResourceType>10</rasd:ResourceType> </Item> <Item> <rasd:AutomaticAllocation>true</rasd:AutomaticAllocation> <rasd:Caption>Ethernet adapter on 'Null'</rasd:Caption> <rasd:Connection>Null</rasd:Connection> <rasd:ElementName>Ethernet adapter on 'Null'</rasd:ElementName> <rasd:InstanceID>13</rasd:InstanceID> <rasd:ResourceSubType>PCNet32</rasd:ResourceSubType> <rasd:ResourceType>10</rasd:ResourceType> </Item> <Item> <rasd:AutomaticAllocation>true</rasd:AutomaticAllocation> <rasd:Caption>Ethernet adapter on 'Null'</rasd:Caption> <rasd:Connection>Null</rasd:Connection> <rasd:ElementName>Ethernet adapter on 'Null'</rasd:ElementName> <rasd:InstanceID>14</rasd:InstanceID> <rasd:ResourceSubType>PCNet32</rasd:ResourceSubType> <rasd:ResourceType>10</rasd:ResourceType> </Item> <Item> <rasd:AutomaticAllocation>true</rasd:AutomaticAllocation> <rasd:Caption>Ethernet adapter on 'Null'</rasd:Caption> <rasd:Connection>Null</rasd:Connection> <rasd:ElementName>Ethernet adapter on 'Null'</rasd:ElementName> <rasd:InstanceID>15</rasd:InstanceID> <rasd:ResourceSubType>PCNet32</rasd:ResourceSubType> <rasd:ResourceType>10</rasd:ResourceType> </Item> <Item ovf:required="false"> <rasd:AutomaticAllocation>false</rasd:AutomaticAllocation> <rasd:ElementName>video</rasd:ElementName> <rasd:InstanceID>16</rasd:InstanceID> <rasd:ResourceType>24</rasd:ResourceType> <vmw:Config ovf:required="false" vmw:key="enable3DSupport" vmw:value="false" /> <vmw:Config ovf:required="false" vmw:key="use3dRenderer" vmw:value="automatic" /> <vmw:Config ovf:required="false" vmw:key="useAutoDetect" vmw:value="false" /> <vmw:Config ovf:required="false" vmw:key="videoRamSizeInKB" vmw:value="16384" /> </Item> <vmw:Config ovf:required="false" vmw:key="cpuHotAddEnabled" vmw:value="false"/> <vmw:Config ovf:required="false" vmw:key="cpuHotRemoveEnabled" vmw:value="false"/> <vmw:Config ovf:required="false" vmw:key="firmware" vmw:value="bios"/> <vmw:Config ovf:required="false" vmw:key="memoryHotAddEnabled" vmw:value="false"/> <vmw:Config ovf:required="false" vmw:key="nestedHVEnabled" vmw:value="false"/> <vmw:Config ovf:required="false" vmw:key="powerOpInfo.powerOffType" vmw:value="soft"/> <vmw:Config ovf:required="false" vmw:key="powerOpInfo.resetType" vmw:value="soft"/> <vmw:Config ovf:required="false" vmw:key="powerOpInfo.standbyAction" vmw:value="checkpoint"/> <vmw:Config ovf:required="false" vmw:key="powerOpInfo.suspendType" vmw:value="hard"/> <vmw:Config ovf:required="false" vmw:key="tools.afterPowerOn" vmw:value="true"/> <vmw:Config ovf:required="false" vmw:key="tools.afterResume" vmw:value="true"/> <vmw:Config ovf:required="false" vmw:key="tools.beforeGuestShutdown" vmw:value="true"/> <vmw:Config ovf:required="false" vmw:key="tools.beforeGuestStandby" vmw:value="true"/> <vmw:Config ovf:required="false" vmw:key="tools.syncTimeWithHost" vmw:value="false"/> <vmw:Config ovf:required="false" vmw:key="tools.toolsUpgradePolicy" vmw:value="manual"/> </VirtualHardwareSection> <!--Extended section (Section 4.5 in DSP2017_1.0.0) is not honored by ESXi--> <!--Instead, add additional extended information as comments in the OVF--> <!--<BuildSystem>arubaef04.rose.rdlabs.hpecorp.net</BuildSystem>--> </VirtualSystem> </Envelope>
-
Great thanks for that, I will Google how to do that before I make any changes.
-
Hi can anyone point me in the direction of some good UNRAID networking guides? Initially im thinking of trunking from my switch to the server using the 4 ethernet ports. Then i want to separate the unraid management to a separate vlan and lock this down. Afterwards i will be looking at moving dockers and VM's to separate VLANS. I dont want to play and find i loose access to management. So would preferer to fully research first. Thanks
-
Hi Is it possible to to run a VM with ESXi installed on UNRAID. I can see a KVM tutorial (KVM: Deploying a nested version of VMware ESXi 7.0 on KVM | Fabian Lee : Software Engineer) but my skills are limited as only been using Unraid for a week. Ideally i would like ESXi 8 for a ESXi lab. I have played a little using a centos VM, and can boot the installer but it halts on the loading. Thanks.
-
Great thanks. Im ordering a couple of 8TB disks today anyway, which doubles my old nas storage. I may stick in an old 240GB disk and make an array with that for now as i need to relocate 200GB worth of data from my old server before its sold on friday, so may plonk this on the array for now. Does anyone know of any good guides that explain what happens we you add / remove disks to an array, as i will then want to move this data from the 24GB disk to the 8TB disk when it arrives. I know one option is to manually move the data, but just wondering if there is an easier way.
-
Thanks, that explains it. What would happen if I created an array using my other 2tb stick and then passed though the other one by I'd, would I then be able to reset the array later and create a new one? Thinking now of using 1 x 2tb for the windows 11. The. Create a new array using a couple slow 5400 disks and use the other 2tb as cache to this. Thanks.
-
Hi, Sorry im trawling forums to try to find answers but im having issues. It may help with me saying what i was going to do before i discovered unraid. I bought a new PC / Home server, the intention was Windows server with Hyper-V booting from a 240GB SSD. 1 x 2TB NVME configured as volume d for my Windows 11 video editing PC 1 x 2TB NVME configured as volume e (cheaper and slower) for other virtual machines. 3 x disks in raid 5 for storage of movies. These will be added when funds allow. Yes im aware there is only redundancy on the raid 5, but all VM's would have been backed up to an old NAS. Im trying to replicate this in unraid, but having issues understanding this, as i can only appear to create a VM in a share, and this must reside on the array. Is there any other way? To keep the performance for the Windows 11 VM, is it best to add the 240GB SSD as disk1 in the array and the slower 2TB NVME as disk 2. Create a share for Windows 11 that resides on disk 1 only for Windows 11. Create shares for the other VM's on disk 2 only, Add the fast 2TB NVME in a disk pool, and set the share for Windows 11 to use the cache in Only mode? That way i get all 2tb for the Windows 11 VM. Just all seems odd, as the 240GB SSD is sitting there doing nothing then. Thanks.
