





JEZBRO
Members
-
Joined
-
Last visited
-
Yeah, that's my plan. what a pain though, it looks like it's gonna take 2-3 days to recover all the data and I'm gonna need to do some weird juggling act with the HDDs as well. I have a 1 18TB drive that I've reformatted to NTFS, then I'm going to have to move any recoverable data from 1 drive onto that, then reformat the drive I just move data from and reformat that, to move the next drive. Then at the end, I should be left with one empty HDD and 6 NTFS HDDs with all the data on it, which I'll have to rebuild the array with, one HDD at a time, adding an array drive then copying one HDD over. I'm hoping that I don't require a parity disk, because the last empty drive will become the parity disk at the end.
-
I set it up so only I could delete media through the Plex app, but not other users. I also set up Nextcloud in a way using, "adapted storage" so that it could share the media folder content with a public or private link if I wanted, but other than that Nextcloud had its own folder on the share and couldn't access anything else.
-
From memory, Nginx was using port 80 and 443 and was on br0 network so had a different IP address to the GUI, Nextcloud also used port 80 and had different IP.
-
Yeah, I'm gonna try and recover as much as I can and tighten security the best I can I guess. Thanks for the help though. It's gonna take 15 hours to scan for lost data.
-
I setup my array so that there was one share called "Data" and nested in that folder were media, downloads, etc. Plex only had access to the media folder, qbit only had access to downloads, and the "arrs" had access to both because they moved completed downloads from one to the other. I did this so that the copying was instant and easy on the processor. I followed this same method for all the other dockers I was running.
-
@itimpi I have a bunch of dockers that use a reverse proxy to access the Internet. Is this what you mean by exposed to the Internet? The only why I've been able to access to Unraid GUI outside of my network has been through Unraid Connect. I'll try to recover the data according to your recommendation.
-
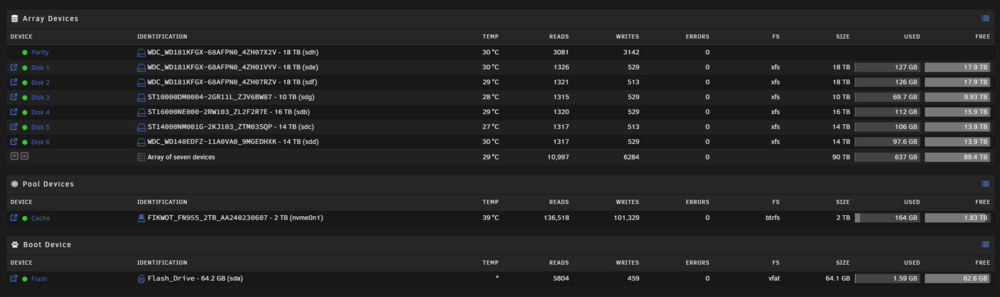
My Unraid was running perfectly. I updated to v7 earlier this week and had no issues. Today, I came home from work, and all the data on all my array devices was gone. I don't know what to do. There was 60-70Tb of data loss. The little bit of data that is there is probably from sonarr and radarr redownloading. can someone advise what I should do? unraid-diagnostics-20250116-2146.zip
-
I gave up trying to get the AFFiNE community app working and used the compose .yaml on the Affine Git Hub. I'll explain what I did below. 1. Create a Directory for Affine on Unraid Open the Unraid terminal. Create a directory for Affine in Unraid’s appdata folder mkdir -p /mnt/user/appdata/affine-selfhost 2. Create the docker-compose.yaml File In the /mnt/user/appdata/affine-selfhost directory, create a file named docker-compose.yaml Add the contents from the GitHub example into this file, with a few modifications for Unraid file paths. services: affine: image: ghcr.io/toeverything/affine-graphql:stable container_name: affine_selfhosted command: ['sh', '-c', 'node ./scripts/self-host-predeploy && node ./dist/index.js'] ports: - '3010:3010' - '5555:5555' depends_on: redis: condition: service_healthy postgres: condition: service_healthy volumes: # custom configurations - /mnt/user/appdata/affine-selfhost/config:/root/.affine/config # blob storage - /mnt/user/appdata/affine-selfhost/storage:/root/.affine/storage logging: driver: 'json-file' options: max-size: '1000m' restart: unless-stopped environment: - NODE_OPTIONS="--import=./scripts/register.js" - AFFINE_CONFIG_PATH=/root/.affine/config - REDIS_SERVER_HOST=redis - DATABASE_URL=postgres://affine:affine@postgres:5432/affine - NODE_ENV=production - AFFINE_ADMIN_EMAIL=${AFFINE_ADMIN_EMAIL} - AFFINE_ADMIN_PASSWORD=${AFFINE_ADMIN_PASSWORD} # Uncomment next line if you wish to quit telemetry. # - TELEMETRY_ENABLE=false redis: image: redis container_name: affine_redis restart: unless-stopped volumes: - /mnt/user/appdata/affine-selfhost/redis:/data healthcheck: test: ['CMD', 'redis-cli', '--raw', 'incr', 'ping'] interval: 10s timeout: 5s retries: 5 postgres: image: postgres container_name: affine_postgres restart: unless-stopped volumes: - /mnt/user/appdata/affine-selfhost/postgres:/var/lib/postgresql/data healthcheck: test: ['CMD-SHELL', 'pg_isready -U affine'] interval: 10s timeout: 5s retries: 5 environment: POSTGRES_USER: affine POSTGRES_PASSWORD: affine POSTGRES_DB: affine PGDATA: /var/lib/postgresql/data/pgdata 3. Set Up Environment Variables You can create a .env file in /mnt/user/appdata/affine-selfhost/config to store your environment variables, like AFFINE_ADMIN_EMAIL and AFFINE_ADMIN_PASSWORD. To do this navigate to the directory cd /mnt/user/appdata/affine-selfhost/config Create the .env file nano .env Add variables AFFINE_ADMIN_EMAIL= AFFINE_ADMIN_PASSWORD= # Server configurations AFFINE_SERVER_HOST=your_server_host # Replace with your actual server host (e.g., 0.0.0.0) AFFINE_SERVER_PORT=3010 # Replace with your desired server port AFFINE_SERVER_HTTPS=false # Set to true if using HTTPS, otherwise false AFFINE_SERVER_EXTERNAL_URL= # Replace with the external URL, e.g., http://yourdomain.com # Mailer configurations MAILER_HOST=smtp.yourmailhost.com # Replace with your mail host (e.g., smtp.gmail.com) MAILER_PORT= # Mail server port (e.g., 587 for SMTP with TLS) MAILER_USER=your_mailer_user # Replace with your mailer username (e.g., your email) MAILER_PASSWORD=your_mailer_password # Replace with your mailer password MAILER_SENDER="Affine Admin <your_email>" # Replace with the email sender's name and email After entering the environment variables, press CTRL + X to exit Press Y to confirm saving the changes. Press Enter to save the file with the name .env 4. Deploy Affine Using Docker Compose Navigate to the directory where the docker-compose.yaml file is located cd /mnt/user/appdata/affine-selfhost Run the following command to start Affine docker-compose up -d 5. Access Affine Once everything is up and running, open your browser and go to http://your-unraid-ip:3010 You should now be able to access Affine
-
I've managed to get the program running with the mailer configured correctly and reached the login screen. When I enter the email address specified in AFFiNE_ADMIN_EMAIL, I receive an email with a link to create an account instead of logging in. Also, when I click the link, it opens a new browser tab with the URL http://localhost:3010/magic-link..., and I encounter the following error in the logs: [Nest] 1 - 08/13/2024, 4:29:17 PM ERROR [HTTP] Internal server error PrismaClientKnownRequestError: Invalid `prisma.user.create()` invocation: An operation failed because it depends on one or more records that were required but not found. No 'Feature' record(s) (needed to inline the relation on 'UserFeature' record(s)) was found for a nested connect on one-to-many relation 'FeatureToUserFeature'. at _n.handleRequestError (/app/node_modules/@prisma/client/runtime/library.js:121:7749) at _n.handleAndLogRequestError (/app/node_modules/@prisma/client/runtime/library.js:121:7057) at _n.request (/app/node_modules/@prisma/client/runtime/library.js:121:6741) at async l (/app/node_modules/@prisma/client/runtime/library.js:130:9355) at async AuthController.magicLinkSignIn (file:///app/dist/core/auth/controller.js:102:22) For those interested in how I got the mailer working, here’s what I did: Edited the Docker container and added the following four variables: Name: AFFiNE_MAILER_HOST Key: MAILER_HOST Value: [Your Email SMTP Server] Name: AFFiNE_MAILER_PORT Key: MAILER_PORT Value: [Your SMTP Port] Name: AFFiNE_MAILER_USER Key: MAILER_USER Value: [Your Email Address] Name: AFFiNE_MAILER_PASSWORD Key: MAILER_PASSWORD Value: [Your Email Password] This setup allows the mailer to function correctly, sending emails as expected. You may need to setup an App Password if you're using outlook or Gmail.
-
What am I suppose to put in the MongoDB URI: field when setting it up?
-
@tekolote Yeah, that's right. I wasn't sure if you could setup sliding sync in the same PG15 database as Matrix that's why I set it up like I did. Your way definitely seems cleaner. When I set this up I was struggling to get any kind of help. Between a number of group chats about Matrix, Element, Sliding Sync and UNRAID, each one directed me to a different chat to get help. So I resorted to just using ChatGPT. I trained a GPT on all the documentation for each component then asked it how to set up Sliding Sync and my little tutorial is the result. I've only been using UNRAID for about 6 months and have no experience with Linux so I'm just teaching myself as I go.
-
Did you get it working following @tekolote advice? I'm not familiar with SWAG but I maybe able to help.
-
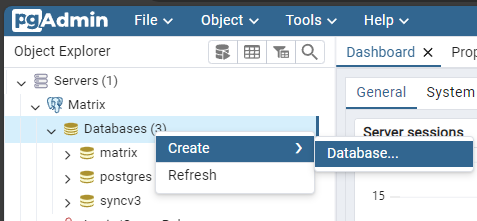
For anyone looking for a guide on how I did this, here it is. Login to pgAdmin4. On the left expand Server > Matrix > Databases, then right click Databases then go Create > Database... Then in the Database field type "syncv3" then click "Save" Install Conpose.Manager from CA. Navigate to the Docker tab, and then to the "Add New Stack". Put in "Sliding_Sync" in the stack_name field, then click "Advanced" and in the stack directory put /mnt/user/appdata/matrix/sliding-sync then click "OK" Now scroll down and below your dockers you should see Sliding_sync under Compose, click the COG > Edit Stack > Compose File Scroll down again and there should be a text editor. Copy and past the following into that. version: '3.8' services: slidingsync-proxy: container_name: slidingsync-proxy image: 'ghcr.io/matrix-org/sliding-sync:latest' restart: unless-stopped environment: - 'SYNCV3_SERVER=https://chat.yourdomain.com' - 'SYNCV3_SECRET=KEY' - 'SYNCV3_BINDADDR=:8009' - 'SYNCV3_DB=user=postgres-username dbname=syncv3 sslmode=disable host=slidingsync-db password=postgres-password' ports: - '8009:8009' depends_on: - slidingsync-db slidingsync-db: container_name: slidingsync-db image: postgres:15 restart: unless-stopped volumes: - /mnt/user/appdata/matrix/sliding-sync/database:/var/lib/postgresql/data environment: - POSTGRES_PASSWORD=postgres-passowrd - POSTGRES_USER=postgres-username - POSTGRES_DB=syncv3 Adjust `SYNCV3_SERVER`, `SYNCV3_DB`, `POSTGRES_PASSWOR`, `POSTGRES USER`, and 'POSTGRES_DB' to match your setup. You can use this command in the unraid console to generate a random string to put in 'SYNCV3_SECRET' echo -n $(openssl rand -hex 32) Create a file called `client.json` with the following content. You can use any text editor for this. { "m.homeserver": { "base_url": "https://matrix.yourdomain.com" }, "org.matrix.msc3575.proxy": { "url": "https://chat1.yourdomain.com" } } Place this file in the Nginx directory on your Unraid server, I put it in /mnt/user/appdata/Nginx-Proxy-Manager-Official/data/nginx/.well-known/matrix/client.json Open the Nginx Proxy Manager UI in your browser. Add a New Proxy Host for Sliding Sync connections, I made mine chat1.yourdomain.com Set it up like normal and have it point to you Sliding Sync Proxy. I have my matrix server on port 8008 and Silding Proxy on 8009. Before you hit save, go to the "Advanced" tab and add this to Custom Nginx Configuration location /.well-known/matrix/client { root /data/nginx/; try_files /.well-known/matrix/client.json =404; default_type application/json; add_header Access-Control-Allow-Origin *; } Verify the Setup, go to https://chat1.yourdomain.com/.well-known/matrix/client It should return the contents of the .json file you made earlier And that's it, it should all be up and running.
-
So from following this guide, some help online and ChatGPT I actually managed to get Sliding Sync working.
-
I followed your guide and got it working, any chance you'd extend your guide to include Sliding Sync?


