

Nebur692
-
Posts
55 -
Joined
-
Last visited
Content Type
Profiles
Forums
Downloads
Store
Gallery
Bug Reports
Documentation
Landing
Posts posted by Nebur692
-
-
Repo: zabbix/zabbix-server-mysql
Can it be used to make a Zabbix Proxy?
If not, could you make a repository for Zabbix Proxy please? -
Good afternoon,
Do we have any updated jlesage/nginx-proxy-manager repository?
-
-
How do I disable unms 2fa?
-
On 7/7/2020 at 11:41 AM, saarg said:
You can try to add it by opening command line of the container and issue: pip3 install pyopenssl
Then restart the container. That should fix the issue until we push a new build.
Error install pyopenssl
root@cf1619f70874:/# pip3 install pyopenssl Collecting pyopenssl Using cached pyOpenSSL-19.1.0-py2.py3-none-any.whl (53 kB) Requirement already satisfied: six>=1.5.2 in /usr/lib/python3.8/site-packages (from pyopenssl) (1.15.0) Collecting cryptography>=2.8 Using cached cryptography-2.9.2.tar.gz (517 kB) Installing build dependencies ... error ERROR: Command errored out with exit status 1: command: /usr/bin/python3 /usr/lib/python3.8/site-packages/pip install --ignore-installed --no-user --prefix /tmp/pip-build-env-2b_3v_u_/overlay --no-warn-script-location --no-binary :none: --only-binary :none: -i https://pypi.org/simple -- 'setuptools>=40.6.0' wheel 'cffi>=1.8,!=1.11.3; platform_python_implementation != '"'"'PyPy'"'"'' cwd: None Complete output (66 lines): Collecting setuptools>=40.6.0 Using cached setuptools-49.1.0-py3-none-any.whl (789 kB) Collecting wheel Using cached wheel-0.34.2-py2.py3-none-any.whl (26 kB) Collecting cffi!=1.11.3,>=1.8 Using cached cffi-1.14.0.tar.gz (463 kB) Collecting pycparser Using cached pycparser-2.20-py2.py3-none-any.whl (112 kB) Using legacy setup.py install for cffi, since package 'wheel' is not installed. Installing collected packages: setuptools, wheel, pycparser, cffi Running setup.py install for cffi: started Running setup.py install for cffi: finished with status 'error' ERROR: Command errored out with exit status 1: command: /usr/bin/python3 -u -c 'import sys, setuptools, tokenize; sys.argv[0] = '"'"'/tmp/pip-install-tsqrwwx0/cffi/setup.py'"'"'; __file__='"'"'/tmp/pip-install-tsqrwwx0/cffi/setup.py'"'"';f=getattr(tokenize, '"'"'open'"'"', open)(__file__);code=f.read().replace('"'"'\r\n'"'"', '"'"'\n'"'"');f.close();exec(compile(code, __file__, '"'"'exec'"'"'))' install --record /tmp/pip-record-owapn2sj/install-record.txt --single-version-externally-managed --prefix /tmp/pip-build-env-2b_3v_u_/overlay --compile --install-headers /tmp/pip-build-env-2b_3v_u_/overlay/include/python3.8/cffi cwd: /tmp/pip-install-tsqrwwx0/cffi/ Complete output (48 lines): unable to execute 'gcc': No such file or directory unable to execute 'gcc': No such file or directory No working compiler found, or bogus compiler options passed to the compiler from Python's standard "distutils" module. See the error messages above. Likely, the problem is not related to CFFI but generic to the setup.py of any Python package that tries to compile C code. (Hints: on OS/X 10.8, for errors about -mno-fused-madd see http://stackoverflow.com/questions/22313407/ Otherwise, see https://wiki.python.org/moin/CompLangPython or the IRC channel #python on irc.freenode.net.) Trying to continue anyway. If you are trying to install CFFI from a build done in a different context, you can ignore this warning. running install running build running build_py creating build creating build/lib.linux-x86_64-3.8 creating build/lib.linux-x86_64-3.8/cffi copying cffi/vengine_cpy.py -> build/lib.linux-x86_64-3.8/cffi copying cffi/model.py -> build/lib.linux-x86_64-3.8/cffi copying cffi/commontypes.py -> build/lib.linux-x86_64-3.8/cffi copying cffi/error.py -> build/lib.linux-x86_64-3.8/cffi copying cffi/backend_ctypes.py -> build/lib.linux-x86_64-3.8/cffi copying cffi/cparser.py -> build/lib.linux-x86_64-3.8/cffi copying cffi/ffiplatform.py -> build/lib.linux-x86_64-3.8/cffi copying cffi/pkgconfig.py -> build/lib.linux-x86_64-3.8/cffi copying cffi/vengine_gen.py -> build/lib.linux-x86_64-3.8/cffi copying cffi/api.py -> build/lib.linux-x86_64-3.8/cffi copying cffi/lock.py -> build/lib.linux-x86_64-3.8/cffi copying cffi/__init__.py -> build/lib.linux-x86_64-3.8/cffi copying cffi/setuptools_ext.py -> build/lib.linux-x86_64-3.8/cffi copying cffi/cffi_opcode.py -> build/lib.linux-x86_64-3.8/cffi copying cffi/verifier.py -> build/lib.linux-x86_64-3.8/cffi copying cffi/recompiler.py -> build/lib.linux-x86_64-3.8/cffi copying cffi/_cffi_include.h -> build/lib.linux-x86_64-3.8/cffi copying cffi/parse_c_type.h -> build/lib.linux-x86_64-3.8/cffi copying cffi/_embedding.h -> build/lib.linux-x86_64-3.8/cffi copying cffi/_cffi_errors.h -> build/lib.linux-x86_64-3.8/cffi running build_ext building '_cffi_backend' extension creating build/temp.linux-x86_64-3.8 creating build/temp.linux-x86_64-3.8/c gcc -Wno-unused-result -Wsign-compare -DNDEBUG -g -fwrapv -O3 -Wall -fomit-frame-pointer -g -fno-semantic-interposition -fomit-frame-pointer -g -fno-semantic-interposition -fomit-frame-pointer -g -fno-semantic-interposition -DTHREAD_STACK_SIZE=0x100000 -fPIC -I/usr/include/ffi -I/usr/include/libffi -I/usr/include/python3.8 -c c/_cffi_backend.c -o build/temp.linux-x86_64-3.8/c/_cffi_backend.o unable to execute 'gcc': No such file or directory error: command 'gcc' failed with exit status 1 ---------------------------------------- ERROR: Command errored out with exit status 1: /usr/bin/python3 -u -c 'import sys, setuptools, tokenize; sys.argv[0] = '"'"'/tmp/pip-install-tsqrwwx0/cffi/setup.py'"'"'; __file__='"'"'/tmp/pip-install-tsqrwwx0/cffi/setup.py'"'"';f=getattr(tokenize, '"'"'open'"'"', open)(__file__);code=f.read().replace('"'"'\r\n'"'"', '"'"'\n'"'"');f.close();exec(compile(code, __file__, '"'"'exec'"'"'))' install --record /tmp/pip-record-owapn2sj/install-record.txt --single-version-externally-managed --prefix /tmp/pip-build-env-2b_3v_u_/overlay --compile --install-headers /tmp/pip-build-env-2b_3v_u_/overlay/include/python3.8/cffi Check the logs for full command output. ---------------------------------------- ERROR: Command errored out with exit status 1: /usr/bin/python3 /usr/lib/python3.8/site-packages/pip install --ignore-installed --no-user --prefix /tmp/pip-build-env-2b_3v_u_/overlay --no-warn-script-location --no-binary :none: --only-binary :none: -i https://pypi.org/simple -- 'setuptools>=40.6.0' wheel 'cffi>=1.8,!=1.11.3; platform_python_implementation != '"'"'PyPy'"'"'' Check the logs for full command output. root@cf1619f70874:/# -
The Last update https error:
2020-07-06 22:27:30 - WARNING :: MainThread : The pyOpenSSL module is missing. Install this module to enable HTTPS. HTTPS will be disabled.
-
Good morning, everybody,
When will version 5.13.29 be available?
https://community.ui.com/releases/UniFi-Network-Controller-5-13-29/d7647910-77a2-4e61-bbfe-389206f2d6ad -
SPEEDtest
I want to see the tests that have been done without sharing the url.
When I put it like this on the stats page nothing appears:
TELEMETRY: true
ENABLE_ID_OBFUSCATION: true
When I put it this way on the stats page if the results appear but also the url to share the test appears:
TELEMETRY: true
ENABLE_ID_OBFUSCATION: false
Is there a way to view the tests performed but that the url does not appear?
-
Can you use https with certificate for calibre webserver gui?
-
I have my certificate in pem format, how do I import it to the Unifi?
-
On 4/1/2020 at 3:27 PM, BestITGuys said:
Search is broken since the last update. Getting the following error in the log:
File "/config/data/qBittorrent/nova3/nova2.py", line 36, in <module>
import urllib.parse
ImportError: No module named parse
I have the same problem:
-
1 hour ago, theone said:
Docker Command:

I tried manually going to port 192.168.1.104:8083 but always get "This site can’t be reached" error
You've misplaced the variable "WEBUI_PORT", it's not detecting it when it comes to making the docker.
I've got it on like this:

-
Good morning
The search engine is still failing:
[s6-init] making user provided files available at /var/run/s6/etc...exited 0.
[s6-init] ensuring user provided files have correct perms...exited 0.
[fix-attrs.d] applying ownership & permissions fixes...
[fix-attrs.d] done.
[cont-init.d] executing container initialization scripts...
[cont-init.d] 01-envfile: executing...
[cont-init.d] 01-envfile: exited 0.
[cont-init.d] 10-adduser: executing...

-------------------------------------
_ ()
| | ___ _ __
| | / __| | | / \
| | \__ \ | | | () |
|_| |___/ |_| \__/


Brought to you by linuxserver.io
We gratefully accept donations at:
https://www.linuxserver.io/donate/
-------------------------------------
GID/UID
-------------------------------------

User uid: 99
User gid: 100
-------------------------------------

[cont-init.d] 10-adduser: exited 0.
[cont-init.d] 30-config: executing...
[cont-init.d] 30-config: exited 0.
[cont-init.d] 99-custom-scripts: executing...
[custom-init] no custom files found exiting...
[cont-init.d] 99-custom-scripts: exited 0.
[cont-init.d] done.
[services.d] starting services
[services.d] done.
Could not parse Nova search engine capabilities, msg:
Error: Traceback (most recent call last):

File "/config/data/qBittorrent/nova3/nova2.py", line 36, in <module>
import urllib.parse
ImportError: No module named parse
Linuxserver.io version:- 4.3.0202003270617-6905-2408ce9ubuntu18.04.1-ls32 Build-date:- 2020-03-27T03:19:29-04:00
Linuxserver.io version:- 14.2.0.99201912051435-6796-912b076ubuntu18.04.1-ls56 Build-date:- 2019-12-05T17:12:21+01:00
UnRaid v6.8.3
-
With version 4.3.0alpha1 has stopped the search plug-ins
Could not parse Nova search engine capabilities, msg:
Error: Traceback (most recent call last):

File "/config/data/qBittorrent/nova3/nova2.py", line 36, in <module>
import urllib.parse
ImportError: No module named parse

-
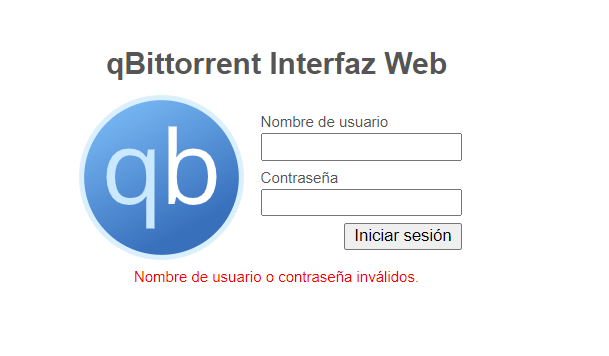
Since the last update I can not access, it gives me the wrong username or password.
I have tried to access as always from several browsers (Edge, Chrome, Firefox, IE...) with the same result.
It also does not allow me to access from the client that I have installed on Android.
-
Do you have a tag to install the beta versions?
UniFi Network Controller 5.11.29
-
On 6/26/2019 at 3:35 PM, Trunkz said:
How can I amend the dockerfile this UNMS container installs? It stills links to 0.13.3 and we are already on 1.0.0-beta / 0.14-rc
+1
-
7 hours ago, koyaanisqatsi said:
I turned on turbo/reconstruct-write part way through a 600GB move from one disk to another, and this is what I got in stats. Roughly twice the write throughput
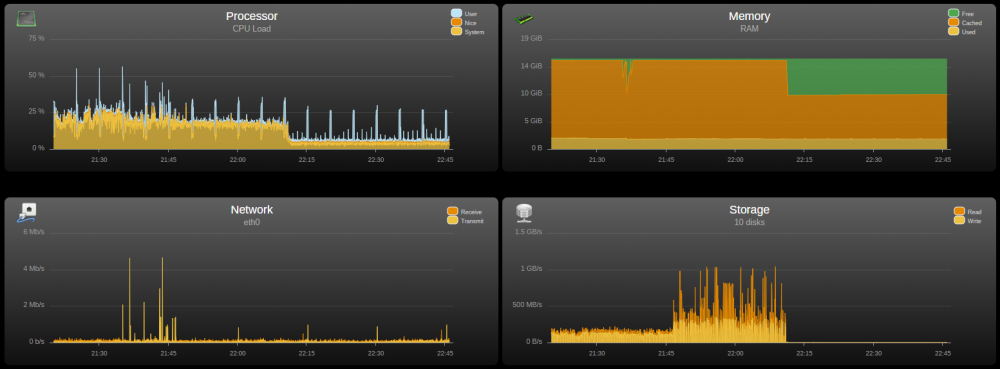
Cacti graphs:
sdc is parity
sdh is the source disk
sdi is the destination disk
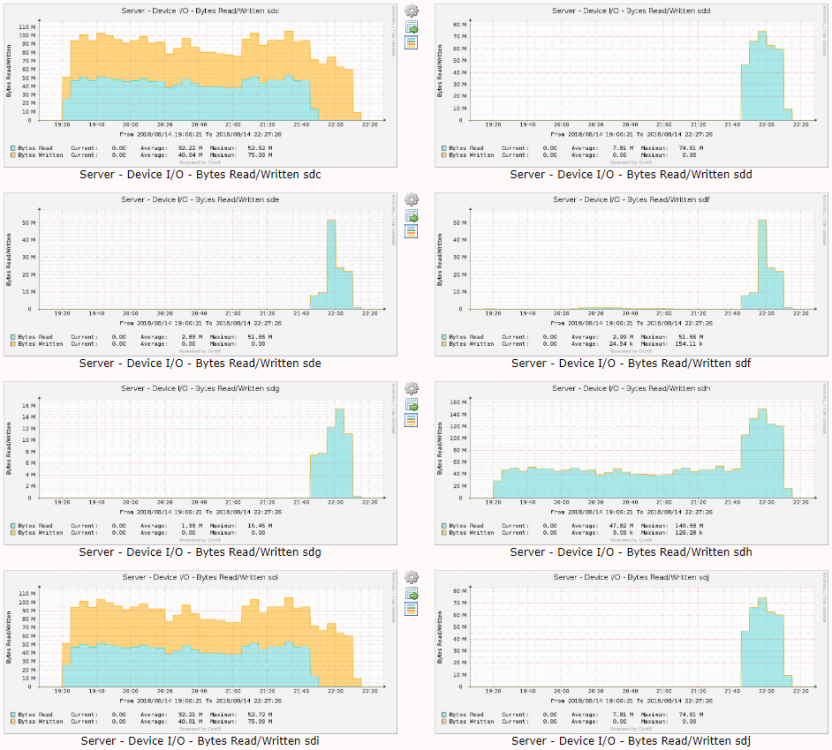
How do you generate these graphics?
-
I configure VMware ESXI and started correctly:
<domain type='kvm' id='1' xmlns:qemu='http://libvirt.org/schemas/domain/qemu/1.0'>
  <name>ESXI</name>
  <uuid>bf8f4db8-e969-ae04-7bec-cdc727ef6349</uuid>
  <metadata>
    <vmtemplate xmlns="unraid" name="Linux" icon="linux.png" os="linux"/>
  </metadata>
  <memory unit='KiB'>11010048</memory>
  <currentMemory unit='KiB'>11010048</currentMemory>
  <memoryBacking>
    <nosharepages/>
  </memoryBacking>
  <vcpu placement='static'>3</vcpu>
  <cputune>
    <vcpupin vcpu='0' cpuset='0'/>
    <vcpupin vcpu='1' cpuset='2'/>
    <vcpupin vcpu='2' cpuset='3'/>
  </cputune>
  <resource>
    <partition>/machine</partition>
  </resource>
  <os>
    <type arch='x86_64' machine='pc-q35-2.11'>hvm</type>
  </os>
  <features>
    <acpi/>
    <apic/>
  </features>
  <cpu mode='host-passthrough' check='none'>
    <topology sockets='1' cores='3' threads='1'/>
  </cpu>
  <clock offset='utc'>
    <timer name='rtc' tickpolicy='catchup'/>
    <timer name='pit' tickpolicy='delay'/>
    <timer name='hpet' present='no'/>
  </clock>
  <on_poweroff>destroy</on_poweroff>
  <on_reboot>restart</on_reboot>
  <on_crash>restart</on_crash>
  <devices>
    <emulator>/usr/local/sbin/qemu</emulator>
    <disk type='file' device='cdrom'>
      <driver name='qemu' type='raw'/>
      <source file='/mnt/user/Almacen/Internet/VMware vSphere/VMware ESXi 6.5/ESXi-6.5.0-20180502001-standard.iso'/>
      <backingStore/>
      <target dev='hda' bus='sata'/>
      <readonly/>
      <boot order='2'/>
      <alias name='sata0-0-0'/>
      <address type='drive' controller='0' bus='0' target='0' unit='0'/>
    </disk>
    <disk type='file' device='disk'>
      <driver name='qemu' type='raw' cache='writeback'/>
      <source file='/mnt/cache/ESXI/VmWare/domains/ESXI/vdisk1.img'/>
      <backingStore/>
      <target dev='hdc' bus='sata'/>
      <boot order='1'/>
      <alias name='sata0-0-2'/>
      <address type='drive' controller='0' bus='0' target='0' unit='2'/>
    </disk>
    <controller type='usb' index='0' model='ich9-ehci1'>
      <alias name='usb'/>
      <address type='pci' domain='0x0000' bus='0x00' slot='0x07' function='0x7'/>
    </controller>
    <controller type='usb' index='0' model='ich9-uhci1'>
      <alias name='usb'/>
      <master startport='0'/>
      <address type='pci' domain='0x0000' bus='0x00' slot='0x07' function='0x0' multifunction='on'/>
    </controller>
    <controller type='usb' index='0' model='ich9-uhci2'>
      <alias name='usb'/>
      <master startport='2'/>
      <address type='pci' domain='0x0000' bus='0x00' slot='0x07' function='0x1'/>
    </controller>
    <controller type='usb' index='0' model='ich9-uhci3'>
      <alias name='usb'/>
      <master startport='4'/>
      <address type='pci' domain='0x0000' bus='0x00' slot='0x07' function='0x2'/>
    </controller>
    <controller type='sata' index='0'>
      <alias name='ide'/>
      <address type='pci' domain='0x0000' bus='0x00' slot='0x1f' function='0x2'/>
    </controller>
    <controller type='pci' index='0' model='pcie-root'>
      <alias name='pcie.0'/>
    </controller>
    <controller type='pci' index='1' model='pcie-root-port'>
      <model name='pcie-root-port'/>
      <target chassis='1' port='0x10'/>
      <alias name='pci.1'/>
      <address type='pci' domain='0x0000' bus='0x00' slot='0x02' function='0x0' multifunction='on'/>
    </controller>
    <controller type='pci' index='2' model='pcie-root-port'>
      <model name='pcie-root-port'/>
      <target chassis='2' port='0x11'/>
      <alias name='pci.2'/>
      <address type='pci' domain='0x0000' bus='0x00' slot='0x02' function='0x1'/>
    </controller>
    <controller type='pci' index='3' model='pcie-root-port'>
      <model name='pcie-root-port'/>
      <target chassis='3' port='0x12'/>
      <alias name='pci.3'/>
      <address type='pci' domain='0x0000' bus='0x00' slot='0x02' function='0x2'/>
    </controller>
    <controller type='pci' index='4' model='pcie-root-port'>
      <model name='pcie-root-port'/>
      <target chassis='4' port='0x13'/>
      <alias name='pci.4'/>
      <address type='pci' domain='0x0000' bus='0x00' slot='0x02' function='0x3'/>
    </controller>
    <controller type='virtio-serial' index='0'>
      <alias name='virtio-serial0'/>
      <address type='pci' domain='0x0000' bus='0x02' slot='0x00' function='0x0'/>
    </controller>
    <interface type='bridge'>
      <mac address='52:54:00:ad:bb:63'/>
      <source bridge='br1'/>
      <target dev='vnet0'/>
      <model type='vmxnet3'/>
      <alias name='net0'/>
      <address type='pci' domain='0x0000' bus='0x01' slot='0x00' function='0x0'/>
    </interface>
    <serial type='pty'>
      <source path='/dev/pts/0'/>
      <target type='isa-serial' port='0'>
        <model name='isa-serial'/>
      </target>
      <alias name='serial0'/>
    </serial>
    <console type='pty' tty='/dev/pts/0'>
      <source path='/dev/pts/0'/>
      <target type='serial' port='0'/>
      <alias name='serial0'/>
    </console>
    <channel type='unix'>
      <source mode='bind' path='/var/lib/libvirt/qemu/channel/target/domain-1-ESXI/org.qemu.guest_agent.0'/>
      <target type='virtio' name='org.qemu.guest_agent.0' state='disconnected'/>
      <alias name='channel0'/>
      <address type='virtio-serial' controller='0' bus='0' port='1'/>
    </channel>
    <input type='tablet' bus='usb'>
      <alias name='input0'/>
      <address type='usb' bus='0' port='1'/>
    </input>
    <input type='mouse' bus='ps2'>
      <alias name='input1'/>
    </input>
    <input type='keyboard' bus='ps2'>
      <alias name='input2'/>
    </input>
    <graphics type='vnc' port='5900' autoport='yes' websocket='5700' listen='0.0.0.0' keymap='es'>
      <listen type='address' address='0.0.0.0'/>
    </graphics>
    <video>
      <model type='qxl' ram='65536' vram='65536' vgamem='16384' heads='1' primary='yes'/>
      <alias name='video0'/>
      <address type='pci' domain='0x0000' bus='0x00' slot='0x01' function='0x0'/>
    </video>
    <memballoon model='virtio'>
      <alias name='balloon0'/>
      <address type='pci' domain='0x0000' bus='0x03' slot='0x00' function='0x0'/>
    </memballoon>
  </devices>
  <seclabel type='dynamic' model='dac' relabel='yes'>
    <label>+0:+100</label>
    <imagelabel>+0:+100</imagelabel>
  </seclabel>
  <qemu:commandline>
    <qemu:arg value='-machine'/>
    <qemu:arg value='vmport=off'/>
  </qemu:commandline>
</domain>
I start the virtual maquine crashed:
Power On VM Clave haTask-2-vim.VirtualMachine.powerOn-119875858 Descripción Enciende esta máquina virtual Máquina virtual CentOS 7 Estado Error - Se produjo un error en el encendido del módulo 'CPUID'. . Errores Se produjo un error en el encendido del módulo 'CPUID'. This virtual machine is configured for 64-bit guest operating systems. However, 64-bit operation is not possible. This host does not support Intel VT-x. Para obtener información más detallada, consulte http://vmware.com/info?id=152. No se pudo iniciar la máquina virtual. -
I have put it in public and I can not use it either.
Every time I'm going to write something through ESXI, it gives an error and disconnects.
Have you been able to solve the problem?Copy Datastore File Clave haTask--vim.FileManager.copyFile-630902455 Descripción Copia el archivo o la carpeta de origen al centro de datos de destino Estado Error - Error provocado por el archivo /vmfs/volumes/658bee17-658405af/Test2_2/Test.nvram. Errores -
If this option is better and faster, because it is not activated by default?
-
On 07/02/2015 at 5:42 PM, Porterhouse said:
To disable power save: /c0/u0 set PSstandbytimer=0
To enable power save: /c0/u0 set PSstandbytimer=5 (Timer can be set 5-999)
To show the timer: /c0/u0 show powersavestandbytimer or /c0/u0 show PSstandbytimer
To check for power save status: /c0/u0 show PSstatus or /c0/u0 show powersavestatus or /c0/u0 show psstatus
If the drives of the unit have spun down and are in standby mode:
/c0/u0 show powersavestatus
/c0/u0 Power Save status = standby
The latest tw_cli may not show the standby status but the older version of tw_cli does.
I have:
/c1 Driver Version = 2.26.02.014
/c1 Model = 9650SE-24M8
/c1 Available Memory = 448MB
/c1 Firmware Version = FE9X 4.10.00.027
/c1 Bios Version = BE9X 4.08.00.004
/c1 Boot Loader Version = BL9X 3.08.00.001
I can not set the shutdown time:
root@nas:~# tw_cli /c1/u0 set PSstandbytimer=0 Error: (CLI:080) Invalid unit set command. -
1 hour ago, jonathanm said:
Ideally, you should either reconfigure your controller to IT mode so the drives identify properly or replace the controller with one that supports IT mode if yours doesn't. Failing that, you can set a new config and put the drives back into their slots, being VERY careful to assign the parity disk correctly. If you accidentally assign a data disk to the parity slot, you WILL lose data.
You should be able to check the setting to tell unraid that parity is already valid, and then do a non-correcting parity check just to be sure.
Is the 3Ware 9650SE-24ML SATA II RAID Controller.
I have tried to configure it as JBOD or as a single disk and in none of the cases the hard disk identifiers appear correctly.
How to make the new configuration without losing data?


[Support] Djoss - Nginx Proxy Manager
in Docker Containers
Posted
Can it be updated to version 2.10.3?