htpcguru

Members
  • Posts

    44
  • Joined

  • Last visited

Everything posted by htpcguru

  1. By reading the two posts above yours. Awesome, that was easy!
  2. root@UnRaid:~# docker inspect -f '{{ index .Config.Labels "build_version" }}' linuxserver/transmission Linuxserver.io version:- 126 Build-date:- June-01-2018-22:08:29-UTC Container version 126 contains Transmission 2.94. I need to downgrade Transmission to 2.93 as one of my trackers rejects the latest Transmission 2.94. How would I do that?
  3. If I specify the vdisk.qcow2 location on KVM/Qemu in /mnt/disk1/... rather than /mnt/user/..., the operations work as expected root@OttSwServer1:~# virsh domblklist Ubuntu-OttSwVM01 Target Source ------------------------------------------------ hdc /mnt/disk1/domains/Ubuntu-OttSwVM01/vdisk1.qcow2 hda /mnt/user/isos/ubuntu-16.04.3-desktop-amd64.iso root@OttSwServer1:~# virsh snapshot-list Ubuntu-OttSwVM01 Name Creation Time State ------------------------------------------------------------ root@OttSwServer1:~# virsh snapshot-create-as --domain "Ubuntu-OttSwVM01" --quiesce --name backup --atomic --disk-onlyDomain snapshot backup created root@OttSwServer1:~# virsh domblklist Ubuntu-OttSwVM01 Target Source ------------------------------------------------ hdc /mnt/disk1/domains/Ubuntu-OttSwVM01/vdisk1.backup hda /mnt/user/isos/ubuntu-16.04.3-desktop-amd64.iso root@OttSwServer1:~# virsh snapshot-list Ubuntu-OttSwVM01 Name Creation Time State ------------------------------------------------------------ backup 2018-04-10 08:46:49 -0700 disk-snapshot root@OttSwServer1:~# virsh blockcommit Ubuntu-OttSwVM01 /mnt/disk1/domains/Ubuntu-OttSwVM01/vdisk1.backup --active --verbose --pivot Block commit: [100 %] Successfully pivoted root@OttSwServer1:~# virsh domblklist Ubuntu-OttSwVM01Target Source ------------------------------------------------ hdc /mnt/disk1/domains/Ubuntu-OttSwVM01/vdisk1.qcow2 hda /mnt/user/isos/ubuntu-16.04.3-desktop-amd64.iso root@OttSwServer1:~# virsh snapshot-list Ubuntu-OttSwVM01 Name Creation Time State ------------------------------------------------------------ backup 2018-04-10 08:46:49 -0700 disk-snapshot root@OttSwServer1:~# Looks like a bug in blockcommit?
  4. I am able to create a snapshot of a running VM. root@OttSwServer1:/mnt/user/domains/Ubuntu-OttSwVM01# virsh snapshot-create-as --domain "Ubuntu-OttSwVM01" --quiesce --name backup --atomic --disk-only Domain snapshot backup created root@OttSwServer1:/mnt/user/domains/Ubuntu-OttSwVM01# ls vdisk1.backup vdisk1.qcow2 root@OttSwServer1:/mnt/user/domains/Ubuntu-OttSwVM01# virsh snapshot-list Ubuntu-OttSwVM01 Name Creation Time State ------------------------------------------------------------ backup 2018-04-10 08:18:15 -0700 disk-snapshot However, when I tried to do blockcommit of the snapshot, it complains about the vdisk location. root@OttSwServer1:/mnt/user/domains/Ubuntu-OttSwVM01# virsh blockcommit Ubuntu-OttSwVM01 /mnt/user/domains/Ubuntu-OttSwVM01/vdisk1.backup --active --verbose --pivot error: internal error: qemu block name '/mnt/disk1/domains/Ubuntu-OttSwVM01/vdisk1.qcow2' doesn't match expected '/mnt/user/domains/Ubuntu-OttSwVM01/vdisk1.qcow2' Looks like blockcommit command looks for the vdisk from actual disk location rather than user share mount. (vdisk1.qcow2 file physical location is on /mnt/disk1) The snapshot xml does have the correct base image path on the user share "/mnt/user" root@OttSwServer1:/mnt/user/domains/Ubuntu-OttSwVM01# virsh snapshot-dumpxml Ubuntu-OttSwVM01 backup | grep disk1 <source file='/mnt/user/domains/Ubuntu-OttSwVM01/vdisk1.backup'/> <source file='/mnt/user/domains/Ubuntu-OttSwVM01/vdisk1.qcow2'/> vdisk files references also look good: root@OttSwServer1:/mnt/user/domains/Ubuntu-OttSwVM01# virsh domblklist Ubuntu-OttSwVM01 Target Source ------------------------------------------------ hdc /mnt/user/domains/Ubuntu-OttSwVM01/vdisk1.backup hda /mnt/user/isos/ubuntu-16.04.3-desktop-amd64.iso Thoughts?
  5. UnRaid defaults to attach a VNC display to each VM so by default you would have a VNC console for each VM. This is also true if you pass-through the GPU, unless you specifically remove the VNC display. As for the GPU-attached display, I can think of 2 possibilities: (1) Use a KVM switch as you envision above. (2) Use a HDMI dummy dongle that emulates an HDMI display (up to 4K 60Hz). This is particularly useful if you stream games to other displays on your LAN. I have used (2) for a gaming VM and worked extremely well when streaming games to other displays in the house.
  6. Thanks for the tip. I replaced the cable AND moved cache2 to another SATA port on the motherboard as the new cable had the same issue. Had to re-install one of the Windows 10 VM's. The original ports are SATA1_2 (with 2 being on top of 1), cache1 still in SATA1, and now I've moved cache2 to SATA3 of SATA3_4. Not sure if SATA2 was the culprit. It's also possible the cache2 SSD could have some H/W issue.
  7. It has happened before. After a power-cycle/SSD re-seat, the cache pool came back alright. Just now one of the Windows 10 VM prompted an updated, which caused a crash of another running Windows 10 VM. After a "forced" reboot of unraid, the cache pool came back unmountable. It has happened before... power-cycling the box and re-seating the 2 SSD's fixed the issue. Any help is appreciated! tower-diagnostics-20170914-2105.zip (Cache pool good) tower-diagnostics-20170924-1601.zip (Cache pool unmountable)
  8. Yes log shows a tonne of read errors. Diagnostics attached. Pre-clearing the spare 2TB now.
  9. After converting all the data disks from Reiserfs to XFS, one of the disks exhibits Sync Errors and Pending Sector Counts. Please see screenshots. I do have another 2TB disk (from the Reiserfs conversion process) that I can use to try swapping this out. What would be the correct troubleshoot procedure?
  10. Thanks for the tip. Now things are much better: root@UnRaid:~# du /mnt/disk3/ -s 1727843185 /mnt/disk3/ root@UnRaid:~# du /mnt/disk4/ -s 1725260516 /mnt/disk4/ Moving onto other Reiserfs disks...
  11. I believe I found where the problem is. Somehow, a vdisk1.img is copied with a much bigger size: root@UnRaid:~# ls -l /mnt/disk4/vm_backup/Windows\ 10\ Workstation/ total 398458884 -rwxrwxrwx 1 root root 408021893120 Mar 1 2016 vdisk1.img* root@UnRaid:~# ls -l /mnt/disk3/vm_backup/Windows\ 10\ Workstation/ total 40994716 -rwxrwxrwx 1 root root 408021893120 Mar 1 2016 vdisk1.img* I know that KVM/Qemu sizes the vm disk dynamically, so that could explain why on disk3 the actual image size of 40994716 is much smaller than the allocated size of 408021893120. However, I cannot explain why the copied image file is not the same size.
  12. I have the same line of thinking - the difference is too much to consider normal. root@UnRaid:/mnt/disk3# find /mnt/disk3 -type f | wc -l 8109 root@UnRaid:/mnt/disk3# find /mnt/disk4 -type f | wc -l 8109
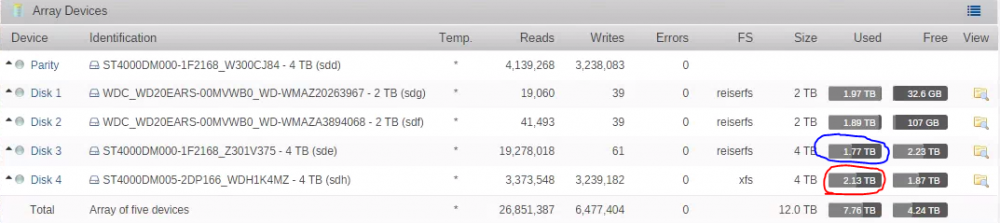
  13. I followed the wiki and step 8 of the first Reiserfs disk is done. However, I notice on the unRaid main page that the used size of the destination XFS disk is larger than the source disk. On the ssh console: root@UnRaid:~# du -s /mnt/disk3 1727843185 /mnt/disk3 root@UnRaid:~# du -s /mnt/disk4 2083663832 /mnt/disk4 root@UnRaid:~# df /mnt/disk3 Filesystem 1K-blocks Used Available Use% Mounted on /dev/md3 3906899292 1727914992 2178984300 45% /mnt/disk3 root@UnRaid:~# df /mnt/disk4 Filesystem 1K-blocks Used Available Use% Mounted on /dev/md4 3905110812 2083701224 1821409588 54% /mnt/disk4 Is this expected? Does XFS use more space than Reiserfs? Please see attached screenshot. The red circle is the used size of the XFS disk (should have the same content of disk3), and blue is the used size of the Reiserfs source disk3.
  14. I have now put a small HDD as an UnRaid data disk (as UnRaid won't proceed without a data drive), and assign the 2 SSD's as RAID0 cache. root@Tower:/mnt# btrfs fi show /mnt/cache Label: none uuid: 90ef06ec-e402-4b2f-9b86-71e9ac2034ca Total devices 2 FS bytes used 206.03GiB devid 1 size 447.13GiB used 107.03GiB path /dev/sdb1 devid 2 size 447.13GiB used 107.03GiB path /dev/sdc1 root@Tower:/mnt# btrfs fi df /mnt/cache Data, RAID0: total=212.00GiB, used=206.03GiB System, RAID1: total=32.00MiB, used=16.00KiB Metadata, RAID1: total=1.00GiB, used=592.00KiB GlobalReserve, single: total=16.00MiB, used=0.00B Any tip on benchmarking the throughput of btrfs RAID0 implementation?
  15. I'm setting up a box purely for gaming VM's. I like UnRaid's VM management interface. I've tried Proxmox which seems to be quite popular, but it is no where near UnRaid's flexibility and user-friendliness. No HDD's for this box, only SSD's. I can simply assign an SSD as a data drive, no parity, no cache, and UnRaid operates VM's happily. Now I've just added another same-sized SSD, and set up an Intel X99 RAID0 volume with the 2 identical SSD's. UnRaid, however, cannot see a single Intel RAID0 volume, instead, it still sees the 2 individual SSD's. I've briefly searched the forum and came across this post. Can someone confirm whether UnRaid works with motherboard or intel chipset H/W Raid?
  16. The ability to spoof vendor_id as hyperV enlightenment to fool Nvidia drivers into loading, is only available for libvirt v 1.3.3 and up.
  17. Clean now root@UnRaid:/mnt/cache# btrfs balance start /mnt/cache/ WARNING: Full balance without filters requested. This operation is very intense and takes potentially very long. It is recommended to use the balance filters to narrow down the balanced data. Use 'btrfs balance start --full-balance' option to skip this warning. The operation will start in 10 seconds. Use Ctrl-C to stop it. 10 9 8 7 6 5 4 3 2 1 Starting balance without any filters. Done, had to relocate 113 out of 113 chunks root@UnRaid:/mnt/cache# btrfs fi show /mnt/cache Label: none uuid: 967e7ee2-326d-40de-b35b-1cd805317520 Total devices 2 FS bytes used 128.99GiB devid 1 size 111.79GiB used 67.06GiB path /dev/sdb1 devid 2 size 111.79GiB used 67.06GiB path /dev/sdg1 root@UnRaid:/mnt/cache# btrfs fi df /mnt/cache Data, RAID0: total=132.06GiB, used=128.96GiB System, RAID1: total=32.00MiB, used=16.00KiB Metadata, RAID1: total=1.00GiB, used=31.36MiB GlobalReserve, single: total=16.00MiB, used=0.00B root@UnRaid:/mnt/cache#
  18. After reducing the cache pool usage to around 90GB which is smaller than a 120GB device, the conversion was successful. Before conversion: root@UnRaid:/mnt/cache# btrfs fi show /mnt/cache Label: none uuid: 967e7ee2-326d-40de-b35b-1cd805317520 Total devices 2 FS bytes used 87.13GiB devid 1 size 111.79GiB used 55.03GiB path /dev/sdb1 devid 2 size 111.79GiB used 56.06GiB path /dev/sdg1 root@UnRaid:/mnt/cache# btrfs fi df /mnt/cache Data, single: total=109.03GiB, used=87.10GiB System, RAID1: total=32.00MiB, used=16.00KiB Metadata, RAID1: total=1.00GiB, used=25.84MiB GlobalReserve, single: total=16.00MiB, used=0.00B Conversion command: root@UnRaid:/mnt/cache# btrfs balance start -dconvert=raid0 -mconvert=raid1 /mnt/cache/ Done, had to relocate 112 out of 112 chunks After conversion: root@UnRaid:/mnt/cache# btrfs fi show /mnt/cache Label: none uuid: 967e7ee2-326d-40de-b35b-1cd805317520 Total devices 2 FS bytes used 87.13GiB devid 1 size 111.79GiB used 110.73GiB path /dev/sdb1 devid 2 size 111.79GiB used 109.73GiB path /dev/sdg1 root@UnRaid:/mnt/cache# btrfs fi df /mnt/cache Data, RAID0: total=218.84GiB, used=87.11GiB Data, single: total=1.00GiB, used=0.00B System, RAID1: total=32.00MiB, used=16.00KiB Metadata, RAID1: total=279.62MiB, used=25.64MiB GlobalReserve, single: total=16.00MiB, used=0.00B Strangely, after conversion, btrfs shows that each device used up ~110GiB. And yet, btrfs df shows Data ... used=87.11GiB. Perhaps a bug in the commands? Anyways, everything seems to be working now, and Cache Data is RAID0.
  19. I moved back a 50GB VM image back to /mnt/cache... the conversion failed probably because of that? I have a hunch that the conversion from Single to RAID0 requires the current usage to be less than the size of a single device. Let me try that...
  20. Got an error after around 10% progress left: root@UnRaid:/mnt/cache# btrfs balance start -dconvert=raid0 -mconvert=raid1 /mnt/cache/ ERROR: error during balancing '/mnt/cache/': No space left on device There may be more info in syslog - try dmesg | tail root@UnRaid:/mnt/cache# btrfs fi show /mnt/cache Label: none uuid: 967e7ee2-326d-40de-b35b-1cd805317520 Total devices 2 FS bytes used 127.16GiB devid 1 size 111.79GiB used 110.79GiB path /dev/sdb1 devid 2 size 111.79GiB used 109.76GiB path /dev/sdg1 root@UnRaid:/mnt/cache# btrfs fi df /mnt/cache Data, RAID0: total=217.52GiB, used=127.14GiB Data, single: total=1.00GiB, used=0.00B System, single: total=32.00MiB, used=16.00KiB Metadata, RAID1: total=1.00GiB, used=25.78MiB GlobalReserve, single: total=16.00MiB, used=0.00B
  21. The disk replacement is successful. One step that I didn't expect to do, however, was to convert the pool to single profile, as when I assigned the second 120GB SSD, UnRaid processed the cache pool as Raid1 profile, to which UnRaid issued a "balance" operation: root@UnRaid:/boot/config/plugins# btrfs fi df /mnt/cache Data, RAID1: total=89.00GiB, used=77.93GiB Data, single: total=10.00GiB, used=8.99GiB System, single: total=32.00MiB, used=16.00KiB Metadata, single: total=1.00GiB, used=24.47MiB GlobalReserve, single: total=16.00MiB, used=0.00B The command to convert to Single profile: root@UnRaid:/boot/config/plugins# btrfs balance start -f -dconvert=single -mconvert=single /mnt/cache/ Done, had to relocate 100 out of 100 chunks ... was only possible after unRaid finished it's own balancing. root@UnRaid:/boot/config/plugins# btrfs fi show /mnt/cache Label: none uuid: 967e7ee2-326d-40de-b35b-1cd805317520 Total devices 2 FS bytes used 87.12GiB devid 1 size 111.79GiB used 50.03GiB path /dev/sdb1 devid 2 size 111.79GiB used 49.00GiB path /dev/sdg1 root@UnRaid:/boot/config/plugins# btrfs fi df /mnt/cache Data, single: total=98.00GiB, used=87.10GiB System, single: total=32.00MiB, used=16.00KiB Metadata, single: total=1.00GiB, used=25.39MiB GlobalReserve, single: total=16.00MiB, used=0.00B Mission accomplished!
  22. Ok looks like the balance step is required root@UnRaid:/mnt/user/cache-backup/domains# btrfs balance start -f /mnt/cache WARNING: Full balance without filters requested. This operation is very intense and takes potentially very long. It is recommended to use the balance filters to narrow down the balanced data. Use 'btrfs balance start --full-balance' option to skip this warning. The operation will start in 10 seconds. Use Ctrl-C to stop it. 10 9 8 7 6 5 4 3 2 1 Starting balance without any filters. Then after 20mins or so root@UnRaid:/mnt/cache# btrfs fi show /mnt/cache/ Label: none uuid: 967e7ee2-326d-40de-b35b-1cd805317520 Total devices 2 FS bytes used 86.30GiB devid 1 size 111.79GiB used 0.00B path /dev/sdb1 devid 2 size 447.13GiB used 89.03GiB path /dev/sdg1 And the removal seems to be doing the right thing now root@UnRaid:/mnt/cache# btrfs device remove /dev/sdg1 /mnt/cache root@UnRaid:/mnt/user/cache-backup/domains# btrfs fi show /mnt/cache Label: none uuid: 967e7ee2-326d-40de-b35b-1cd805317520 Total devices 2 FS bytes used 86.30GiB devid 1 size 111.79GiB used 51.03GiB path /dev/sdb1 devid 2 size 0.00B used 37.00GiB path /dev/sdg1 root@UnRaid:/mnt/user/cache-backup/domains# btrfs fi show /mnt/cache Label: none uuid: 967e7ee2-326d-40de-b35b-1cd805317520 Total devices 2 FS bytes used 87.29GiB devid 1 size 111.79GiB used 66.03GiB path /dev/sdb1 devid 2 size 0.00B used 23.00GiB path /dev/sdg1 And finally... root@UnRaid:/mnt/user/cache-backup/domains# btrfs fi show /mnt/cache Label: none uuid: 967e7ee2-326d-40de-b35b-1cd805317520 Total devices 1 FS bytes used 86.30GiB devid 1 size 111.79GiB used 88.03GiB path /dev/sdb1 root@UnRaid:/mnt/user/cache-backup/domains# Now onto exchanging the disks...
  23. Hmm hit a snag... This is after I trimmed down the cache usage: root@UnRaid:/mnt/cache/domains# btrfs fi show /mnt/cache/ Label: none uuid: 967e7ee2-326d-40de-b35b-1cd805317520 Total devices 2 FS bytes used 86.31GiB devid 1 size 111.79GiB used 108.79GiB path /dev/sdb1 devid 2 size 447.13GiB used 34.00GiB path /dev/sdg1 Somehow, /dev/sdb1 shows 108.79GiB used, when in fact the cache pool is only using 86.31GiB Then, root@UnRaid:/mnt/cache/domains# btrfs device remove /dev/sdg1 /mnt/cache After a few minutes: ERROR: error removing device '/dev/sdg1': No space left on device Now /dev/sdb1 is shown full: root@UnRaid:/mnt/cache# btrfs fi show /mnt/cache/ Label: none uuid: 967e7ee2-326d-40de-b35b-1cd805317520 Total devices 2 FS bytes used 86.30GiB devid 1 size 111.79GiB used 111.79GiB path /dev/sdb1 devid 2 size 447.13GiB used 3.00GiB path /dev/sdg1 Any thoughts?
  24. Ok, right now the cache pool has the following stats root@UnRaid:~# btrfs fi df /mnt/cache Data, single: total=144.78GiB, used=125.84GiB System, single: total=4.00MiB, used=16.00KiB Metadata, single: total=1.01GiB, used=32.42MiB GlobalReserve, single: total=16.00MiB, used=0.00B root@UnRaid:~# btrfs fi show /mnt/cache Label: none uuid: 967e7ee2-326d-40de-b35b-1cd805317520 Total devices 2 FS bytes used 125.87GiB devid 1 size 111.79GiB used 111.79GiB path /dev/sdb1 devid 2 size 447.13GiB used 34.00GiB path /dev/sdg1 I will now backup the whole /mnt/cache, remove an VM image to reduce the cache usage, then follow step 3 and onward of this procedure to remove the 480GB disk.
  25. Ok, let me try to summarize what I should do. [*]I will re-size the 480GB device to 120GB according to the steps above [*]Reduce the cache usage (e.g., move VM images to the array) so that only the 1st 120GB disk is used [*]Shutdown the box, and swap out the 480GB with the 2nd 120GB [*]Turn it back on, fingers acrossed For 2 above, how can I guarantee?