


zakna
Members
-
Joined
-
Last visited
-
@dereitzHappy you found it handy, check also comment from @total with his experiences. About the files, sorry, I don't want to break any copyright. I would recommend you to create your own image, even for security reasons as some unofficial images downloaded from internet may contain malicious code. However, if you don't have an option to create your own image, try to search for "ark:/13960/t5q864f63" or "Windows10PEX86" on google, it should point you to archive.org site, where someone shared one, but it is at your own risk. Or you can try to use Hiren’s BootCD (also at own risk), it is based on windows PE, should do the same job maybe. I didn't test the windows installation from there, but succedded to boot it with following menu: #!ipxe ### ### custom menu ### :start chain --autofree boot.cfg || :custom clear custom_choice menu Menu item --gap item hbcd ${space} Hiren's Boot CD choose custom_choice || goto custom_exit goto ${custom_choice} :hbcd initrd http://10.0.0.16:8080/HBCD/HBCD_PE_x64.iso chain memdisk iso raw || :custom_exit exit
-
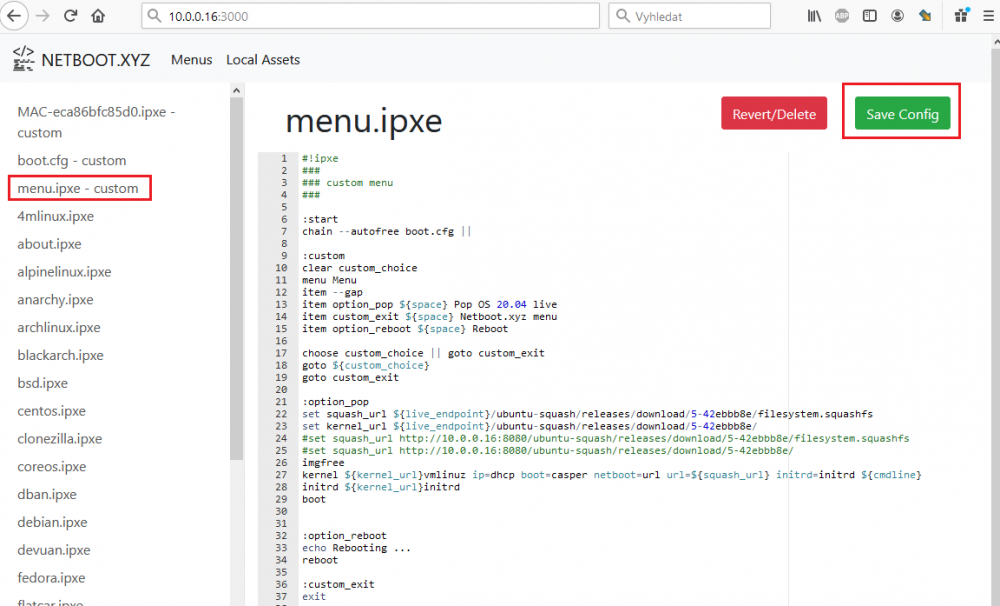
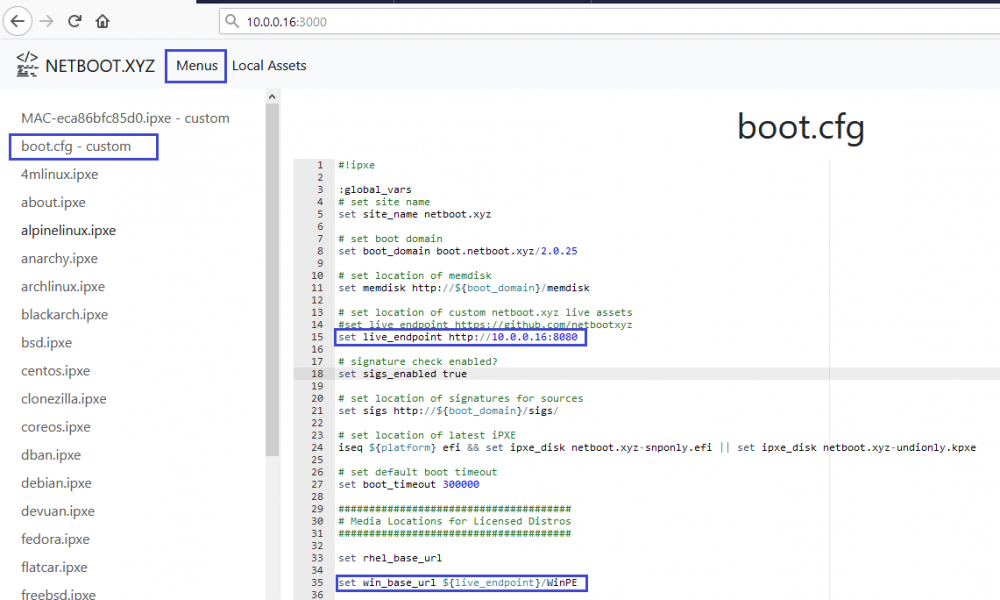
@badsmoke I'm editing the files via web interface, after every change i just "save config". Modified file then change its name to "*.ipxe - custom". See below simple example of custom menu, system then should boot to that custom menu and from that menu you can still exit to netboot default menu (by pressing ESC or by selecting respective menu option) if you need. You can also update default netboot menu with a new menu options of your needs. In boot.cfg file I just update "live_endpoint" and "win_base_url" variables, but this is optional. If variable(s) not updated, you will need to hardcode full path to your boot files (see snapshot below with commented lines 24, 25) otherwise netboot will take the files from "https://github.com/netbootxyz" by default.
-
Based on the output it looks it start to download the image from netboot and then crash at 89%, might be VM related. Do you experience the same problem when you boot it on some different PC? I just tested popos 20.04 (downloaded "pop-20.04-default-squash" (initrd+vmlinuz+filesystem.squashfs) files), works for me (apart that it boots with 2 screens enabled and installation wizard). I used same boot script as in predefined "live-popos.ipxe" menu: set squash_url ${live_endpoint}/ubuntu-squash/releases/download/5-42ebbb8e/filesystem.squashfs set kernel_url ${live_endpoint}/ubuntu-squash/releases/download/5-42ebbb8e/ imgfree kernel ${kernel_url}vmlinuz ip=dhcp boot=casper netboot=url url=${squash_url} initrd=initrd ${cmdline} initrd ${kernel_url}initrd boot
-
What do you mean by this or what is your goal ? If you want to boot your own menu, i'm aware about following 3 solutions: 1) just customize "menu.ipxe" to your needs. You can always revert back to default setup with a single click. 2) create a new ipxe file based on client MAC address (example MAC-1c6f65d1b67e.ipxe) or hostname (HOSTNAME-myhostname.ipxe). Those files/menus will be prioritized during the boot process. 3) update "menu.ipxe" by adding a new item entry, which will point to your custom.ipxe file. item custom-user ${space} Custom menu :custom-user chain custom/custom.ipxe goto main_menu
-
Try to update the menus to latest version. Could be that the newly installed app doesn't have menus pre-installed.

-
boot.cfg should be there by default, didn't create a new one, just edited existing. note: if you are going to update the win_base_url variable, do not put forward slash at the end of the path (see above the post from user total) as some machines might have issue with it
-
Have you "chained" the boot.cfg to your menu script? Following setup works for me: - in the webinterface under "Local Assets" I downloaded "debian-10-live-kernel" (initrd+vmlinuz) and "debian-10-kde-squash" - boot.cfg file updated with: set live_endpoint http://10.0.0.16:8080 - menu.ipxe: #!ipxe ### ### custom menu ### :start chain --autofree boot.cfg || :custom clear custom_choice menu Menu item --gap item option_debian ${space} Debian 10 Kde live item option_reboot ${space} Reboot choose custom_choice || goto custom_exit goto ${custom_choice} goto custom_exit :option_debian set squash_url ${live_endpoint}/debian-squash/releases/download/10.4.0-4403d54d/filesystem.squashfs set kernel_url ${live_endpoint}/debian-core-10/releases/download/10.4.0-a6a0d71a/ imgfree kernel ${kernel_url}vmlinuz ip=dhcp boot=live fetch=${squash_url} initrd=initrd initrd ${kernel_url}initrd boot :option_reboot echo Rebooting ... reboot :custom_exit exit note: in addition to predefined netboot config (live-debian.ipxe), i had to add "ip=dhcp" parametr to the kernel command to make it work note2: the additional param "ip=dhcp" is not needed. The issue I had seems related to my network, sometime dhcp server takes longer than 15s to answer the request, which cause timeout/boot failure. Fixed this problem by param "ethdevice-timeout=40" which extends default 15s timeout to 40s.
-
It is really great. I've managed to create custom menu for specific client machine. Also succeeded to run Kodi/LibreELEC from network boot. Bolow my notes, might be handy for someone. Kodi part: - downloaded official LibreELEC image and extracted it via 7zip to my image folder (/mnt/cache/appdata/iso/LibreELEC-Generic.x86_64-9.2.2 - inside the folder are KERNEL, SYSTEM,.. files). - enabled NFS on my unraid server and set share (share my appdata folder where my image folder is located) - created a new folder for Kodi data/savings (folder system location: /mnt/cache/appdata/Kodi; nfs location: 10.0.0.16:/mnt/user/appdata/Kodi). Once you boot the Kodi, subfolder will be created there with config files. The subfolder will be named based on mac address of the client PC (in my case 1c6f65d1b67e). NETBOOT.XYZ part: - connected via webinterface - under "Menus" created new ipxe file, name of the file has to be in this format "MAC-1c6f65d1b67e.ipxe". This boot file will be then used only for system with the mac address 1c:6f:65:d1:b6:7e. - the customed menu has 4 options (run Kodi, run Win10 install, switch to standard Netboot.xyz menu and Reboot) Content of the MAC-1c6f65d1b67e.ipxe file: #!ipxe :custom clear custom_choice menu Menu for 1c:6f:65:d1:b6:7e item --gap item option_kodi ${space} KODI item option_win ${space} Win10 install item option_netboot ${space} Netboot.xyz menu item option_reboot ${space} Reboot choose custom_choice || goto custom_exit goto ${custom_choice} goto custom_exit :option_kodi set url http://10.0.0.16:8080/LibreELEC-Generic.x86_64-9.2.2/ kernel ${url}KERNEL ip=dhcp boot=NFS=10.0.0.16:/mnt/user/appdata/ISO/LibreELEC-Generic.x86_64-9.2.2 disk=NFS=10.0.0.16:/mnt/user/appdata/Kodi overlay boot || goto custom_exit :option_win set url http://10.0.0.16:8080/Win10_1903_V2/x64 imgfree kernel http://${boot_domain}/wimboot initrd -n bootmgr ${url}/bootmgr bootmgr || initrd -n bootmgr.efi ${url}/bootmgr.efi bootmgr.efi || initrd -n bcd ${url}/boot/bcd bcd || initrd -n bcd ${url}/Boot/BCD bcd || initrd -n boot.sdi ${url}/boot/boot.sdi boot.sdi || initrd -n boot.sdi ${url}/Boot/boot.sdi boot.sdi || initrd -n boot.wim ${url}/sources/boot.wim boot.wim boot :option_reboot echo Rebooting ... reboot :custom_exit exit Here 2 nice tutorials on this topic: https://www.notjustcables.co.nz/blog/index.php?/archives/8-XBMC-using-Network-Boot.html https://blog.linuxserver.io/2019/12/16/netboot-xyz-docker-network-boot-server-pxe/
-
Great job, thank you! I just successfully booted win10 installation image. Few steps, but took me couple of hours to make it work. Here how i configured it: - installed netbootxyz docker (used default settings + mapped "/asset" to my image folder "/mnt/cache/appdata/ISO") - configured my pfsense FW/router via webinterface. Went to services/dhcp server and specified the following options : IP Address of TFTP server (my unraid server IP) Enable network booting yes Next Server (my unraid server IP) Default Bios file name (netboot.xyz.kpxe) - configured NETBOOT.XYZ via webinterface (http://unraid_IP:3000/) - in the file "boot.cfg" located under "Menus" updated variables "live_endpoint" and "win_base_url" as follow: set live_endpoint http://unraid_IP:8080 set win_base_url ${live_endpoint}/WinPE/ - downloaded official win10 x64 iso file and extracted it via 7zip to my image folder (/mnt/cache/appdata/ISO/Win10_1903_V2/x64/). Files had to be place to subfolder x64. note: with normal Win10 iso everything went fine except when I got to the actual install phase, I was getting "A required CD/DVD drive device is missing. If you have a driver floppy disk, CD,DVD, or USB flash drive, please insert it now" message. WinPE image had to be used instead and from WinPE then install any win iso you need. - created Win PE with integrated PowerShell (PowerShell needed for mounting iso images) as per instructions: https://docs.microsoft.com/en-us/windows-hardware/manufacture/desktop/winpe-adding-powershell-support-to-windows-pe - uploaded the Win PE to my image folder (/mnt/cache/appdata/ISO/WinPE/x64/). Files had to be place to subfolder x64. - powered on client PC and forced it to boot from LAN. It booted up to netboot menu where navigated to windows disro - booted WinPE, mounted required win 10 iso file and started the installation: wpeinit (initialize the network) net use z: \\10.0.0.16\appdata\ISO (map z: drive to my samba image folder with official Win 10 image "Win10_1903_V2.iso") PowerShell (run powershell) Mount-DiskImage (mount the official iso win10 file located at z: drive z:\Win10_1903_V2.iso) d:\setup.exe (run win10 installation from the mounted ISO) useful links: https://ipxe.org/howto/winpe https://ipxe.org/wimboot


