


triafgg
Members
-
Joined
-
Last visited
-
All fixed, rebuilt the parity on the original parity disk and now everything is showing as good. Thanks itimpi and JorgeB for your help.
-
Hi again, the rebuild went OK and now can see all data on Disk1, however now my parity disk is showing as not present in the overview but on the disks page shows as present but not spun up with a red cross. Smart test shows no errors so I will rebuild parity to the same disk as suggested earlier for the data disk.
-
I moved it and changed cable to check if the controller slot and cable were OK as easier to replace/move to another slot. I didn't realise that Unraid would mark as failed due to a connection error so maybe rebuilding to the same drive would be OK. Not a problem though as I will now have some extra space on the array. I can keep the old Disk1 as a spare and then I will find out if it is good or bad if another one dies, not a problem as I have others if it is bad. Thanks again.
-
Hi Jorge changed cables and moved to another controller but disk1 still always showing as failed so replaced with new 2TB drive and it is now rebuilding and all data available. It was simply a failed disk, not sure why cache disks(cache and appdata with dockers on) were also unavailable but it is all back now and everything working fine. Thanks for your help.
-
Diagnostics after reboot trunr1-diagnostics-20230819-1237.zip
-
Thanks Jorge. I have rebooted it now, had to force it so unclean shutdown. It is showing as failed disk so I can replace it and rebuild I think.
-
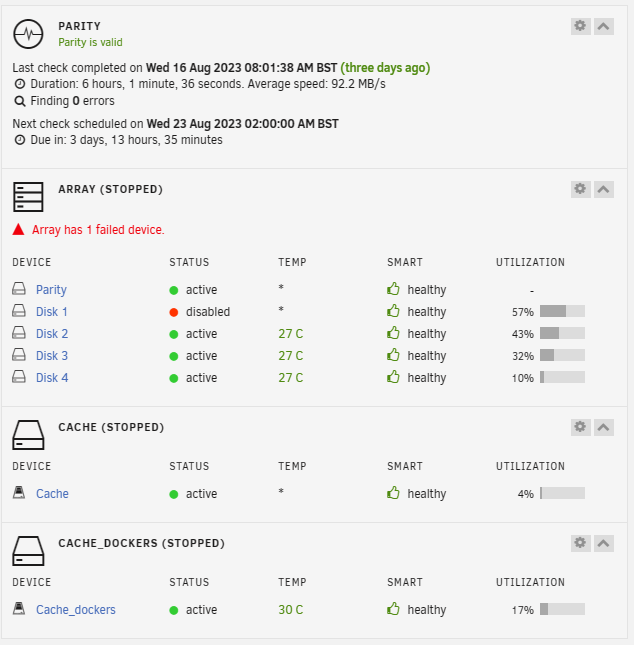
Thank you. Should I just replace the disk anyway as this screenshot attached shows parity as valid.
-
I seem to have an error with one of my disks. I can't shut down the server, shutdown or reboot do nothing. The array is showing as started, unprotected and not showing a valid configuration, any help would be appreciated to get the array running again. I have a 2TB disk to replace Disk 1. trunr1-diagnostics-20230819-1140.zip trunr1-syslog-20230819-1047.zip
-
Many thanks, got that now.
-
Thanks for your reply. So apart from using cache:yes at the beginning would you say that the rest of the procedure is OK? And also disabling the VM service. I got to thinking though, would the domains share better off being cache:only as I want to keep everything on the NVME drives, rather than cache:prefer. I guess set to cache:prefer initially to move the data to cache and set to cache:only when mover complete, is that correct? At the moment all the VMs are on the NVME as it still has spare capacity. I have VM backup backing up the VMs.
-
Hi, hope some one can help. I wish to upgrade my UnRAID and just wanted someone to sanity check that I am doing it correctly. Currently have domains share with VMs on a small NVME drive as a pool device called cache_nvme. Share is set to prefer:cache_nvme. I want to upgrade CPU, MB and add a faster 1TB NVME drive for the domains. Is this the best order of operations. Change domains share to cache No. Run Mover to put share onto array Shutdown array/PC Add new hardware(CPU, MB & 1TB NVME) Restart PC in GUI mode, check disk allocations Add new 1TB NVME to pool devices as cache_nvme2 Start array Change domains share to Prefer:cache_nvme2 Run mover to move domains to 1TB NVME(cache_nvme2). VMs should now be running from 1TB NVME Many thanks in advance

