


Thomas Edain
Members
-
Joined
-
Last visited
Everything posted by Thomas Edain
-
After some adventures, transition is complete. The Unraid part went extremely smooth. Just as @JorgeB mentioned, it was plug and play. Once the CPU, motherboard, memory, PSU and LSI card were changed, I connected the drives, plugged in the USB and that was it. The adventures came more from a defective motherboard that was initially delivered, which made the whole process much longer than it was supposed to be. One note on the LSI card. Seeing much much better speeds on the parity checks. Went up from an average of 40 to almost 100MB/s. Definitely worth it.
-
The LSI card is flashed into IT mode so shouldn't be a problem.
-
Hey everyone, I want to update my server which means basically moving all my drives to a new computer - new CPU, motherboard, LSI card (replacing a PCI Sata controller), RAM and power supply. Basically just the case, HDDs, NVME drives and the USB stick with Unraid will remain :). The question is - should I pay atention to something specific so I do not lose data, or after reassembly and booting up everything should work normally? Any support and knowledge sharing is appreciated. Thank you all!
-
It actually worked fine following the steps. Thanks @itimpi!
-
Hey I am trying to shrink my array by a few drives but I ran into an issue after the first one. Followed the instructions given and everything worked like a charm until I needed to stop the array in order to unassign the disk. Basically the zeroing went smooth, but when wanting to stop the array, it wouldn't stop saying something like "retrying to unmount disk shares". Seeing that didn't work, I performed a clean shutdown from the interface. When the server restarted, I was told it wasn't a clean shutdown and that parity needs to be checked. I stopped the array, unassigned the drive I wanted to remove -- but now basically Unraid is expecting a replacement. A bit stuck on how to continue. Diagnostics attached. tower-diagnostics-20241116-1107.zip
-
Thanks JorgeB for the support. We can close this thread.
-
Unimportant of how big that write is? Thinking of a situation similar to mine where more drives were shown as unmountable because of cabling. If it was between losing the entire volume or just a smaller amount of data, I would definitely opt for the smaller amount of data. Hope it make sense what I am saying. Thanks again for the quick answer and check.
-
Hey! Thanks for taking the time to check the logs. Two follow-up questions if possible: 1. When you say on the pool -- you mean on the cache pool I have right? And I need to do it while being in maintenance mode? 2. I do not get why I got this disabled HDD. If it was a cable problem and somehow the other drives got fixed by moving a bit the cables....why is this remaining one still in disabled?
-
Checked again the cables....didn't do that much in the end, and somehow now only one HDD is shown as disabled besides the one I wanted to replace anyway. Started the rebuild for both as I couldn't enable the disabled one. Here are the logs. tower-diagnostics-20241110-1214.zip
-
Hey, Having quite the adventure here. Since some of my HDDs were getting old I decided to start moving to new ones using Rebuild -- basically pulling one out at a time and letting rebuilding work. Wroked perfectly for the first one, but then when I replace the next one and restarted, all of a suddent 6 drives were marked as missing. Turned off the machine, checked all the cabling again and restarted. All drives, except the one that I wanted to replace showed up fine. I assigned the missing one to the new drive and started the array, only to get the "Unmountable: No file system" error on all 6. Strangely enough rebuilding started. I stopped it and tried to get into maintenance mode but I can't now since it's telling me that too many drives have errors. For sure I cannot rebuild for 6 drives. The most I can is 2 as I have two parity drives. A bit stuck on how to proceed so any help is appreciated. Logs attached. tower-diagnostics-20241110-1016.zip
-
Thank you @Mainfrezzer. That seems to be the case.
-
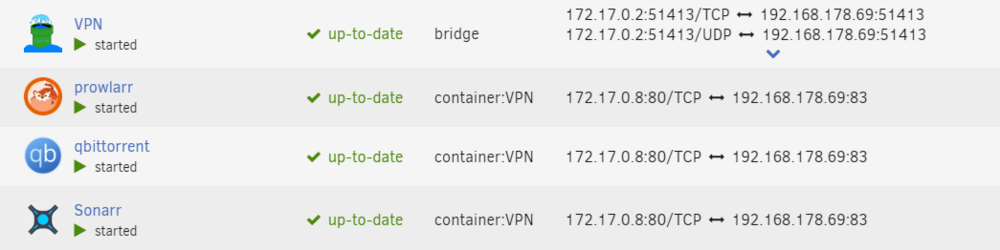
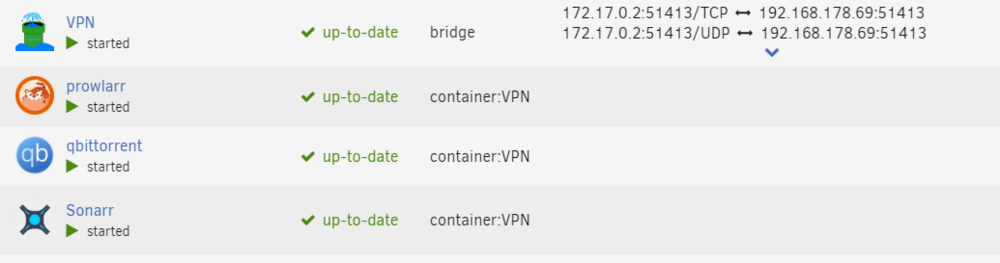
Hey For a while now every time I update or modify a container which is not redirected through the VPN container, the containers from under the VPN all get the same ports of the container that I've updated/modified. This is problematic as I cannot enable auto-update and I am forced to do manual updates after which I need to go to the VPN Container, modify it and save it, which triggers a forced update of the port mappings of all the related containers reseting them. Logs are showing this: After modifying and saving any container not related to the VPN one: Jul 1 19:44:28 Tower kernel: eth0: renamed from vethb08bd1d Jul 1 19:44:41 Tower kernel: vethb08bd1d: renamed from eth0 Jul 1 19:44:59 Tower kernel: veth5616f43: renamed from eth0 Jul 1 19:44:59 Tower kernel: docker0: port 4(vethf316952) entered disabled state Jul 1 19:44:59 Tower kernel: docker0: port 4(vethf316952) entered disabled state Jul 1 19:44:59 Tower kernel: vethf316952 (unregistering): left allmulticast mode Jul 1 19:44:59 Tower kernel: vethf316952 (unregistering): left promiscuous mode Jul 1 19:44:59 Tower kernel: docker0: port 4(vethf316952) entered disabled state Jul 1 19:45:00 Tower kernel: docker0: port 4(vetha56ab64) entered blocking state Jul 1 19:45:00 Tower kernel: docker0: port 4(vetha56ab64) entered disabled state Jul 1 19:45:00 Tower kernel: vetha56ab64: entered allmulticast mode Jul 1 19:45:00 Tower kernel: vetha56ab64: entered promiscuous mode Jul 1 19:45:00 Tower kernel: eth0: renamed from vetha930cba Jul 1 19:45:00 Tower kernel: docker0: port 4(vetha56ab64) entered blocking state Jul 1 19:45:00 Tower kernel: docker0: port 4(vetha56ab64) entered forwarding state After modfying and saving VPN Container: Jul 1 19:51:16 Tower kernel: docker0: port 1(veth2072a9e) entered disabled state Jul 1 19:51:16 Tower kernel: veth146bb87: renamed from eth0 Jul 1 19:51:16 Tower kernel: docker0: port 1(veth2072a9e) entered disabled state Jul 1 19:51:16 Tower kernel: veth2072a9e (unregistering): left allmulticast mode Jul 1 19:51:16 Tower kernel: veth2072a9e (unregistering): left promiscuous mode Jul 1 19:51:16 Tower kernel: docker0: port 1(veth2072a9e) entered disabled state Jul 1 19:51:16 Tower kernel: docker0: port 1(vetheed5be8) entered blocking state Jul 1 19:51:16 Tower kernel: docker0: port 1(vetheed5be8) entered disabled state Jul 1 19:51:16 Tower kernel: vetheed5be8: entered allmulticast mode Jul 1 19:51:16 Tower kernel: vetheed5be8: entered promiscuous mode Jul 1 19:51:16 Tower kernel: eth0: renamed from veth61e4a1b Jul 1 19:51:16 Tower kernel: docker0: port 1(vetheed5be8) entered blocking state Jul 1 19:51:16 Tower kernel: docker0: port 1(vetheed5be8) entered forwarding state Any help is appreciated!
-
@JorgeB - attached you have the syslog as I just had a freeze. @gloeckle When it comes to CPU load average what I did a few days ago is to restrict partially access of docker containers to CPU cores, always keep 2 cores and 2 threads open. Obviously it didn't help. I will try what you suggested.
-
Just want to add to this topic as it keeps happening to me as well. I've had to to do several hard reboots lately which is making the whole system unreliable. These are other similar reports on the same topic:


