





Dacilla
Members
-
Joined
-
Last visited
-
Yup, tried both with VFIO bound and unbound. The update to 6.10 wasn't the fix because it was behaving identically before and after the update.
-
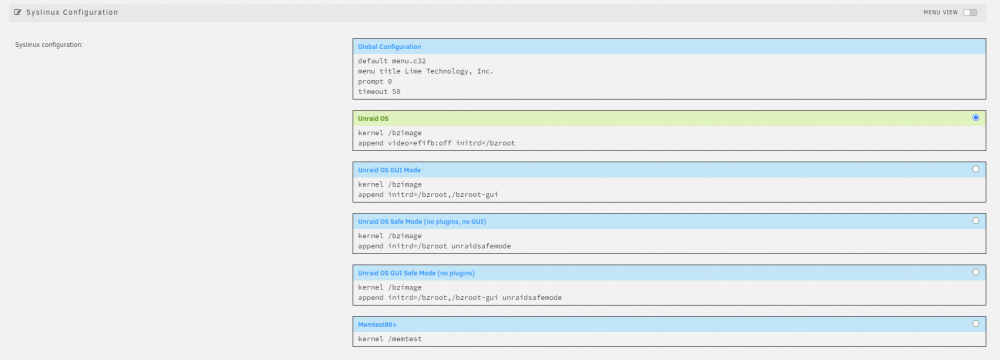
I have since fixed this. Here's a writeup on what changes I made to fix it. Big thanks to @own on the Unraid Discord for their help: Update Unraid. I was on 6.9.2, now on 6.10.3. Make sure your motherboard is in full UEFI mode. It will probably be that way by default, but worth a check. If you're not sure how to check, look up your motherboard vendor on Google as they will probably do it the same on all their recent boards. For me it was already enabled. Make sure resizeable BAR is disabled, again look up your motherboard vendor for where they keep the setting. The VM should have the following settings: BIOS: OVMF Machine: The latest Q35 Don't use a GPU BIOS, that seems to have been phased out and is now unnecessary. If you are passing through the only GPU in your system (so in my case, I don't have an iGPU, and only one dGPU), you must: From the web UI, go to main > flash > syslinux configuration Edit the Unraid OS section (or whichever one you use) to add 'video=efifb:off' to the append. So for me it looks like this: This forces unraid to not interact with the GPU. Unraid won't display on the GPU anymore. Once you have created the VM and have confirmed it posts, DON'T LET IT UPDATE OR INSTALL DRIVERS. First you must do a complete shutdown from within the VM, and then restart it from Unraid. I accidentally installed video drivers before I was told not to, but it was recoverable. The screen went black and unresponsive like before, but in Unraid I could see disk usage spikes from the VM installing the drivers. I gave it enough time until I was sure it was finished, then forced shut down the VM. I then had to reboot Unraid, and create a new VM from scratch, but I pointed the vdisk location to the old image, allowing me to pick up from where I left off with the video drivers installed. This is what the VM looks like: (NOTE: This was only possible because my old image was created with a UEFI BIOS and OVMF, if yours is different it might be a different story) From there, Windows should work and accept drivers and updates fine Again, big thanks to @own on the Unraid Discord, you saved me from crying because I was starting to think I spent almost $2000 on an idea that wasn't going to work

-
Hi, I am very new to unraid, only been using it for a few days. I've set up a Windows 10 Pro VM, passing through my GTX 1050. When I start the VM for the first time, it loads windows fine, installs, and I get to the desktop. I then start downloading updates and drivers. This is where I think the problem comes from, because not long after that, the screen goes black and the VM becomes unresponsive. The only way I've been able to get display back is to recreate the VM. My GPU's vBIOS was made following: I have tried rolling back by motherboard's BIOS to use an older version of AGESA Any help would be appreciated Logs: Win10 VM: ErrorWarningSystemArrayLogin -device pcie-root-port,port=0x10,chassis=1,id=pci.1,bus=pcie.0,multifunction=on,addr=0x2 \ -device pcie-root-port,port=0x11,chassis=2,id=pci.2,bus=pcie.0,addr=0x2.0x1 \ -device pcie-root-port,port=0x12,chassis=3,id=pci.3,bus=pcie.0,addr=0x2.0x2 \ -device pcie-root-port,port=0x13,chassis=4,id=pci.4,bus=pcie.0,addr=0x2.0x3 \ -device pcie-root-port,port=0x14,chassis=5,id=pci.5,bus=pcie.0,addr=0x2.0x4 \ -device pcie-root-port,port=0x8,chassis=6,id=pci.6,bus=pcie.0,addr=0x1 \ -device pcie-pci-bridge,id=pci.7,bus=pci.1,addr=0x0 \ -device qemu-xhci,p2=15,p3=15,id=usb,bus=pcie.0,addr=0x7 \ -device virtio-serial-pci,id=virtio-serial0,bus=pci.2,addr=0x0 \ -blockdev '{"driver":"file","filename":"/mnt/disks/SN214408908173/Windows 10/Windows 10/vdisk1.img","node-name":"libvirt-3-storage","cache":{"direct":false,"no-flush":false},"auto-read-only":true,"discard":"unmap"}' \ -blockdev '{"node-name":"libvirt-3-format","read-only":false,"cache":{"direct":false,"no-flush":false},"driver":"raw","file":"libvirt-3-storage"}' \ -device virtio-blk-pci,bus=pci.4,addr=0x0,drive=libvirt-3-format,id=virtio-disk2,bootindex=1,write-cache=on \ -blockdev '{"driver":"file","filename":"/mnt/user/GeneralData/ISOs/Windows.iso","node-name":"libvirt-2-storage","auto-read-only":true,"discard":"unmap"}' \ -blockdev '{"node-name":"libvirt-2-format","read-only":true,"driver":"raw","file":"libvirt-2-storage"}' \ -device ide-cd,bus=ide.0,drive=libvirt-2-format,id=sata0-0-0,bootindex=2 \ -blockdev '{"driver":"file","filename":"/mnt/user/isos/virtio-win-0.1.190-1.iso","node-name":"libvirt-1-storage","auto-read-only":true,"discard":"unmap"}' \ -blockdev '{"node-name":"libvirt-1-format","read-only":true,"driver":"raw","file":"libvirt-1-storage"}' \ -device ide-cd,bus=ide.1,drive=libvirt-1-format,id=sata0-0-1 \ -netdev tap,fd=33,id=hostnet0 \ -device virtio-net,netdev=hostnet0,id=net0,mac=52:54:00:c7:55:a7,bus=pci.3,addr=0x0 \ -chardev pty,id=charserial0 \ -device isa-serial,chardev=charserial0,id=serial0 \ -chardev socket,id=charchannel0,fd=35,server,nowait \ -device virtserialport,bus=virtio-serial0.0,nr=1,chardev=charchannel0,id=channel0,name=org.qemu.guest_agent.0 \ -device usb-tablet,id=input0,bus=usb.0,port=1 \ -device vfio-pci,host=0000:06:00.0,id=hostdev0,bus=pci.5,addr=0x0,romfile=/mnt/user/GeneralData/ISOs/Gigabyte.GTX1050.2048.170519.dump \ -device vfio-pci,host=0000:06:00.1,id=hostdev1,bus=pci.6,addr=0x0 \ -device usb-host,hostbus=1,hostaddr=2,id=hostdev2,bus=usb.0,port=2 \ -device usb-host,hostbus=1,hostaddr=4,id=hostdev3,bus=usb.0,port=3 \ -sandbox on,obsolete=deny,elevateprivileges=deny,spawn=deny,resourcecontrol=deny \ -msg timestamp=on 2022-09-01 08:37:04.416+0000: Domain id=1 is tainted: high-privileges 2022-09-01 08:37:04.416+0000: Domain id=1 is tainted: host-cpu char device redirected to /dev/pts/0 (label charserial0) 2022-09-01T08:37:29.954807Z qemu-system-x86_64: vfio: Unable to power on device, stuck in D3 2022-09-01T08:37:29.958819Z qemu-system-x86_64: vfio: Unable to power on device, stuck in D3 2022-09-01T08:37:31.023003Z qemu-system-x86_64: vfio: Unable to power on device, stuck in D3 2022-09-01T08:37:31.026925Z qemu-system-x86_64: vfio: Unable to power on device, stuck in D3 2022-09-01T08:38:29.877191Z qemu-system-x86_64: terminating on signal 15 from pid 6158 (/usr/sbin/libvirtd) 2022-09-01 08:38:32.680+0000: shutting down, reason=destroyed Setup: Model: Custom M/B: ASRock B550 Pro4 Version - s/n: M80-E5010100483 BIOS: American Megatrends International, LLC. Version L2.22. Dated: 05/17/2022 CPU: AMD Ryzen 5 3600 6-Core @ 3600 MHz HVM: Enabled IOMMU: Enabled Cache: 384 KiB, 3 MB, 32 MB Memory: 16 GiB DDR4 (max. installable capacity 128 GiB) Network: bond0: fault-tolerance (active-backup), mtu 1500 eth0: 1000 Mbps, full duplex, mtu 1500 Kernel: Linux 5.10.28-Unraid x86_64 OpenSSL: 1.1.1j lore-diagnostics-20220901-1854.zip


