





Jerlam
Members
-
Joined
-
Last visited
Everything posted by Jerlam
-
Hi, I am having the exact same issue, the GUI is not working anymore eventhough the container seems to be running smoothly. I didnt change any setting for more than a year
-
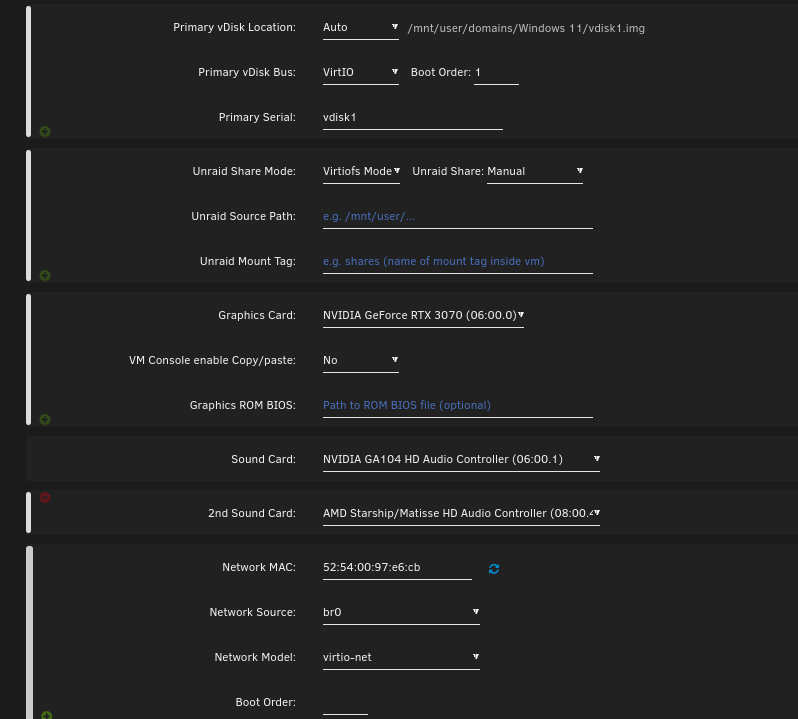
@SpaceInvaderOne I actually added the MB audio because that's the only chance I had in previous tests to have audio working. It works, I have the sound on. However, I have now an even worse issue, my GPU is not detected in my VM anymore. I clean reinstalled my VM because I switched my VM drive, everything was working fine and all, I installed my Nvidia drivers. My GPU was detected until (I suspect) I added the MB audio to the VM config, which i forgot because I realised I had no sound, but since then I am unable to see my GPU in my VM. I realised that everytime I change of video/audio in my VM config, the next time I run the VM nothing works as it used to be, even when I revert the changes. I usually keep a copy of my xml config file before any modif, but this time I forgot, and my GPU is gone. Do you think you can tell me if you see something wrong in my config please?
-
Hi, I have passed through my GPU and my audio hardware as you can see in the image, but I have no sound in my VM, maybe a problem of drivers? Here is my config:
-
Ok I see, but sadly it is not that, I am probably wrong. I think I loaded the wrong drivers during windows installation at the disk partition step, maybe my pb is coming from this, I am trying to reinstall W11 and keep up to date.
-
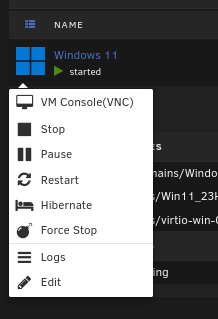
Is there not another option to run VNC beside console? I am pretty sure there was another option beside VNC console. Either ways, I cannot connect to my VM anymore and I didnt change any VM settings in unraid.
-
Hi, I reinstalled my w11 VM, I booted the first via VNC for the installation, but then when I shutdown my VM via window, I cannot run the VM via VNC anymore, the option is gone I can only run "VM console(VNC)", which tells me "Guest has not initialized the display (yet)". Could someone help me please? Here is my config: <?xml version='1.0' encoding='UTF-8'?> <domain type='kvm'> <name>Windows 11</name> <uuid>00f916e0-04c9-6f46-3382-9601517f432c</uuid> <metadata> <vmtemplate xmlns="unraid" name="Windows 11" icon="windows11.png" os="windowstpm"/> </metadata> <memory unit='KiB'>22020096</memory> <currentMemory unit='KiB'>22020096</currentMemory> <memoryBacking> <nosharepages/> </memoryBacking> <vcpu placement='static'>10</vcpu> <cputune> <vcpupin vcpu='0' cpuset='3'/> <vcpupin vcpu='1' cpuset='11'/> <vcpupin vcpu='2' cpuset='4'/> <vcpupin vcpu='3' cpuset='12'/> <vcpupin vcpu='4' cpuset='5'/> <vcpupin vcpu='5' cpuset='13'/> <vcpupin vcpu='6' cpuset='6'/> <vcpupin vcpu='7' cpuset='14'/> <vcpupin vcpu='8' cpuset='7'/> <vcpupin vcpu='9' cpuset='15'/> </cputune> <os> <type arch='x86_64' machine='pc-q35-7.1'>hvm</type> <loader readonly='yes' type='pflash'>/usr/share/qemu/ovmf-x64/OVMF_CODE-pure-efi-tpm.fd</loader> <nvram>/etc/libvirt/qemu/nvram/00f916e0-04c9-6f46-3382-9601517f432c_VARS-pure-efi-tpm.fd</nvram> </os> <features> <acpi/> <apic/> <hyperv mode='custom'> <relaxed state='on'/> <vapic state='on'/> <spinlocks state='on' retries='8191'/> <vendor_id state='on' value='none'/> </hyperv> </features> <cpu mode='host-passthrough' check='none' migratable='on'> <topology sockets='1' dies='1' cores='5' threads='2'/> <cache mode='passthrough'/> <feature policy='require' name='topoext'/> </cpu> <clock offset='localtime'> <timer name='hypervclock' present='yes'/> <timer name='hpet' present='no'/> </clock> <on_poweroff>destroy</on_poweroff> <on_reboot>restart</on_reboot> <on_crash>restart</on_crash> <devices> <emulator>/usr/local/sbin/qemu</emulator> <disk type='file' device='disk'> <driver name='qemu' type='raw' cache='writeback'/> <source file='/mnt/user/domains/Windows 11/vdisk1.img'/> <target dev='hdc' bus='virtio'/> <serial>vdisk1</serial> <boot order='1'/> <address type='pci' domain='0x0000' bus='0x04' slot='0x00' function='0x0'/> </disk> <disk type='file' device='cdrom'> <driver name='qemu' type='raw'/> <source file='/mnt/user/isos/Win11_23H2_EnglishInternational_x64v2.iso'/> <target dev='hda' bus='sata'/> <readonly/> <boot order='2'/> <address type='drive' controller='0' bus='0' target='0' unit='0'/> </disk> <disk type='file' device='cdrom'> <driver name='qemu' type='raw'/> <source file='/mnt/user/isos/virtio-win-0.1.248-1.iso'/> <target dev='hdb' bus='sata'/> <readonly/> <address type='drive' controller='0' bus='0' target='0' unit='1'/> </disk> <controller type='usb' index='0' model='ich9-ehci1'> <address type='pci' domain='0x0000' bus='0x00' slot='0x07' function='0x7'/> </controller> <controller type='usb' index='0' model='ich9-uhci1'> <master startport='0'/> <address type='pci' domain='0x0000' bus='0x00' slot='0x07' function='0x0' multifunction='on'/> </controller> <controller type='usb' index='0' model='ich9-uhci2'> <master startport='2'/> <address type='pci' domain='0x0000' bus='0x00' slot='0x07' function='0x1'/> </controller> <controller type='usb' index='0' model='ich9-uhci3'> <master startport='4'/> <address type='pci' domain='0x0000' bus='0x00' slot='0x07' function='0x2'/> </controller> <controller type='pci' index='0' model='pcie-root'/> <controller type='pci' index='1' model='pcie-root-port'> <model name='pcie-root-port'/> <target chassis='1' port='0x9'/> <address type='pci' domain='0x0000' bus='0x00' slot='0x01' function='0x1'/> </controller> <controller type='pci' index='2' model='pcie-root-port'> <model name='pcie-root-port'/> <target chassis='2' port='0xa'/> <address type='pci' domain='0x0000' bus='0x00' slot='0x01' function='0x2'/> </controller> <controller type='pci' index='3' model='pcie-root-port'> <model name='pcie-root-port'/> <target chassis='3' port='0xc'/> <address type='pci' domain='0x0000' bus='0x00' slot='0x01' function='0x4'/> </controller> <controller type='pci' index='4' model='pcie-root-port'> <model name='pcie-root-port'/> <target chassis='4' port='0x13'/> <address type='pci' domain='0x0000' bus='0x00' slot='0x02' function='0x3'/> </controller> <controller type='pci' index='5' model='pcie-root-port'> <model name='pcie-root-port'/> <target chassis='5' port='0x14'/> <address type='pci' domain='0x0000' bus='0x00' slot='0x02' function='0x4'/> </controller> <controller type='pci' index='6' model='pcie-root-port'> <model name='pcie-root-port'/> <target chassis='6' port='0x8'/> <address type='pci' domain='0x0000' bus='0x00' slot='0x01' function='0x0' multifunction='on'/> </controller> <controller type='pci' index='7' model='pcie-root-port'> <model name='pcie-root-port'/> <target chassis='7' port='0xb'/> <address type='pci' domain='0x0000' bus='0x00' slot='0x01' function='0x3'/> </controller> <controller type='pci' index='8' model='pcie-to-pci-bridge'> <model name='pcie-pci-bridge'/> <address type='pci' domain='0x0000' bus='0x01' slot='0x00' function='0x0'/> </controller> <controller type='virtio-serial' index='0'> <address type='pci' domain='0x0000' bus='0x02' slot='0x00' function='0x0'/> </controller> <controller type='sata' index='0'> <address type='pci' domain='0x0000' bus='0x00' slot='0x1f' function='0x2'/> </controller> <interface type='bridge'> <mac address='52:54:00:98:2a:ba'/> <source bridge='br0'/> <model type='virtio-net'/> <address type='pci' domain='0x0000' bus='0x03' slot='0x00' function='0x0'/> </interface> <serial type='pty'> <target type='isa-serial' port='0'> <model name='isa-serial'/> </target> </serial> <console type='pty'> <target type='serial' port='0'/> </console> <channel type='unix'> <target type='virtio' name='org.qemu.guest_agent.0'/> <address type='virtio-serial' controller='0' bus='0' port='1'/> </channel> <input type='tablet' bus='usb'> <address type='usb' bus='0' port='1'/> </input> <input type='mouse' bus='ps2'/> <input type='keyboard' bus='ps2'/> <tpm model='tpm-tis'> <backend type='emulator' version='2.0' persistent_state='yes'/> </tpm> <graphics type='vnc' port='-1' autoport='yes' websocket='-1' listen='0.0.0.0' keymap='en-us'> <listen type='address' address='0.0.0.0'/> </graphics> <audio id='1' type='none'/> <video> <model type='qxl' ram='65536' vram='65536' vgamem='16384' heads='1' primary='yes'/> <address type='pci' domain='0x0000' bus='0x08' slot='0x01' function='0x0'/> </video> <memballoon model='virtio'> <address type='pci' domain='0x0000' bus='0x05' slot='0x00' function='0x0'/> </memballoon> </devices> </domain>
-
Indeed, I had misunderstood. I have just watched a video and it makes so much more sense now! Thanks guys for your replies and explanations. About my old HDDs though, I am for now experimenting with my NAS, setting up a media server for streaming, running some docker containers for testing, installing some plugins and all. Only once I got the hand of it will I start moving my precious data into it, and probably invest in some new HDD beforehand. Thanks again
-
Hello, I have just set up my very first NAS. Right now it is made up of 1Tb parity drive and 1Tb data drive (+ 500Gb cache). However, I have several smaller drives that I'd like to add to my array, 2 x 300Gb drives. But since my parity drive is only 1Gb, I know that I cannot expand my array. I would need to increase my parity drive, but since my biggest drive is 1Tb, and it is already used for parity, I cannot do it. My understanding is quite limited, and from what I read, I cannot have one parity made up of 2 drives: 1Tb + 300Gb, then same for data drives: 1Tb + 300Gb. Am I right? If so, can I achieve my goal somehow? Thanks in advance
