


Hellesylt
Members
-
Joined
-
Last visited
-
Thank you so much! For future dummies like me: Use the haos_ova-9.5.qcow2 Virtual Disk file from Home Assistant Github.
-
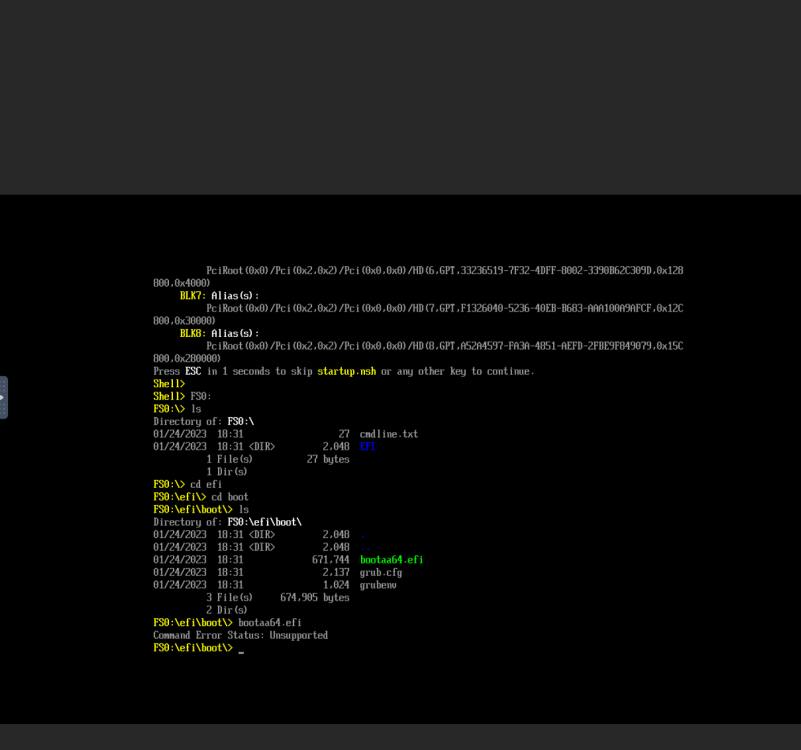
I tried this and still no luck. Attached are the commands i used and the error message.
-
Hi, as stated above i have tried to change the disk type to SATA before making the vm and after using the UI edit. Still same issue
-
VM log if that is helpful: text error warn system array login 2023-02-21 11:19:28.563+0000: starting up libvirt version: 8.7.0, qemu version: 7.1.0, kernel: 5.19.17-Unraid, hostname: Poseidon LC_ALL=C \ PATH=/bin:/sbin:/usr/bin:/usr/sbin \ HOME='/var/lib/libvirt/qemu/domain-1-Home Assistant' \ XDG_DATA_HOME='/var/lib/libvirt/qemu/domain-1-Home Assistant/.local/share' \ XDG_CACHE_HOME='/var/lib/libvirt/qemu/domain-1-Home Assistant/.cache' \ XDG_CONFIG_HOME='/var/lib/libvirt/qemu/domain-1-Home Assistant/.config' \ /usr/local/sbin/qemu \ -name 'guest=Home Assistant,debug-threads=on' \ -S \ -object '{"qom-type":"secret","id":"masterKey0","format":"raw","file":"/var/lib/libvirt/qemu/domain-1-Home Assistant/master-key.aes"}' \ -blockdev '{"driver":"file","filename":"/usr/share/qemu/ovmf-x64/OVMF_CODE-pure-efi.fd","node-name":"libvirt-pflash0-storage","auto-read-only":true,"discard":"unmap"}' \ -blockdev '{"node-name":"libvirt-pflash0-format","read-only":true,"driver":"raw","file":"libvirt-pflash0-storage"}' \ -blockdev '{"driver":"file","filename":"/etc/libvirt/qemu/nvram/8e54c8a9-03e2-4730-d5ba-f5588684bb59_VARS-pure-efi.fd","node-name":"libvirt-pflash1-storage","auto-read-only":true,"discard":"unmap"}' \ -blockdev '{"node-name":"libvirt-pflash1-format","read-only":false,"driver":"raw","file":"libvirt-pflash1-storage"}' \ -machine pc-q35-7.1,usb=off,dump-guest-core=off,mem-merge=off,memory-backend=pc.ram,pflash0=libvirt-pflash0-format,pflash1=libvirt-pflash1-format \ -accel kvm \ -cpu host,migratable=on,host-cache-info=on,l3-cache=off \ -m 4096 \ -object '{"qom-type":"memory-backend-ram","id":"pc.ram","size":4294967296}' \ -overcommit mem-lock=off \ -smp 2,sockets=1,dies=1,cores=2,threads=1 \ -uuid 8e54c8a9-03e2-4730-d5ba-f5588684bb59 \ -no-user-config \ -nodefaults \ -chardev socket,id=charmonitor,fd=36,server=on,wait=off \ -mon chardev=charmonitor,id=monitor,mode=control \ -rtc base=utc,driftfix=slew \ -global kvm-pit.lost_tick_policy=delay \ -no-hpet \ -no-shutdown \ -boot strict=on \ -device '{"driver":"pcie-root-port","port":16,"chassis":1,"id":"pci.1","bus":"pcie.0","multifunction":true,"addr":"0x2"}' \ -device '{"driver":"pcie-root-port","port":17,"chassis":2,"id":"pci.2","bus":"pcie.0","addr":"0x2.0x1"}' \ -device '{"driver":"pcie-root-port","port":18,"chassis":3,"id":"pci.3","bus":"pcie.0","addr":"0x2.0x2"}' \ -device '{"driver":"pcie-root-port","port":19,"chassis":4,"id":"pci.4","bus":"pcie.0","addr":"0x2.0x3"}' \ -device '{"driver":"pcie-root-port","port":20,"chassis":5,"id":"pci.5","bus":"pcie.0","addr":"0x2.0x4"}' \ -device '{"driver":"ich9-usb-ehci1","id":"usb","bus":"pcie.0","addr":"0x7.0x7"}' \ -device '{"driver":"ich9-usb-uhci1","masterbus":"usb.0","firstport":0,"bus":"pcie.0","multifunction":true,"addr":"0x7"}' \ -device '{"driver":"ich9-usb-uhci2","masterbus":"usb.0","firstport":2,"bus":"pcie.0","addr":"0x7.0x1"}' \ -device '{"driver":"ich9-usb-uhci3","masterbus":"usb.0","firstport":4,"bus":"pcie.0","addr":"0x7.0x2"}' \ -device '{"driver":"virtio-serial-pci","id":"virtio-serial0","bus":"pci.2","addr":"0x0"}' \ -blockdev '{"driver":"file","filename":"/mnt/user/domains/home_assistant/haos_generic-aarch64-9.5.qcow2","node-name":"libvirt-1-storage","cache":{"direct":false,"no-flush":false},"auto-read-only":true,"discard":"unmap"}' \ -blockdev '{"node-name":"libvirt-1-format","read-only":false,"cache":{"direct":false,"no-flush":false},"driver":"qcow2","file":"libvirt-1-storage","backing":null}' \ -device '{"driver":"virtio-blk-pci","bus":"pci.3","addr":"0x0","drive":"libvirt-1-format","id":"virtio-disk2","bootindex":1,"write-cache":"on"}' \ -netdev tap,fd=37,id=hostnet0 \ -device '{"driver":"virtio-net","netdev":"hostnet0","id":"net0","mac":"52:54:00:ff:4e:c6","bus":"pci.1","addr":"0x0"}' \ -chardev pty,id=charserial0 \ -device '{"driver":"isa-serial","chardev":"charserial0","id":"serial0","index":0}' \ -chardev socket,id=charchannel0,fd=35,server=on,wait=off \ -device '{"driver":"virtserialport","bus":"virtio-serial0.0","nr":1,"chardev":"charchannel0","id":"channel0","name":"org.qemu.guest_agent.0"}' \ -device '{"driver":"usb-tablet","id":"input0","bus":"usb.0","port":"1"}' \ -audiodev '{"id":"audio1","driver":"none"}' \ -vnc 0.0.0.0:0,websocket=5700,audiodev=audio1 \ -k en-us \ -device '{"driver":"qxl-vga","id":"video0","max_outputs":1,"ram_size":67108864,"vram_size":67108864,"vram64_size_mb":0,"vgamem_mb":16,"bus":"pcie.0","addr":"0x1"}' \ -device '{"driver":"virtio-balloon-pci","id":"balloon0","bus":"pci.4","addr":"0x0"}' \ -sandbox on,obsolete=deny,elevateprivileges=deny,spawn=deny,resourcecontrol=deny \ -msg timestamp=on char device redirected to /dev/pts/0 (label charserial0) qxl_send_events: spice-server bug: guest stopped, ignoring
-
Hi, i have recently installed Unraid on my old Lenovo pc. Unraid is up and running, but i have a problem when i try to install Home Assistant using a VM. Not sure if this is the correct place to post this, but hopefully someone smarter than me has allready been trough this. I have allready checked that i use the correct info, when i make the VM. Using Xcow2 vm file Using 2 Cores CPU RAM: 2048-4096 And have tried using SATA as well as VirtIO as Primary vDisk Bus. Attached are a picture of my Unraid VM info. This is where the OS wont boot, it’s stuck in this BIOS shell. I can type Exit and can enter a menu. I have seen someone with a simular problem and they fixed it with disabling Secure Boot. I can’t see a Secure boot option in this menu.( Checked everywhere ) Posted on Home Assistant Community Forums aswell, as i am not sure where this fits best. Link to Home Assistant Forums thread: https://community.home-assistant.io/t/home-assistant-stuck-in-uefi-shell-unraid/538268


