


ronia
Members
-
Joined
-
Last visited
-
@Masterwishx I would like to request an option under: To give the option of "Never". There is already an option to "Disable mover running on a schedule"; however, what I'm looking for is a mode in which the scheduler is inactive and the only way to execute the mover is through the "Move Now" button. That option will disable all of the filtering options as well as the pre and post scripts. This can be useful for testing; however, what I'm really after is that I would like to run the mover on demand through external scripts. Having the scheduled mover preempt my script would not be good. Also this is my script I'm using at the moment in case anyone is interested: #!/bin/bash THRESHOLD=85 LOCK_FILE="/dev/shm/mover.lock" # Function to release the lock on exit cleanup() { rm -f "$LOCK_FILE" echo "Lock released." } trap cleanup EXIT # Try to acquire the lock if [ -e "$LOCK_FILE" ]; then echo "Lock already exists. Exiting." exit 1 else touch "$LOCK_FILE" echo "Lock acquired." fi # Get the use% of /mnt/cache and remove the '%' sign USAGE=$(df -h /mnt/cache | awk 'NR==2 {gsub("%",""); print $5}') # Check if mover is already running if pgrep -f "/usr/local/sbin/mover" > /dev/null; then logger -t move "[$(date)] Mover is already running. Skipping start." elif [ "$USAGE" -ge "$THRESHOLD" ]; then logger -t move "[$(date)] /mnt/cache usage at ${USAGE}%. Initiating mover." /usr/local/sbin/mover start |& logger -t move & else echo "[$(date)] /mnt/cache usage is at ${USAGE}% — below the threshold of ${THRESHOLD}%." fi

-
What alturismo said about 0, 0. And I agree that you should set 5, 0 just to be safe, but what you have will ... "probably work?". As for the 95 in my scenario. It doesn't come into play because I don't have array -> cache shares, but the idea I had at the time was that if I needed an emergency amount of space, and all I had left was some stuff that should normally be on cache 100% of the time I could eject it into the array to free up space. I never tested to see if it would work. The majority of the time, when people have array -> cache shares, it's because of appdata. My recommendation is to make appdata a cache only share and create an appdata_backup on an array only share. Then you scan snapshot your appdata folder with any number of backup tools which is probably far more useful than potentially ejecting your appdata from cache to array.
-
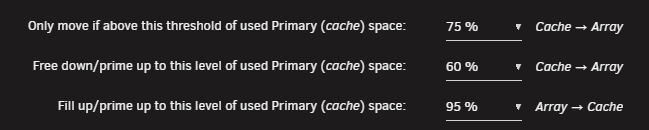
All three settings are necessary. If you only had threshold value, then you would constantly be moving above or below the threshold (ie. thrashing). Threshold value is what triggers the mover to move cache -> array. Fill up value is what it will free down to. This should be lower than the threshold value. The delta between threshold value and free down value is the grace period in which the mover will be in an idle state. A shorter delta means a shorter interval between when the mover must be run. A longer delta means that the mover will be invoked less often. For example, my setting will trigger whenever my cache moves above 75%. It will free down to 60% and allow the mover/disks to rest while I populate the cache another 15%. My 2TB cache means that I can fill another 300GB before the mover will be invoked again. Which is roughly a weeks worth of content for me on average. And you should never have array -> cache shares. They're terrible.
-
I'm not sure the mover script could or should handle these kinds of situations. This is going outside of the scope of what a simple community script can do. At the end of the day, the mover script is messing around with Unraid's internal file organization behind it's back and without the native ability to intercept calls from other apps and cleanup these extra copies. I don't think there's anything the script can do in this case. It would be up to Sonarr/Radarr or Unraid itself to come up with a solution for this unique situation. One such possible solution is through Sonarr's 'Custom Script' settings. You could write a script that triggers on 'File Upgrade' that would then look for and cleanup duplicate copies. You would probably need to expose each /mnt/disk* and /mnt/cache to the sonarr/radarr docker itself as well.
-
Thanks @Masterwishx , it seems to have worked: /usr/local/sbin/mover start |& logger -t move & And from what I can tell, it seems to have followed all my mover rules as well which is good. I'm going to try testing this a bit more and writing a user script for this, but this looks promising.
-
@Masterwishx if I want to run the mover manually what arguments can I provide to age_mover to simulate as if the "move now" button were pressed? Is this possible? The reason I want to do this, is I want to write a small script that essentially hits the "Move Now" button whenever disk utilization is above a certain value.
-
Actually, looking into it it further, seems like cron itself is pulled from here: // Check if value was changed if ($cfg_moverDisabled != $_POST["ismoverDisabled"]) { // If mover schedule is disabled then rename 'mover.cron' to 'mover.cron.disabled' if ($_POST['ismoverDisabled'] == "yes") { // Check if the file exists before attempting to rename it if (file_exists("/boot/config/plugins/dynamix/mover.cron")) { if (!rename("/boot/config/plugins/dynamix/mover.cron", "/boot/config/plugins/dynamix/mover.cron.disabled")) { logger("Error: Failed to rename mover cron file"); } else { logger("Mover schedule disabled successfully."); } } else { logger("Error: Mover cron file does not exist"); } } else { // If mover schedule is enabled then rename back if (file_exists("/boot/config/plugins/dynamix/mover.cron.disabled")) { if (!rename("/boot/config/plugins/dynamix/mover.cron.disabled", "/boot/config/plugins/dynamix/mover.cron")) { logger("Error: Failed to rename mover cron file"); } else { logger("Mover schedule enabled successfully."); } } else { logger("Error: Mover cron file does not exist"); } } } And that's your error message too: Error: Mover cron file does not existSo something messed up with your /boot/config/plugins/dynamix/ edit: I don't know how or why this file would become corrupted since I think it's part of Unraid itself, but if for some reason you need to recreate it mover.cron is supposed to look something like this: root@Dammerung:/boot/config/plugins/dynamix# cat mover.cron # Generated mover schedule: 0 11 * * 2 /usr/local/sbin/mover start |& logger -t move edit 2: Actually, I have a theory. @Masterwishx consider the following scenario: User tries running "move now" with "Disable Mover running on a schedule: Yes" This would cause: /boot/config/plugins/dynamix/mover.cron -> /boot/config/plugins/dynamix/mover.cron.disabled User uninstalls/reinstalls ca.mover.tuning.plugin mover.cron would remain as mover.cron.disabled Could this lead to mover.cron becoming permanently disabled and then the plugin thinks it's missing? I don't want to run this myself and screw up my shares/mover, so I'll leave this here for someone else to pick up.
-
There is definitely something wrong with your setup. This is your log file: Jun 12 13:48:07 Tower plugin-manager: running: 'anonymous' Jun 12 13:48:08 Tower plugin-manager: ca.mover.tuning.plg installed Jun 12 13:48:24 Tower emhttpd: shcmd (28627): /usr/local/sbin/update_cron Jun 12 13:50:00 Tower move: Unraid mover schedule enabled successfully. Jun 12 13:50:00 Tower move: Error: Mover cron file does not exist Jun 12 13:50:19 Tower emhttpd: shcmd (28740): /usr/local/sbin/mover start |& logger -t move & Jun 12 13:50:19 Tower move: Starting Mover ... Jun 12 13:50:19 Tower move: ionice -c 2 -n 0 nice -n 0 /usr/local/emhttp/plugins/ca.mover.tuning/age_mover Jun 12 13:50:19 Tower move: Mover Tuning Plugin version 2025.06.07 Jun 12 13:50:19 Tower move: Jun 12 13:50:19 Tower move: Usage: /usr/local/emhttp/plugins/ca.mover.tuning/age_mover <or> mover start [-e <disk_name>] Jun 12 13:50:19 Tower move: /usr/local/emhttp/plugins/ca.mover.tuning/age_mover <or> mover stop|softstop|status|reset|debug Jun 12 13:50:19 Tower move: <disk_name> must match pattern 'disk[0-9]*' and /mnt/<disk_name> must be a mountpoint Jun 12 13:50:19 Tower move: Jun 12 13:50:19 Tower move: reset - reset config file to default values and delete override config folder Jun 12 13:50:19 Tower move: debug - creating plugin diagnostics file at /boot/logs/ca.mover.tuning-debug-<date-time>.zip And this is my log file: Jun 12 09:59:26 Dammerung move: Starting Mover ... Jun 12 09:59:26 Dammerung move: ionice -c 2 -n 0 nice -n 0 /usr/local/emhttp/plugins/ca.mover.tuning/age_mover start Jun 12 09:59:26 Dammerung move: ***************************************************** Mover Tuning Plugin version 2025.06.01 **************************************************** Jun 12 09:59:26 Dammerung move: Log Level: 1 Jun 12 09:59:26 Dammerung move: ----------------------------------------------------------------- Global settings --------------------------------------------------------------- Jun 12 09:59:26 Dammerung move: Using global (cache:yes) moving threshold: 75 % Jun 12 09:59:26 Dammerung move: Using global (cache:yes) freeing threshold: 60 % Jun 12 09:59:26 Dammerung move: Using global (cache:prefer) fillup threshold: 95 % You can see, you're not even making it to the age_mover script which is the main script of the plugin. And that's because age_mover is not being called with any arguments at all. Since it's so early into the script, we can even debug this through code inspection. This is the very first few lines of mover.php and the only logs that you're actually seeing: if ($cron && $cfg['moverDisabled'] == 'yes') { logger("Mover schedule disabled"); exit(); } if ($cfg['parity'] == 'no' && $vars['mdResyncPos']) { logger("Parity Check / rebuild in progress. Not running mover"); exit(); } logger("Starting Mover ..."); startMover($args);Your log entry is consistent up to this point and is the last log that indicates good working order: Jun 12 13:50:19 Tower move: Starting Mover ... So digging into startMover: function startMover(array $args) { global $vars, $cfg, $cron, $bash, $argv, $args; if ($argv[2]) { $args[] = trim($argv[2]); } if ($cfg['debuglogging'] == 'yes') { // If run manually by bash cli if ($bash) { logger("Manually executed (bash)\n"); } // If run via crond then log it as cron else if ($cron) { logger("Auto executed (crond)\n"); } // If run manually by button, $argv[1] is not set (""), then log it as move button else if (empty($argv[1])) { logger("Manually executed (Move button)\n"); } } if (!$cron) { // Example usage of specific arguments if (isset($args[0])) { $option1 = $args[0]; if ($cfg['debuglogging'] == 'yes') { logger("Option 1: $option1\n"); } } else if (version_compare($vars['version'], '7.0.0', '<')) { $args[0] = 'start'; $option1 = $args[0]; if ($cfg['debuglogging'] == 'yes') { logger("Option 1 set to 'start' due to version < 7.0.0\n"); } } // Combine all arguments into a single string with spaces $options = implode(' ', $args); // Example usage of $options if ($cfg['debuglogging'] == 'yes') { logger("Options: $options\n"); } } else { $options = "start"; logger("Cron + options: $options"); } if ($options != "stop") { clearstatcache(); $pid = @file_get_contents("/var/run/mover.pid"); if ($pid) { logger("Mover already running"); exit(); } } if ($cfg['force'] == "yes") { $options = ""; if ($cfg['forceParity'] == "no" && $vars['mdResyncPos']) { logger("Parity Check / Rebuild in Progress. Not running forced move"); exit(); } } // Check if Move Now button follows plug-in filters if ($cfg['movenow'] == "yes") { $mover_str = "/usr/local/emhttp/plugins/ca.mover.tuning/age_mover"; } else { $mover_str = "/usr/local/sbin/mover.old"; } if ($options == "stop") { $niceLevel = $cfg['moverNice'] ?: "0"; $ioLevel = $cfg['moverIO'] ?: "-c 2 -n 0"; logger("ionice $ioLevel nice -n $niceLevel $mover_str stop"); passthru("ionice $ioLevel nice -n $niceLevel $mover_str stop"); exit(); } if ($cron or $cfg['movenow'] == "yes") { //exec("echo 'running from cron or move now question is yes' >> /var/log/syslog"); $niceLevel = $cfg['moverNice'] ?: "0"; $ioLevel = $cfg['moverIO'] ?: "-c 2 -n 0"; if ($cfg['movingThreshold'] >= 0 or $cfg['fillupThreshold'] >= 0 or $cfg['age'] == "yes" or $cfg['sizef'] == "yes" or $cfg['sparsnessf'] == "yes" or $cfg['filelistf'] == "yes" or $cfg['filetypesf'] == "yes" or $cfg['beforescript'] != '' or $cfg['afterscript'] != '' or $cfg['testmode'] == "yes") { $age_mover_str = "/usr/local/emhttp/plugins/ca.mover.tuning/age_mover"; //exec("echo 'about to hit mover string here: $age_mover_str' >> /var/log/syslog"); logger("ionice $ioLevel nice -n $niceLevel $age_mover_str $options"); passthru("ionice $ioLevel nice -n $niceLevel $age_mover_str $options"); } } else { //exec("echo 'Running from button' >> /var/log/syslog"); //Default "move now" button has been hit. $niceLevel = $cfg['moverNice'] ?: "0"; $ioLevel = $cfg['moverIO'] ?: "-c 2 -n 0"; logger("ionice $ioLevel nice -n $niceLevel /usr/local/sbin/mover.old $options"); passthru("ionice $ioLevel nice -n $niceLevel /usr/local/sbin/mover.old $options"); } } The important part is your log entry: Jun 12 13:50:19 Tower move: ionice -c 2 -n 0 nice -n 0 /usr/local/emhttp/plugins/ca.mover.tuning/age_mover and this line of code: logger("ionice $ioLevel nice -n $niceLevel $age_mover_str $options");This implies that $options is empty and the only way for options to be empty is for: if (!$cron) { // Example usage of specific arguments if (isset($args[0])) { $option1 = $args[0]; if ($cfg['debuglogging'] == 'yes') { logger("Option 1: $option1\n"); } } else if (version_compare($vars['version'], '7.0.0', '<')) { $args[0] = 'start'; $option1 = $args[0]; if ($cfg['debuglogging'] == 'yes') { logger("Option 1 set to 'start' due to version < 7.0.0\n"); } } // Combine all arguments into a single string with spaces $options = implode(' ', $args); // Example usage of $options if ($cfg['debuglogging'] == 'yes') { logger("Options: $options\n"); } } else { $options = "start"; logger("Cron + options: $options"); }cron must evaluate false args[0] is not set plugin version is > 7.0.0 (it is) So given that your issues seem to revolve around cron. What is it? Well at the top of the PHP file, it is defined as: #!/usr/bin/php <?PHP require_once("/usr/local/emhttp/plugins/dynamix/include/Wrappers.php"); $cfg = parse_plugin_cfg("ca.mover.tuning"); $vars = @parse_ini_file("/var/local/emhttp/var.ini"); $cron = $argv[1] == "crond"; $bash = $argv[1] == "bash"; $args = [];And crond is a basic linux daemon. The only reason this worked before was because your plugin version was less than 7.0.0 and forced option to "start". I am not sure why this check exists, but given that your install doesn't have crond, that seems to be the bigger issue. You can test in a terminal: root@Dammerung:~# crond --help dillon's cron daemon 4.5 crond [-s dir] [-c dir] [-t dir] [-m user@host] [-M mailer] [-S|-L [file]] [-l level] [-b|-f|-d] -s directory of system crontabs (defaults to /etc/cron.d) -c directory of per-user crontabs (defaults to /var/spool/cron/crontabs) -t directory of timestamps (defaults to /var/spool/cron/cronstamps) -m user@host where should cron output be directed? (defaults to local user) -M mailer (defaults to /usr/sbin/sendmail) -S log to syslog using identity 'crond' (default) -L file log to specified file instead of syslog -l loglevel log events <= this level (defaults to notice (level 5)) -b run in background (default) -f run in foreground -d run in debugging mode
-
I found the relevant lines in the debug log: -------------------------------------------------------------- Debugging Move Action ------------------------------------------------------------ 07:29:38.073 Move cmd: move, Move file: /mnt/cache/data/media/tv2/Single's Inferno/Season 03/Single's Inferno (2021)-s03e05-MrHulk-WEBDL-1080p.mkv, Dest: /mnt/user0/ file: /mnt/cache/data/media/tv2/Single's Inferno/Season 03/Single's Inferno (2021)-s03e05-MrHulk-WEBDL-1080p.mkv [28,c178b0] has 1 dangling link(s) ------------------------------------------------------- Debugging Clean Folder - Start Loop ----------------------------------------------------- 07:29:38.099 Current file: /mnt/cache/data/media/tv2/Single's Inferno/Season 03/Single's Inferno (2021)-s03e05-MrHulk-WEBDL-1080p.mkv, Current folder: /mnt/cache/data/media/tv2/Single's Inferno/Season 03, Previous folder: , Previous cou nt: -1 -------------------------------------------------------- Debugging Clean Folder - End Loop ------------------------------------------------------ 07:29:38.120 Cycle of delete folder, Previous count: 11, Count of files: 11 ------------------------------------------------------- Debugging Clean Folder - Start Loop ----------------------------------------------------- 07:29:38.143 Current file: /mnt/cache/data/torrents/avistaz/Singles.Inferno.S03.1080p.NF.WEB-DL.DDP5.1.H.264-MrHulk/Singles.Inferno.S03E05.1080p.NF.WEB-DL.DDP5.1.H.264-MrHulk.mkv, Current folder: /mnt/cache/data/torrents/avistaz/Singles .Inferno.S03.1080p.NF.WEB-DL.DDP5.1.H.264-MrHulk, Previous folder: /mnt/cache/data/media/tv2/Single's Inferno/Season 03, Previous count: 11 -------------------------------------------------------- Debugging Clean Folder - End Loop ------------------------------------------------------ 07:29:38.165 Cycle of delete folder, Previous count: 11, Count of files: 11 -------------------------------------------------------------- Debugging Move Action ------------------------------------------------------------ 07:29:38.201 Move cmd: move, Move file: /mnt/cache/data/media/tv2/Single's Inferno/Season 03/Single's Inferno (2021)-s03e02-MrHulk-WEBDL-1080p.mkv, Dest: /mnt/user0/ file: /mnt/cache/data/media/tv2/Single's Inferno/Season 03/Single's Inferno (2021)-s03e02-MrHulk-WEBDL-1080p.mkv [28,c178ed] has 1 dangling link(s) ------------------------------------------------------- Debugging Clean Folder - Start Loop ----------------------------------------------------- 07:29:38.227 Current file: /mnt/cache/data/media/tv2/Single's Inferno/Season 03/Single's Inferno (2021)-s03e02-MrHulk-WEBDL-1080p.mkv, Current folder: /mnt/cache/data/media/tv2/Single's Inferno/Season 03, Previous folder: /mnt/cache/dat a/torrents/avistaz/Singles.Inferno.S03.1080p.NF.WEB-DL.DDP5.1.H.264-MrHulk, Previous count: 11 -------------------------------------------------------- Debugging Clean Folder - End Loop ------------------------------------------------------ 07:29:38.248 Cycle of delete folder, Previous count: 11, Count of files: 11 ------------------------------------------------------- Debugging Clean Folder - Start Loop ----------------------------------------------------- 07:29:38.271 Current file: /mnt/cache/data/torrents/avistaz/Singles.Inferno.S03.1080p.NF.WEB-DL.DDP5.1.H.264-MrHulk/Singles.Inferno.S03E02.1080p.NF.WEB-DL.DDP5.1.H.264-MrHulk.mkv, Current folder: /mnt/cache/data/torrents/avistaz/Singles .Inferno.S03.1080p.NF.WEB-DL.DDP5.1.H.264-MrHulk, Previous folder: /mnt/cache/data/media/tv2/Single's Inferno/Season 03, Previous count: 11 -------------------------------------------------------- Debugging Clean Folder - End Loop ------------------------------------------------------ 07:29:38.293 Cycle of delete folder, Previous count: 11, Count of files: 11 So it seems like it's not picking up the hardlink, as the previous logs indicated that the hardlinks were detected: Jun 3 07:29:38 Dammerung move: Moving "/mnt/cache/./data/media/tv2/Single's Inferno/Season 03/Single's Inferno (2021)-s03e05-MrHulk-WEBDL-1080p.mkv" "/mnt/cache/./data/torrents/avistaz/Singles.Inferno.S03.1080p.NF.WEB-DL.DDP5.1.H.264-MrHulk/Singles.Inferno.S03E05.1080p.NF.WEB-DL.DDP5.1.H.264-MrHulk.mkv" to /mnt/user0/ (preserving hardlinks) Jun 3 07:29:38 Dammerung move: Moving "/mnt/cache/./data/media/tv2/Single's Inferno/Season 03/Single's Inferno (2021)-s03e02-MrHulk-WEBDL-1080p.mkv" "/mnt/cache/./data/torrents/avistaz/Singles.Inferno.S03.1080p.NF.WEB-DL.DDP5.1.H.264-MrHulk/Singles.Inferno.S03E02.1080p.NF.WEB-DL.DDP5.1.H.264-MrHulk.mkv" to /mnt/user0/ (preserving hardlinks)
-
@Masterwishx I tried the new move utility and it seems to fail on hardlinked files. Actually, it's unclear to me if it's working on non-hardlinked files as well. Due to how my cache is currently structured nearly everything that is being moved is hardlinked at the moment. Here is a snippet of the log: Jun 3 07:29:31 Dammerung move: ***************************************************** Mover Tuning Plugin version 2025.06.01 **************************************************** Jun 3 07:29:31 Dammerung move: Log Level: 1 Jun 3 07:29:31 Dammerung move: ----------------------------------------------------------------- Global settings --------------------------------------------------------------- Jun 3 07:29:31 Dammerung move: Using global (cache:yes) moving threshold: 75 % Jun 3 07:29:31 Dammerung move: Using global (cache:yes) freeing threshold: 60 % Jun 3 07:29:31 Dammerung move: Using global (cache:prefer) fillup threshold: 95 % Jun 3 07:29:31 Dammerung move: Age: Automatic (smart caching) Jun 3 07:29:31 Dammerung move: After script: /tmp/user.scripts/tmpScripts/mover_post/script Jun 3 07:29:31 Dammerung move: Before script: /tmp/user.scripts/tmpScripts/mover_pre/script Jun 3 07:29:31 Dammerung move: Clean Folders: yes Jun 3 07:29:31 Dammerung move: Skip file list: /dev/shm/ignore.txt Jun 3 07:29:31 Dammerung move: Notify: no Jun 3 07:29:31 Dammerung move: Logging: yes Jun 3 07:29:31 Dammerung move: Debug Logging: yes Jun 3 07:29:31 Dammerung move: Log parent folder: /tmp Jun 3 07:29:31 Dammerung move: Log files delete age: 5 days Jun 3 07:29:31 Dammerung move: List files delete age: 10 days Jun 3 07:29:31 Dammerung move: Validate Filenames: yes Jun 3 07:29:31 Dammerung move: Move files tool: move Jun 3 07:29:31 Dammerung move: Launching before script: /tmp/user.scripts/tmpScripts/mover_pre/script <snip... just removed my pre-script output> Jun 3 07:29:32 Dammerung move: Before script finished Jun 3 07:29:32 Dammerung move: ***************************************************************** FILTERING FILES *************************************************************** Jun 3 07:29:32 Dammerung move: ----------------------------------------------------------- Processing [appdata] share ---------------------------------------------------------- Jun 3 07:29:32 Dammerung move: Primary storage: cache - size: 1.9TiB - used: 82 % (1.5TiB) Jun 3 07:29:32 Dammerung move: Secondary storage: none Jun 3 07:29:32 Dammerung move: Share Information: Name: appdata - Path: /mnt/cache/appdata Jun 3 07:29:32 Dammerung move: Mover action: no action, only cache used (cache:only). Jun 3 07:29:32 Dammerung move: => Nothing will be moved. Share usage is taken into account in the calculation of the threshold for other shares. Jun 3 07:29:32 Dammerung move: Calculating share usage... (can take a moment) Jun 3 07:29:33 Dammerung move: cache/appdata used: 20GiB Jun 3 07:29:33 Dammerung move: -------------------------------------------------------- Processing [appdata_backup] share ------------------------------------------------------ Jun 3 07:29:33 Dammerung move: Primary storage: user0 - size: 28TiB - used: 39 % (11TiB) Jun 3 07:29:33 Dammerung move: Secondary storage: none Jun 3 07:29:33 Dammerung move: Share Information: Name: appdata_backup - Path: /mnt/user0/appdata_backup Jun 3 07:29:33 Dammerung move: Mover action: no action, only user0 used (cache:no). Jun 3 07:29:33 Dammerung move: => Skipping Jun 3 07:29:33 Dammerung move: ---------------------------------------------------------- Processing [cold_data] share --------------------------------------------------------- Jun 3 07:29:33 Dammerung move: Primary storage: user0 - size: 28TiB - used: 39 % (11TiB) Jun 3 07:29:33 Dammerung move: Secondary storage: none Jun 3 07:29:34 Dammerung move: Share Information: Name: cold_data - Path: /mnt/user0/cold_data Jun 3 07:29:34 Dammerung move: Mover action: no action, only user0 used (cache:no). Jun 3 07:29:34 Dammerung move: => Skipping Jun 3 07:29:34 Dammerung move: ------------------------------------------------------------- Processing [data] share ----------------------------------------------------------- Jun 3 07:29:34 Dammerung move: Primary storage: cache - size: 1.9TiB - used: 82 % (1.5TiB) Jun 3 07:29:34 Dammerung move: Secondary storage: user0 Jun 3 07:29:34 Dammerung move: Share Information: Name: data - Path: /mnt/cache/data Jun 3 07:29:34 Dammerung move: Moving threshold: 75% (1.4TiB) ; Freeing threshold: 60% (1.1TiB) Jun 3 07:29:34 Dammerung move: Mover action: cache->user0 (cache:yes). Pool is above moving threshold percentage: 82% >= 75%. Jun 3 07:29:34 Dammerung move: => Will smart move old files from cache to user0. Nothing will be moved from user0 to cache Jun 3 07:29:34 Dammerung move: Skipping Files from List. File size are taken into account in the calculation of the threshold Jun 3 07:29:34 Dammerung move: List Path: /dev/shm/ignore.txt: Jun 3 07:29:34 Dammerung move: ------------------------------------------------------------- Debugging Skipped Path ------------------------------------------------------------ Jun 3 07:29:34 Dammerung move: skipped_path = /mnt/cache/data/downloads Jun 3 07:29:34 Dammerung move: Jun 3 07:29:34 Dammerung move: ------------------------------------------------------------- Debugging Skipped Path ------------------------------------------------------------ Jun 3 07:29:34 Dammerung move: /mnt/cache/data/downloads - exists Jun 3 07:29:34 Dammerung move: Jun 3 07:29:34 Dammerung move: ------------------------------------------------------------- Debugging Skipped Path ------------------------------------------------------------ Jun 3 07:29:34 Dammerung move: /mnt/cache/data/downloads - is a Folder Jun 3 07:29:34 Dammerung move: Jun 3 07:29:34 Dammerung move: ------------------------------------------------------------- Debugging Skipped Path ------------------------------------------------------------ Jun 3 07:29:34 Dammerung move: skipped_path = /mnt/cache/data/irc Jun 3 07:29:34 Dammerung move: Jun 3 07:29:34 Dammerung move: ------------------------------------------------------------- Debugging Skipped Path ------------------------------------------------------------ Jun 3 07:29:34 Dammerung move: /mnt/cache/data/irc - exists Jun 3 07:29:34 Dammerung move: Jun 3 07:29:34 Dammerung move: ------------------------------------------------------------- Debugging Skipped Path ------------------------------------------------------------ Jun 3 07:29:34 Dammerung move: /mnt/cache/data/irc - is a Folder Jun 3 07:29:34 Dammerung move: Jun 3 07:29:34 Dammerung move: ------------------------------------------------------------- Debugging Skipped Path ------------------------------------------------------------ Jun 3 07:29:34 Dammerung move: skipped_path = /mnt/cache/data/media/music Jun 3 07:29:34 Dammerung move: Jun 3 07:29:34 Dammerung move: ------------------------------------------------------------- Debugging Skipped Path ------------------------------------------------------------ Jun 3 07:29:34 Dammerung move: /mnt/cache/data/media/music - exists Jun 3 07:29:34 Dammerung move: Jun 3 07:29:34 Dammerung move: ------------------------------------------------------------- Debugging Skipped Path ------------------------------------------------------------ Jun 3 07:29:34 Dammerung move: /mnt/cache/data/media/music - is a Folder Jun 3 07:29:34 Dammerung move: Jun 3 07:29:34 Dammerung move: ------------------------------------------------------------- Debugging Skipped Path ------------------------------------------------------------ Jun 3 07:29:34 Dammerung move: skipped_path = /mnt/cache/data/scripts Jun 3 07:29:34 Dammerung move: Jun 3 07:29:34 Dammerung move: ------------------------------------------------------------- Debugging Skipped Path ------------------------------------------------------------ Jun 3 07:29:34 Dammerung move: /mnt/cache/data/scripts - exists Jun 3 07:29:34 Dammerung move: Jun 3 07:29:34 Dammerung move: ------------------------------------------------------------- Debugging Skipped Path ------------------------------------------------------------ Jun 3 07:29:34 Dammerung move: /mnt/cache/data/scripts - is a Folder Jun 3 07:29:34 Dammerung move: Jun 3 07:29:36 Dammerung move: Ignored files are using 88GiB Jun 3 07:29:36 Dammerung move: ------------------------------------------------------ Debugging [data] share Find Function ----------------------------------------------------- Jun 3 07:29:36 Dammerung move: FINDSTR: find "/mnt/cache/data" -type f -depth -not -name '.placeholder' -not -path "/mnt/cache/data/downloads/*" -not -path "/mnt/cache/data/irc/*" -not -path "/mnt/cache/data/media/music/*" -not -path "/mnt/cache/data/scripts/*" -not -path "/mnt/cache/data/media/tv2/The Rookie/Season 03/The Rookie (2018)-s03e01-NTb-WEBDL-1080p.mkv" -not -path "/mnt/cache/data/media/tv2/The Rookie/Season 03/The Rookie (2018)-s03e02-NTb-WEBDL-1080p.mkv" -not -path "/mnt/cache/data/media/tv2/The Rookie/Season 03/The Rookie (2018)-s03e03-NTb-WEBDL-1080p.mkv" -not -path "/mnt/cache/data/media/tv2/The Rookie/Season 03/The Rookie (2018)-s03e04-NTb-WEBDL-1080p.mkv" -not -path "/mnt/cache/data/media/tv2/The Rookie/Season 03/The Rookie (2018)-s03e05-NTb-WEBDL-1080p.mkv" -not -path "/mnt/cache/data/media/tv2/The Rookie/Season 03/The Rookie (2018)-s03e06-NTb-WEBDL-1080p.mkv" -not -path "/mnt/cache/data/media/tv2/The Rookie/Season 03/The Rookie (2018)-s03e07-NTb-WEBDL-1080p.mkv" -not -path "/mnt/cache/data/media/tv2/The Rookie/Season 03 Jun 3 07:29:36 Dammerung move: /The Rookie (2018)-s03e08-NTb-WEBDL-1080p.mkv" -not -path "/mnt/cache/data/media/tv2/The Rookie/Season 03/The Rookie (2018)-s03e09-NTb-WEBDL-1080p.mkv" -not -path "/mnt/cache/data/media/tv2/The Rookie/Season 03/The Rookie (2018)-s03e10-NTb-WEBDL-1080p.mkv" -not -path "/mnt/cache/data/media/tv2/The Rookie/Season 03/The Rookie (2018)-s03e11-NTb-WEBDL-1080p.mkv" -not -path "/mnt/cache/data/media/tv2/The Rookie/Season 03/The Rookie (2018)-s03e12-NTb-WEBDL-1080p.mkv" -not -path "/mnt/cache/data/media/tv2/The Rookie/Season 03/The Rookie (2018)-s03e13-NTb-WEBDL-1080p.mkv" -not -path "/mnt/cache/data/media/tv2/The Rookie/Season 03/The Rookie (2018)-s03e14-NTb-WEBDL-1080p.mkv" -not -path "/mnt/cache/data/media/tv2/When Life Gives You Tangerines/Season 01/When Life Gives You Tangerines (2025)-s01e01-MrHulk-WEBDL-1080p.mkv" -not -path "/mnt/cache/data/media/tv2/When Life Gives You Tangerines/Season 01/When Life Gives You Tangerines (2025)-s01e02-MrHulk-WEBDL-1080p.mkv" -not -path "/mnt/cache/data/media/tv2/When Life Giv Jun 3 07:29:36 Dammerung move: es You Tangerines/Season 01/When Life Gives You Tangerines (2025)-s01e03-MrHulk-WEBDL-1080p.mkv" -not -path "/mnt/cache/data/media/tv2/When Life Gives You Tangerines/Season 01/When Life Gives You Tangerines (2025)-s01e04-MrHulk-WEBDL-1080p.mkv" -not -path "/mnt/cache/data/media/tv2/When Life Gives You Tangerines/Season 01/When Life Gives You Tangerines (2025)-s01e05-MrHulk-WEBDL-1080p.mkv" -not -path "/mnt/cache/data/media/tv2/When Life Gives You Tangerines/Season 01/When Life Gives You Tangerines (2025)-s01e06-MrHulk-WEBDL-1080p.mkv" -not -path "/mnt/cache/data/media/tv2/When Life Gives You Tangerines/Season 01/When Life Gives You Tangerines (2025)-s01e07-MrHulk-WEBDL-1080p.mkv" -not -path "/mnt/cache/data/media/tv2/When Life Gives You Tangerines/Season 01/When Life Gives You Tangerines (2025)-s01e08-MrHulk-WEBDL-1080p.mkv" -not -path "/mnt/cache/data/media/tv2/When Life Gives You Tangerines/Season 01/When Life Gives You Tangerines (2025)-s01e09-MrHulk-WEBDL-1080p.mkv" -not -path "/mnt/cache/data/media/tv2/W Jun 3 07:29:36 Dammerung move: hen Life Gives You Tangerines/Season 01/When Life Gives You Tangerines (2025)-s01e10-MrHulk-WEBDL-1080p.mkv" -not -path "/mnt/cache/data/media/tv2/When Life Gives You Tangerines/Season 01/When Life Gives You Tangerines (2025)-s01e11-MrHulk-WEBDL-1080p.mkv" -not -path "/mnt/cache/data/media/tv2/When Life Gives You Tangerines/Season 01/When Life Gives You Tangerines (2025)-s01e12-MrHulk-WEBDL-1080p.mkv" -not -path "/mnt/cache/data/media/tv2/When Life Gives You Tangerines/Season 01/When Life Gives You Tangerines (2025)-s01e13-MrHulk-WEBDL-1080p.mkv" -not -path "/mnt/cache/data/media/tv2/When Life Gives You Tangerines/Season 01/When Life Gives You Tangerines (2025)-s01e14-MrHulk-WEBDL-1080p.mkv" -not -path "/mnt/cache/data/media/tv2/When Life Gives You Tangerines/Season 01/When Life Gives You Tangerines (2025)-s01e15-MrHulk-WEBDL-1080p.mkv" -not -path "/mnt/cache/data/media/tv2/When Life Gives You Tangerines/Season 01/When Life Gives You Tangerines (2025)-s01e16-MrHulk-WEBDL-1080p.mkv" -printf '%T@|%s|%S|%n|%i|%p Jun 3 07:29:36 Dammerung move: |\0' | awk -v RS='\0' -v FS='|' -v SPARSENESS='0' -v PRIMARYSTORAGENAME='cache' -v SECONDARYSTORAGENAME='user0' -v SHARENAME='data' -v SHAREUSECACHE='yes' -v PRIMARYSIZETHRESH='1200244604928' ' { printf "%s|%s|%s|%s|%d|%d|%d|%d|%d|%d|%s\n", PRIMARYSTORAGENAME, SECONDARYSTORAGENAME, SHARENAME, SHAREUSECACHE, $1, PRIMARYSIZETHRESH, $2, $3, $4, $5, $6}' Jun 3 07:29:36 Dammerung move: Jun 3 07:29:36 Dammerung move: Updated Filtered filelist: /tmp/ca.mover.tuning/Filtered_files_2025-06-03T072931.list for data Jun 3 07:29:36 Dammerung move: ------------------------------------------------------------- Processing [isos] share ----------------------------------------------------------- Jun 3 07:29:36 Dammerung move: Primary storage: cache - size: 1.9TiB - used: 82 % (1.5TiB) Jun 3 07:29:36 Dammerung move: Secondary storage: user0 Jun 3 07:29:36 Dammerung move: Share Information: Name: isos - Path: /mnt/cache/isos Jun 3 07:29:36 Dammerung move: Moving threshold: 75% (1.4TiB) ; Freeing threshold: 60% (1.1TiB) Jun 3 07:29:36 Dammerung move: Mover action: cache->user0 (cache:yes). Pool is above moving threshold percentage: 82% >= 75%. Jun 3 07:29:36 Dammerung move: => Will smart move old files from cache to user0. Nothing will be moved from user0 to cache Jun 3 07:29:36 Dammerung move: ------------------------------------------------------ Debugging [isos] share Find Function ----------------------------------------------------- Jun 3 07:29:36 Dammerung move: FINDSTR: find "/mnt/cache/isos" -type f -depth -not -name '.placeholder' -printf '%T@|%s|%S|%n|%i|%p|\0' | awk -v RS='\0' -v FS='|' -v SPARSENESS='0' -v PRIMARYSTORAGENAME='cache' -v SECONDARYSTORAGENAME='user0' -v SHARENAME='isos' -v SHAREUSECACHE='yes' -v PRIMARYSIZETHRESH='1200244604928' ' { printf "%s|%s|%s|%s|%d|%d|%d|%d|%d|%d|%s\n", PRIMARYSTORAGENAME, SECONDARYSTORAGENAME, SHARENAME, SHAREUSECACHE, $1, PRIMARYSIZETHRESH, $2, $3, $4, $5, $6}' Jun 3 07:29:36 Dammerung move: Jun 3 07:29:36 Dammerung move: Updated Filtered filelist: /tmp/ca.mover.tuning/Filtered_files_2025-06-03T072931.list for isos Jun 3 07:29:36 Dammerung move: ---------------------------------------------------------- Processing [scratchpad] share -------------------------------------------------------- Jun 3 07:29:36 Dammerung move: Primary storage: cache - size: 1.9TiB - used: 82 % (1.5TiB) Jun 3 07:29:36 Dammerung move: Secondary storage: none Jun 3 07:29:36 Dammerung move: Share Information: Name: scratchpad - Path: /mnt/cache/scratchpad Jun 3 07:29:36 Dammerung move: Mover action: no action, only cache used (cache:only). Jun 3 07:29:36 Dammerung move: => Nothing will be moved. Share usage is taken into account in the calculation of the threshold for other shares. Jun 3 07:29:36 Dammerung move: Calculating share usage... (can take a moment) Jun 3 07:29:36 Dammerung move: cache/scratchpad used: 44KiB Jun 3 07:29:36 Dammerung move: ------------------------------------------------------------ Processing [system] share ---------------------------------------------------------- Jun 3 07:29:36 Dammerung move: Primary storage: cache - size: 1.9TiB - used: 82 % (1.5TiB) Jun 3 07:29:36 Dammerung move: Secondary storage: none Jun 3 07:29:36 Dammerung move: Share Information: Name: system - Path: /mnt/cache/system Jun 3 07:29:36 Dammerung move: Mover action: no action, only cache used (cache:only). Jun 3 07:29:36 Dammerung move: => Nothing will be moved. Share usage is taken into account in the calculation of the threshold for other shares. Jun 3 07:29:36 Dammerung move: Calculating share usage... (can take a moment) Jun 3 07:29:36 Dammerung move: cache/system used: 30GiB Jun 3 07:29:36 Dammerung move: ---------------------------------------------------------- Processing [workspace] share --------------------------------------------------------- Jun 3 07:29:36 Dammerung move: Primary storage: cache - size: 1.9TiB - used: 82 % (1.5TiB) Jun 3 07:29:36 Dammerung move: Secondary storage: user0 Jun 3 07:29:36 Dammerung move: Share Information: Name: workspace - Path: /mnt/*/workspace Jun 3 07:29:36 Dammerung move: Moving threshold: 0% (0B) ; Filling up threshold: 95% (323GiB) Jun 3 07:29:36 Dammerung move: Mover action: user0->cache (cache:prefer). Pool is below priming threshold percentage: 82% < 95%. Jun 3 07:29:36 Dammerung move: => Will smart move newest files from user0 to cache until threshold. Jun 3 07:29:36 Dammerung move: ---------------------------------------------------- Debugging [workspace] share Find Function -------------------------------------------------- Jun 3 07:29:36 Dammerung move: FINDSTR: find -type f -depth -not -name '.placeholder' -printf '%T@|%s|%S|%n|%i|%p|\0' | awk -v RS='\0' -v FS='|' -v SPARSENESS='0' -v PRIMARYSTORAGENAME='cache' -v SECONDARYSTORAGENAME='user0' -v SHARENAME='workspace' -v SHAREUSECACHE='prefer' -v PRIMARYSIZETHRESH='346151431782' ' { printf "%s|%s|%s|%s|%d|%d|%d|%d|%d|%d|%s\n", PRIMARYSTORAGENAME, SECONDARYSTORAGENAME, SHARENAME, SHAREUSECACHE, $1, PRIMARYSIZETHRESH, $2, $3, $4, $5, $6}' Jun 3 07:29:36 Dammerung move: Jun 3 07:29:36 Dammerung move: -------------------------------------------------------- Debugging [workspace] count files ------------------------------------------------------ Jun 3 07:29:36 Dammerung move: Amount of files on secondary storage: 0 Jun 3 07:29:36 Dammerung move: Jun 3 07:29:36 Dammerung move: ************************************************************ ANALYSING MOVING ACTIONS *********************************************************** Jun 3 07:29:36 Dammerung move: Deciding the action (move/sync/keep) for each file. There are 1157 files, it can take a while... Jun 3 07:29:38 Dammerung move: A total of 266 files representing 319GiB will be moved/synced: Jun 3 07:29:38 Dammerung move: - 266 files representing 319GiB will be moved/sync from cache to secondary Jun 3 07:29:38 Dammerung move: *********************************************************** LET THE MOVING SHOW BEGIN ! ********************************************************* Jun 3 07:29:38 Dammerung move: Moving "/mnt/cache/./data/media/tv2/Single's Inferno/Season 03/Single's Inferno (2021)-s03e05-MrHulk-WEBDL-1080p.mkv" "/mnt/cache/./data/torrents/avistaz/Singles.Inferno.S03.1080p.NF.WEB-DL.DDP5.1.H.264-MrHulk/Singles.Inferno.S03E05.1080p.NF.WEB-DL.DDP5.1.H.264-MrHulk.mkv" to /mnt/user0/ (preserving hardlinks) Jun 3 07:29:38 Dammerung move: -------------------------------------------------------------- Debugging Move Action ------------------------------------------------------------ Jun 3 07:29:38 Dammerung move: Move cmd: move, Move file: /mnt/cache/data/media/tv2/Single's Inferno/Season 03/Single's Inferno (2021)-s03e05-MrHulk-WEBDL-1080p.mkv, Dest: /mnt/user0/ Jun 3 07:29:38 Dammerung move: Jun 3 07:29:38 Dammerung move: ------------------------------------------------------- Debugging Clean Folder - Start Loop ----------------------------------------------------- Jun 3 07:29:38 Dammerung move: Current file: /mnt/cache/data/media/tv2/Single's Inferno/Season 03/Single's Inferno (2021)-s03e05-MrHulk-WEBDL-1080p.mkv, Current folder: /mnt/cache/data/media/tv2/Single's Inferno/Season 03, Previous folder: , Previous count: -1 Jun 3 07:29:38 Dammerung move: Jun 3 07:29:38 Dammerung move: -------------------------------------------------------- Debugging Clean Folder - End Loop ------------------------------------------------------ Jun 3 07:29:38 Dammerung move: Cycle of delete folder, Previous count: 11, Count of files: 11 Jun 3 07:29:38 Dammerung move: Jun 3 07:29:38 Dammerung move: Not deleting folder containing 11 files: /mnt/cache/data/media/tv2/Single's Inferno/Season 03 Jun 3 07:29:38 Dammerung move: ------------------------------------------------------- Debugging Clean Folder - Start Loop ----------------------------------------------------- Jun 3 07:29:38 Dammerung move: Current file: /mnt/cache/data/torrents/avistaz/Singles.Inferno.S03.1080p.NF.WEB-DL.DDP5.1.H.264-MrHulk/Singles.Inferno.S03E05.1080p.NF.WEB-DL.DDP5.1.H.264-MrHulk.mkv, Current folder: /mnt/cache/data/torrents/avistaz/Singles.Inferno.S03.1080p.NF.WEB-DL.DDP5.1.H.264-MrHulk, Previous folder: /mnt/cache/data/media/tv2/Single's Inferno/Season 03, Previous count: 11 Jun 3 07:29:38 Dammerung move: Jun 3 07:29:38 Dammerung move: -------------------------------------------------------- Debugging Clean Folder - End Loop ------------------------------------------------------ Jun 3 07:29:38 Dammerung move: Cycle of delete folder, Previous count: 11, Count of files: 11 Jun 3 07:29:38 Dammerung move: Jun 3 07:29:38 Dammerung move: Not deleting folder containing 11 files: /mnt/cache/data/torrents/avistaz/Singles.Inferno.S03.1080p.NF.WEB-DL.DDP5.1.H.264-MrHulk Jun 3 07:29:38 Dammerung move: 264 files remaining from caches to array 316GiB Jun 3 07:29:38 Dammerung move: Moving "/mnt/cache/./data/media/tv2/Single's Inferno/Season 03/Single's Inferno (2021)-s03e02-MrHulk-WEBDL-1080p.mkv" "/mnt/cache/./data/torrents/avistaz/Singles.Inferno.S03.1080p.NF.WEB-DL.DDP5.1.H.264-MrHulk/Singles.Inferno.S03E02.1080p.NF.WEB-DL.DDP5.1.H.264-MrHulk.mkv" to /mnt/user0/ (preserving hardlinks) Jun 3 07:29:38 Dammerung move: -------------------------------------------------------------- Debugging Move Action ------------------------------------------------------------ Jun 3 07:29:38 Dammerung move: Move cmd: move, Move file: /mnt/cache/data/media/tv2/Single's Inferno/Season 03/Single's Inferno (2021)-s03e02-MrHulk-WEBDL-1080p.mkv, Dest: /mnt/user0/ Jun 3 07:29:38 Dammerung move: Jun 3 07:29:38 Dammerung move: ------------------------------------------------------- Debugging Clean Folder - Start Loop ----------------------------------------------------- Jun 3 07:29:38 Dammerung move: Current file: /mnt/cache/data/media/tv2/Single's Inferno/Season 03/Single's Inferno (2021)-s03e02-MrHulk-WEBDL-1080p.mkv, Current folder: /mnt/cache/data/media/tv2/Single's Inferno/Season 03, Previous folder: /mnt/cache/data/torrents/avistaz/Singles.Inferno.S03.1080p.NF.WEB-DL.DDP5.1.H.264-MrHulk, Previous count: 11 Jun 3 07:29:38 Dammerung move: Jun 3 07:29:38 Dammerung move: -------------------------------------------------------- Debugging Clean Folder - End Loop ------------------------------------------------------ Jun 3 07:29:38 Dammerung move: Cycle of delete folder, Previous count: 11, Count of files: 11 Jun 3 07:29:38 Dammerung move: Jun 3 07:29:38 Dammerung move: Not deleting folder containing 11 files: /mnt/cache/data/media/tv2/Single's Inferno/Season 03 Jun 3 07:29:38 Dammerung move: ------------------------------------------------------- Debugging Clean Folder - Start Loop ----------------------------------------------------- Jun 3 07:29:38 Dammerung move: Current file: /mnt/cache/data/torrents/avistaz/Singles.Inferno.S03.1080p.NF.WEB-DL.DDP5.1.H.264-MrHulk/Singles.Inferno.S03E02.1080p.NF.WEB-DL.DDP5.1.H.264-MrHulk.mkv, Current folder: /mnt/cache/data/torrents/avistaz/Singles.Inferno.S03.1080p.NF.WEB-DL.DDP5.1.H.264-MrHulk, Previous folder: /mnt/cache/data/media/tv2/Single's Inferno/Season 03, Previous count: 11 Jun 3 07:29:38 Dammerung move: Jun 3 07:29:38 Dammerung move: -------------------------------------------------------- Debugging Clean Folder - End Loop ------------------------------------------------------ Jun 3 07:29:38 Dammerung move: Cycle of delete folder, Previous count: 11, Count of files: 11 Jun 3 07:29:38 Dammerung move: Jun 3 07:29:38 Dammerung move: Not deleting folder containing 11 files: /mnt/cache/data/torrents/avistaz/Singles.Inferno.S03.1080p.NF.WEB-DL.DDP5.1.H.264-MrHulk Jun 3 07:29:38 Dammerung move: 262 files remaining from caches to array 313GiBNothing in the log really jumps out at me as not working; however, if I check the location of those files I can see that nothing has actually moved. I'm also a bit concerned as the hardlinked paths are not all showing up. You can see that two hardlinks are found here: Jun 3 07:29:38 Dammerung move: Moving "/mnt/cache/./data/media/tv2/Single's Inferno/Season 03/Single's Inferno (2021)-s03e05-MrHulk-WEBDL-1080p.mkv" "/mnt/cache/./data/torrents/avistaz/Singles.Inferno.S03.1080p.NF.WEB-DL.DDP5.1.H.264-MrHulk/Singles.Inferno.S03E05.1080p.NF.WEB-DL.DDP5.1.H.264-MrHulk.mkv" to /mnt/user0/ (preserving hardlinks)However, only the first file shows up later as a distinct mover action: Jun 3 07:29:38 Dammerung move: Move cmd: move, Move file: /mnt/cache/data/media/tv2/Single's Inferno/Season 03/Single's Inferno (2021)-s03e05-MrHulk-WEBDL-1080p.mkv, Dest: /mnt/user0/Whether or not this is related to the actual issue (no files actually moved) is also unclear to me, but I thought it was interesting to point out. Toggling only the tool back from mover to rsync and files/hardlinks are being moved as expected.
-
Can you provide an option to continue using the rsync method? I'm hesitant to switch back to the Unraid mover binary as it is a significant change from rsync and especially how hardlinks are currently handled with the mover tuning plugin. Additionally, could you list the issues that users are observing that should be fixed with the binary vs rsync? Thanks.
-
That second option is wrong. The first line will cause the mover to trigger at 85% and the second line will cause the mover to free up space on the cache until 85%. Thus, no files will move since your free down/prime up is the same as your threshold. @Masterwishx we must get this question every other day. I propose that we set default values of 85% and 25% for these two options specifically. I think this is better as users are likely expecting something to happen with default settings. When the mover moves a large portion of their cache, but not all of it most will likely be able to infer what happened with the settings and adjust accordingly. When nothing happens, then most either assume the mover is broken or have no idea which setting could be causing the behavior. At least when something moves and perhaps more/less than they are expecting, then they should have a rough idea of which options to play with.
-
It's very possible that it never worked and I just never paid attention to it. Not a groundbreaking bug, but maybe something to look into if you have free time. Easiest workaround is just to simply use MTIME.
-
So this entry isn't accurate? Apr 25 00:00:17 Storage root: Primary storage: cache - size: 1.9TiB - used: 76 % (1.4TiB) You don't have roughly 2TB of nvme and using 1.4TB?
-
Your moving thresholds are this: Apr 25 00:00:01 Storage root: Using global (cache:yes) moving threshold: 90 % Apr 25 00:00:01 Storage root: Using global (cache:yes) freeing threshold: 70 % Apr 25 00:00:01 Storage root: Using global (cache:prefer) fillup threshold: 95 % presumably nothing is being moved from nvme -> array, but your size calculation is this: Apr 25 00:00:17 Storage root: Mover action: cache->user0 (cache:yes). Pool is below moving threshold percentage: 76% < 90%. Nothings going to move since you are below your threshold value of 90%


