trauby3620
Members
-
Joined
-
Last visited
-
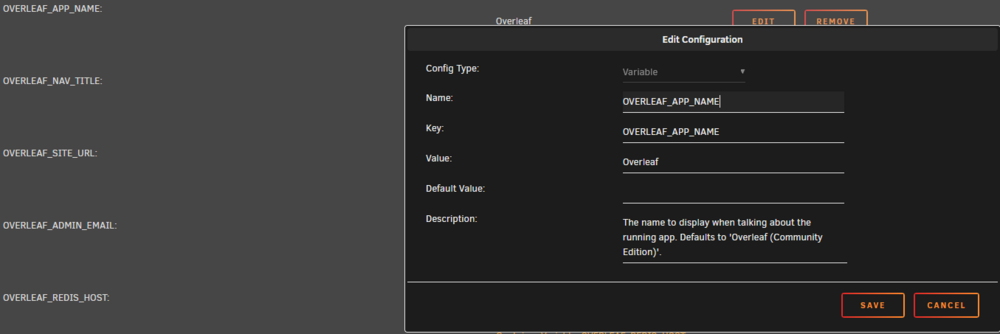
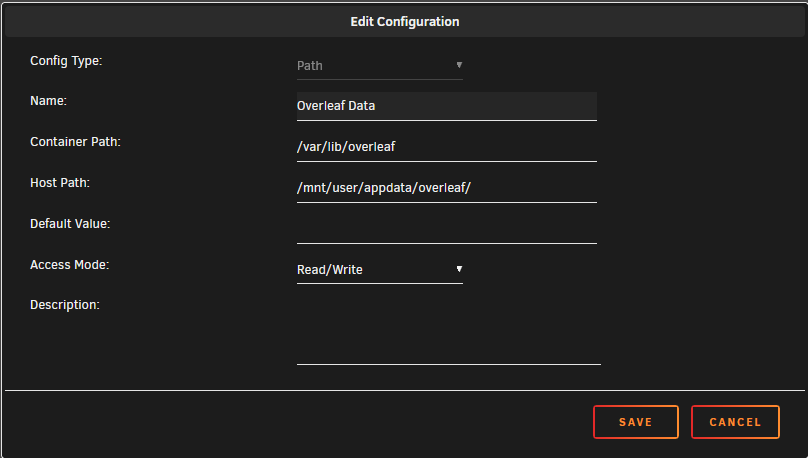
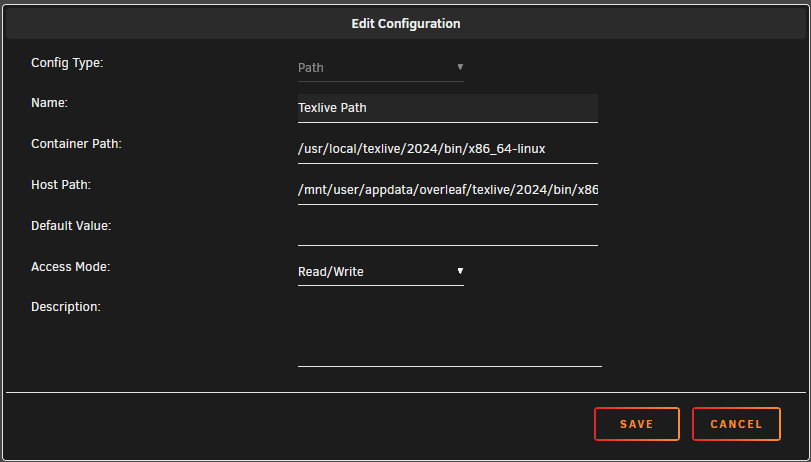
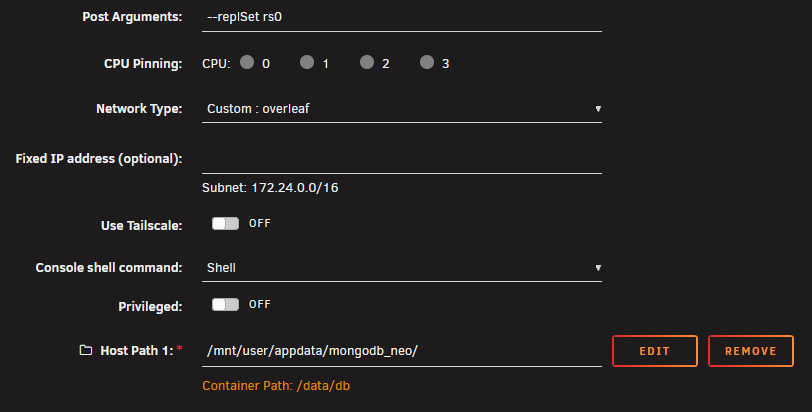
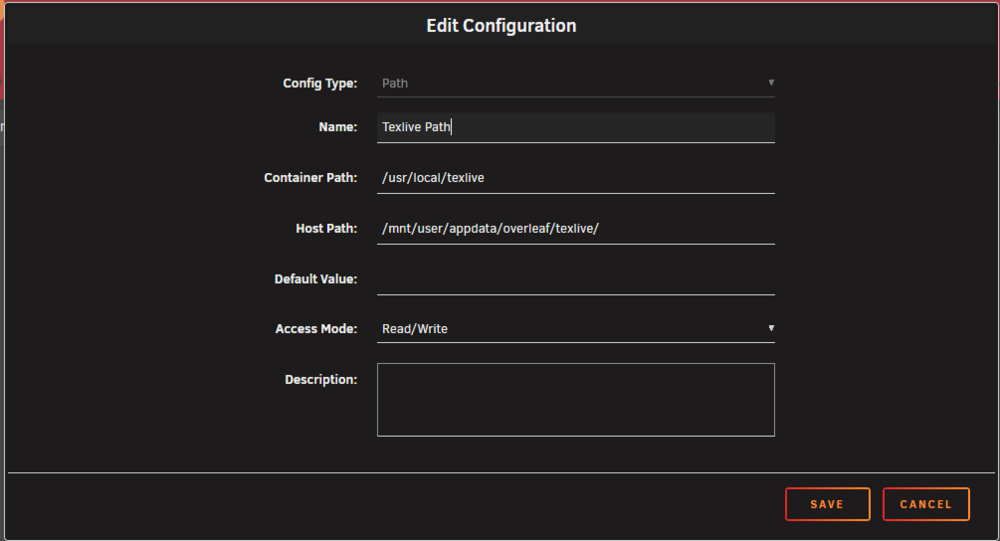
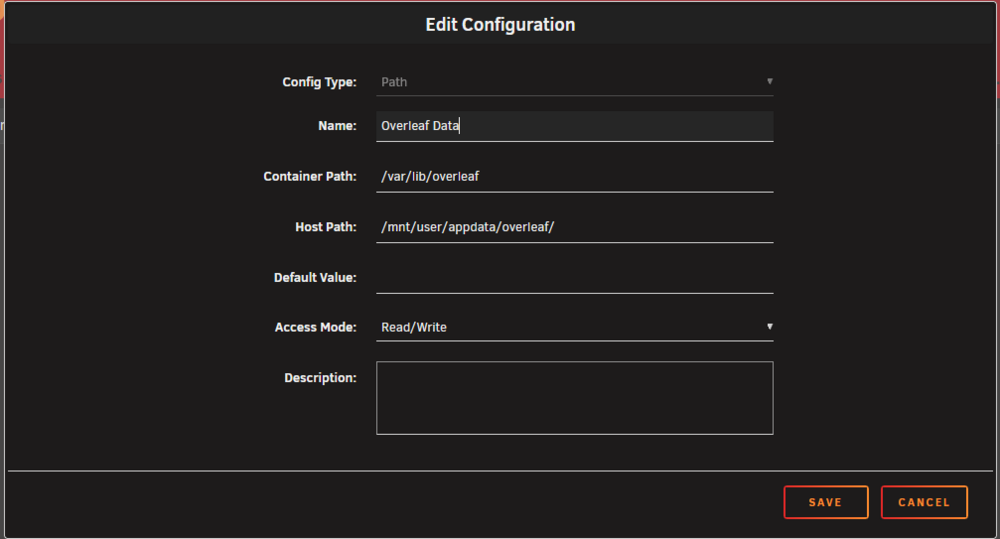
So I revisited this topic once again yesterday and decided to reinstall everything related to Overleaf from scratch, since I still had some trouble at times... I changed the procedure a bit, which is now as follows: NEW! Create a custom network for Overleaf: 0.1 Open the terminal 0.2 Type the following command (you can change "overleaf" to any name you want): docker network create overleaf From the apps-tab in Unraid: 1.1 Install “Redis” (default options should work fine, but change "Network Type" to "Custom: overleaf") 1.2 Install "MongoDB" Toggle view to "Advanced view" in the top right corner Type "--replSet rs0" into the field "Post Arguments" Change "Network Type" to "Custom: overleaf" Delete variable "Host Port 1" Set Host Path 1 to your desired appdata location Apply the changes and start the container Open the console again and type the following command docker exec -it mongo mongosh --eval "rs.initiate()" 1.3 --skipped/unnecessary-- Load the “Overleaf”-template from the apps-tab. Here, quite a few modifications are needed before you can finish the install: 2.1 Change "Network Type" to "Custom: overleaf" 2.2 All variables need to be edited to start with OVERLEAF_ instead of SHARELATEX_ The result should look a little something like this: 2.3 Optionally, you can add any of the options listed on the official overleaf git-page as variables: https://github.com/overleaf/overleaf/wiki/Configuring-Overleaf (e.g. I added the variables needed for Overleaf to be able to send emails) 2.4 Type "mongodb://mongodb/overleaf" into the OVERLEAF_MONGO_URL field: 2.5 Add the following path (by clicking on the little blue plus at the bottom of the template), which tells Overleaf to store the uploaded user data in the directory specified in "Host Path": 2.6 You must also add the following path (by clicking on the little blue plus at the bottom of the template), to install Texlive in a location that is outside your dockerfile specified by the entry in "Host Path": 2.7 Once all of these steps are complete: Apply the changes and finish installing the container In the docker tab, you should now see the three containers Redis, MongoDB and Overleaf all running on the custom network "overleaf". --skipped/unnecessary-- Open the Overleaf WebUI and finish the set-up of Overleaf by creating an admin account like described in the wiki: https://github.com/overleaf/toolkit/blob/master/doc/quick-start-guide.md (replace “localhost” with the IP-adress of your docker installation or the domain you use for it) Once you finish the setup, everything seems to be working fine. But as soon as you try to compile a document with packages that are not shipped with the standard overleaf-container, you will see a critical error along with messages that certain packages were not found. To fix this, we need to install the full Texlive installation by opening the console and running the following commands: 5.1 Type the following command: docker exec -it overleaf bash 5.2 Update tlmgr by running the following command: tlmgr update --self 5.3 Install all Texlive packages by running the following command (NOTE: This will take up to an hour) or more: tlmgr install scheme-fullAlternatively, install only the packages you need using the following guide: https://docs.overleaf.com/on-premises/installation/upgrading-tex-live 5.4 Run the following command next: tlmgr update --all 5.5 Exit the container: exit 5.6 Copy the data to your desired location to make it permanent: docker cp overleaf:/usr/local/texlive /mnt/user/appdata/overleaf/texlive Test if everything works: 6.1 Go to your Overleaf site and refresh the page (you need to log in again) 6.2 Create/upload a LaTeX project that uses different packages like biblatex or microtype. You can use the following example: \documentclass{article} \usepackage{tikz} \begin{document} It is working! You just successfully installed Overleaf on Unraid! \begin{tikzpicture} \draw (0,0) circle (1cm); \end{tikzpicture} \end{document} 6.3 If the compile works without any critical error, you are done! Hope this update helps you install and use Overleaf without any problems. If you have any suggestions on how to further improve the procedure, feel free to reply and let me (and the others) know.


-
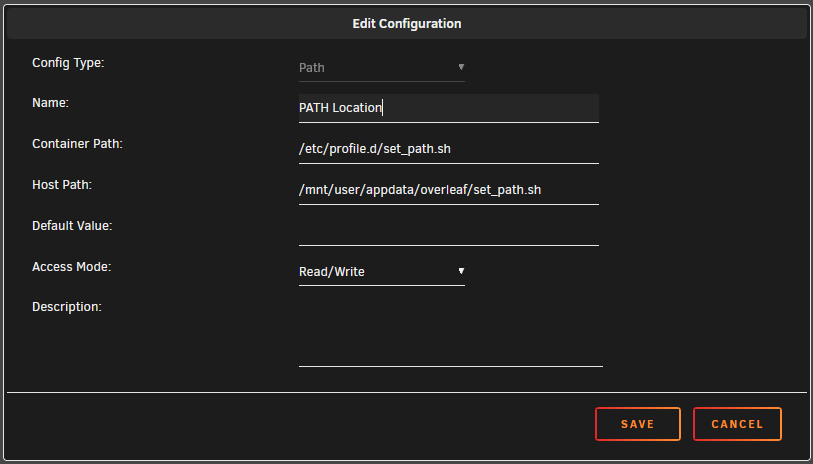
UPDATE early 2026: https://forums.unraid.net/topic/87798-support-selfhostersnets-template-repository/page/38/#findComment-1606105 I have been trying to solve the issue on my own and figured out a way to fix it. Not saying it is the easiest or prettiest, but it seems to work (for now). So if anyone is having trouble, here are all the steps to set up a working Overleaf container in Unraid: From the apps-tab in Unraid: 1.1 Install “Redis” (The default options should work fine) 1.2 Install “MongoDB” (You can also use the default options, but don't forget to set Host Path 1 to your desired appdata location) 1.3 You probably need to add a database in MongoDB. Please refer to another guide for detailed instructions. Load the “Overleaf”-template from the apps-tab. Here, some modifications are needed before you can finish the install: 2.1 All variables need to be edited to start with OVERLEAF_ instead of SHARELATEX_ The result should look a little something like this: 2.2 Optionally, you can add any of the options listed on the official overleaf git-page as variables: https://github.com/overleaf/overleaf/wiki/Configuring-Overleaf (e.g. I added the variables needed for Overleaf to be able to send emails) 2.3 You must add the following path (by clicking on the little blue plus at the bottom of the template), to install texlive in a location that is outside your dockerfile. If you don't do that, 8 GB of data is being installed in your dockerfile, which is not recommended. Also add the following where we can save some commands later, that otherwise you would need to type manually after every restart of your server: Note: You might want to adjust the Host Path to point to your desired location on your array. The entry in “Name” can be whatever you like. 2.4 Also optional, but recommended: free up even more space in your Dockerfile by adding the following path, which tells Overleaf to store the uploaded user data in the directory specified: 2.5 Once all of these steps are complete: Apply the changes and finish installing the container. In the docker tab, you should now see the three containers we just installed. Create a file named “set_path.sh” and add the following contents to the file using nano or a text-editor of your choice (I use Notepad++): export PATH="/usr/local/texlive/2024/bin/x86_64-linux:$PATH" chmod +x /mnt/user/appdata/overleaf/set_path.shHint: You might need to adjust the year in the first line. Save the file in the location set by the variable “PATH location” from step 2.3. Open the Overleaf WebUI and finish the set-up of Overleaf by creating an admin account like described in the wiki: https://github.com/overleaf/toolkit/blob/master/doc/quick-start-guide.md (replace “localhost” with the IP-adress of your docker installation or the domain you use for it) Once you finished the setup, everything seems to be working fine. But as soon as you try to compile a document with packages that are not shipped with the standard overleaf-container, you will see a critical error along with messages that certain packages were not found. To fix this, we need to install the full texlive-installation, by opening the Overleaf-console and running the following commands: 5.1 Download texlive by typing the following command: wget https://mirror.ctan.org/systems/texlive/tlnet/update-tlmgr-latest.sh 5.2 Install all texlive packages (This might take a long time, since over 4,000 packages are being installed): tlmgr install scheme-full 5.3 Once the installation is finished, run the following command (most packages might work without it, but I had problems with biblatex): tlmgr path add Test if everything works: 6.1 Go to your Overleaf-site and refresh the page (log in again if necessary) 6.2 Create/Upload a latex-project which uses different packages like biblatex or microtype 6.3 If the compile works without any critical error, you are done! Hope this helps, and you can install and use Overleaf without any problems. If you have any suggestions on how to improve the procedure, feel free to reply and let me (and the others) know.
-
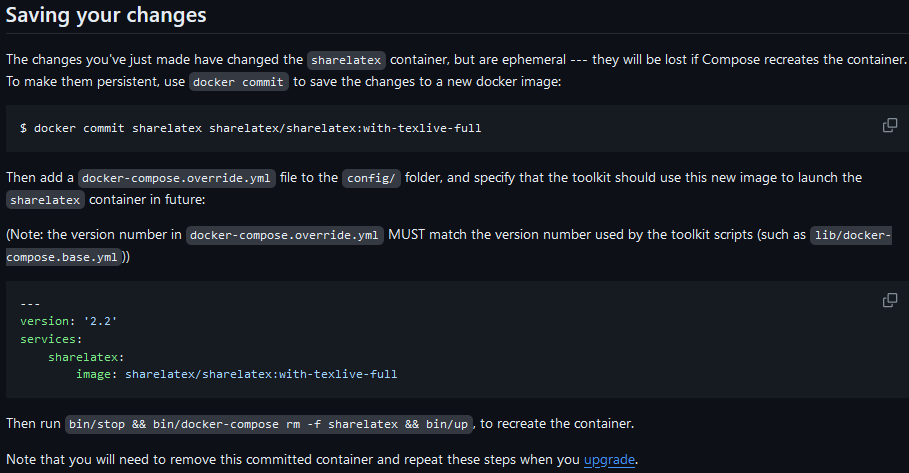
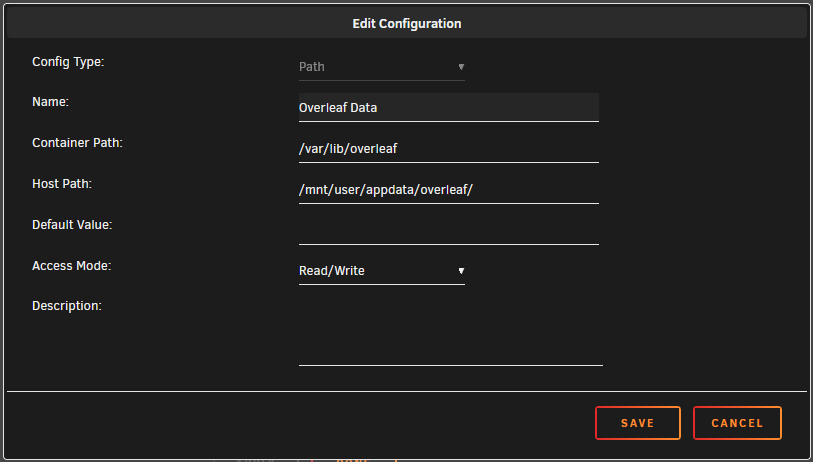
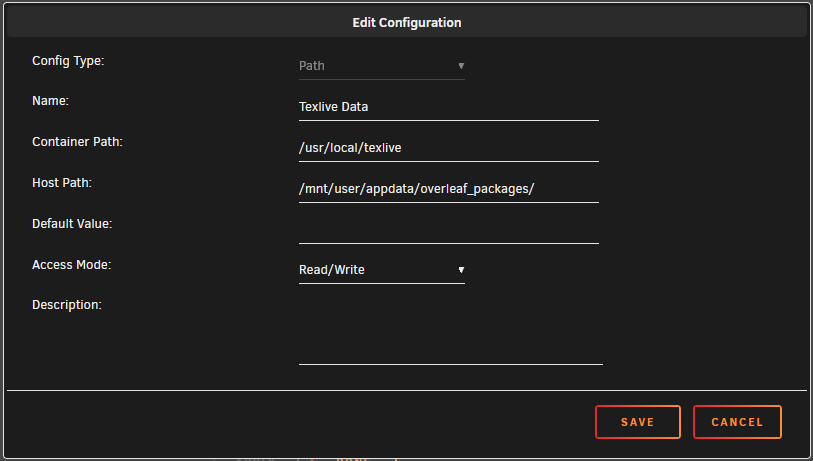
Hi there, I'm a newbie in the docker sphere and currently trying to set up the Overleaf container using your very helpful template. While doing that, I ran into a couple of problems that I can't seem to find an answer to: How do I finish the set-up/installation of TexLive like it is described in the official git of the Overleaf Container: https://github.com/overleaf/toolkit/blob/master/doc/ce-upgrading-texlive.md? I was able to install the upgrade, but I don't know how to save these changes like they described it on the above git-page: Is there a way to point the TexLive files to a different directory? When I install it in the docker image, it consumes roughly 8 GB of space and I kinda want to avoid that and put the data in a different directory. For the "regular" Overleaf data, I was able to add a (seemingly) working path in the container template like this: But I can't figure out a way to do the same for the TexLive directory. I tried the following path, but it always completely breaks the compile feature of Overleaf: Any help would be much appreciated and thanks for your awesome work already!