


subsonicg1ft
Members
-
Joined
-
Last visited
Everything posted by subsonicg1ft
-
Manually spinning down/up is working though. The system only runs into problems when the whole system is going to sleep. I am checking the power control EPC feature now and trying to disable it.
-
Hello together, i got a LSI 9500-8i HBA card connected to two SAS drives. Both /dev/sdi and /dev/sdj get recognize at first start up without any issue. But after putting the system to sleep and wake it up again, the same drive /dev/sdi keeps disappearing from the system. Preclearing it, or LSI 9500-8i details Here my drives after start up lsscsi [0:0:0:0] disk ATA ST20000NM007D-3D SN03 /dev/sdb [1:0:0:0] disk ATA ST20000NM007D-3D SN03 /dev/sdc [2:0:0:0] disk ATA ST20000NM007D-3D SN01 /dev/sdd [3:0:0:0] disk ATA ST20000NM007D-3D SN01 /dev/sde [4:0:0:0] disk ATA ST20000NM007D-3D SN01 /dev/sdf [5:0:0:0] disk ATA ST20000NM007D-3D SN01 /dev/sdg [7:0:0:0] disk ATA WDC WD5000LPVT-0 1A01 /dev/sdh [8:0:0:0] disk Kingston DataTraveler 3.0 PMAP /dev/sda [9:0:0:0] disk WDC WUH722020BL5204 C5C0 /dev/sdi [9:0:1:0] disk HGST HUH721212AL4200 DD08 /dev/sdj [9:0:2:0] enclosu BROADCOM VirtualSES 03 - [N:0:0:1] disk CT1000P310SSD8__1 /dev/nvme0n1 [N:1:0:1] disk CT2000P310SSD8__1 /dev/nvme1n syslog dmesg -w | grep -E "(mpt|scsi| sd )" I switched cables, switched to a 9400-8i HBA card and this behavior still occurs. I reinstalled the Spin Down SAS Drives Plugin. First I thought the emulated sector size of 512 bytes was the problem so i low level formatted the drive, see [Guide] Low level formatting SAS drives. Does anyone have a suggestion or hint what to do? It is driving me nuts, since I can not solve this for two weeks... dmseg.log syslog.log
-
I ran into the issue that my SAS drive was formatted in emulated 512 bytes sector size and i low level formatted it into 4096 sector size. Since analyzing another problem with my SAS drive which took me several hours of headache (two new HBA cards and SAS drives) i formatted my drive to the specific native sector size. Here is my summary for anyone running into the same issue. Sources / inspiration: [Guide] Changing block size on SAS and SCSI drives How to reformat drive sector size | 520b 524b 528b to 512b or 4k @ArtofServer: thank you for your amazing content! 😀 Setting Parity check running - no docker container possible -> Ubuntu Playground could not be used Broadcom 9500-8i PCI HBA Card (newest firmware version: FW Version = 37.00.00.00) Ultrastar DC HC560 SAS drive (WUH722020BL5204) (used drive from ebay) Required additional software Create a directory /boot/extra, navigate to to the official Slackware page https://slackware.pkgs.org/15.0/slackware-patches-x86_64/sg3_utils-1.47-x86_64-2_slack15.0.txz.html, navigate to the Download section and copy the link to the binary files, download, install it and verify installation. Hint: all files in /boot/extra will get automatically installed at first boot. mkdir /boot/extra cd /boot/extra wget https://slackware.uk/slackware/slackware64-15.0/slackware64/l/sg3_utils-1.47-x86_64-1.txz installpkg sg3_utils-1.47-x86_64-1.txz whereis sg3_utils Get drive information Get the generic SCSI name of all devices and search for your specific drive, here drive WUH722020BL5204 has /dev/sg8. lsscsi -g[0:0:0:0] disk ATA ST20000NM007D-3D SN03 /dev/sdb /dev/sg1 [1:0:0:0] disk ATA ST20000NM007D-3D SN03 /dev/sdc /dev/sg2 [2:0:0:0] disk ATA ST20000NM007D-3D SN01 /dev/sdd /dev/sg3 [3:0:0:0] disk ATA ST20000NM007D-3D SN01 /dev/sde /dev/sg4 [4:0:0:0] disk ATA ST20000NM007D-3D SN01 /dev/sdf /dev/sg5 [5:0:0:0] disk ATA ST20000NM007D-3D SN01 /dev/sdg /dev/sg6 [7:0:0:0] disk ATA WDC WD5000LPVT-0 1A01 /dev/sdh /dev/sg7 [8:0:0:0] disk Kingston DataTraveler 3.0 PMAP /dev/sda /dev/sg0 [9:0:0:0] disk WDC WUH722020BL5204 C5C0 /dev/sdi /dev/sg8 [9:0:1:0] disk HGST HUH721212AL4200 DD08 /dev/sdj /dev/sg9 [9:0:2:0] enclosu BROADCOM VirtualSES 03 - /dev/sg10 [N:0:0:1] disk CT2000P310SSD8__1 /dev/nvme0n1 - [N:1:0:1] disk CT1000P310SSD8__1 /dev/nvme1n1 -Validate if the generic name shows the expected info with the sg3_scan command. sg_scan -i /dev/sgX/dev/sg8: scsi9 channel=0 id=0 lun=0 WDC WUH722020BL5204 C5C0 [rmb=0 cmdq=1 pqual=0 pdev=0x0]Check the current drive parameter in line Logical block length. Here it is 512 bytes and i want it to be 4096 bytes, according to the official datasheet Ultrastar DC HC560 page 2, Format: Sector size (bytes) 4Kn: 4096 (SAS Models row). Ensure that you follow the manufacturer's recommendations for sector sizes for your hard drive! sg_readcap /dev/sgXREAD CAPACITY (10) indicates device capacity too large now trying 16 byte cdb variant Read Capacity results: Protection: prot_en=0, p_type=0, p_i_exponent=0 Logical block provisioning: lbpme=0, lbprz=0 Last LBA=39063650303 (0x9185fffff), Number of logical blocks=39063650304 Logical block length=512 bytes Logical blocks per physical block exponent=3 [so physical block length=4096 bytes] Lowest aligned LBA=0 Hence: Device size: 20000588955648 bytes, 19074048.0 MiB, 20000.59 GB, 20.00 TBLow level format According to @ArtofServer Sometimes changing the sector size directly does not work. To do this, the disk must first be zeroed sg_format --format /dev/sgX and then the sector size changed sg_format --format --size=4096 /dev/sgX. I highly recommend to create a tmux session in order to prevent loss of connection during this step, since formatting will take several hours. Replace /dev/sgX with your specific generic drive name. After creating a new tmux session, a green highlighted lines at the end of your concosle will apear, indicating that you are in the tmux session. Just enter the sg_format command with your specific sector sizes values, here 4096 bytes. To detach tmux session: Ctrl+b then d To reattach tmux session: tmux attach -t format_session To list all tmux sessions: tmux ls tmux new -s format_session sg_format -v --format --size=4096 /dev/sgXThis process took almost 24h for a 20TB drive. After the sg_format command is finished validate the sector size with sg_readcap /dev/sgXREAD CAPACITY (10) indicates device capacity too large now trying 16 byte cdb variant Read Capacity results: Protection: prot_en=0, p_type=0, p_i_exponent=0 Logical block provisioning: lbpme=0, lbprz=0 Last LBA=4882956287 (0x1230bffff), Number of logical blocks=4882956288 Logical block length=4096 bytes Logical blocks per physical block exponent=0 Lowest aligned LBA=0 Hence: Device size: 20000588955648 bytes, 19074048.0 MiB, 20000.59 GB, 20.00 TB Terminate the tmux session tmux kill-session -t session_nameHope this is helpful. Have a good one!
-
Hi jchaven, yes each unraid server has its own Tailscale account. I am going to check the admin console of my backup server. Update: Problem solved: Open a new private window on your browser and log in to your backup's Tailscale Admin Console. Select the three-dot menu of the corresponding machine and click on share. Select 'copy share link' and copy the invitation link via 'Copy share link'. Open this link in the main browser and log in with the Tailscale credentials of the main server.
-
Hello everyone, I have two unraid servers each with a own tailnet: main unraid server (DNS main.demo-dns.ts.net) backup unraid server (DNS backup.demo-dns.ts.net) Any idea how to add the main server to the tailnet of the backup server? Somehow I can not figure it out.. Thank you in advance! Kind regards
-
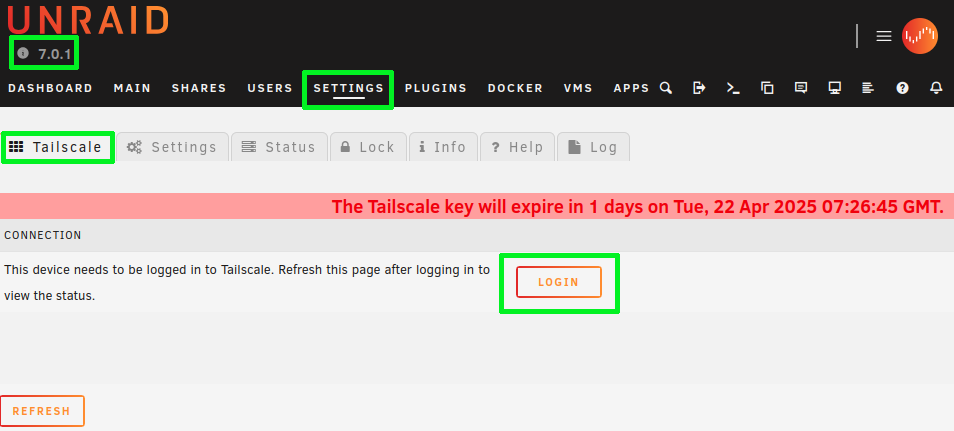
I had the same issue, since the reauthenticate button was moved to Settings/Tailscale/Settings/Advanced View. Open your tailscale Plugin, navigate to settings and check the advanced view button: Navigate to the Tailscale tab and Login in. You will be navigated to the tailscale login prompt and need your credentials. Dont forget to refresh the Unraid Tailscale window, in order to update the displayed data. Cheers!

-
Hallo all, somehow MediaElch can not access / see the subdirectories and movies defined in host path 2 and 3. Key 1 = 000, Key 2 = 99 and Key 3 = 100. Example file structure within the defined host path2: drwxrwxrwx 2 nobody users 71 Jan 15 06:05 dir1 drwxrwxrwx 2 nobody users 82 Jan 15 06:04 dir2 drwxrwxrwx 2 nobody users 74 Jan 15 08:29 dir3 UID and GID matches with key 2 and key 3: id nobody uid=99(nobody) gid=100(users) groups=100(users),98(nobody) What am I missing? Thank you in advance!
-
Hello all, Currently I'm running Unraid V6.12.14 with the apps: - ITE IT87 Driver - Nuvoton NCT6687 Driver - Dynamix System Autofan - Dynamix System Temp I have searched for directories related to hardware info, e.g. the temperatures which are displayed in the dashboard: ```bash find /sys -type d -name "*hw*" find: ‘/sys/kernel/slab’: Input/output error /sys/class/hwmon /sys/devices/platform/it87.2592/hwmon /sys/devices/platform/it87.2592/hwmon/hwmon3 /sys/devices/platform/coretemp.0/hwmon /sys/devices/platform/coretemp.0/hwmon/hwmon2 /sys/devices/pci0000:00/0000:00:1d.1/0000:06:00.0/nvme/nvme0/hwmon1 /sys/devices/virtual/thermal/thermal_zone0/hwmon0 /sys/devices/virtual/misc/hw_random /sys/module/hwmon_vid ``` I am wondering where the temperatures of the disks in the array are stored. Anyone has an idea? I don't want to read out the specs using smartctl, since the values should be already available somewhere. Why I am doing this? I want to record the temperatures of system, in order to optimize the airflow/cooling within the case. Therefore I have wrote a little script, which selects the specific temperatures of my components: #!/usr/bin/bash # Version 2 # Better performing temperature logger than logging # with $(sensors | awk '/CPU Temp/ {print $3}'). # This script gets the current temperature values # and sleeps (sleep_interval) for 10s # Usage: # bash temp_loggerV2.sh <test_period> <specs> # # Example, logging for 60 seconds and specifying # an idle system: # bash temp_loggerV2.sh 60 idle # # Tested on Unraid V6.12.14 # Operants test_period=$1 specs=$2 sleep_interval=10 if ((test_period<sleep_interval));then test_period=$((10/sleep_interval)) else test_period=$((test_period/sleep_interval)) fi logdir=/boot/config/plugins/stresstest # Variables path_T_cpu="/sys/devices/platform/it87.2592/hwmon/hwmon3/temp2_input" path_T_main="/sys/devices/virtual/thermal/thermal_zone0/hwmon0/temp1_input" path_T_nvme="/sys/devices/pci0000:00/0000:00:1d.1/0000:06:00.0/nvme/nvme0/hwmon1/temp1_input" T_cpu=0 T_main=0 T_nvme=0 sum_T_cpu=0 sum_T_main=0 sum_T_nvme=0 # Messages msg_head="Measurement\tT_cpu / (k°C)\tT_main / (k°C)\tT_nvme / (k°C)\n" msg_line="==============================================================\n" # Verifying stresstest log directory & creating logfile if [[ ! -d "$logdir" ]]; then mkdir "$logdir" fi log_filename=${logdir}/$(date +%Y%m%d_%H%M%S)_temperature_${specs}.log touch $log_filename # Temperature logger function record_temps() { test_period=$1 printf "${msg_head}" | tee -a ${log_filename} printf "${msg_line}" | tee -a ${log_filename} for ((i = 0 ; i < "${test_period}" ; i++)); do # CPU T_cpu=$(cat $path_T_cpu) sum_T_cpu=$(echo ${sum_T_cpu} ${T_cpu} | awk '{print $1 + $2}') # Mainboard T_main=$(cat $path_T_main) sum_T_main=$(echo ${sum_T_main} ${T_main} | awk '{print $1 + $2}') # NVME T_nvme=$(cat $path_T_nvme) sum_T_nvme=$(echo ${sum_T_nvme} ${T_nvme} | awk '{print $1 + $2}') # Logging printf "${i}\t\t${T_cpu}\t\t${T_main}\t\t${T_nvme}\n" | tee -a ${log_filename} sleep $sleep_interval done # Average avg_T_cpu=$(awk -v var1=$sum_T_cpu -v var2=$test_period 'BEGIN { print ( var1 / var2 / 1000 ) }') avg_T_main=$(awk -v var1=$sum_T_main -v var2=$test_period 'BEGIN { print ( var1 / var2 / 1000 ) }') avg_T_nvme=$(awk -v var1=$sum_T_nvme -v var2=$test_period 'BEGIN { print ( var1 / var2 /1000 ) }') printf "${msg_line}" | tee -a ${log_filename} echo "Average CPU temperature: ${avg_T_cpu}°C" | tee -a ${log_filename} echo "Average Mainboard temperature: ${avg_T_main}°C" | tee -a ${log_filename} echo "Average NVME temperature: ${avg_T_nvme}°C" | tee -a ${log_filename} } record_temps ${test_period} printf "Log was written to $log_filename\n" Anyone who want to use it, has to change the variables path_T_cpu, path_T_main and path_T_nvme according to his/her system. Running it via User scripts destroys the tab seperators, but the log is still readable. The log is stored under /boot/config/plugins/stresstest/<YYYYMMDD_HHMMSS>_temperature_<specs>.log.


