





PlutoAQ
Members
-
Joined
-
Last visited
-
Very interesting... but after all the tests I have done, after everything I have read online (and not only on this forum), I have come to the conclusion (my very personal idea, of course) that it is better to have the boot device (and therefore the entire unRAID system) on a USB stick. First, because you don't go and occupy a Sata port; second, because if the hardware fails, you just need to move the USB stick to the new hardware and everything starts again.
-
So, I received the M2 NGFF to USB3 adapter, and I immediately wanted to test it, even though it wasn't licensed this time... just to see if the unRAID system would boot correctly and/or faster. I have to say I was a little disappointed, because even though the PC port is USB3 and the adapter is also USB3, I didn't notice a significant increase in performance (neither in boot times nor in system shutdown times). Everything seems pretty much the same. Perhaps because the unRAID system has some mechanism that prevents it from fully exploiting the USB3 protocol? At this point I retrace my steps and... for my unRAID system made with a (recovered) Lenovo TS140 Server PC with 16 GB of RAM and 5 Sata ports on board (which I will increase in the future with a PCI Sata controller) I decided to use a small (I'm talking about size) USB pendrive, so I don't have the bulk of the M2-USB adapter and the USB pendrive won't protrude much from the case.
-
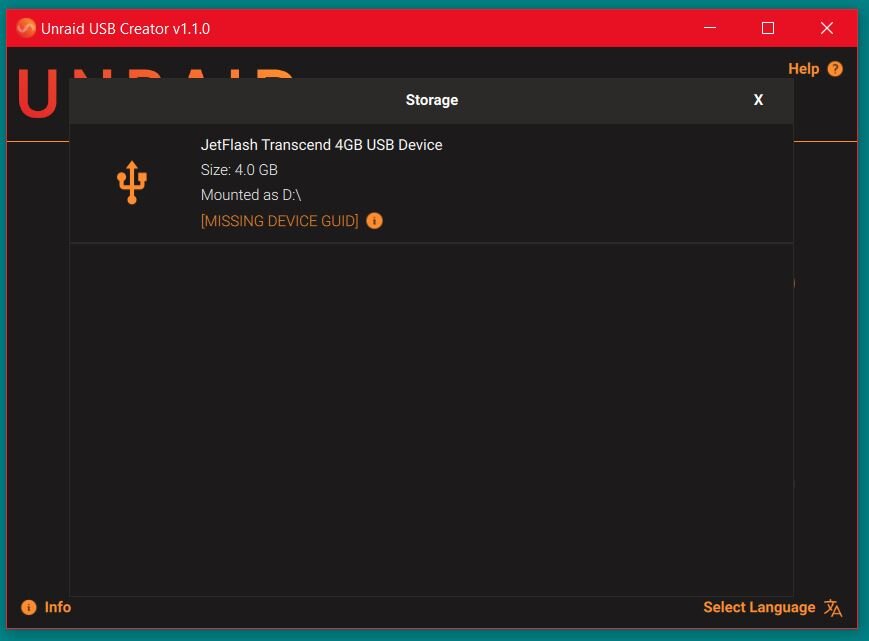
So, the procedure I followed, without even knowing what I was doing, was as follows: I confess that I wasn't trying to boot from disk instead of USB, and that this was a discovery I made by accident. When I first tried to install unRAID 7.2.0 using the "unraid-usb-creator-1.1.0" software on a USB stick I had, it said it couldn't be installed because it couldn't find the device's GUID (I've attached a photo). So, since I had an old 500GB SATA HDD mounted in a SATA-USB adapter, I connected it to the PC's USB port, and the "unraid-usb-creator-1.1.0" software saw it as a USB stick with a GUID (which is what I used to get the free trial license). The HDD had an NTFS partition, but when the "unraid-usb-creator-1.1.0" software transferred the unRAID system to it, it erased everything and created a single 500 GB FAT32 partition. At this point, I connected my SATA HDD, using the SATA-USB adapter, to the USB port of the PC I wanted to turn into a NAS, and it booted immediately without any problems, with a valid license. Then I wanted to do more research by reading the unRAID forum (and elsewhere online), and all the information I found only mentioned "installation only on USB and not on the HDD". I realized that perhaps I had done the wrong procedure or that something wasn't working as it should; so I started doing more research and testing. In fact, I first tried connecting my HDD with the unRAID system directly to a SATA port on the PC (it didn't work because the GUID was completely different and had strange characters). Then I also tried putting my HDD with the unRAID system into another SATA-to-USB adapter I have, and even then the GUID changed and the unRAID system didn't work. So I concluded that the GUID read is that of the adapter, not the disk. In any case, the unRAID boot device must always be connected to a USB port and not to an internal SATA port on the PC. It's basically the same procedure (or problem for some) as USB adapters for SD cards. At this point, I assume the entire procedure could also work if the disk were an external SSD USB, or an M2 (NGFF or NVME) with a USB adapter. This will give anyone worried about their USB stick deteriorating or breaking over time greater peace of mind. And since an SSD or M2 drive doesn't suffer from the heat issues of USB flash drives, they could easily be used with USB 3 interfaces, also benefiting from faster boot speeds for the entire unRAID system. I personally have a 128GB M2 NGFF drive left over, and as soon as I get a USB adapter, I'll try that too. In any case, the license would be tied to the adapter's GUID, but be careful... - If the adapter breaks and you replace it, you'll have to perform the license transfer procedure on the new device (adapter), and the old device will be blacklisted and can no longer be used with UnRAID. This action is permanent and cannot be undone (as required by the unRAID licensing system). - If you use one of those external SSDs that are integrated with the SATA-USB adapter circuitry; Since you can't just replace the disk and must replace the entire device (SSD with adapter), you'll also need to perform the license transfer procedure on the new device. - If the disk (SSD or M2) breaks, gets damaged, or needs to be replaced, you can do so by keeping the same license (which is tied to the adapter) and copying all the files from the unRAID system (which I recommend making a good backup of). Now, there are some considerations regarding USB adapters... USB adapters (for HDD, SSD or M2) of the same make and model may have the same GUID; therefore, they may be rejected by the unRAID licensing system if they have already been used by someone to register the license. That's all!!! P.S. Sorry for my poor English... I'm using a translator.
-
Hello everyone; this is my first post, as a new user, and I hope my experience can be of help to someone. I'll start by saying that the conclusion I reached was a discovery made by chance, not something I intended. What am I talking about? I'm talking about installing the entire unRAID system on disk (HDD, SSD, or other), including the license. In my next post, I'll explain what I did... P.S. Sorry for my poor English... I'm using a translator.
