xylon
Members
-
Joined
-
Last visited
-
it seems like the mounted sparse file was not moved properly
-
Seems like the second nfs share i configured in/using the exports doesn't use the cache how would i reconfigure this in unraid?

-
i tested it with a new file using the following command. fio --randrepeat=1 --ioengine=libaio --direct=1 --gtod_reduce=1 --name=test --bs=4k --iodepth=64 --readwrite=randrw --rwmixread=75 --size=4G --filename=/path/to/git-data/testfile and it begins writing to the array with about 200MB/s then it gets really slow. It never writes to the cache. Do you know how I could reconfigure or debug this further?
-
The nfs share is set to cache prefer. However, when starting a stress test it is only writing to the hdd and not the sdd pool. the following are my exports: cat /etc/exports # See exports(5) for a description. # This file contains a list of all directories exported to other computers. # It is used by rpc.nfsd and rpc.mountd. "/mnt/user/tftp" -fsid=100,async,no_subtree_check *(rw,sec=sys,insecure,anongid=100,anonuid=99,all_squash) "/mnt/user/tftp/arch" *(rw,no_root_squash,no_subtree_check) the following is my nfsmount.conf cat /etc/nfsmount.conf # # /etc/nfsmount.conf - see nfsmount.conf(5) for details # # This is an NFS mount configuration file. This file can be broken # up into three different sections: Mount, Server and Global # # [ MountPoint "Mount_point" ] # This section defines all the mount options that # should be used on a particular mount point. The '<Mount_Point>' # string need to be an exact match of the path in the mount # command. Example: # [ MountPoint "/export/home" ] # background=True # Would cause all mount to /export/home would be done in # the background # # [ Server "Server_Name" ] # This section defines all the mount options that # should be used on mounts to a particular NFS server. # Example: # [ Server "nfsserver.foo.com" ] # rsize=32k # wsize=32k # All reads and writes to the 'nfsserver.foo.com' server # will be done with 32k (32768 bytes) block sizes. # [ NFSMount_Global_Options ] # This statically named section defines global mount # options that can be applied on all NFS mount. # # Protocol Version [3,4] # This defines the default protocol version which will # be used to start the negotiation with the server. # limetech - start negotiation with v4 #Defaultvers=3 Defaultvers=4 # # Setting this option makes it mandatory the server supports the # given version. The mount will fail if the given version is # not support by the server. # Nfsvers=4 # # Network Protocol [udp,tcp,rdma] (Note: values are case sensitive) # This defines the default network protocol which will # be used to start the negotiation with the server. # Defaultproto=tcp # # Setting this option makes it mandatory the server supports the # given network protocol. The mount will fail if the given network # protocol is not supported by the server. # Proto=tcp # # The number of times a request will be retired before # generating a timeout # Retrans=2 # # The number of minutes that will retry mount # Retry=2 # # The minimum time (in seconds) file attributes are cached # acregmin=30 # # The Maximum time (in seconds) file attributes are cached # acregmin=60 # # The minimum time (in seconds) directory attributes are cached # acregmin=30 # # The Maximum time (in seconds) directory attributes are cached # acregmin=60 # # Enable Access Control Lists # Acl=False # # Enable Attribute Caching # Ac=True # # Do mounts in background (i.e. asynchronously) # Background=False # # Close-To-Open cache coherence # Cto=True # # Do mounts in foreground (i.e. synchronously) # Foreground=True # # How to handle times out from servers (Hard is STRONGLY suggested) # Hard=True # Soft=False # # Enable File Locking # Lock=True # # Enable READDIRPLUS on NFS version 3 mounts # Rdirplus=True # # Maximum Read Size (in Bytes) # Rsize=8k # # Maximum Write Size (in Bytes) # Wsize=8k # # Maximum Server Block Size (in Bytes) # Bsize=8k # # Ignore unknown mount options # Sloppy=False # # Share Data and Attribute Caches # Sharecache=True # # The amount of time, in tenths of a seconds, the client # will wait for a response from the server before retransmitting # the request. # Timeo=600 # # Sets all attributes times to the same time (in seconds) # actimeo=30 # # Server Mountd port mountport # mountport=4001 # # Server Mountd Protocol # mountproto=tcp # # Server Mountd Version # mountvers=3 # # Server Mountd Host # mounthost=hostname # # Server Port # Port=2049 # # RPCGSS security flavors # [none, sys, krb5, krb5i, krb5p ] # Sec=sys # # Allow Signals to interrupt file operations # Intr=True # # Specifies how the kernel manages its cache of directory # Lookupcache=all|none|pos|positive # # Turn of the caching of that access time # noatime=True # limetech - default is actually False, we want True noatime=True alfheim-diagnostics-20240303-1320.zip
-
it seems like rebooting and unassign/start/stop/reassign/start without format did the trick
-
I was following the instruction in the Replace SSD Tutorial however after removing the old ssds and replacing them with the new ssds and starting the format process. I replaced 4 ssds with 2 bigger ssds. The formatting process doesn't stop. What did I do wrong. alfheim-diagnostics-20240212-1422.zip

-
Thanks for the help
-
thanks for the response enabled the mover logging here are the new diags alfheim-diagnostics-20240211-1231.zip
-
I have set both the system and appdata shares to use cache to 'Yes'; stopped all docker containers and vms and disabled them; invoked the mover. Yet still some files remain on the cache could somebody point me in the right direction. These are the files remaining: ``` /mnt/cache/ ├── ArrayVdisks ├── Docker ├── appdata │ ├── openvpn-as │ │ └── lib │ │ ├── liblber.so -> liblber-2.4.so.2.10.7 │ │ ├── libldap.so -> libldap-2.4.so.2.10.7 │ │ ├── libldap_r.so -> libldap_r-2.4.so.2.10.7 │ │ ├── libmbedtls.so.9 -> libmbedtls.so.1.3.16 │ │ ├── libtidy.so -> libtidy-0.99.so.0.0.0 │ │ └── pkgconfig │ │ ├── python.pc -> python2.pc │ │ └── python2.pc -> python-2.7.pc │ └── unms │ ├── cert │ │ ├── cert -> /config/cert │ │ ├── live.crt -> ./localhost.crt │ │ └── live.key -> ./localhost.key │ └── usercert │ └── usercert -> /config/usercert ├── system │ ├── docker │ │ └── docker.img │ └── libvirt │ └── libvirt.img └── vdisks ``` My current docker configuration has the paths set like it is recommended: Docker vDisk location: /mnt/user/system/docker/docker.img Default appdata storage location: /mnt/user/appdata/ alfheim-diagnostics-20240211-1049.zip
-
I am trying to setup PXE diskless booting hosted on my unraid server. My disk image is mounted by the server using the go file, however nfs is flaky with files in a mounted directory, thus I want to export this directory aswell. I want to export the following folders. /mnt/user/tftp/ /mnt/user/tftp/arch my current exports /etc/exports "/mnt/user/tftp" -fsid=100,async,no_subtree_check *(rw,sec=sys,insecure,anongid=100,anonuid=99,all_squash) I was not able to find the correct way to export a subfolder of a share. Does anybody have any suggestions?
-
xylon changed their profile photo
-
Thanks didn't think of that. It is not the cleanest solution however it works and that is all that counts.
-
Help
-
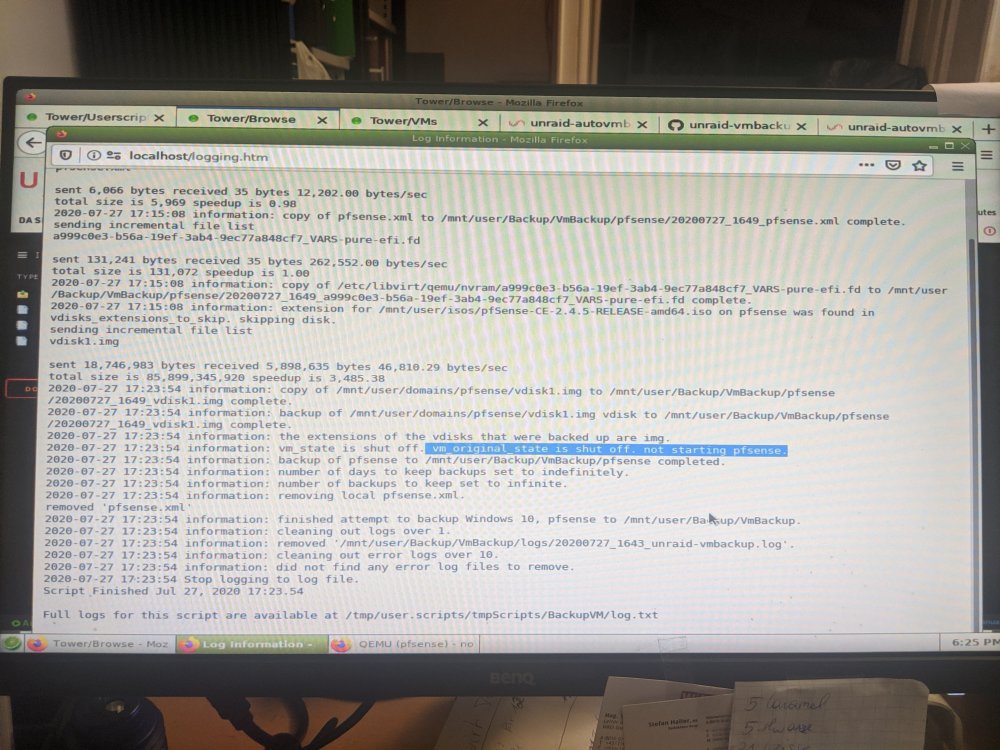
@JTok I have some weird bug that senses the vm_original_state incorrectly, it's state according to the program was off (but it was actually on because it is the router) and thus doesn't turn the VM back on. Please HELP TIA