KryptykHermit

Members
  • Posts

    8
  • Joined

  • Last visited

Everything posted by KryptykHermit

  1. Just wanted to give a huge thank you to JorgeB with the information provided and support through this issue. After my drive was swapped and parity sync restored everything back to the new drive, I ran a PowerShell script overnight comparing the 2 drives and everything is where it is expected to be and hashes check out. No idea what caused the flub on my server but I will say that I am NOT a fan of the Toshiba non-NAS drives. I have since made backups of all my configs, and moved my schedules around for parity checking and other automated tasks so that they don't collide with each other.... oh, and I'm porting my NextCloud/MariaDB to another computer. Docker is so cool! Wanted to say thank you again!
  2. Lol. Yeah I realized that after copying a few hundred gigs of data. There is a list+found folder which has 250gb of data in it, mostly movies and ISOs from MSDN which I wasn’t worried about. I bought some software from Paragon Software that allows Windows to mount XFS in read only mode. I did this because when I mounted the drive in Linux and used SCP to copy between 2 systems the perms were wrong (not a big deal) and anything that was already on the array from the restore was overwritten. Using the mounted XFS drive in Windows, I used robocopy, excluding older and logging to text so I could compare what was going on. If the files did not exist, they were copied back to the array with proper perms. All the “older” files were left on the physical drive and now I can spot check to see if anything important is corrupt from parity, and if so, restore those files from the physical drive even though they are older. I know, probably not needed but I’m still learning this process. Lol. I got an “error” when the parity restore finished stating the drive was the wrong size but that was to be expected (I hope). all the missing stuff is being copied to the array and all the lost and found I can prob delete but I’ll copy that off to another drive just for safety sake. Tonight I’ll be running a full parity to make sure it’s up to snuff. Have 2 drives arriving tomorrow so I can get rid of the last non-NAS drive in the array. Ill write back once the whole process is complete. thank you for the follow-up
  3. Status update: Powering on the server this morning, I started the array in maintenance mode and then selected the bad drive, running a xfs_repair with no switches. This took about 3 minutes to complete. Next, I shut the array down, and brought it back up in full array mode. Disk 5 is still showing DISABLED. I let this sit for about 30 minutes hoping something would happen here... so this is where my ignorance of "what to do next" is surfacing. I set the array to no start on reboot, as well as disabling the VMs and Docker images. Shut down the PC, pulled the drive, installed the new drive, and powered back on. In the MAIN tab, selected the DISK 5 pulldown and switched it to the new WD drive. Starting the array has now kicked off the recovery process via parity. I'll send an update in 17 hours when this has completed. Some further questions: Is there anything I should/shouldn't be doing that I am doing now? Any idea on what could have caused this issue? Dockers/VM/Plugins possibly bleeding into spaces they shouldn't?
  4. Thank you for the reply JorgeB. I hope my screenshots were not misleading in the amount of data actually returned. I can hold the page-down button for a good 20 seconds. It's LONGGGGGG LOL! I can get around in Linux comfortably, but Windows is my wheelhouse, so I have a lot of concerns/questions. If you could, help me understand my situation and thought process. I understand that having 2 parity drives would save me from a situation where a drive (or 2 drives at one time) could be lost and my data would be safe. This does NOT protect me from corruption. The mechanisms built into the XFS filesystem are currently "safe-guarding" my data in saying that it sees a LOT of file corruption and it doesn't want that to continue, so it disabled the drive. Sound about right? This is where I need some help. My course of action today is: Get a new drive (8 TB WD Red Pro) Fire up a temporary UnRAID server on a spare PC using this drive and run the plugin that zeros the drive Once finished, attach the drive to my server, bringing up the array in maintenance mode. Run the xfs_repair with no options selected Once finished, connect to the console and look at the lost+found dir. My plans are to pull this 6TB drive. What are the next steps to get the data off of this drive? This drive is still being emulated since it is offline, so what would I do to get the data off of emulation and back on to physical media, now with a new 8TB drive being present?
  5. Logged into my UnRAID server to day after noticing some lag in my Plex/Emby streaming, and saw one of my 6TB drives is disabled. Running a check with the -n switch from the GUI gives this data, and then MILES of additional line. The drive comes back good on SMART checks, but I don't know the "proper" way to resolve this. Should I : 1. Check the checkbox to format all unmountable disks 2. Pull the drive and just replace with a new drive My parity is still good, so I don't think I lost anything. Is that true? Is there any way to pull the data from parity and place on the good disks without reusing the existing "bad" drive? UnBalance doesn't see the disk to move data, console also don't have the disk available for a file copy, and I'm hoping parity will just do its job when required. I have a new 8TB WD Red coming but that won't be here till Monday. NO ONE around here sells drives but Micro Center, so I may take a trip down there and bring some Vaseline for the checkout process. Any help would be greatly appreciated. Phase 1 - find and verify superblock... Phase 2 - using internal log - zero log... - scan filesystem freespace and inode maps... bad magic number Metadata CRC error detected at 0x439496, xfs_agf block 0x1ffffffe1/0x200 agf has bad CRC for ag 4 Metadata CRC error detected at 0x4643f6, xfs_agi block 0x1ffffffe2/0x200 agi has bad CRC for ag 4 bad on-disk superblock 4 - bad magic number primary/secondary superblock 4 conflict - AG superblock geometry info conflicts with filesystem geometry would zero unused portion of secondary superblock (AG #4) bad magic # 0x846ee5fe for agf 4 bad version # 1217142957 for agf 4 bad sequence # 275752827 for agf 4 bad length 846806836 for agf 4, should be 268435455 flfirst 825879604 in agf 4 too large (max = 118) fllast -625122927 in agf 4 too large (max = 118) bad uuid 640e9a0b-cc46-db6d-4980-7e8450ebb7bd for agf 4 bad magic # 0x2ceeb90b for agi 4 bad version # 1606560011 for agi 4 bad sequence # 716564984 for agi 4 bad length # 23987019 for agi 4, should be 268435455 bad uuid 228d1fd7-ad8d-60fe-c469-6df73ae042eb for agi 4 would reset bad sb for ag 4 would reset bad agf for ag 4 would reset bad agi for ag 4 bad uncorrected agheader 4, skipping ag... sb_icount 36160, counted 30272 sb_ifree 1268, counted 1029 sb_fdblocks 653835694, counted 536472444 - found root inode chunk Phase 3 - for each AG... - scan (but don't clear) agi unlinked lists... - process known inodes and perform inode discovery... - agno = 0 - agno = 1 - agno = 2 - agno = 3 - agno = 4 - agno = 5 - process newly discovered inodes... Phase 4 - check for duplicate blocks... - setting up duplicate extent list... - check for inodes claiming duplicate blocks... - agno = 0 - agno = 2 - agno = 1 - agno = 4 - agno = 5 entry "Al-Qadim - The Genie's Curse (January 1, 1994)" at block 0 offset 96 in directory inode 4294967424 references non-existent inode 8589934720 would clear inode number in entry at offset 96... entry "Death_Knights_of_Krynn_GOG_Linux_-_`Death_Knights_of_Krynn_(January_1__1990).nzb`_yEnc_(00_23)" at block 0 offset 568 in directory inode 4294967424 references non-existent inode 8589934721 would clear inode number in entry at offset 568... entry "Gateway_to_the_Savage_Frontier_GOG_Linux_-_`Gateway_to_the_Savage_Frontier_(December_1__1988).nzb`_yEnc_(00_26)" at block 0 offset 1304 in directory inode 4294967424 references non-existent inode 8589934722 would clear inode number in entry at offset 1304... entry "Ravenloft_-_Stradh's_Possession_GOG_Linux_-_`Ravenloft_-_Strahd's_Possession_(January_1__1994).nzb`_yEnc_(00_31)" at block 0 offset 1920 in directory inode 4294967424 references non-existent inode 8589934723 would clear inode number in entry at offset 1920... - agno = 3 entry "Videos" in shortform directory 128 references non-existent inode 8876442261 would have junked entry "Videos" in directory inode 128 would have corrected i8 count in directory 128 from 7 to 6 entry ".." at block 0 offset 80 in directory inode 10737418430 references non-existent inode 8645206841 entry "config" in shortform directory 1126273 references non-existent inode 8589934778 would have junked entry "config" in directory inode 1126273 entry "syslinux" in shortform directory 1126273 references non-existent inode 8590602900 would have junked entry "syslinux" in directory inode 1126273 would have corrected i8 count in directory 1126273 from 5 to 3 entry "IMG_20200124_0001~20200208-075113.pdf" at block 0 offset 136 in directory inode 1126275 references non-existent inode 8723369622 would clear inode number in entry at offset 136... would have reset inode 6556482029 nlinks from 4 to 3 would have reset inode 6556482040 nlinks from 3 to 2 would have reset inode 6556482041 nlinks from 4 to 3 would have reset inode 6556482178 nlinks from 6 to 5 would have reset inode 6556482179 nlinks from 7 to 6 would have reset inode 6556482215 nlinks from 11 to 9 would have reset inode 6556483103 nlinks from 3 to 2 would have reset inode 6556483132 nlinks from 6 to 5 would have reset inode 6556483133 nlinks from 3 to 2 would have reset inode 6556483134 nlinks from 3 to 2 would have reset inode 6556483135 nlinks from 4 to 3 would have reset inode 6573662018 nlinks from 13 to 11 would have reset inode 6573679000 nlinks from 5 to 4 would have reset inode 6573679002 nlinks from 4 to 3 would have reset inode 6573679003 nlinks from 3 to 2 unraid-diagnostics-20210319-2048.zip
  6. Without attempting to do a 1.12 version myself, I wouldn’t even know where to start. There was a point where Minecraft jar files had to be opened with an archived program and you had to delete a META-something-or-other folder and inject files to customize? Maybe 1.12 doesn’t like the java version installed in the docker? I’ll look into it and reply back but I know the process worked for me using 1.13 and 1.14. Could you post what errors you are getting? I will screenshot and post a word doc with a successful install.
  7. I agree. I thought what I was doing was a hack job to begin with, and the info I put in the forum was more of a hope that someone would tell me of an easier way of doing it. I do think the docker "upgrade" part is a non-issue for me, as I don't intend to upgrade it simply because it's working. If a security vulnerability pops up, then absolutely, but for now, I'm happy it's working and I'm having ZERO issues. I do think that a lot of users serving MC servers up will be utilizing some sort of forged/bukkit scenario, so again, that's why I did what I did. I am extremely thankful for all that you do for the community Binhex.
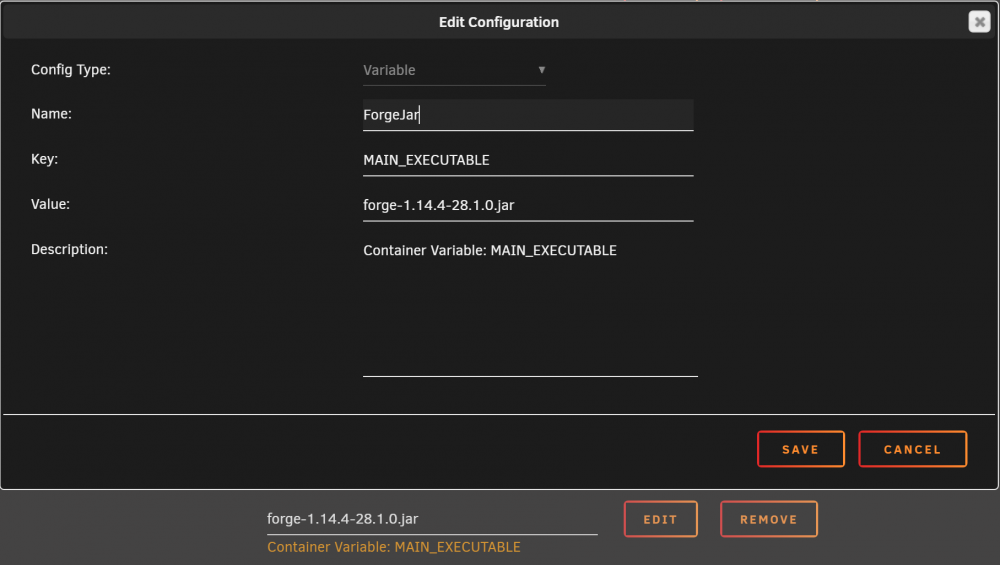
  8. I started understanding how to put this all together and wanted to throw some info out there for those that need it. First of all, I would recommend that if you are going to use the Vanilla version of MC (what binhex has provided) make sure the docker not running browse out to your appdata\binhex-minecraftserver\minecraft folder edit the server.properties file with notepad++ (I'm using Windows for all of this) Change the following settings if you like: difficulty=[easy|hard] gamemode=[creative|adventure|survival] force-gamemode=[true|false] level-name=world <=== This is the folder name all your game data is saved into motd=Logon Message <=== Message displayed when you log into the server from a MC client Now, if you are like me, you want to use Forge or Bukkit. In this case create a folder on your C:\ drive called "Minecraft" download the minecraft server file from HERE, and place it into C:\Minecraft (believe it's called 'minecraft_server.1.14.4.jar') double-click the file, and wait for a minute as it downloads some MC server files. When it stops, edit the EULA.txt file, and change the line inside from false to true eula=true Double-click on the minecraft_server.1.14.4.jar file again and wait for it to finish type in "/stop". This will kill the minecraft server. Download forge for the version of MC server you just downloaded (You want the INSTALLER button in the recommended box on the site) Place this file (forge-1.14.4-28.1.0.jar) in C:\Minecraft Double click on this file. Select SERVER and change the path to C:\Minecraft Let it perform its magic Once finished, again, shut it down with "/stop" Now copy the contents of C:\Minecraft to appdata\binhex-minecraftserver\minecraft Delete the file appdata\binhex-minecraftserver\perms.txt (this will restore the default permissions to the files you copied over) In Unraid, edit the docker and create a new variable Click SAVE and then APPLY/DONE Fire up the docker This will use the forge jar file within the docker container, instead of the vanilla jar file. From this point, if you want to add resource packs or mods, you can download them and install into the "mods" or "resourcepacks" folder as necessary. These folders may need to be created. A good mod to verify that your server is working is FastLeafDecay-Mod-1.14.4.jar. You can find it HERE. Chop a tree down and it should dissolve a lot quicker than normal. I would also recommend adding one or two mods at a time and testing. Let me know if you'd like more details on the above.